
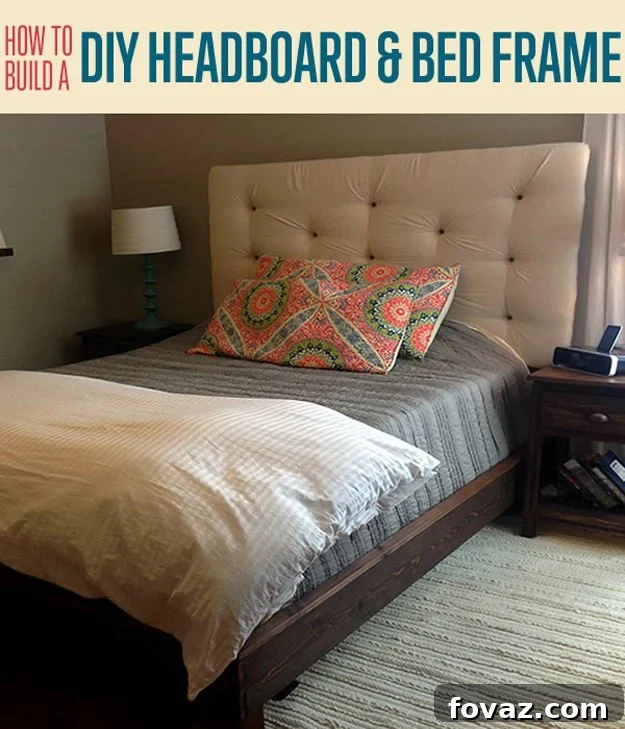
Dreaming of a luxurious bedroom transformation that won’t break the bank? This comprehensive guide will walk you through building your very own exquisite DIY upholstered headboard and a robust platform bed frame. Imagine a bedroom centerpiece, perfectly tailored to your style and dimensions, crafted with your own hands. This project is not only incredibly rewarding but also surprisingly achievable, even for those new to DIY furniture building. Say goodbye to generic store-bought pieces and embrace the satisfaction of creating truly custom bedroom decor.
Building your own furniture, especially a significant piece like a bed, offers a myriad of advantages. First and foremost, it grants you unparalleled customization. You get to select every detail: the precise size to perfectly fit your space, the fabric color and texture to complement your existing decor, and the wood finish to match your aesthetic vision, be it shabby chic, modern minimalist, or classic elegance. This level of personalization is rarely found in retail options. Beyond aesthetics, DIY projects like this can lead to significant cost savings, allowing you to invest in higher-quality materials than a pre-made equivalent might offer. Plus, there’s an immense sense of pride and accomplishment when you can confidently tell guests, “I built this!” Prepare for jaws to drop and compliments to flow when they learn you’re the master craftsman behind your stunning new bed.
This project is designed to be efficient, with the potential to assemble the main components of both the headboard and bed frame in as little as one afternoon. To streamline the process, consider having your local hardware store cut the larger pieces of wood to size for you. This saves time, ensures precision, and allows you to focus on the assembly and finishing touches at home. Whether you opt for a pristine white fabric for a serene look or a vibrant pattern to make a statement, the choice is entirely yours. Let’s embark on this exciting journey to create the ultimate DIY bedroom masterpiece, starting with the beautiful upholstered headboard!
How To Build a Luxurious DIY Upholstered Headboard
Creating a plush, tufted headboard is a fantastic way to add sophistication and comfort to your bedroom. This step-by-step guide will ensure a professional-looking finish.
Essential Headboard Supplies:
- 1 sheet of Plywood (¾” thick): This forms the sturdy base of your headboard. Ensure it’s good quality, as it will hold all the upholstery.
- 1 x 2×4” @ 8’ Long: Used to create the support cleats for attaching the headboard to your bed frame.
- 2” thick Foam: Provides the essential cushioning for your upholstered headboard. High-density foam offers better longevity and comfort.
- Batting (Polyester Fiberfill): Essential for smoothing out any imperfections in the foam and adding a soft, rounded finish. Consider doubling it up for extra plushness and to further flatten seam lines in the foam.
- Spray Adhesive: Specifically designed for foam and fabric, this will securely bond the foam to the plywood.
- Washers and Wood Screws (¾”): Used for creating the distinctive tufted look, securing the fabric and foam to the plywood base.
- Decorative Nail Heads (Upholstery Tacks): These are purely for aesthetic appeal, providing a classic, polished finish to your tufting points.
- Staple Gun with ½” staples: Crucial for securing the batting and fabric neatly to the back of the headboard.
- Fabric of your choice: Select a durable upholstery fabric that matches your style. Consider factors like color, texture, and pattern.
- Light-colored marker: For marking your tufting grid on the batting without showing through the fabric.
- Power Screw Gun/Drill: For efficiently driving screws through the foam and into the plywood.
Sturdy Platform Bed Frame Supplies:
- 4 x 1×6” @ 8’ Long: These boards will form the main side rails and footboard of your bed frame.
- 6 x 1×2” @ 8’ Long: Used for creating sturdy cleats inside the frame to support the bed slats.
- 1 x 4×4” @ 8’ Long: This will be cut to create the robust corner legs for your bed frame.
- Wood Stain or Paint: To finish and protect your wooden bed frame, matching your aesthetic preference.
- Bed Rail Brackets: Highly recommended for easy assembly, disassembly, and superior strength compared to traditional joinery. (Example: No-Mortise Bed Rail Brackets)
- Pocket Hole Screws (1 ¼” coarse thread): Essential for strong, hidden joinery when attaching trim pieces.
- Wood Glue: For reinforcing all wood-to-wood joints, providing extra stability.
- Clamps: To hold pieces securely in place while glue dries or screws are driven.
- Measuring Tape and Square: For accurate measurements and ensuring all corners are perfectly square.
- Sandpaper (120-grit and finer): For preparing the wood surface for staining or painting.
- Vacuum or Microfiber Cloth: For dust removal after sanding.
Step-by-Step Headboard Construction:
Step 1: Determine Dimensions and Cut Plywood Base
The first crucial step is to decide on the desired dimensions for your headboard. A standard queen-size headboard is typically around 62 inches wide, allowing for a slight overhang on either side of a 60-inch mattress. For height, 36 inches is a popular choice, but feel free to adjust this to your preference. If you’re following these dimensions, you’ll need your ¾” plywood cut to 62″ x 36″. For other bed sizes: for a King, aim for approximately 78 inches wide; for a Full, around 56 inches; and for a Twin, about 41 inches. Remember, precise measurements here are key to a professional outcome. If you’re not comfortable with cutting large sheets of plywood yourself, most hardware stores offer cutting services – a real-time-saver!
Step 2: Attach Foam for Plushness
Next, cut your 2-inch thick foam to precisely fit the plywood base. Don’t worry if you need to piece together a few sections of foam to cover the entire area; the batting and fabric layers will effectively smooth out any seams. Apply a generous, even layer of spray adhesive to the plywood, following the product instructions for optimal bonding. Carefully place the foam onto the adhesive-coated plywood, pressing down firmly to ensure a strong and lasting bond across the entire surface. Allow the adhesive to cure for the recommended time before proceeding.
Step 3: Secure the Batting Layer
Lay your batting over a large, clean work surface. Position the foam-covered plywood headboard face down onto the batting, ensuring there’s enough batting to wrap around the edges. Starting on one of the longer sides, begin stapling the batting securely to the back edge of the plywood using your staple gun with ½” staples. Work your way down the side, pulling the batting taut and smooth as you go to eliminate wrinkles and create a consistent, plush surface. Repeat this process on the opposite long side, then move to the shorter sides, always pulling snugly. Pay extra attention to the corners, folding and stapling neatly to avoid bulk. Once the batting is smoothly attached, flip the headboard over – it’s now ready for your chosen fabric!
Step 4: Mark Tufting Grid and Prepare Fabric
This step is where the tufted magic begins. Use a light-colored marker – one that won’t show through your chosen fabric – to draw a grid directly onto the face of the batting. This grid will serve as your guide for precisely placing each tuft, ensuring a symmetrical and aesthetically pleasing design. The spacing of your tufts is a personal preference; for larger nail heads, adequate spacing prevents a crowded appearance. Once you are completely satisfied with your tufting layout, carefully drape your upholstery fabric over the batting, ensuring it’s centered and aligned. Trim the fabric, leaving a generous 6-inch overhang past the back edge of the plywood on all sides. This extra fabric is essential for securely stapling it later.
Step 5: Initiate the Tufting Process
Begin your tufting with the very center “dot” on your marked grid. Take a ¾” wood screw and a ¼” washer. Using a power screw gun, push firmly through the fabric, batting, and foam until you feel the plywood base. Drive the screw most of the way in, creating a depression, but be careful not to overtighten. The goal is to create a pleasing ‘tuft’ or dimple in the fabric and foam without compressing it excessively. This initial tuft sets the depth and tension for the rest of your design.
Step 6: Complete All Tufting Points
Continue working outwards from the center tuft, systematically tackling each marked point on your grid. As you work, gently lift the fabric to visually align your screw placement with the grid dots. Consistency in pressure and screw depth is important to achieve a uniform tufted appearance. Take your time with each tuft, ensuring the fabric gathers nicely around the screw to create those signature dimples. Once all screws are in place, you’ll start to see the beautiful, textured pattern of your upholstered headboard emerge.
Step 7: Secure the Fabric to the Back
With all the tufts now firmly in place on the front, it’s time to flip the headboard over onto your clean work surface. Carefully arrange the excess fabric on the back side of the plywood. This is where you will permanently secure the fabric, ensuring a neat and taut finish.
Step 8: Staple Fabric with Consistent Tension
Using your staple gun, begin stapling the fabric to the back of the plywood, much like you did with the batting. The key here is to pull the fabric taut, ensuring that the tension on the fabric around the tufts remains consistent with the overall tautness you apply while stapling. Work around all four sides, pulling the fabric snugly and stapling every few inches. Pay particular attention to the corners, folding the fabric neatly to create crisp, clean edges. A consistent pull will ensure your headboard looks professionally upholstered.
Step 9: Attach Headboard Support Cleats
The final step for your headboard is to attach the support cleats that will connect it to the bed frame. Cut your 2×4” lumber to appropriate lengths (usually two pieces, slightly shorter than the headboard width). Position these 2x4s vertically on the back of the headboard, ensuring they are centered and will align with your bed frame. Securely attach them to the plywood using wood screws, making sure the screws are long enough to penetrate the plywood without going through to the front. These cleats provide the necessary stability and attachment points for a seamless integration with your new bed frame.
Constructing a Sturdy DIY Platform Bed Frame
Now that your stunning headboard is complete, let’s move on to building its equally impressive partner: a sturdy and stylish platform bed frame. This design eliminates the need for a box spring, offering a sleek, modern aesthetic and firm mattress support. The following instructions are for a Queen-size bed (designed for a 60″x80″ mattress). If you are constructing a different size, remember to adjust all measurements accordingly by adding or subtracting the difference in mattress dimensions.
Precise Cut List for Queen Platform Bed Frame:
- (2) 1×6” boards: 81″ Long (for the side rails)
- (2) 1×6” boards: 61″ Long (for the headboard and footboard panels)
- (2) 1×2” boards: 79″ Long (for the interior side rail cleats that support the slats)
- (2) 1×2” boards: 81″ Long, angled at 45 degrees off square (These are for the decorative trim. Tip: Cut these boards *after* you have the main bed frame assembled to ensure perfectly flush 45-degree angles for a “picture frame” look.)
- (4) 4×4” posts: 8″ Long (for the corner legs of the bed frame)
Step 10: Build the Side Rails with Cleats
Start by preparing your two 81-inch 1×6” boards, which will serve as the long side rails of your bed frame. Take one of the 79-inch 1×2” boards (these are for the internal cleats) and position it along the bottom inside edge of one of the 1×6” side rails. This 1×2” cleat will provide crucial support for your mattress slats later on. Apply wood glue along the edge where the two boards meet, then clamp them firmly together. Once clamped, drive 1 ¼” wood screws through the 1×6” into the 1×2” at regular intervals (every 8-10 inches) to create a strong, permanent bond. Repeat this entire process for the second side rail.
Step 11: Assemble Footboard and Prepare for Trim
For the two 61-inch 1×6” boards (headboard and footboard panels), you’ll need to drill ¾” pocket holes along the upper edge of *one* of these boards – this will be your footboard. These pocket holes are essential for attaching the decorative trim pieces later, creating a clean, hidden joint. Now, take your four 8-inch 4×4” leg pieces. Attach a 4×4” leg to each end of both 61-inch 1×6” boards. Use a generous amount of wood glue and secure each leg with 2-inch pocket hole screws (or long wood screws if you’re not using pocket holes for this specific joint), ensuring a very strong connection. These assemblies form the headboard and footboard sections of your bed frame.
Step 12: Install Bed Rail Brackets
High-quality bed rail brackets are paramount for creating a robust and easily disassembled bed frame. I highly recommend using sturdy, no-mortise bed rail brackets, such as those found on sites like Rockler.com. These brackets offer superior strength and allow you to take the bed apart and reassemble it multiple times without compromising the wood’s integrity, unlike some flimsier alternatives. Carefully follow the manufacturer’s specific instructions for installing these brackets onto the inside faces of your assembled side rails, headboard panel, and footboard panel. Ensure they are perfectly level and aligned for a seamless fit.
Step 13: Assemble the Main Frame and Measure for Trim
With the bed rail brackets installed, it’s time to assemble the main structure of your bed frame. Hook the side rails into the brackets on the headboard and footboard panels. Once the bed frame is together, critically check for squareness using a large carpenter’s square or by measuring diagonals. An “out of square” frame will cause issues later. With the frame squared, you can now precisely measure for your 1×2” trim pieces. These pieces will create a “picture frame” effect around the top edge of your bed frame. Measure each side individually, then carefully cut the ends at a 45-degree angle to create flush mitered corners. Attach the trim to the 1×6” boards using 1 ¼” pocket hole screws (if you drilled pocket holes on the footboard as instructed in Step 11) or finish nails for a clean look.
Step 14: Final Frame Check and Slat Preparation
Take one last critical look at your assembled bed frame. Ensure all joints are tight, screws are secure, and the entire structure is perfectly square. This attention to detail now will prevent problems down the line. At this stage, you’ll also prepare for your mattress slats. You will need additional 1×4 or 1×6 boards cut to the inside width of your bed frame (approximately 59.5 inches for a Queen). These slats will rest on the 1×2 cleats you installed in Step 10 and provide direct support for your mattress. While not explicitly listed in the main cut list, ensure you have enough lumber for about 12-15 slats, spaced roughly 2-3 inches apart.
Step 15: Bed Frame Built – Ready for Finishing!
Congratulations, the core structure of your platform bed frame is now complete! All the woodworking is done, and it’s now a robust, functional piece of furniture. Take a moment to appreciate your hard work. The next exciting phase is to transform this raw wood into a beautifully finished piece that perfectly complements your bedroom aesthetics. This is where your chosen stain or paint will bring the wood to life and tie in with your headboard.
Step 16: Stain Application for a Rich Finish
For a beautiful wood stain finish, proper preparation is key. Begin by thoroughly sanding all surfaces of your bed frame with 120-grit sandpaper to smooth out any rough spots or imperfections. Follow up with a finer grit (180 or 220) for an even smoother finish, which will allow the stain to absorb more evenly. After sanding, meticulously clean off all dust particles using a vacuum cleaner or a tack cloth. Any remaining dust can compromise the finish. I used Rustoleum Wood Stain in Dark Walnut for a rich, deep tone. Apply the stain evenly with a natural fiber brush, working with the wood grain. Allow the stain to penetrate for 2-3 minutes, then wipe off any excess with a clean, lint-free cloth. For a deeper color, apply additional coats, allowing adequate drying time between each. Always test the stain on a scrap piece of wood first to ensure you achieve your desired hue.
Step 17: Install Slats and Final Finish Touches
After your stain (or paint) has completely dried and cured, it’s time to install the bed slats. Position your pre-cut slats evenly across the 1×2 cleats inside the bed frame. For added stability and to prevent shifting, you can secure each slat to the cleats with a small wood screw on each end. This ensures your mattress has a consistently firm and reliable base. If you desire extra protection for your stained finish, consider applying a coat or two of clear polyurethane or varnish, sanding lightly between coats for a silky smooth feel.
Step 18: Attach Headboard to Frame and Adjust Height
Now for the exciting culmination of your project! Once the bed frame is fully assembled and positioned with your mattress on top, you can attach your custom upholstered headboard. Position the headboard against the back of the bed frame, aligning its 2×4 support cleats with the top of the frame. You can adjust the headboard’s height by moving the 2x4s up or down along the back of the headboard, allowing you to find the perfect visual balance with your mattress and pillows. Once the ideal height is set, clamp the headboard’s legs securely to the back of the bed frame. Then, from the back of the frame, attach the headboard using 3-inch wood screws, driving them through the frame into the 2×4 cleats of the headboard. For exceptionally tall headboards (over 40 inches) or if you notice any slight forward tilt, consider anchoring the headboard to the wall for additional stability. Large “D” rings and appropriate picture hangers or wall anchors can be used for this purpose, ensuring your headboard remains perfectly upright and secure. Your luxurious, custom-built bed is now complete!
And there you have it – your magnificent, custom-built upholstered headboard and platform bed frame! Revel in your incredible handiwork and the unique charm it brings to your bedroom. This project is a testament to the power of DIY, proving that with a little effort and guidance, you can create stunning, high-quality furniture that perfectly suits your home and personal style. Happy DIY-ing, and enjoy your beautifully crafted sanctuary!
Join Our DIY Community! Share Your Creations and Get Inspired!
Did you find our comprehensive tutorial on how to build a bed frame and upholstered headboard helpful? We’d love to hear your thoughts and see your finished projects! Share your experiences, tips, and any variations you made in the comments section below. Do you have other creative craft projects or home decor ideas you’re passionate about? We’re always eager to discover new inspirations and perhaps even feature your amazing work!
Our mission is to foster a vibrant community of DIY enthusiasts, empowering everyone to tap into their creative side and realize the endless possibilities of making things themselves. From ingenious craft projects and transformative home decor ideas to upcycling challenges, delicious recipes, and detailed tutorials – if you can do it yourself, we want to celebrate it! Stay connected and explore a world of DIY inspiration with us on Facebook, Twitter, Pinterest, and Instagram!