
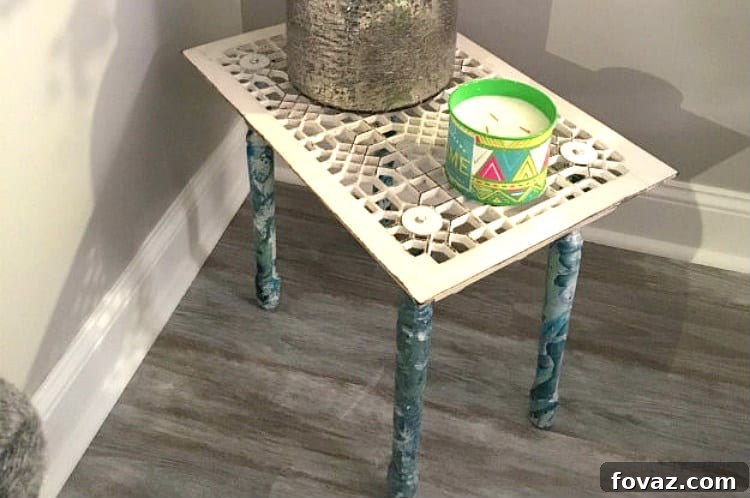
Are you someone who finds joy in breathing new life into forgotten treasures, transforming them into something beautiful and unique? If so, then embarking on an upcycling journey to create this stunning Coastal Distressed End Table might just be your next passion project! This guide will walk you through salvaging a vintage industrial piece and giving it a fresh, coastal-inspired twist.
While I certainly appreciate the craft of building from scratch and working with raw wood, my deepest passion lies in the art of salvaging. There’s an undeniable thrill in discovering unique items that have outlived their original purpose, and then envisioning them reborn as something entirely different, something truly special. Salvaging isn’t just about finding old objects; it’s an adventure into forgotten places – abandoned buildings, junkyards, dilapidated homes – to unearth raw materials rich with history and character. It’s a pursuit with two essential components: first, developing a keen eye to identify potential pieces amidst the rubble, and second, possessing the creativity and skill to transform these ‘foundlings’ into cherished, one-of-a-kind creations.
I confess a particular fondness for old, crumbling structures, especially those with unique architectural details or industrial settings. These places hold stories, and their materials often carry an authentic patina that cannot be replicated. When venturing into such sites, I adhere to a couple of personal guidelines to ensure both safety and ethical conduct. My first rule is that the property must be clearly decrepit, showing no signs of recent abandonment or social value, meaning it’s not actively being prepared for sale or renovation. My second rule involves ensuring plausible deniability regarding entry. This means I never force my way in; there must always be an existing opening – a broken window, an open gate, a missing wall – that allows for natural access. There’s no breaking, cutting, jumping, or any other forceful method to gain entry. As a personal pro-tip, I always carry a camera. Should I ever be questioned, I can genuinely claim to be an urban photographer documenting forgotten spaces. (And as a delightful side effect, I’ve amassed a truly impressive photo album of these intriguing locations over the years!)
With the philosophy of salvaging firmly in mind, let’s dive into the exciting process of crafting our Coastal Distressed End Table!
DIY Coastal Distressed End Table: From Salvage to Stunning Home Decor
Essential Salvage Tools for Your Upcycling Adventures:
Having the right tools on hand can make all the difference when you’re exploring forgotten spaces and disassembling old items. These versatile tools will cover approximately 90% of your typical salvaging needs:
- Crescent wrench: Indispensable for loosening various nuts and bolts.
- Hammer: For gentle persuasion, or to free stubborn components.
- Screwdrivers (flat and Phillips-Head): A must-have for disassembling.
- Wonderbar or Prybar: Perfect for leverage and carefully separating materials without causing undue damage.
- Flashlight: Crucial for navigating dimly lit areas and inspecting details.
- Gloves: Essential for protecting your hands from rust, splinters, and sharp edges.
- Wire cutters: Handy for severing wires or small metal ties.
- Bolt cutters: For tougher metal elements, though use with discretion to maintain plausible deniability.
- Pliers: For gripping, bending, and twisting.
The key here is portability and discretion. Everything listed above can comfortably fit into a backpack. Walking in with a sledgehammer or a large saw might raise questions and immediately negate any claim of plausible deniability. Remember, the goal is to be a resourceful treasure hunter, not a demolition crew.
My inspiration for this particular project came from a nearby church that has sadly succumbed to the ravages of time, slowly decaying into ruin. It’s truly heartbreaking to witness, as it’s evident it was once a magnificent place of worship. While the sheer volume of materials within its crumbling walls was overwhelming, I had to be selective. I was specifically searching for small, easily portable, and ‘flippable’ pieces – items that could be readily transformed. Though there was an abundance of beautiful marble that I would have loved to incorporate, its weight and impracticality for transport meant it had to be left behind.
It was amidst this rich environment that I discovered these captivating metal grates. Their aesthetic, size, and inherent appeal immediately caught my eye. These were old air vent grates, and while the exact one used in this project isn’t pictured here, it was found in the same location and in a similar state of weathered glory. At that moment, I wasn’t entirely sure what their ultimate purpose would be, but I recognized their unique character and potential to become something truly exceptional. The plaster encasing them was so old and brittle that it simply crumbled in my hands, requiring minimal effort to extract the grates.
So, there I was, with a unique salvaged grate in hand. The question remained: what exactly would I transform it into?
The perfect opportunity arose when my brother married last year in beautiful South Carolina. I wanted to create a thoughtful and unique wedding gift for him and his wife. I figured that for a couple in their thirties, another toaster or generic household item likely wasn’t what they needed. I decided to craft something truly personal. I asked them about their home decor style, and their response was “coastal distressed.” This intrigued me – a wonderful challenge to interpret and translate into a functional piece of art.
And so, the decision was made: I would transform one of these salvaged grates into a charming Coastal Distressed End Table for their new home, perfectly aligning with their aesthetic preferences.
Materials and Supplies Needed for Your Upcycling Project:
Gathering your materials before you begin ensures a smooth and efficient crafting process. Here’s what you’ll need:
- Old grate (these versatile pieces can often be discovered at thrift stores, flea markets, antique shops, or architectural salvage yards).
- Table legs (the style is entirely up to your personal taste and the desired aesthetic of your table).
- Drill Screws (ensure they are appropriate for fastening metal to wood).
- Washers (to provide a larger surface area for securing the legs, enhancing stability).
Note: The hardware listed here worked for my specific project. Depending on the design of your salvaged grate and chosen legs, your project may require different types or sizes of hardware. Always assess your materials before purchasing fasteners.
Tools Used for This DIY Transformation:
Equip yourself with these tools to tackle each stage of the project, from cleaning to assembly:
- Orbital sander: Essential for efficiently removing rust and preparing flat surfaces.
- Respirator: Crucial for protecting your lungs from metal dust and paint fumes.
- Small metal hand file: For meticulously cleaning intricate details and hard-to-reach areas.
- Pick: A sharp, pointed tool for scraping rust from crevices.
- Hammer: For various tasks, including gently tapping components or breaking off old attachments.
- Crescent wrench: For tightening screws and bolts.
- Sandpaper (coarse, medium, and fine grits): For progressive sanding, from aggressive rust removal to smooth finishing.
- Saw: To adjust the length or shape of your table legs if needed.
- Caulk: For filling larger gaps and holes in wooden legs.
- Wood filler: For patching smaller imperfections and creating a smooth surface on wood.
- Spray paint: Your chosen color for the grate and hardware, specifically formulated for metal.
- Sealer: To protect the painted surfaces and enhance durability.
- Nail polish: (Yes, trust me on this!) – for the unique water marbling technique on the legs.
- Wide, shallow tub: For the water marbling process.
- Dishwashing gloves: To protect your hands during the nail polish application.
Step #1: Meticulously Sand All Flat and Easily Accessible Surfaces to Remove Rust
The foundational step in preparing your salvaged grate is thorough rust removal. I employed my orbital sander to efficiently tackle all the rust on the flat surfaces. Given that it’s metal and had endured decades of elemental exposure, I started with a coarse grit sandpaper. This allowed me to aggressively cut through the layers of rust, which surprisingly came off quite easily. For the sake of your health and safety, it is absolutely imperative to perform this step outdoors or in an exceptionally well-ventilated area. Sanding metal generates a fine cloud of metal particles that can be harmful if inhaled. Even outdoors, I diligently wore a respirator to protect my lungs from this noxious rust dust. Taking these precautions ensures a safer working environment and a cleaner base for your project.
Step #2: The Tedious but Critical Task of Filing and Picking Intricate Details
Let’s be honest, this part is challenging, and there’s no way around it: it requires immense patience. I had to meticulously file and pick every single surface of every intricate hole and crevice on the grate. This amounted to well over 1,300 individual surfaces! It’s incredibly tempting to rush this step, or even worse, to skip it altogether. However, if you succumb to that temptation and then proceed with painting, those tiny, residual rust particles will inevitably flake off over time, taking the paint with them. The result will be a shoddy, spotty finish that undermines all your hard work. This rigorous process took me several weeks of dedicated, intermittent effort. The upside was that I could set up a piece of cardboard on the floor, put on a movie or a TV show with my wife, and simply work away while enjoying some downtime. Hours upon hours of painstaking work, but by integrating it into my relaxation routine, the time passed more quickly and enjoyably. This thorough preparation is the secret to a professional, long-lasting finish.
Step #3: Applying a Smooth, Even Coat of Spray Paint
With the grate meticulously cleaned and prepped, it was finally time to apply the paint. I deliberated quite a bit over the color choice. Ultimately, I decided to introduce color through the table legs and maintain the grate – the most visually prominent component – in a neutral, crisp white. When working with unique, one-of-a-kind materials, I always advocate for experimenting or conducting a trial run if possible. I used some of the smaller grates I had salvaged to test various paint options and techniques. I opted for a matte white spray paint specifically formulated for metal surfaces. Once again, ensure you are working in a well-ventilated area to avoid inhaling fumes. It’s always best practice to apply several light coats rather than one thick one. A thick coat is prone to drips and runs, which will mar the smooth finish you’re aiming for. Take your time, allowing each light coat to dry properly before applying the next.
My wife found the grate particularly beautiful in its pristine white state and initially suggested I leave it as is, without distressing. However, for my aesthetic vision, it felt too uniform, lacking the visual depth and character that comes with age. Moreover, if you’re aiming for an “industrial” or “salvaged” look, making it appear brand new somewhat defeats the purpose of the whole project. After applying a few even coats, I finished the grate with a protective spray sealer. This crucial step helps to shield the paint from potential water damage and everyday wear and tear, ensuring the table remains beautiful for years to come.
Step #4: The Art of Distressing for an Authentic, Worn Look
Distressing is the artistic technique of making something new or pristine appear old, used, or authentically worn. For this project, I wanted the grate to subtly reflect its age and history. To achieve an effective distressed look, you need to visualize how the piece would naturally experience wear and tear over time. Imagine where it would have been rubbed, knocked, or handled. These points are typically on edges, corners, and other random areas that would experience frequent contact. I carefully selected these contact points and began gently hand-sanding them with coarse-grit sandpaper. I then progressively moved to medium-grit and finally fine-grit sandpaper, which helps to soften the distressed areas and blend them naturally. Observing the images, you can see that most of the edges and corners now exhibit a subtle, believable level of wear and tear, contributing to the desired coastal distressed aesthetic.
Step #5: Selecting the Perfect Legs for Your Upcycled Masterpiece
The next exciting step involves finding the ideal legs to complement your upcycled grate. The style and type of legs you choose are entirely a matter of personal preference and how you envision the final piece. My goal was to find legs that possessed a certain visual appeal without drawing attention away from the unique character of the grate itself. Additionally, I specifically wanted to avoid legs that were instantly identifiable with a particular historical period, such as mid-century modern or Victorian styles, as this might conflict with the salvaged, timeless aesthetic. My usual hunting grounds for such treasures include local Salvation Army stores, Goodwill, various thrift shops, and old furniture warehouses. After considerable searching, I eventually settled on these particular legs, which I carefully salvaged from a discarded chair found at the Salvation Army.
Once I had skillfully removed (broken off, cut, or sawed, depending on the attachment) all four legs from the chair, I arranged them beneath the grate to get a visual sense of how they would look together. This preliminary setup allowed me to ensure that the design was cohesive and that the proportions – width, height, and overall size – were well-balanced. It’s a crucial step to avoid the dreaded “sunk cost fallacy.” This fallacy, in essence, warns against continuing with a course of action simply because you’ve already invested time or money, even if it’s no longer the best option. Do not tell yourself, “Well, these aren’t quite right, but I’ve already bought them, so I should just use them.” If the legs don’t feel right, they aren’t right. It’s perfectly acceptable to discard them and resume your search for alternatives. This is precisely why I always prioritize sourcing items from used places; if a component doesn’t work out, my investment is only a few dollars, making it easy to justify letting it go and starting fresh. In fact, for this project, I purchased two different sets of legs as options. One set worked perfectly, and I happily discarded the other (though not before stripping it for any salvageable parts!).
Step #6: Preparing the Legs for a Unique Painting Process
To get the salvaged legs ready for their distinctive nail polish bath (a fascinating technique we’ll explore shortly!), several preparatory steps were necessary. First, I needed to ensure all the legs were perfectly level, as they had been angled on their original chair. This required precise cutting. Next, I carefully removed any plastic pads that were attached to the bottom of the legs. The most significant task was filling the large holes left by the chair’s original bracing. If a hole is small and shallow, you can proceed directly with wood filler. However, for deeper or larger holes, I recommend filling the majority of the void with caulk. Caulk is excellent for bulk filling and dries firm. After applying the caulk, allow it to dry completely overnight.
Once the caulk had thoroughly dried, I then filled in the remaining sections with wood filler. It’s important to apply a generous amount of wood filler, ensuring that all parts of the hole are completely filled and slightly mounded over the top. This provides ample material for sanding, guaranteeing a seamless finish. Allow the wood filler to dry completely overnight as well, as rushing this step can lead to cracking or sinking later on. Once the wood filler is dry, it’s time to sand it down. When sanding, use a circular, “around” motion, similar to how you would unscrew something. This technique is particularly effective for matching the curved contour of the leg, creating a perfectly smooth and integrated surface. The goal is to make the filled areas utterly indistinguishable from the original wood.
Step #7: Embracing Creativity with Water Marbling for the Legs
I recently discovered and have been enthusiastically experimenting with a captivating process called water marbling, utilizing ordinary nail polish. This unique technique was perfect for the table legs, allowing me to truly capture the “coastal distressed” style. I selected a palette inspired by the sea and sand: various shades of blue, green, teal, and a clean white. To begin, find a wide, shallow tub and fill it with enough water to fully submerge one of the legs. Then, carefully pour drops of nail polish onto the surface of the water. Aim for zig-zag or circular motions as you pour, preventing the colors from clumping together. You only need a thin slick of polish on the water’s surface; there’s no need to empty entire bottles. To get a feel for the technique and visualize the potential outcomes, I first practiced on the chair’s braces that I wouldn’t be using for the final project.
Once I was confident in my technique and pleased with the test results, it was time to apply the water marbling to the actual table legs. The dipping process is swift and magical.
After each leg has been dipped, carefully remove it and allow it to dry completely. To prevent any of the freshly marbled surfaces from resting on anything during the drying process, I devised a clever drying rack: I nailed several long nails into a piece of scrap wood, creating individual hangers for each leg. I was absolutely delighted with the final outcome! Each leg, while part of a cohesive set, displays its own distinctly unique marbled pattern, adding an exquisite, organic touch that perfectly embodies the coastal aesthetic.
Step #8: Securely Attaching the Upcycled Legs to the Grate
Attaching the legs to the grate presented a unique challenge, and I spent a considerable amount of time experimenting with different methods to find the most effective solution. The grate’s design, with its large holes and inwardly sloping base, required a creative approach. Ultimately, I decided to use drill screws. These are distinct screws featuring a hex head, allowing them to be securely tightened with either a crescent wrench or a socket wrench. To ensure maximum stability and a wide bearing surface, I incorporated large washers. To maintain the cohesive aesthetic, I spray painted the washers and screws to match the grate, and then subtly distressed them as well. For me, continuity in design is paramount; a beautifully distressed table paired with brand-new, undistressed hardware would create an imbalanced and visually jarring effect.
Step #9: Positioning Your New Table and Adding Decorative Flair!
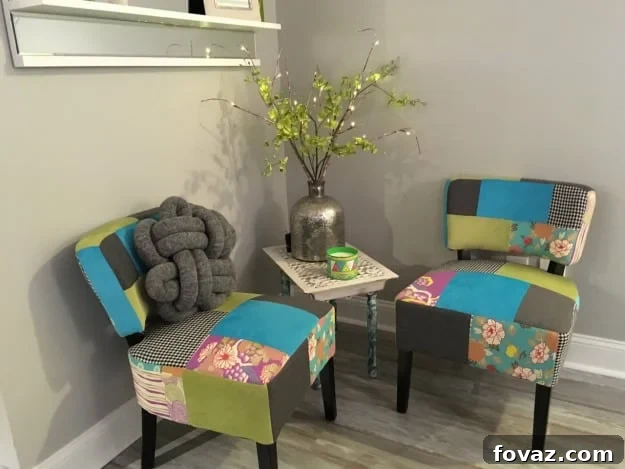
And here it is! The finished Coastal Distressed End Table, proudly displayed in my brother and sister-in-law’s home. I believe it looks absolutely fantastic, a true testament to the beauty of upcycling and salvaged design. It’s more than just a table; it’s a conversation piece with a story, perfectly suited to their coastal-inspired living space.
Valuable Lessons Learned and Things That Went Wrong (So You Don’t Make the Same Mistakes!):
- Persistent Rust: Despite my diligent efforts with filing and picking, a few stubborn rust spots reappeared and caused paint to chip off as I continued working. This necessitated a few touch-ups. Lesson learned: When dealing with heavily rusted metal, be even more meticulous than you think is necessary. Consider using a rust-converting primer for an extra layer of protection before your final paint coats.
- Tricky Leg Attachment: Securing the legs was more difficult than anticipated. The grate proved challenging to keep steady, even with assistance. My solution was to pre-drill pilot holes for the screws, then loosely attach all the legs. I then incrementally tightened each screw, moving around the table and making minor adjustments as I went, until all legs were firmly and evenly secured. This gradual tightening method ensures better alignment and stability.
- Brittle Cast Iron: Cast iron, especially pieces that have been exposed to the elements for decades, can be surprisingly brittle. Tragically, during transit to South Carolina, one entire side of the grate’s frame snapped off. I was incredibly upset at first, but such incidents are part of working with vintage materials. I had to borrow some white paint to touch up all the newly exposed edges and then carefully distress them to blend with the rest of the table. You can observe the broken edge/corner in the last photo, located on the front left. But hey, *shrugs* life happens, and when working with salvaged items, you often have to roll with the punches and adapt! These imperfections often add to the character and story of the piece.
We hope this comprehensive step-by-step guide inspires you to embark on your own journey to build a beautiful Coastal Distressed End Table! The satisfaction of transforming a forgotten item into a cherished piece of home decor is immense. Will you give this rewarding upcycling project a try? We’d love to hear your thoughts and see your creations! Share your comments and questions in the section below.
Up Next:21 Fleece Patterns You Can Sew To Stay Warm This Winter