
Ready to revolutionize your home workouts? Discover how to construct a robust, DIY pull-up bar that will transform your fitness routine. We’ll guide you through every step to ensure you build a piece of equipment strong enough for even the most intense sessions.
RELATED: 687 DIY Outdoor Projects | The Ultimate List
Table of Contents: Build Your Ultimate DIY Pull-Up Bar
- Why Build Your Own Indoor DIY Pull-Up Bar?
- Essential Supplies for Your Bombproof Pull-Up Bar
- Step-by-Step Instructions to Assemble Your Pull-Up Bar
- Crucial Guide to Safely Mounting Your Pull-Up Bar
- The Unbeatable Benefits of Pull-Ups
How to Make a Bombproof Pull-Up Bar: Your Ultimate DIY Fitness Project
Why Build Your Own Indoor DIY Pull-Up Bar?
Have you been dreaming of a personal gym setup that doesn’t break the bank? Building your own pull-up bar is not just a rewarding DIY project; it’s a smart investment in your health and fitness. Nothing quite signifies dedication to strength and intellect like constructing your own heavy-duty fitness equipment. With readily available metal pipes and a few simple tools, you can create a pull-up bar that’s not only incredibly sturdy but also perfectly tailored to your space. Say goodbye to flimsy doorframe bars and hello to a truly bombproof solution that will support your fitness journey for years to come.
A well-built pull-up bar at home eliminates the need for gym memberships, allowing you to train on your schedule, anytime inspiration strikes. It’s an indispensable tool for developing upper body strength, targeting your back, shoulders, biceps, and even core muscles. This guide will walk you through creating a durable, reliable piece of equipment, ensuring maximum safety and performance. Let’s gather our materials and get started on this empowering DIY adventure!
Essential Supplies You Will Need for This DIY Pull-Up Bar Project
The key to a bombproof pull-up bar lies in selecting the right materials. We recommend using robust, threaded metal pipes and flanges for superior strength and durability. Here’s a comprehensive list of what you’ll need. Always choose high-quality components to ensure the longevity and safety of your fitness equipment.
- 1-inch diameter threaded metal pipe (36-inches in length): This will serve as your main pull-up bar, offering ample width for various grip positions. The 1-inch diameter provides an excellent grip challenge while remaining comfortable.
- (x2) 1-inch diameter threaded metal pipes (24-inches in length): These will form the sturdy side supports, distributing the load effectively across your wall.
- (x4) 1-inch diameter floor flanges: These critical components are what will securely attach your pull-up bar system to the wall. Ensure they are heavy-duty to withstand significant force.
- (x4) 1-inch diameter 90-degree elbow connectors: Used to create the corners and directional changes in your pipe structure, ensuring a rigid framework.
- (x2) 1-inch diameter T-connectors: These connectors are essential for branching out the structure, accommodating the different arms of your pull-up bar.
- (x4) 1-inch diameter threaded nipple connectors (4-inches in length): These determine how far the main pull-up bar will extend from the wall. A 4-inch length often works well, especially over door frames, providing sufficient clearance without excessive leverage on the wall. While you can adjust this length, we advise against going beyond 6 inches, as longer nipples can increase stress on the wall anchors during use.
- (x2) 1-inch diameter nipple connectors (1.5 inches in length): These shorter connectors are typically the smallest readily available at hardware stores and are used for specific connections within the elbow structure.
- Power Drill: Necessary for driving screws into your wall or support structure.
- (x16) 2-1/2-inch exterior screws: The length is flexible, but always opt for the longest screws possible without penetrating through the other side of your wall. Crucially, do not use cheap drywall screws; invest in robust structural or exterior-grade screws designed for heavy loads. The 16 screws are for the four flanges (4 screws per flange).
- Level: Absolutely essential for ensuring your pull-up bar is perfectly horizontal and vertically aligned, preventing uneven stress and providing a comfortable, safe workout.
- Optional but Recommended: Pipe wrenches (for extra tightening, but proceed with caution), stud finder (critical for safe mounting), measuring tape, safety glasses, work gloves.
Step-by-Step Instructions: Assembling Your DIY Pull-Up Bar
Building this pull-up bar is a straightforward process, primarily involving threading pipe sections and connectors together. The key is to ensure each connection is snug and secure. Follow these steps carefully to construct a solid frame before mounting it.
Step 1: Prepare Your Side Supports by Threading Elbows
Begin by taking one of your 24-inch long metal pipes. On each end of this pipe, thread one of the 90-degree elbow connectors. It doesn’t matter which end you start with; the goal is to have an elbow on both sides. For now, simply hand-tighten these connections, along with all subsequent connectors. You don’t need to apply excessive force at this stage; we’ll ensure everything is snug later.
Step 2: Connect a Nipple to a Flange
Grab one of your 4-inch nipple connectors. Thread one end of this nipple into one of your floor flanges. This combination will eventually be used to mount the bar to your wall. Ensure it’s hand-tight for now.
Step 3: Integrate the Flange Assembly into the Pipe Structure
Take the flange with the nipple connector you just assembled. Thread the other end of that nipple into one of the 90-degree elbow fittings on your 24-inch pipe from Step 1. This forms one of your vertical support arms.
Step 4: Mirror the Process for the Second Side Support
Repeat Steps 1-3 precisely with your second 24-inch pipe. This means threading a 90-degree elbow onto each end, then attaching a nipple and floor flange assembly to one of those elbows. By the end of this step, you will have two identical pipe assemblies, which will serve as the left and right vertical supports of your pull-up bar system.
Step 5: Attach the T-Connectors to Your Side Supports
Now, take your T-connectors. These will be attached to the free ends of your 24-inch pipes – specifically, the ends that currently have only a 90-degree elbow attached (the opposite end from where your flanges are). Screw the T-connectors onto these ends, ensuring they are attached from the center thread as shown in typical diagrams. Make sure to attach a T-connector to both 24-inch pipe assemblies.
Step 6: Prepare the Elbows for the Main Bar Connection
Next, we’ll prepare the connectors that will hold your main 36-inch pull-up bar. Grab two of your remaining 90-degree elbows and two of the smaller 1.5-inch nipple connectors. Screw one 1.5-inch nipple into one end of each 90-degree elbow. You should now have two separate elbow-nipple units, ready to integrate into your main structure. These small, pre-assembled units will make the next step smoother.
Step 7: Connect the Elbows to the Main System
Take the elbow-nipple units you just created. Screw the 1.5-inch nipple end into the top opening of each T-connector on your two 24-inch pipe assemblies. Crucially, position these elbows so that they are facing each other. This alignment is vital because your 36-inch main pull-up bar will span horizontally between these two inward-facing elbows. If you’re feeling a bit lost, remember that the visual reference from the original article would show these elbows opening towards each other.
RELATED: 22 Easy Woodworking Projects You Must Try
Step 8: Finalize the Lower Flange Connections
At this stage, each of your T-connectors should have one remaining open thread, typically facing downwards towards the ground in your current assembly orientation. Take your two remaining 4-inch nipple pipes and thread one into each of these open T-connector ends. Finally, attach one of your remaining floor flanges to the end of each of these 4-inch nipples. This completes the structure of your two vertical side supports, each now featuring two floor flanges for wall mounting.
Step 9: Integrating the Main Center Pull-Up Bar
You’re almost there! It’s time to add the heart of your system: the 36-inch main pull-up bar. Lay your assembled pipe configuration flat on the ground. You’ll notice the two 90-degree elbows from Step 7 are now perfectly aligned and facing each other.
Carefully pick up your 36-inch long pipe. Thread one end of this pipe into one of the available 90-degree elbows. Hand-tighten it as much as possible.
Connecting the other end requires a slightly more coordinated effort because the system is now partially rigid. Since you can’t simply twist the bar into the second elbow, you’ll need to twist the entire second side support assembly onto the 36-inch bar.
To make this easier, place the end of the 36-inch bar that’s already connected firmly on the floor or a stable surface. Then, holding the second side support assembly (the one you need to attach) firmly, carefully begin threading its 90-degree elbow onto the free end of the 36-inch bar. It might be a little tricky to catch the threads initially, but once they engage, slowly rotate the entire side assembly until the connection is secure. Keep working it until the main bar is tightly connected to both elbows, forming a robust, single unit.
Step 10: Preparing for Mounting – Critical Safety Considerations
Congratulations, your DIY pull-up bar is fully assembled! You now have a solid structure with four flanges ready to be mounted to your wall. This is arguably the most critical step, as improper mounting can lead to serious injury. Pull-up bars bear a significant amount of weight and dynamic force, especially during explosive movements.
Safety Note: Always Mount to Something Strong!
If your walls are drywall, it is absolutely imperative that you locate the wall studs and fasten your flanges directly into them. Wall studs are the vertical wooden or metal framing components behind your drywall. They are designed to bear structural load and are the only reliable anchoring points for a pull-up bar. Use a reliable stud finder to locate the center of each stud. Standard stud spacing is typically 16 inches on center, but this can vary.
If your pull-up bar’s dimensions (especially the 36-inch main bar) don’t align perfectly with your wall studs, you have a crucial alternative:
Using Backer Boards for Enhanced Security: If stud spacing doesn’t match your bar, or if you want to distribute the load even further, consider mounting wood backer boards (e.g., 1x6s or 2x6s) horizontally across at least two wall studs. These backer boards should be securely fastened to the studs with long, heavy-duty structural screws. Once the backer boards are firmly in place, you can then mount your pull-up bar’s flanges to these wooden boards. This method provides a much larger surface area for attachment, spreading the stress and significantly increasing stability, even if your bar doesn’t directly hit every stud. For concrete or brick walls, use appropriate masonry anchors and screws, ensuring they are rated for extreme pull-out strength.
Remember, the stability of your pull-up bar is directly proportional to the strength of its mounting. Do not compromise on this step. Your safety depends on it!
- When dealing with drywall, you have two primary options for ensuring a solid base:
- Option 1 (Highly Recommended): Find your wall studs and ensure your pull-up bar’s width allows for direct attachment to these studs behind the drywall. This provides the most secure anchor.
- Option 2 (When Studs Don’t Align): Install sturdy wood faceplates (e.g., 1×6 boards) horizontally across your studs. Secure these boards deeply into the studs with robust screws. Then, attach your pull-up bar flanges to these wooden faceplates using several large, heavy-duty drywall anchors. While this method distributes weight, direct stud attachment remains superior. Only proceed with heavy-duty anchors if you are confident in their installation and load rating.
Step 11: Initial Anchoring and Leveling
While you can mount the flanges in any order, a strategic sequence helps ensure proper alignment. We recommend starting with two opposing flanges.
Begin by positioning the top-right flange of your assembled system against the wall at your desired height. Once you’ve marked its position (ensuring it’s centered over a stud or your pre-installed backer board), secure it firmly with four of your 2-1/2 inch screws. Do not overtighten yet, just secure it enough to hold the weight.
Now, before anchoring the bottom-left flange, it’s crucial to ensure your entire bar is level. Place your level tool directly on the 36-inch main pull-up bar. Adjust the free-hanging side of the bar up or down until the bubble on your level is perfectly centered. This guarantees a horizontally straight pull-up bar, which is vital for balanced workouts and aesthetic appeal. Once perfectly level, mark the positions for the bottom-left flange screws and secure it with all four screws into the stud or backer board.
Step 12: Completing the Mounts for Vertical Straightness
With the top-right and bottom-left flanges securely in place, your pull-up bar is partially anchored. Now, let’s focus on the vertical alignment of your side supports.
Working on the left side of your rig, place your level vertically along the 24-inch side bar. Adjust the position of the top-left flange slightly until the bar is perfectly plumb (vertically straight). Once you’re satisfied with the vertical alignment, drive in all four screws for the top-left flange, securing it firmly to the wall stud or backer board. Repeat this process for the bottom-right flange, using your level to ensure the right 24-inch bar is also vertically straight before driving in its four screws.
Step 13: Finalizing All Flange Screws and Connections
With all four flanges now loosely or partially secured, it’s time to go around and ensure every connection is as tight and bombproof as possible. Use your power drill to drive all remaining screws into each flange until they are firmly snug against the wall. Be careful not to strip the screw heads or overtighten to the point of damaging your wall or the flange.
You might encounter tight spaces, especially for the screws closest to the pipes. If your drill bit struggles to fit, you can use a bit extender or even stack multiple extenders (if safe and stable) to reach those awkward angles. The goal is to ensure every single screw is driven securely. A little extra effort here ensures maximum stability and safety for your pull-up bar.
Step 14: Feel the Burn! Your New Pull-Up Bar Awaits
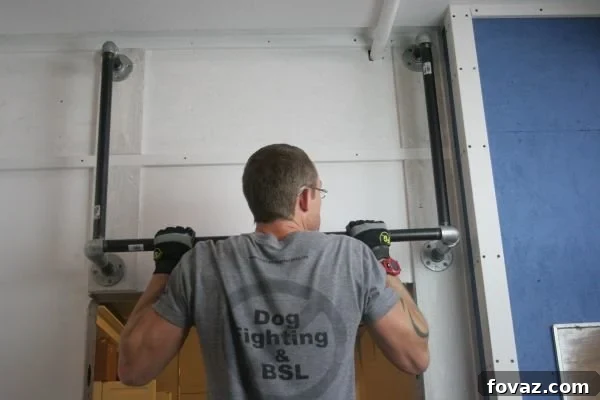
Your custom, bombproof DIY pull-up bar is now successfully installed and ready for action! Resist the urge to hang coats on it – this magnificent piece of equipment is destined for far greater things. It’s time to embark on your pull-up journey, building incredible upper body and core strength right in the comfort of your home gym.
Now, for a slightly different perspective, check out this video on Building an Outdoor Pull-Up Bar below. Thanks to HomeMadeModern, you can compare different approaches and gather more inspiration:
The Unbeatable Benefits of Incorporating Pull-Ups into Your Routine
Having a DIY pull-up bar isn’t just about the satisfaction of building something yourself; it’s about unlocking a powerhouse exercise that offers unparalleled benefits for your physical fitness. Pull-ups are widely regarded as one of the most effective compound upper-body exercises, engaging multiple muscle groups simultaneously.
- Comprehensive Back Development: Pull-ups are kings for building a strong, wide back. They primarily target your latissimus dorsi (lats), which are the large muscles responsible for that coveted V-taper.
- Arm and Bicep Strength: While often seen as a back exercise, pull-ups are also fantastic for developing formidable bicep and forearm strength. Your biceps work hard to pull your body up, and your forearms are engaged throughout for grip.
- Enhanced Grip Strength: Consistently performing pull-ups significantly improves your grip strength, which translates positively into many other exercises and daily activities.
- Core Engagement: To maintain a stable body position during a pull-up, your core muscles (abs and obliques) must engage strongly, contributing to overall core stability and strength.
- Improved Posture: By strengthening the muscles in your upper back, pull-ups can help correct rounded shoulders and improve overall posture, reducing the risk of back pain.
- Functional Fitness: Pull-ups are a highly functional movement, mimicking actions like climbing and lifting your body over obstacles, making you stronger and more capable in real-world scenarios.
- Calisthenics Foundation: For those interested in advanced bodyweight training, a pull-up bar is the essential foundation for mastering movements like muscle-ups, front levers, and more.
This bombproof design, built with four separate anchor points, offers a robust and redundant system, ensuring it won’t give way when you’re pushing your limits. This robust construction safeguards against any unfortunate incidents, letting you focus solely on perfecting your form and building incredible strength. So, start pulling and enjoy the journey to a stronger you!
Was this DIY tutorial helpful for building your own pull-up bar? How likely are you to recommend this guide to others looking to boost their home fitness? Share your thoughts and progress in the comments below!
UP NEXT:
- DIY Vacuum Grabber Tool | Robotic Arm Plans | Fun Projects
- 33 Quick And Easy DIY Home Projects You Can Do This Weekend
- Best Christmas Cookie Recipes | 16 Favorite DIY Christmas Cookies
Editor’s Note: This post was originally published on May 13, 2014, and has been updated for quality, relevancy, and to enhance SEO performance.