
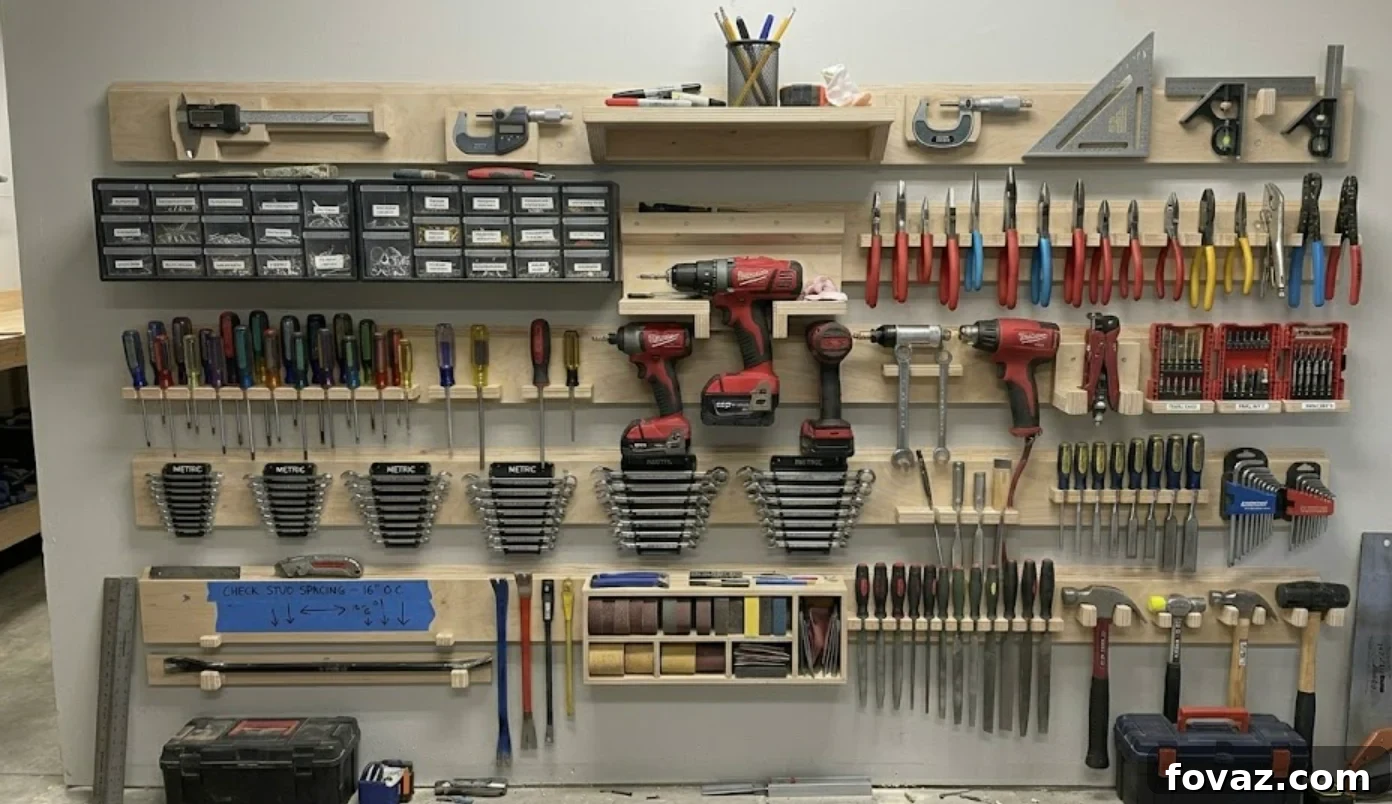
Revolutionize Your Workshop: The Ultimate Guide to Building a French Cleat Tool Wall
Transforming a cluttered workspace into an organized, efficient powerhouse is a dream for many DIY enthusiasts and professionals alike. A French cleat tool wall offers an ingenious, flexible solution for tool storage, allowing you to maximize your space and keep every essential item within easy reach. Far more dynamic than traditional pegboards or fixed shelving, this modular system provides unparalleled versatility for any garage, workshop, or craft room. This comprehensive guide will walk you through everything you need to know about French cleat systems, from their fundamental design to a detailed, step-by-step installation process, ensuring you build a robust and highly functional storage solution.
Understanding the French Cleat Tool Wall System
At its core, a French cleat tool wall is a modular storage system renowned for its simplicity and strength. It operates on a brilliant interlocking principle, allowing you to hang, move, and reorganize tools and accessories without ever drilling new holes into your wall. The magic lies in two complementary pieces of wood, each cut with a precise 45-degree bevel.
One strip, known as the “wall cleat,” is securely mounted to your wall with its bevel facing upwards. The corresponding strip, the “holder cleat,” is attached to your custom tool holder, shelf, or cabinet, with its bevel facing downwards. When these two pieces are brought together, gravity acts as the locking mechanism, drawing the beveled edges tightly against each other. This creates an incredibly secure connection that can support substantial weight without the need for additional clamps, latches, or hardware. The beauty of this design is its inherent flexibility; holders can be easily lifted off the wall and repositioned horizontally along any wall cleat, offering limitless organizational possibilities as your tool collection evolves.
This system is celebrated for its ability to create a clean, organized aesthetic, keeping tools off benchtops and floors. It not only enhances safety by preventing tripping hazards but also significantly improves workflow by making tools readily accessible. Whether you’re a seasoned woodworker, a weekend warrior, or a crafting enthusiast, a French cleat system is an investment in efficiency and order.
How to Build Your French Cleat Tool Wall Storage: A Step-by-Step Guide
Building a French cleat tool wall is a rewarding project that can dramatically improve your workspace organization. This section provides a detailed, nine-step walkthrough to ensure a successful installation. Dedicate a focused afternoon to this project, as precision in the initial steps is key to a functional and aesthetically pleasing outcome. Rushing can lead to misaligned cleats and wasted materials, so take your time and enjoy the process.
Essential Materials List
- 3/4-inch Plywood: This is the standard and recommended material.
- Baltic Birch Plywood: The premium choice, known for its consistent thickness, numerous void-free laminations, and superior strength. Ideal for a professional finish and heavy loads.
- CDX Construction Plywood: A more budget-friendly option. It may have some voids but is perfectly adequate for most home workshop applications.
- Solid Wood (e.g., Pine, Poplar): Can be used, but ensure it’s straight and dry. Be aware that solid wood can warp or cup over time, especially in humid environments, which might compromise the cleat’s interlocking integrity.
- 2½-inch Wood Screws: For attaching cleats to wall studs.
- Scrap 2×4: Crucial for consistent spacing between wall cleats.
- Painter’s Tape or Pencil: For marking stud locations and reference lines.
- Tapcon Concrete Screws: Specifically for concrete or masonry walls.
- Paint or Polyurethane (optional): For finishing the visible surfaces of your cleats and holders, enhancing durability and appearance.
Required Tools
- Table Saw: The most efficient and precise tool for ripping plywood strips and making the 45-degree bevel cuts.
- Circular Saw (with a reliable guide): Can be used as an alternative to a table saw, especially for breaking down full sheets of plywood. A track saw is even better for accuracy.
- Stud Finder: Absolutely essential for accurately locating wall studs.
- 4-foot Level: Critical for ensuring your wall cleats are perfectly horizontal. A longer level or laser level can also be beneficial.
- Pencil: For marking.
- Power Drill/Impact Driver: For driving screws.
- SDS Rotary Hammer (for concrete walls only): Needed for drilling into concrete.
Step 1: Strategically Lay Out Your Tools on the Floor
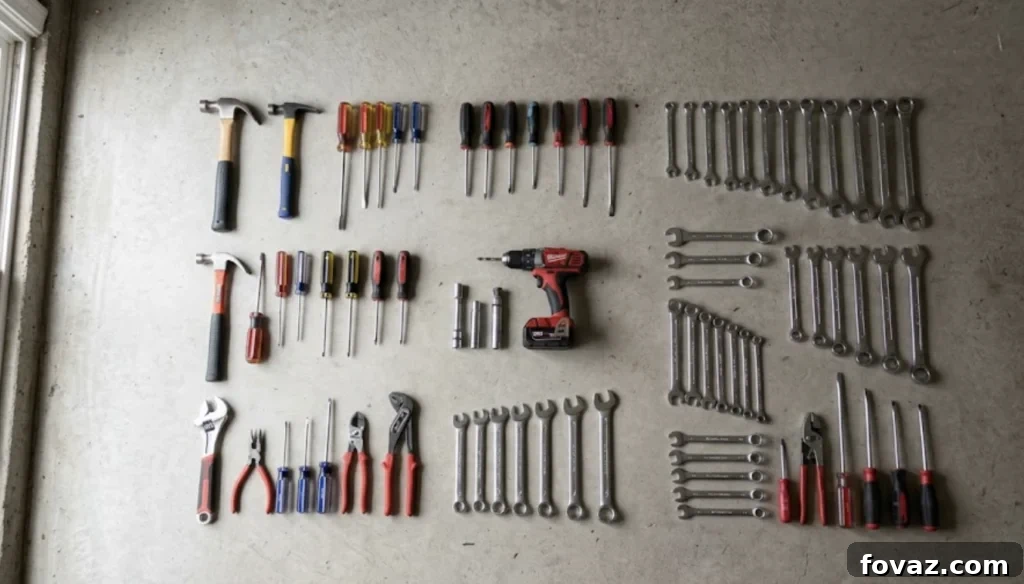
Before you make a single cut or drill a hole, empty all the tools you intend to hang onto the garage or workshop floor. Arrange them in the exact configuration you envision on your wall. This preliminary layout is more than just a rough sketch; it’s a critical planning stage that helps you visualize your system, determine optimal cleat spacing, and identify any specialized holders you might need to build. Consider grouping similar tools together, placing frequently used items at eye level, and thinking about workflow. Once satisfied with your arrangement, take several photos from different angles. These images will serve as invaluable references throughout the construction process, guiding your cleat placement and holder design.
Step 2: Precisely Cut Your Cleats from Plywood
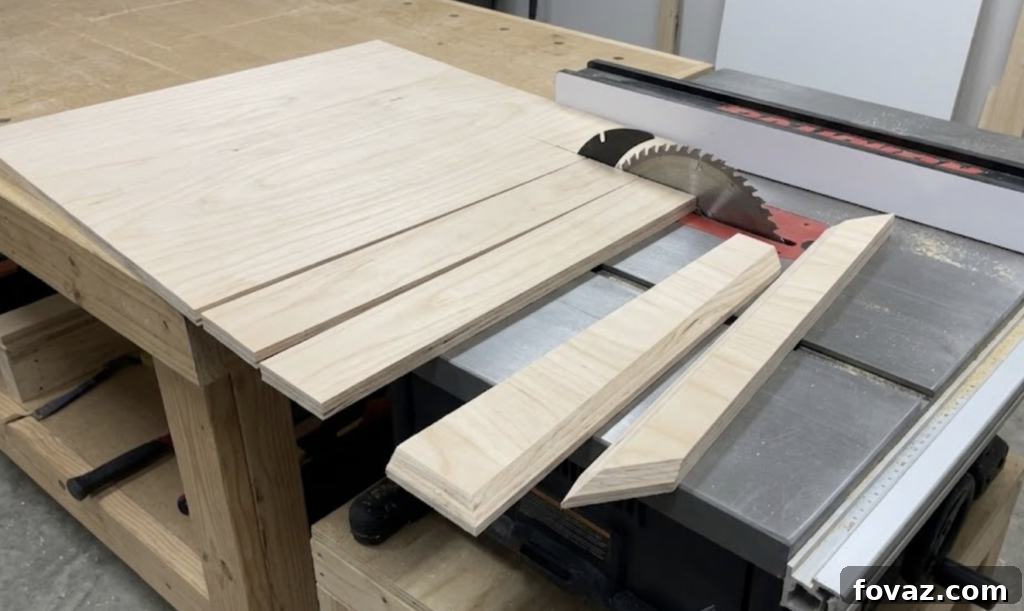
Safety first! Always wear appropriate eye and hearing protection when operating power saws. Begin by ripping your 3/4-inch plywood sheet into 4-inch-wide strips using your table saw or circular saw with a guide. These strips will become the foundation of both your wall cleats and holder cleats. Next, carefully tilt your saw blade to a precise 45-degree angle. With the blade tilted, rip each 4-inch strip down its center. This single angled cut will yield two perfectly matched cleats, each approximately 2 inches wide with a 45-degree bevel along one edge. The efficiency of this method ensures that your wall cleats and holder cleats will interlock seamlessly. To maintain consistency and save time, cut all your required cleats in a single session. Batch cutting minimizes saw setup changes and guarantees uniform angles across every strip, which is crucial for a smooth-fitting system.
Step 3: Enhance Safety by Removing the Sharp Point from Each Cleat
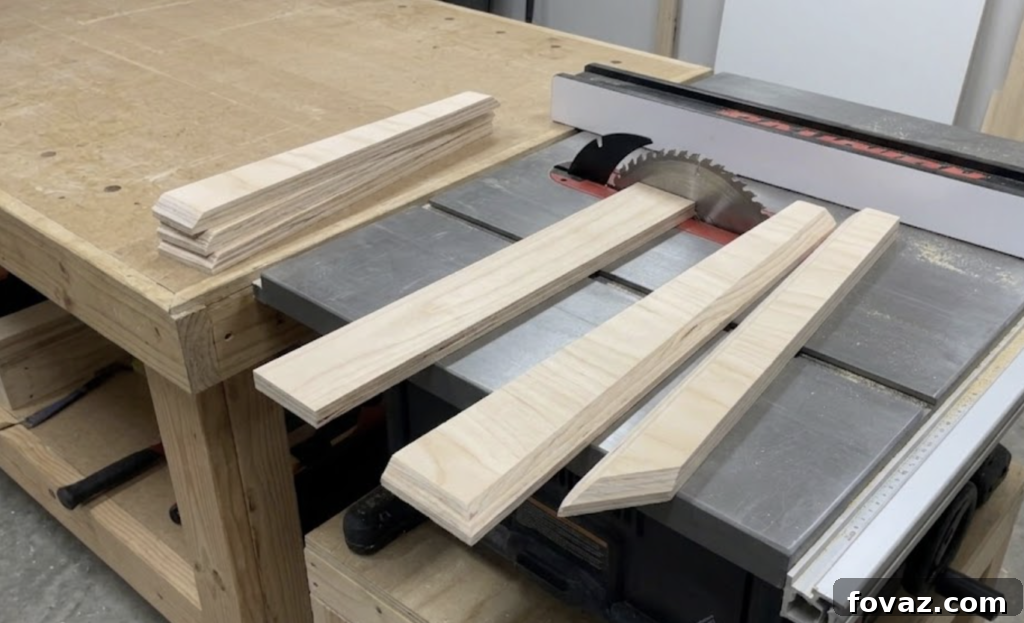
After creating your beveled cleat strips, you’ll notice a very sharp, delicate point along the thin edge. To prevent splinters and protect your hands during handling and installation, it’s advisable to remove this sharp tip. Run each cleat through your table saw one more time, carefully shaving off approximately 1/8 inch from the sharpest point. This small adjustment creates a blunted edge, making the cleats safer to work with and more durable. At this stage, you should have a neatly stacked pile of beveled cleat strips, all with blunted points and consistent widths. If you observe any inconsistencies in width, your saw fence might have shifted during cutting. It’s imperative to re-cut any imperfect strips before proceeding, as uniform cleats are fundamental to the success of your French cleat system.
Step 4: Accurately Locate and Mark Your Wall Studs
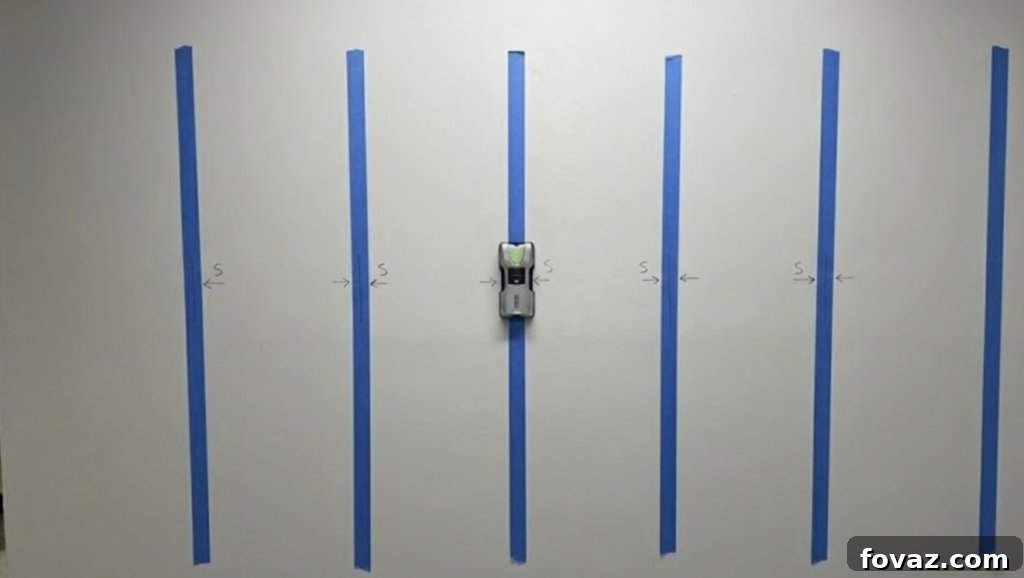
The structural integrity of your French cleat tool wall hinges on properly securing the cleats into wall studs. Drywall alone cannot support the weight of tools and the cleat system; it will inevitably fail, potentially causing damage and injury. Use a reliable stud finder to meticulously locate every stud within the section of wall you plan to cover. Once located, clearly mark each stud’s center with painter’s tape or a pencil. Mark above and below where your cleats will be mounted to ensure you hit the studs accurately. This step is non-negotiable for safety and stability. For those with concrete walls, traditional studs aren’t present, so you’ll prepare for direct concrete mounting in a later step. For standard drywall, failing to hit a stud, even by a half-inch, can lead to your entire wall system ripping free under load. Investing in a quality stud finder is highly recommended for any DIY homeowner.
Step 5: Draw a Level Reference Line on the Wall
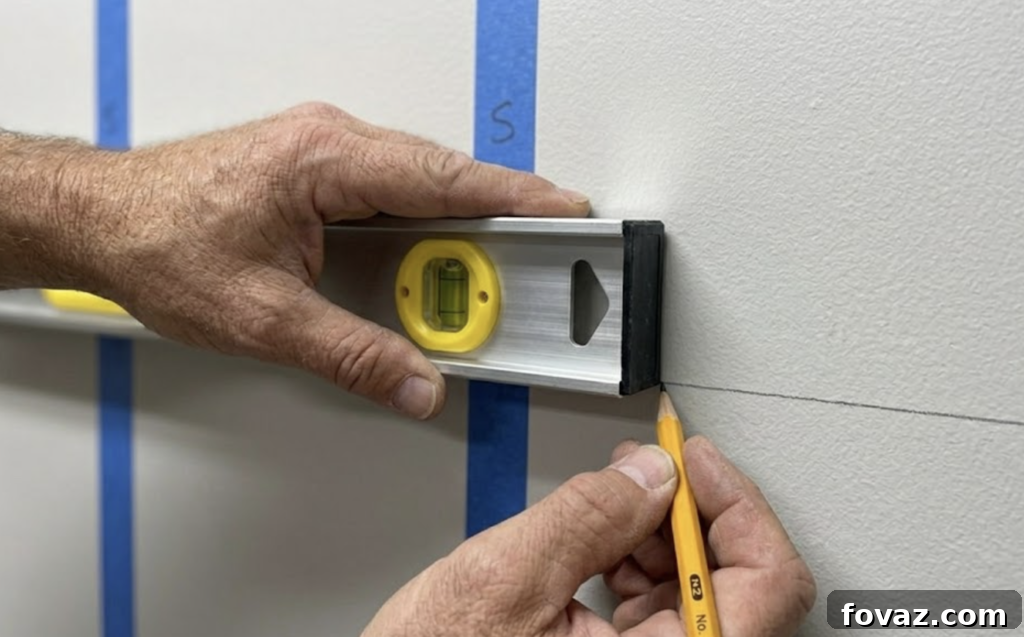
Precision is paramount in this step. Using your 4-foot level, draw a perfectly horizontal line on the wall at the desired height for the bottom edge of your first (lowest) wall cleat. This line will serve as the foundational reference for every subsequent cleat you install, ensuring that your entire system is level and visually appealing. Any deviation from level here will compound with each additional cleat, resulting in a noticeably crooked wall. Take your time, double-check your level, and make sure this first line is as accurate as possible. It sets the stage for the entire project.
Step 6: Securely Attach the First Cleat to the Wall
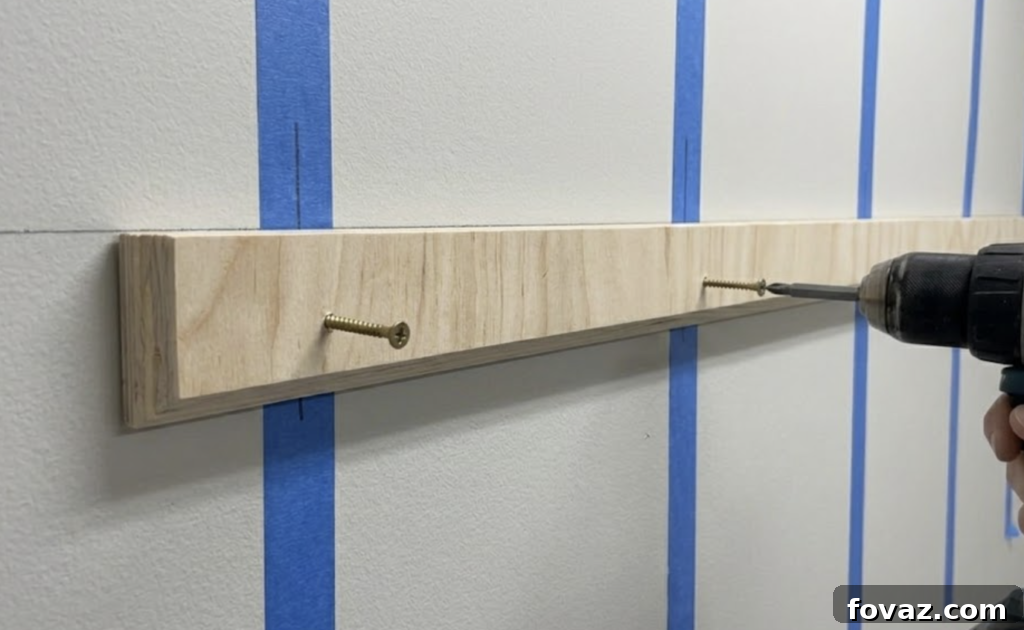
With your reference line drawn, it’s time to install the first wall cleat. Position the cleat precisely along your level line, ensuring that the 45-degree bevel faces upwards and angles back towards the wall. This orientation is crucial for the interlocking mechanism. Pre-drill pilot holes through the cleat and into the center of each marked stud. Then, drive 2½-inch wood screws through these pilot holes, using two screws per stud for maximum holding power. Make sure the screws are driven flush or slightly countersunk to avoid interfering with subsequent cleats or holders. For concrete walls, you would first pre-drill into the concrete using an SDS rotary hammer and then secure the cleat with Tapcon concrete screws. Remember this rule: the wall cleat bevel always faces up and towards the wall, while the holder cleat bevel faces down and away from the holder. Incorrect orientation will prevent your holders from locking securely.
Step 7: Add Consistent Spacing and Install Additional Cleats
To create uniform spacing between your cleat rows, a simple yet effective technique is to use a scrap 2×4 as a spacer block. Place the 2×4 on its edge, resting it directly on top of the cleat you just installed. This provides a consistent 3½-inch vertical gap (the width of a 2×4). Now, rest your next wall cleat directly on top of this spacer block, ensure it’s level, and screw it into the studs using the same method as the first cleat. Repeat this process until you’ve covered your desired wall section. For a typical 4-foot wide starter wall, installing three to four horizontal cleats usually provides ample storage and flexibility. This method ensures all your cleats are parallel and evenly spaced, making it easy to interchange tool holders across different rows. You can adjust the spacing by using different sized scrap wood, or opting for wider gaps for larger tools and narrower gaps for smaller hand tools.
Step 8: Construct Your First Tool Holder: The Foundation
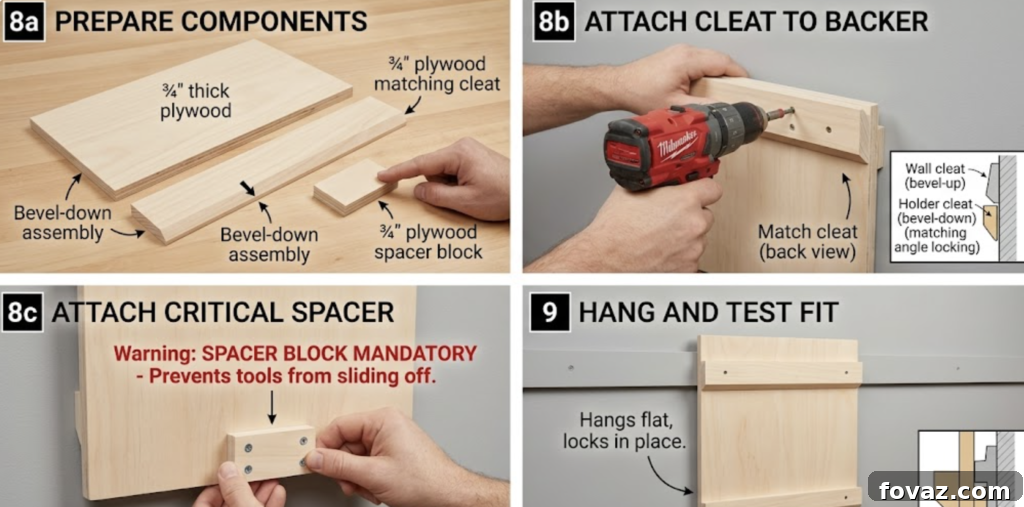
Now that your wall cleats are installed, it’s time to create your first tool holder. This basic holder will demonstrate the interlocking principle that underpins your entire system. Start by cutting a rectangular backer panel from 3/4-inch plywood, sized appropriately for the tools it will hold. Next, attach a matching cleat (cut in Step 2) to the top edge of this backer panel. Crucially, the 45-degree bevel on this holder cleat must face downwards and away from the backer. Secure it firmly with screws or wood glue and brad nails.
The final, vital component of any French cleat holder is the spacer block. Cut a piece of 3/4-inch plywood or solid wood to match the thickness of your holder cleat (typically 3/4-inch or slightly less). Attach this spacer block to the bottom edge of your backer panel. This seemingly small detail is paramount: without a correctly sized spacer block, the holder will tilt inward when hung, causing tools to slide off or creating an unstable display. Most common French cleat failures stem from a missing or improperly sized spacer. The spacer ensures the holder hangs plumb (vertically straight) against the wall, allowing the weight to be distributed correctly and the tools to sit flat.
Step 9: Hang the Holder and Rigorously Test the Fit
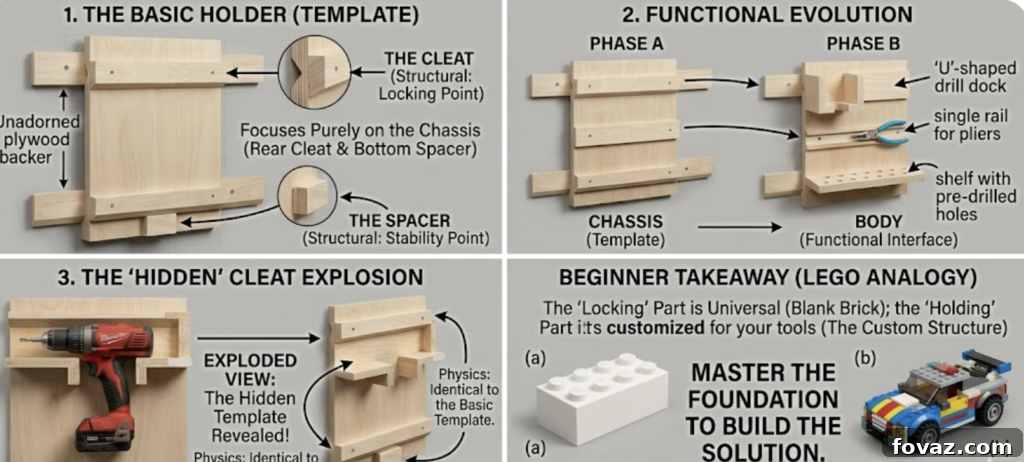
With your first basic tool holder complete, slide its holder cleat onto one of the installed wall cleats. It should slide smoothly into place and lock securely, sitting flat and plumb against the wall. The backer panel should be perfectly vertical, without any inward tilt. If the holder wobbles or leans inward, this indicates an issue with your spacer block – it might be missing, too thin, or uneven. Add additional material to the spacer or replace it until the holder hangs perfectly vertical and stable. This checkpoint is critical: ensure both the wall cleats are firmly mounted into studs and that your first holder is rock-solid. A wobbly start will lead to a wobbly finish. Once you’ve mastered this basic holder, you have the foundation to build an infinite array of custom tool storage solutions.
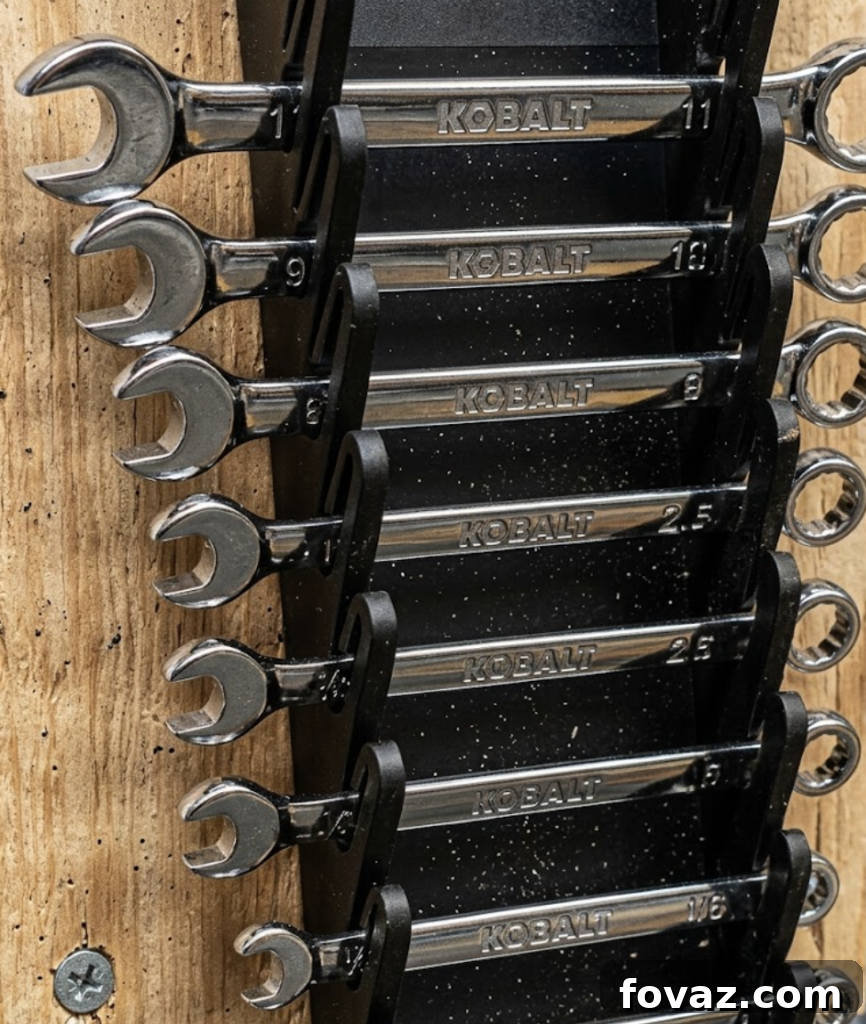
While custom wooden wrench sets are beautiful, carving out individual slots for a dozen wrenches can be time-consuming for beginners. Consider simplifying your initial projects by integrating ready-made organizers. For example, tiered plastic wrench organizers can be easily bolted onto a standard 3/4-inch backer panel. This method allows you to achieve a perfect, secure layout for both Metric and SAE sets in minutes, preventing tools from sliding around and making them easy to grab.
Beyond the Basics: Customizing Your French Cleat System
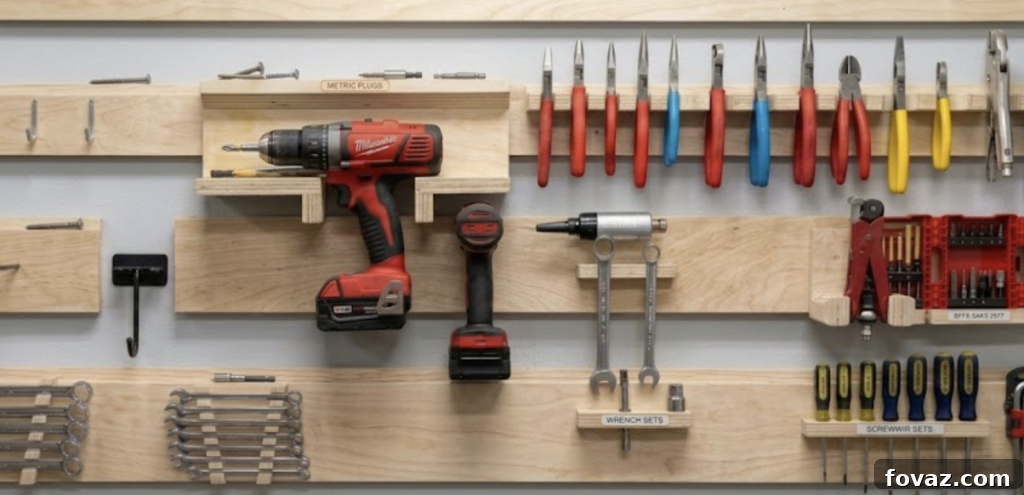
Once you’ve mastered the fundamental interlocking mechanism, the possibilities for customization are endless. French cleats shine brightest when you design holders specifically for your unique tools and workflow. Here are some ideas:
- Shelves: Simple plywood boxes or shelves can be built with a cleat on the back to hold paints, glues, small parts bins, or chargers.
- Power Tool Cradles: Design custom cradles for drills, circular saws, or sanders, ensuring they fit snugly and securely.
- Clamp Racks: A common and highly effective use, allowing easy access and organization of various clamp types.
- Hand Tool Holders: Create specific slots for screwdrivers, chisels, files, and more.
- Consumable Bins: Attach small bins or containers to store nails, screws, washers, or other small consumables.
- Magnetic Strips: Integrate magnetic strips into holders for quick access to small metal tools like drill bits or hex keys.
The beauty of this system is its adaptability. As your tool collection grows or your needs change, you can simply design and build new holders, then hang them wherever makes the most sense. This eliminates the need for constant re-drilling and offers unparalleled flexibility in your workshop organization.
When to Consider Hiring a Professional
For most homeowners, building a French cleat tool wall is a completely safe and manageable DIY project. It involves no complex electrical work, plumbing, or load-bearing structural modifications. The primary skills required are accurate measuring, cutting, and fastening.
The one notable exception is if your shop wall is constructed from concrete block or poured concrete. Drilling into concrete requires specialized tools that many DIYers may not own or be comfortable operating. For concrete walls, you will need a robust hammer drill or an SDS rotary hammer, along with appropriate Tapcon concrete screws. These tools are designed to efficiently penetrate hard masonry surfaces.
If you don’t own these specialized tools and prefer not to rent them, consider hiring a local handyman or a contractor experienced in masonry work. They can quickly and accurately mount the first row of cleats for you, ensuring a solid foundation. Once these initial cleats are securely attached to the concrete, you can confidently handle the rest of the project yourself, including installing additional cleats and building all your custom tool holders. A skilled professional can typically mount the foundational cleats on a concrete wall in under an hour, making it a cost-effective solution for ensuring a proper, secure installation without the investment in specialized tools.
Frequently Asked Questions (FAQs) About French Cleat Tool Walls
What router bit do I need for a French cleat tool storage?
You generally do not need a router bit for creating French cleats. The standard and most efficient method involves using a table saw or circular saw with the blade tilted to a 45-degree angle. This technique produces perfectly matched beveled strips for both the wall cleats and tool holder cleats. While specialized router bits designed for French cleats do exist, they typically add unnecessary cost and complexity for projects of this scale without providing any significant practical advantage over a saw cut.
How do I install a French cleat tool wall system?
The installation process begins by accurately locating and marking your wall studs. Next, draw a perfectly level reference line on the wall. Mount your cleats to the studs using 2½-inch wood screws, ensuring the 45-degree bevel faces upwards and angles towards the wall. Maintain consistent spacing between cleats, typically 3 to 5 inches apart for general use, by using a scrap wood block as a reliable guide. Once the wall cleats are installed, you can begin building custom tool holders with a corresponding downward-facing cleat and a crucial spacer block to ensure they hang plumb.
Can I attach French cleats directly to drywall?
No, you should not attach French cleats directly to drywall alone. Drywall lacks the structural integrity to support the weight of tools and the cleat system over time. Cleats must always be securely fastened into the wall studs behind the drywall. Use screws that are at least 2½ inches long to ensure adequate penetration (at least 1½ inches) into the solid wood of the stud. If hitting studs isn’t possible across your entire wall section, consider installing a full plywood backing panel directly to the studs, and then attach your French cleats to this plywood panel. This provides a continuous, strong mounting surface.
Where can I find free French cleat tool storage holder plans?
Many online woodworking communities and DIY websites offer a wealth of free downloadable plans for French cleat tool holders. Popular resources include “Fix This Build That,” “Woodworking for Mere Mortals,” and “Neat French Cleat.” These sites often provide detailed instructions and diagrams for a variety of holders, such as drill holders, clamp racks, and various shelves. A simple drill holder or a basic clamp rack makes an excellent first project for beginners to get acquainted with the system.
Should I paint or seal my French cleat tool wall storage?
When finishing your French cleat system, it’s generally recommended to leave the 45-degree mating surfaces (the beveled edges where the wall cleat and holder cleat meet) raw and unfinished. Applying paint, polyurethane, or other sealers to these interlocking surfaces can create friction or cause the wood to stick together over time, making it difficult to move or remove holders. If you desire a finished aesthetic, apply paint or sealer only to the visible face of the cleats, the sides, and the backer boards of your holders. This allows for a customized look while preserving the smooth, functional interlocking action of the system.
How far apart should French cleat strips be spaced?
The ideal spacing between French cleat strips depends on the types of tools you plan to store. For small hand tools, craft supplies, and consumables, a spacing of 3 to 5 inches apart is often sufficient. For larger power tools, bulkier items, or custom cabinets, a wider spacing of 6 to 8 inches or more might be necessary. A good strategy for beginners is to start with a moderate spacing (e.g., 4-5 inches) and avoid covering your entire wall with cleats on day one. This provides flexibility to add more cleats or adjust spacing later as your storage needs become clearer and your tool collection evolves.
What is the best wood for a French cleat tool storage system?
Three-quarter-inch (3/4-inch) plywood is the industry standard and most recommended material for building French cleat tool storage systems due to its stability, strength, and ease of workability. Baltic Birch plywood is considered the premium choice; it features more laminations (plys) per thickness, fewer internal voids, and a very stable core, making it exceptionally strong and visually appealing. For more budget-conscious builds, CDX construction plywood works very well and is readily available. Solid wood, such as pine or poplar, can also be used, but it’s important to select straight, knot-free boards and be aware that solid wood is more susceptible to warping, twisting, or cupping due to changes in humidity, which could compromise the precise fit of the cleats over time.