
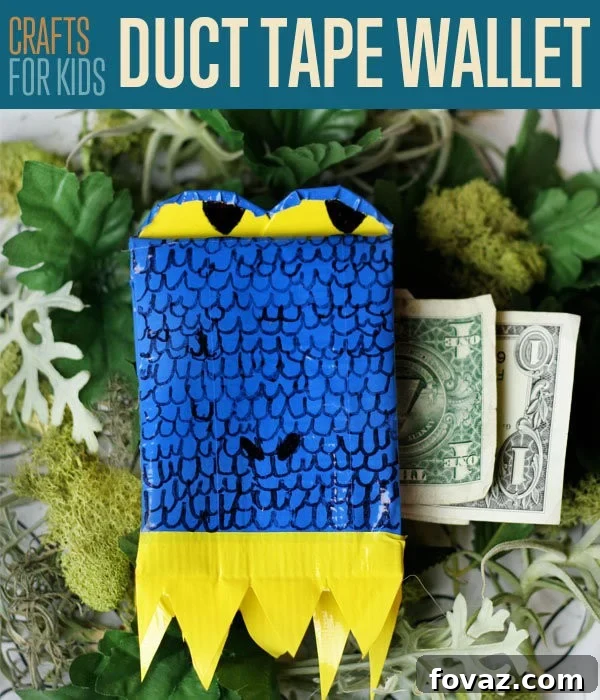
Unleash Your Creativity: How to Craft an Epic Duct Tape Dragon Wallet
Duct tape, often hailed as the universal fixer-upper, is much more than just a repair tool. Its incredible versatility makes it a fantastic medium for countless DIY craft projects, transforming ordinary rolls into extraordinary creations. From practical items like clothing and tools to imaginative safety gear and fashionable handbags, the possibilities with duct tape are truly boundless. There are even incredible tales of its robust nature, like the legendary story of a pilot who brilliantly repaired an entire plane with this resilient material after a bear attack! Given its strength and adaptability, it’s no wonder that duct tape has become a favorite for engaging and fun crafts for kids. Today, we’re diving into one of the most exciting and imaginative projects: creating your very own fearsome and adorable **Duct Tape Dragon Wallet**.
In ancient folklore, dragons are often depicted as majestic, powerful creatures that guard immense hoards of gold and precious treasures in their hidden caverns. Who better to entrust with your valuable lunch money, bus fare, or secret allowance than a loyal and fierce dragon? Our unique duct tape dragon wallet offers not only a secure and durable way to keep your money and cards safe but also adds a playful, whimsical touch to your everyday essentials. Imagine pulling out a wallet that brings a smile to your face and sparks conversations – that’s the magic of this craft!
This engaging DIY project is perfectly suited for crafters of all ages, from young kids eager to explore their creativity to adults looking for a fun, nostalgic activity. It’s an ideal way to spend a rainy afternoon, a fantastic centerpiece for a birthday party activity, or simply a mindful exercise in hands-on creation. The beauty of crafting your dragon wallet lies in its complete customizability. There’s absolutely no ‘wrong’ way to design your mythical money guardian. Feel free to unleash your imagination: add sparkly glitter for a magical glow, attach googly eyes for a quirky personality, or incorporate fabric scraps for unique textures. Each dragon wallet becomes a unique reflection of its creator!
While this project is incredibly fun, it does involve the use of a straight edge cutting blade and scissors. Therefore, we highly recommend having an adult present to supervise and assist with these steps, ensuring a safe and enjoyable crafting experience for everyone. And just in case your fantastic dragon creation mysteriously comes to life and decides to guard your money a little *too* fiercely, it’s always good to have an extra pair of hands!
Embark on Your Crafting Adventure: How To Make a DIY Duct Tape Dragon Wallet
Ready to bring your legendary money guardian to life? Follow these detailed steps to create a one-of-a-kind **DIY duct tape wallet** that’s both functional and incredibly cool. Get ready to transform simple rolls of tape into an item you’ll treasure!
Essential Supplies for Your Duct Tape Dragon Wallet Project:
Before you begin, gather all your materials. Having everything organized will make the crafting process smoother and more enjoyable. Choosing your duct tape colors is one of the most exciting parts – think about what kind of dragon you want to create!
- **3 Spools of Duct Tape:** This is where you can get really creative! We recommend choosing a solid color for the main body of your dragon (like blue), a contrasting pattern or metallic tape for accents like teeth or eyes (we used yellow and red), and perhaps a third color for additional details. The combinations are endless, allowing for a truly personalized duct tape creation!
- **Scissors:** A good pair of sharp scissors is essential for clean cuts, especially for intricate details.
- **Straight Edge Cutting Blade (Craft Knife):** This tool will help you achieve perfectly straight lines and neat edges for your wallet’s structure. Remember to use it with caution and adult supervision.
- **Permanent Marker:** For drawing scales, eyes, and other facial features to bring your dragon to life.
- **Velcro:** A small strip of Velcro will serve as the closure mechanism for your wallet, keeping everything securely tucked inside.
- **Paper Cup:** The base of a paper cup will be ingeniously repurposed to create your dragon’s expressive eyes.
- **Self-Healing Cutting Mat:** This mat protects your work surface and prolongs the life of your cutting blade. If you don’t have one, choose a surface you don’t mind getting cut, like a piece of thick cardboard or an old cutting board.
- **Straight Edge Ruler:** Absolutely crucial for measuring and ensuring your cuts are precise, leading to a professional-looking finish for your **DIY duct tape wallet**.
Step 1: Constructing the Duct Tape “Fabric” for Your Wallet Base
Every sturdy wallet needs a strong foundation, and when it comes to durability, very few materials can rival duct tape. This first step is about creating a flexible yet incredibly robust sheet of “fabric” that will form the main body of your **dragon duct tape wallet**. Lay out your self-healing cutting mat on a clean, flat surface. Position your straight edge ruler horizontally across your workspace; this will help you maintain straight lines.
Begin by selecting your chosen base color duct tape – for our example, we opted for a vibrant blue. Carefully rip or cut a strip of this tape. While we’ll only need the strips to be around 9 inches long for the final wallet, it’s always better to start with slightly longer pieces to give yourself some slack for trimming. Aim for strips approximately 1 foot (12 inches) in length to be safe. Gently place this first strip onto your cutting mat with the non-sticky side facing down. Ensure it’s as straight as possible, as this will set the precedent for the rest of your “fabric.” If you’re new to making duct tape fabric, you might find it helpful to check out our comprehensive guide:
Duct Tape Projects 101: The Basics to Make Anything
Step 2: Lapping It Up – Building the First Layer
With your first strip of duct tape securely (but temporarily) positioned on your mat, it’s time to build out your “fabric.” Take your next strip of the same base color tape. Carefully overlap it horizontally over the first strip you laid down. The key here is consistency: aim for an overlap of approximately ½ inch. This slight overlap is crucial; it ensures there are no sticky gaps and creates a seamlessly strong and durable surface. Gently press each strip down to adhere it to the one below it, working slowly to prevent bubbles or wrinkles.
Continue this process, adding strip after strip, always overlapping by about ½ inch, until your duct tape fabric square reaches a height of approximately 6 inches. You’ll notice how the material starts to feel cohesive and sturdy, ready to be shaped into a fantastic **DIY wallet**. Don’t worry too much about the ends being perfectly aligned at this stage; we’ll trim those later for a clean finish. Focus on creating a consistent, smooth surface.
Step 3: Reinforcing Your Fabric – Repeating on the Other Side
Now that you have one side of your duct tape fabric complete with its sticky side facing up (and slightly adhered to your mat), it’s time to create the smooth, non-sticky exterior. This step is about “sandwiching” your first layer to encapsulate all the sticky surfaces and provide extra strength and a clean finish to your **duct tape wallet** material. Carefully flip your entire duct tape sheet over so the sticky side is now facing down towards your mat.
Just as you did with the bottom layer, begin to apply new strips of your base color tape, this time with the sticky side facing *down*. Stagger this second layer of tape precisely onto the first. This means you’ll align the edges and overlaps to cover the exposed sticky areas of the first layer. This mirroring technique not only hides all the adhesive but also doubles the thickness and durability of your fabric, making it incredibly robust and ready for the rigors of daily use as a wallet. Take your time to ensure each strip aligns well, creating a uniform, non-sticky surface that will be the exterior of your dragon’s body.
Step 4: Precision Trimming – Folding and Cutting Your Fabric
With both sides of your duct tape fabric complete, it’s time to refine its shape and create clean, professional-looking edges for your **DIY duct tape wallet**. This step is all about tidying up the raw edges and ensuring your main wallet piece is perfectly sized. First, carefully fold over any uneven, sticky edges that are left on the top and bottom of your duct tape fabric. This creates neat, finished seams, giving your wallet a polished look and preventing any accidental stickiness later on.
Next, grab your straight edge ruler and your cutting blade. This is where precision is key. Line up the ruler along one of the messy sides of your fabric and use your straight edge blade to trim off the excess, creating a perfectly straight edge. Repeat this on the opposite side. Once your sides are clean, measure 8-1/2 inches across the length of your blue (or chosen color base) fabric. Trim it down to this length. Finally, confirm your fabric measures a tidy 8-1/2 inches long by 6 inches wide. This precise rectangular shape will form the foundation for your dragon’s body and billfold, ensuring a neat and functional **duct tape wallet**.
Step 5: Crafting the Base for Your Card Holders
Every functional wallet needs compartments for cards, and your **DIY duct tape wallet** will be no exception. We’ll be creating three card holders for this project, but remember, customization is part of the fun – feel free to add more if you need extra storage! Begin by ripping off a strip of duct tape that is at least 10 inches in length. Choose a contrasting or complementary color for your card pockets if you wish, or stick with your main color for a cohesive look.
Place this strip onto your cutting mat with the sticky side facing up. To make the next step easier and prevent the tape from moving, use a small scrap of tape to temporarily secure the ends of this sticky-side-up strip to your mat. This makeshift anchor will provide stability. Now, take another strip of tape of the same length and color, and carefully sandwich it directly on top of the first strip, sticky side down. Press firmly to ensure both strips adhere completely, effectively tucking away all the sticky surfaces in between. You should now have one smooth, double-layered, non-sticky 10-inch strip, perfectly prepared to become the durable base for your card pockets within your **duct tape wallet**.
Step 6: Cutting Your Card Holder Bases
Once you have your double-layered, non-sticky strip, which serves as the robust base for your small card pockets, it’s time to cut it into the individual pocket pieces for your **DIY duct tape wallet**. Using your ruler and straight edge cutting blade, carefully measure and cut this strip into 4-inch long rectangles. For example, if you created a 10-inch strip, you’ll be able to get two 4-inch pockets and have a 2-inch scrap left over.
The more of these 4-inch rectangles you create, the more small pockets your **duct tape wallet** will ultimately have. We recommend making at least three for a standard wallet, but if you carry many cards or simply want more compartments, go ahead and make more! Precision in cutting here will result in neater, more uniform pockets, contributing to the overall polished look of your dragon wallet. Remember to use a cutting mat and adult supervision for this step.
Step 7: Refining Your Pockets – Creating Clean Edges
To give your card pockets a polished, finished look and make them easier to slide cards into, you’ll need to create neat, non-sticky top edges. This step is crucial for the functionality and aesthetic appeal of your **duct tape wallet**. Take one of your 4-inch long card pocket pieces. Now, rip or cut a fresh strip of duct tape that is slightly longer than the width of your pocket piece – just enough to wrap around the top edge.
Carefully align this new strip of tape along one of the 4-inch edges of your pocket piece. Press it down so about half of the tape’s width adheres to the pocket. Then, fold the remaining half of the tape over to the other side of the pocket, creating a clean, folded seam. This action effectively “seals” the top edge, eliminating any stickiness and providing a smooth opening for your cards. Repeat this process for all the card pockets you wish to make. This attention to detail will significantly elevate the overall quality and durability of your **DIY duct tape wallet**.
Step 8: Arranging and Securing Your Small Card Pockets
Now that your individual card pockets are neatly trimmed and have their finished top edges, it’s time to arrange them and integrate them into your **duct tape wallet**. This step requires careful placement to ensure your cards will fit perfectly. Take your finished pockets and stagger them on top of each other. The goal is to create an overlapping effect where a portion of each pocket is visible, allowing easy access to your cards.
A smart tip here: use an actual ID card, credit card, or even your Disneyland pass (like ours, if you’re a premium pass owner!) to test the fit. Place your card into the top pocket, then the one below it, making sure there’s enough room for each card to slide in and out comfortably. Once you’re satisfied with the staggered arrangement and fit, cut a strip of duct tape in half lengthwise. This thinner strip will be used to secure your stacked card pockets. Carefully align the pockets and use the halved tape strip to seal down one side of the stacked pockets. We recommend keeping your card inside the pockets during this taping step. This clever trick ensures you leave just the right amount of space, preventing the pockets from being taped too tightly and making it difficult to insert cards later. Press firmly to secure the pockets in place, creating a functional and organized section for your **DIY wallet**.
Step 9: Assembling the Main Wallet Compartment (Billfold)
With your card pockets prepared, it’s time to bring together the main structure of your **dragon duct tape wallet**. Retrieve the large duct tape rectangle you created in Step 4 (our blue one). This piece will form the core of your wallet and the spacious compartment for bills. Carefully fold this entire rectangle in half lengthwise. Imagine folding a hotdog bun – that’s the motion you’re going for! This precise fold will create the essential billfold section of your wallet, providing a secure and organized space for your paper money.
Ensure the fold is crisp and even, as this will determine the overall symmetry and tidiness of your finished wallet. Once folded, gently press along the crease to set the shape. This main compartment will be robust and ready to hold all your valuable greenbacks, making it a truly functional element of your creative DIY gift for kids or yourself.
Step 10: Integrating Small Pockets into the Wallet Base
Now for the exciting part – bringing all the components of your **DIY duct tape wallet** together! With your main wallet body folded, it’s time to securely attach the card pockets you’ve meticulously prepared. Take your stacked small pockets and position them neatly onto one side of the folded wallet base. You’ll want to align them close to the edge, leaving enough space for the wallet to fold smoothly without obstruction. Once you’re happy with their placement, you’ll seal them down. This is also where we start adding a touch of dragon flair!
Choose the duct tape color you’ve designated for your dragon’s teeth (we used yellow, imagining our dragon as a coffee enthusiast!). Cut a strip of this tape in half lengthwise to make it thinner and more manageable. Use this halved strip to seal down one corner or side of the small pockets onto the main wallet body. Carefully fold the tape over the edge, creating a neat, crisp seam. This not only secures the pockets but also starts forming a decorative edge. For extra security and a more finished look, you can also add another layer of your main body color (like blue tape) along the opposite edge of the small pockets, ensuring they are firmly held in place on all sides. This step is crucial for both the functionality and the developing aesthetic of your unique **dragon wallet**.
Step 11: Laying the Foundation for Dragon Teeth
Every formidable dragon needs an impressive set of teeth, and your **duct tape dragon wallet** is no exception! This step is all about preparing the base for those fierce, toothy edges that will give your wallet its unique character. Take a strip of your chosen “teeth” colored tape (ours is yellow, for that vibrant, coffee-loving dragon look!) and place it onto your cutting mat with the sticky side facing up. This strip only needs to be as wide as your wallet, so don’t worry about precise measurements right now; you can always trim any excess later.
To help secure this sticky strip while you work, use small scraps of tape to temporarily hold its ends to your mat. This prevents it from shifting. Now, carefully place one edge of your folded wallet (the top edge, where the opening for bills is) over this sticky strip, positioning it about a half-inch up from the tape’s edge, as shown in the accompanying image. Press it down firmly. Next, take another strip of your “teeth” tape and place it directly over the wallet, aligning it precisely with the first sticky strip. This action effectively “sandwiches” the edge of your wallet between the two strips of yellow tape, securing them together and creating a double-layered, robust foundation for your dragon’s impressive smile. If you desire a symmetrical look, repeat this process on the other side of the wallet as well. This attention to detail transforms a simple wallet into a unique **dragon wallet** statement piece.
Then place another strip of your teeth tape right over the wallet as shown, sandwiching your two yellow (or whatever color) pieces together. You can also do this top the other side of the wallet if you want both ends to match.
Step 12: Cutting Your Dragon’s Teeth! RAR!
With the “teeth” colored tape securely layered onto the edges of your **duct tape wallet**, it’s time to unleash your inner artist and give your dragon its distinctive, fearsome grin! This is where the personality of your dragon truly begins to emerge. Using a sharp pair of scissors (with adult supervision, of course!), carefully begin to make diagonal cuts into the exposed strip of tape along the wallet’s edge. These diagonal cuts will form the jagged, individual teeth of your dragon.
Don’t strive for absolute perfection with straight lines; remember, dragons in legends rarely have perfectly uniform teeth, and a little asymmetry can add to their unique charm and fierce character! Feel free to freehand your cuts, making them as sharp, blunt, or irregular as you envision your dragon’s smile to be. Repeat this exciting step on both sides of your wallet. The goal is that when the wallet is closed, these newly cut teeth will align, creating the magnificent, gaping maw of your very own **dragon wallet**. This playful detail is what truly transforms your creation from a simple wallet into an imaginative creature, making it a standout easy DIY project.
Step 13: Creating the Dragon’s Expressive Eyes
Every mythical creature needs eyes to see, and your **duct tape dragon wallet** is no exception! This step focuses on crafting those essential “poppin’ peepers” that will give your dragon character and bring its face to life. Grab your paper cup. The small circle at the base of the cup is our secret weapon for perfectly sized, sturdy eyes. Carefully cut out this bottom circle. Don’t stress about making it absolutely perfect or symmetrical at this stage – a little unevenness can actually add a whimsical, unique character to your dragon’s gaze!
Once you have the circular base, cut it in half, creating two semi-circles. These will form the foundation for each eye. Now, cover each paper semi-circle completely with your chosen duct tape color. We opted for more vibrant yellow tape for our dragon’s eyes, intending to create a fierce and bold look. Wrap the tape smoothly around the paper, folding over any excess tape to the backside to create clean, finished edges. You now have two distinct, colorful eye bases, ready to be attached and detailed, adding another layer of personality to your incredible duct tape craft.
Step 14: Sketching Dragon Scales and Details
Now for an artistic touch that truly brings your **duct tape dragon wallet** to life: adding scales! Grab your permanent marker, and let your creativity flow. On the front and back of your wallet, begin drawing simple scale shapes. You’ll notice that scale patterns often resemble a series of overlapping ‘W’s, or perhaps ‘M’s, or even little ‘butts’ if you look closely enough! The beauty of this step is that there’s no need for perfect uniformity. In fact, freehanding the scales adds a wonderful sense of organic movement and personality to your dragon, making each wallet uniquely charming.
Embrace the imperfections; uneven scales create visual interest and give your dragon a more authentic, lived-in feel. While you’re at it, don’t forget to add a couple of distinct nose holes on the front of your wallet. These small but crucial details will complete your dragon’s face, enhancing its fearsome (or friendly!) expression. This step allows for immense personalization, truly making your **DIY wallet** a one-of-a-kind dragon masterpiece.
Step 15: Bringing the Dragon Eyes to Life
Your dragon’s eyes are the windows to its soul, and this step is all about making them pop! Take a strip of your main body color tape (our blue tape) and carefully attach your prepared eye pieces to the back of the wallet. Position them so that your dragon’s eyes appear to be peeking over the top edge of the wallet when it’s closed. This creates an engaging, three-dimensional effect. Once positioned, firmly fold this blue tape over the top of the eye pieces and onto the front of the wallet, securing them in place. Ensure they are evenly spaced and firmly adhered.
Next, grab another strip of your body color tape. Starting again from the backside of the wallet, attach it just above the secured eyes. Carefully trim off any excess tape, leaving only a small outline of tape that mirrors the curve of your eyeballs. This narrow strip will serve as the base for the eyelids. Fold this small outline of tape over the front of the eyes, creating a subtle yet effective eyelid effect. Finally, pick up your permanent marker and draw in the pupils and irises. The scarier, the better – after all, this is a formidable **dragon wallet**! This layering and detailing transforms simple tape into expressive features, enhancing the overall charm and character of your fun craft idea.
Step 16: Applying Velcro for a Secure Wallet Closure
Your amazing **duct tape dragon wallet** is almost complete! The final step is to add a reliable closure mechanism to keep all your treasures safely tucked away. This is where the Velcro comes in. Take out your roll or sheet of Velcro. Velcro typically comes in two parts: a “hook” side (the rougher, stiffer plastic side) and a “loop” side (the softer, fuzzy fabric side). For a neat and symmetrical closure, cut both sides of the Velcro strip together, ensuring they are perfectly aligned. A length of about 1 to 1.5 inches should be sufficient for a secure clasp.
Carefully peel the backing off one side of your cut Velcro (for example, the hook side). Position it inside the wallet, on the edge where the dragon’s teeth begin, ensuring it lines up cleanly with the wallet’s opening. Press down firmly to adhere it. Now, peel the backing off the other side of the Velcro (the loop side). Gently close the wallet, pressing the two sides of the Velcro together. This will ensure the second Velcro piece adheres in the exact corresponding spot on the opposite inner flap of the wallet, creating a perfect, secure closure. Open the wallet, and press down firmly on the newly attached loop side. Your **DIY duct tape wallet** is now fully functional and ready to guard your valuables with draconic might!
Congratulations! You’ve successfully crafted an incredible **duct tape dragon wallet** that’s as unique and fierce as any creature from legend. Your personal dragon is now fully equipped and ready to store your cash, cards, and other small treasures. Just make sure to feed him regularly with some greenbacks, or this magnificent beast might just get a little out of hand!
Loved Crafting This Dragon Wallet? Explore More Awesome DIY Projects!
We hope you had a fantastic time bringing your **duct tape dragon wallet** to life! If you enjoyed this creative process and are looking for more fun ways to express your DIY spirit, we have a treasure trove of inspiring projects waiting for you. Dive into our extensive collection of crafts that are perfect for saving money, personalizing your space, or simply enjoying a rewarding creative session.
Check out our popular post featuring a variety of clever and engaging DIY ideas: