
Transforming everyday items into enchanting decorative pieces is a hallmark of truly inspiring DIY projects. Mason jar crafts, in particular, offer a wonderful opportunity to breathe new life into humble glass jars that might otherwise head straight for the recycling bin. They embody the spirit of upcycling, turning potential waste into charming treasures.
For those who love to infuse their homes with seasonal cheer, especially during the spooktacular season, these darling pumpkin candy jars are an absolute must-try. Perfectly suited for Halloween, they combine the rustic charm of mason jars with the elegance of old candlesticks, resulting in a whimsical yet sophisticated decoration. What makes this project even more appealing is its simplicity; these adorable jars can be assembled with just a few common materials and five easy steps, making it an accessible craft for beginners and seasoned DIY enthusiasts alike.
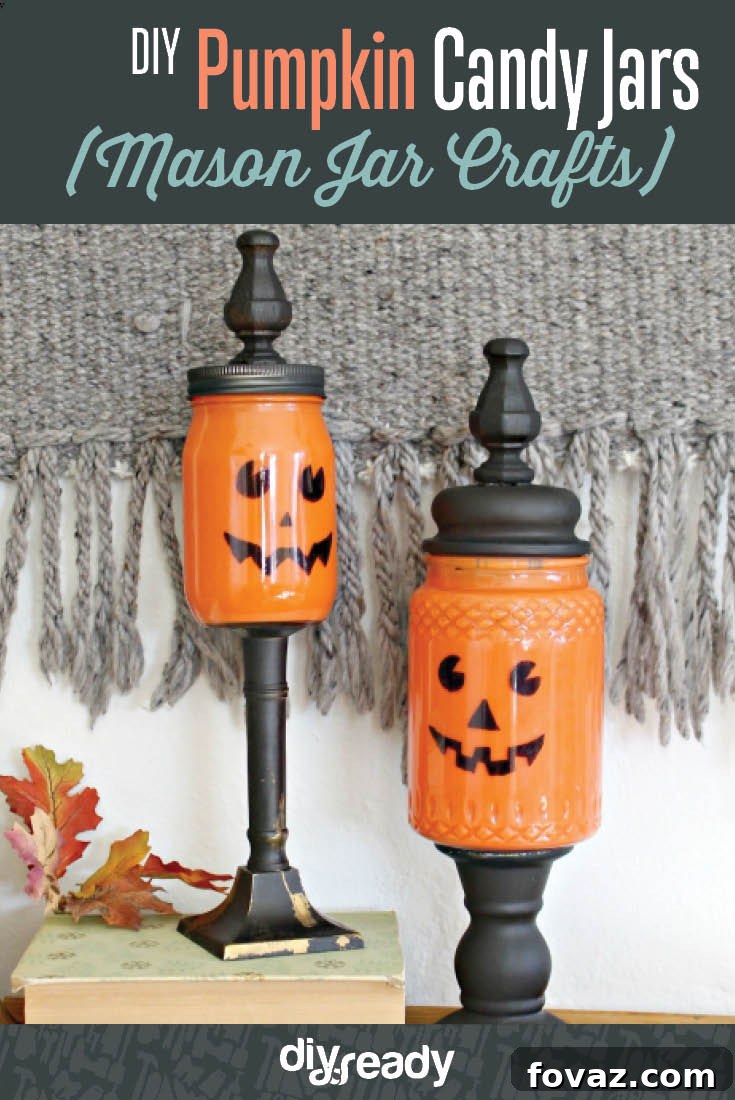
Imagine the gleeful expressions on trick-or-treaters’ faces when they encounter these charming pumpkin candy jars! Beyond just holding sweet treats, these handcrafted creations serve as delightful decorative accents that elevate your Halloween display. The visible delight they bring is truly priceless, adding a personalized and heartwarming touch to your festive celebrations.
Moreover, this specific mason jar craft presents an excellent opportunity for conscious upcycling. Do you have any old drawer knobs, finials, or even decorative bottle stoppers lying around? This project is the perfect excuse to repurpose them, giving these forgotten pieces a new lease on life as the “stems” of your whimsical pumpkins. It’s a fantastic way to declutter while simultaneously creating something beautiful and functional.
Mason jars, with their ubiquitous presence and timeless appeal, have long been a favorite medium for crafters. Their sturdy construction, clear glass, and versatile shapes make them ideal candidates for a myriad of DIY projects, from storage solutions to intricate decorative pieces. Opting for mason jar crafts like these not only showcases your creativity but also champions a sustainable lifestyle by minimizing waste and maximizing the potential of everyday objects. This particular pumpkin candy jar project taps into that rich tradition, offering a blend of creativity, sustainability, and seasonal festivity.
Crafting Your Spooky Sweetness: Let’s Get Started!
Embarking on a DIY project can be incredibly rewarding, especially when the result is as charming and practical as these Halloween pumpkin candy jars. Before diving into the fun of painting and assembly, it’s essential to gather all your materials. Ensuring you have everything at hand will make the crafting process smooth, enjoyable, and efficient.
What you’ll need for your Pumpkin Candy Jars:
- Mason Jar with Lid: A standard-mouth or wide-mouth quart-sized mason jar works best, offering ample space for candy and a good surface for decoration. Ensure the lid is clean and free of rust.
- Candlestick Stands: These form the base of your pumpkin. Look for sturdy, flat-top candlesticks at thrift stores, dollar stores, or craft supply shops. Various heights and styles can add unique character to your finished piece.
- Drawer Knobs or Finials: These will serve as the “stem” of your pumpkin. Repurpose old ones for an eco-friendly touch, or purchase new ones in interesting shapes and sizes. Small decorative finials often found on furniture are perfect for this.
- Black Spray Paint: Choose an all-purpose spray paint that adheres well to metal and wood. A matte or satin finish often works well for a classic Halloween look, but gloss can add a sleek touch.
- Sharpie or Permanent Marker: An extra-fine or fine-tip black Sharpie is ideal for drawing the intricate details of a jack-o’-lantern face. Ensure it’s permanent to prevent smudging.
- Orange Acrylic Craft Paint: A vibrant orange acrylic paint is crucial for achieving that classic pumpkin hue. You’ll need enough to coat the inside of your mason jar thoroughly.
- Clear Gloss Varnish (e.g., Mod Podge Gloss or similar): This is vital for mixing with the orange paint. It helps the paint adhere evenly to the glass and provides a durable, glossy finish, giving your pumpkin a lovely sheen.
- Super Glue or Strong Craft Adhesive: You’ll need a reliable adhesive to securely attach the candlestick base and the finial/knob to the glass jar. Ensure it bonds well with glass, metal, and wood/ceramic.
Detailed Instructions: Crafting Your Mason Jar Pumpkin
With your materials ready, it’s time to bring your pumpkin candy jars to life. Follow these steps carefully to ensure a beautiful and lasting creation. Remember, a little patience goes a long way in crafting!
1. Conceptualize Your Design and Select Components: Before reaching for any paint, take a moment to plan your creation. Carefully consider the size of your mason jar and how it will sit on your chosen candlestick stand. Experiment with different drawer knobs or finials to find one that not only fits aesthetically but also complements the overall look. A wider candlestick base will offer more stability, while a smaller, more intricate finial can add a delicate touch to the top. This initial planning stage is crucial for ensuring all components are proportional and visually pleasing, creating a cohesive and well-balanced pumpkin. Visualize the final product to guide your choices and ensure a harmonious design. This step is about marrying functionality with artistic vision, ensuring the jar, base, and stem align perfectly.
2. Prepare and Paint the Structural Elements: Move to a well-ventilated area, preferably outdoors or in a garage with open windows, and lay down newspaper or a drop cloth. Thoroughly clean your jar lid, candlestick, and finial/knob to remove any dust or grease. Apply several thin, even coats of black spray paint to each of these components. It’s better to apply multiple thin coats rather than one thick coat, as this prevents drips, ensures even coverage, and allows for a smoother, more professional finish. Allow each coat to dry completely according to the manufacturer’s instructions before applying the next. While black is traditional for a spooky Halloween feel, feel free to experiment with other Halloween-themed colors that appeal to your designer eye—perhaps a metallic silver, a deep purple, or even a ghostly white for a different effect. Ensure all surfaces that will be visible are uniformly covered.
3. Create the Signature Pumpkin Glow: This step gives your jar its vibrant pumpkin color. In a separate container, mix together equal parts clear gloss varnish and orange acrylic paint. The varnish is essential here; it allows the paint to adhere properly to the smooth glass interior and provides a durable, glossy finish that makes the pumpkin truly shine. Once thoroughly mixed, carefully pour the mixture into the clean mason jar. Swirl the jar around slowly and steadily, rotating it to ensure the entire inside surface is coated with the paint mixture. Pay attention to the neck and bottom of the jar to ensure full coverage. Once coated, invert the jar over a piece of newspaper or a paper plate to allow any excess paint to drain out. This step is crucial to prevent pooling and ensure an even, consistent color. Let the jar dry completely, preferably upside down for several hours or overnight, to allow all moisture to escape and the paint to cure fully. For best results, allow up to 24 hours of drying time.
4. Design Your Jack-o’-Lantern Face: Once the interior orange paint is perfectly dry, it’s time for the most creative part: drawing the jack-o’-lantern face. Using a Sharpie or a fine-tip permanent marker, let your imagination run wild! You can go for a classic triangular eyes and jagged smile, a silly and goofy expression, a cute and friendly face, or a truly scary and sinister look. Before drawing directly on the jar, you might want to practice a few designs on a piece of paper. This allows you to refine your chosen face and build confidence. When drawing on the jar, press firmly but smoothly to create crisp, defined lines. Consider adding details like eyebrows or teeth to enhance the expression. The beauty of this step is its personalization; your pumpkin can reflect any mood or style you desire, making each jar uniquely yours.
5. Assemble and Seal Your Masterpiece: After all the painted pieces—the lid, candlestick, finial/knob, and the orange-coated jar—are completely dry and cured, it’s time for the final assembly. Apply a small amount of super glue or strong craft adhesive to the top of the candlestick stand and carefully center the bottom of the mason jar onto it, pressing down firmly. Hold it in place for a few moments to ensure a strong bond. Next, apply a small amount of glue to the center of the jar lid and carefully attach the finial or drawer knob, ensuring it’s straight and securely fastened. Allow all adhered pieces to dry completely, ideally for several hours or even overnight, to ensure maximum strength and stability. Once everything is perfectly dry and secure, your charming pumpkin candy jar is ready! Now, you can fill your jar with your favorite Halloween candy, festive treats, or even use it as a decorative centerpiece with a small LED tea light inside for a soft, glowing effect (never use a real flame in an enclosed jar).
Voila! You’ve successfully crafted a delightful and personalized Halloween decoration. These charming pumpkin candy jars are not only perfect for holding treats for trick-or-treaters but also make fantastic gifts or decorative accents throughout your home. Enjoy the compliments and the festive spirit they bring!
If you loved this story and enjoyed this creative upcycling project, we think you’d also be interested in exploring more DIY fun for the spooky season and beyond:
15 Halloween Decor DIY Projects: Unleash Your Inner Ghoul
Dive deeper into the spirit of Halloween with a collection of 15 diverse and exciting DIY projects that promise to transform your home into a haunted haven. From eerie wreaths to spooky centerpieces, find inspiration to make this Halloween your most creative one yet. These projects cater to various skill levels, ensuring everyone can find something to craft and adore.
10 Bewitching Nail Art Ideas for Halloween: Spooktacular Manicures Await!
Extend your Halloween creativity to your fingertips with these 10 enchanting nail art ideas. Whether you prefer subtle hints of fright or full-on ghoulish glam, these designs are perfect for adding a festive touch to your look. Discover step-by-step guides to create everything from spiderwebs to ghosts, ensuring your nails are as ready for trick-or-treating as your decor.
Quick & Easy DIY Mason Jar Crafts You Can Make in Under an Hour: Instant Creativity!
If you’re a fan of the versatility of mason jars and love quick projects, this article is for you. Explore a curated selection of DIY mason jar crafts that can be completed in less than sixty minutes. Perfect for last-minute gifts, home decor refreshes, or simply satisfying your crafting itch, these ideas showcase the endless possibilities of humble mason jars in a flash.