
As winter’s chill fades, spring bursts forth with vibrant colors, warmer breezes, and an undeniable sense of renewal. This season of fresh beginnings offers the perfect invitation to refresh your home, shedding the accumulated clutter of colder months. Spring organizing isn’t just about tidying; it’s an opportunity to transform your living spaces into havens of calm, functionality, and beauty. Imagine a home that feels lighter, more organized, and perfectly attuned to your lifestyle – a goal that’s entirely achievable with a touch of creativity and intention.
Gone are the days of bland, utilitarian storage. This spring, empower yourself to personalize every corner of your home with charming DIY labels, ingeniously repurposed storage boxes, and thoughtful organizing hacks. These creative solutions don’t just conceal clutter; they enhance your decor and make maintaining order a joyful, sustainable practice. Let’s roll up our sleeves, embrace the spirit of decluttering with purpose, and infuse every organizational effort with a sense of fun and personal style!
Why Spring is the Ultimate Season for Home Organization
Spring truly embodies the concept of a fresh start. As nature awakens with blossoming flowers and longer, sunnier days, a natural wave of motivation sweeps through us, inspiring a desire to declutter and cleanse our surroundings. This season naturally prompts a necessary rotation of household items, from packing away heavy winter clothing and festive holiday decorations to preparing for the lighter, more open feel of warmer months. This cyclical transition makes spring an ideal time to assess what you own and how it serves you.
But spring organization extends far beyond mere tidying. It’s a holistic approach to renewing your environment, cultivating a home that not only looks clean but feels genuinely welcoming and invigorating. An organized space offers profound benefits: it significantly reduces stress, enhances productivity by minimizing distractions, and streamlines daily routines, making everyday tasks smoother and more enjoyable. Beyond the practical advantages, a well-ordered home supports mental well-being, fostering a sense of peace and control.
Moreover, integrating DIY projects into your organizational journey allows you to imbue your space with your unique personality and aesthetic. When you actively create functional and beautiful storage solutions, you develop a deeper connection to your home and its systems. This personal investment makes it far easier and more rewarding to adhere to your newly established organizational practices, transforming a chore into a delightful creative endeavor.
Before You Start: Planning Your Spring Home Refresh
Before diving headfirst into decluttering, a little planning can make your spring organizing efforts much more effective and less overwhelming. Approaching your home refresh with a clear strategy will ensure sustainable results and help you stay motivated.
Set Clear Goals for Your Space
Begin by envisioning your ideal organized space. Do you want a minimalist aesthetic, a cozy haven, or a highly functional workspace? Identify specific areas that cause the most stress or visual clutter. Prioritize these “hot spots” – perhaps a overflowing pantry, a cluttered entryway, or a disorganized closet. Setting manageable goals for each zone, such as “clear out kitchen cabinets” or “organize one dresser drawer,” will prevent you from feeling overwhelmed and allow you to celebrate small victories along the way.
Embrace a Decluttering Mindset
Decluttering involves making decisions about your belongings. This can be challenging, especially with sentimental items. Adopt a mindset of intentionality: keep only what you love, what you need, or what brings you joy. Consider the “four-box method”: designate boxes for “Keep,” “Donate,” “Recycle,” and “Trash.” As you go through items, place each into its respective box. This systematic approach streamlines the decision-making process and ensures that items are properly handled.
Gather Your Organizing Supplies
Having the right tools ready beforehand can save time and frustration. Stock up on cleaning supplies, empty bins, baskets, and boxes that you already own or plan to repurpose. For your DIY projects, ensure you have materials like cardstock, chalkboard paint, adhesive paper, kraft paper, markers, fabric, glue, and scissors. A clear workspace and easy access to your supplies will keep your momentum going.
DIY Labels: The Backbone of Lasting Order
Labels are indispensable for any effective organizing system. They serve as clear signposts, assigning a designated “home” for every item and making it effortless to maintain order. But why settle for plain, uninspired labels when you can transform them into charming decorative elements? Below, we explore several creative ways to add personality and aesthetic appeal to your labels, making them both functional and beautiful.
Chalkboard Labels: Chic and Reusable
Chalkboard labels offer a sophisticated, rustic, and wonderfully reusable solution. To create them, start with sturdy cardstock or even thin wood cut into elegant shapes like scalloped circles, classic rectangles, or ornate ovals. Apply two even coats of chalkboard paint, allowing each layer to dry completely for optimal coverage and durability. Once cured, use a white or colored chalk marker to write your labels. These versatile labels are perfect for pantry jars, storage bins, baskets, or craft containers. Attach them with mini clothespins, twine, or adhesive backing for a polished and easily changeable look that perfectly complements a farmhouse or industrial aesthetic.
Floral-Themed Stickers: A Breath of Spring
For an infusion of cheer and a truly spring-inspired touch, floral-themed stickers are an excellent choice. Design or find beautiful botanical patterns online and print them onto adhesive paper. You can then handwrite your labels directly onto the printed stickers with a fine-tip pen, or use a word processor to add text before printing for a more uniform look. These vibrant labels are ideal for clear containers, bathroom storage, spice jars, or office organizers. Opt for pastel hues or intricate botanical illustrations to instantly bring a fresh, seasonal feel to any room, reflecting the natural beauty of spring.
Rustic Kraft Tags: Warm and Earthy Charm
If your home style leans towards a cozy, rustic, or farmhouse aesthetic, then DIY kraft paper tags are an absolute must. Cut sturdy kraft paper into small rectangles, circles, or even decorative shapes with a punch. Use a fine-tip marker for crisp lettering, or for an added touch of charm, incorporate decorative stamps or stencils. These tags can be tied around wicker baskets, glass jars, linen bins, or even plant pots using natural twine, jute string, or delicate ribbon. This style works beautifully in kitchens, laundry rooms, and living areas where you desire an organic, handcrafted feel.
Personalized Vinyl Labels: Modern Precision
For a sleek, professional, and highly durable labeling solution, consider personalized vinyl labels. With the help of a cutting machine like a Cricut or Silhouette, you can design custom text and intricate graphics. Choose from various vinyl colors to match your decor. These labels adhere directly to containers, offering a seamless, waterproof finish that’s perfect for frequently used items in the kitchen, bathroom, or garage. Vinyl labels are particularly excellent for pantry staples, cleaning supplies, and kids’ toy bins, offering a tidy and long-lasting organizational upgrade.
DIY Storage Boxes: Transforming Clutter into Home Decor
While plastic storage bins certainly get the job done, they rarely inspire or contribute to your home’s aesthetic. Why settle for purely functional when your storage solutions can be both practical and beautiful? These DIY ideas will help you conquer clutter while simultaneously enhancing your home’s visual appeal, making organization an integral part of your decor.
Repurposed Shoeboxes: Budget-Friendly and Versatile
Shoeboxes are an often-overlooked goldmine for small-scale storage needs. Give them a stylish makeover by covering them with elegant patterned paper, luxurious fabric scraps, or vibrant scrapbook designs. Secure your chosen material with a strong craft glue or double-sided tape, ensuring smooth, neat edges. For a finishing touch, add a decorative pull tab made from ribbon or a small metal handle, and, of course, a chic label. These upgraded boxes are perfect for organizing office supplies, small toys, accessories, beauty products, or even photographs, keeping tiny items neatly contained and out of sight.
Colorful Wooden Crates: Sturdy and Customizable
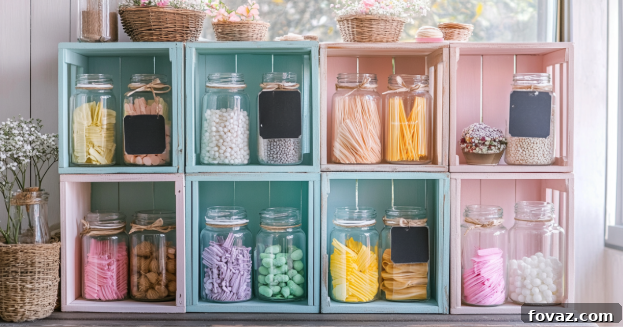
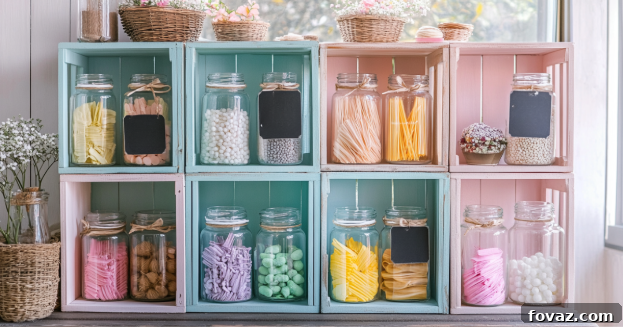
Wooden crates are incredibly sturdy, remarkably versatile, and begging for customization. Start by sanding the crates to remove any rough edges and prepare the surface. Then, unleash your creativity by painting them in soft, spring-inspired hues like refreshing mint green, delicate blush pink, soothing lavender, or crisp white. For added functionality, you can attach fabric liners to protect contents, or install small caster wheels to make them easily movable. Wooden crates are excellent for storing books, throw blankets, pantry goods, records, or even as stylish side tables, adding a touch of rustic charm to any room.
Custom Fabric Bins: Softness and Structure
Fabric bins introduce a wonderful element of texture and warmth to your living spaces, offering a softer alternative to rigid boxes. To create your own, sew sturdy fabrics like canvas, denim, or heavy drop cloth into cube-shaped bins. For extra structure, incorporate iron-on interfacing or use cardboard inserts. Add decorative stenciling, embroidery, contrasting trim, or even custom patches for a truly personalized touch. These durable and attractive bins are ideal for bedrooms, bathrooms, playrooms, or living rooms, perfect for storing towels, linens, toys, magazines, or extra throw pillows, blending style with robust functionality.
Upcycled Mason Jars: Clear and Charming
Mason jars are a classic and eco-friendly choice for organizing small items where visibility is key. Beyond their traditional uses, they can be transformed with a bit of creativity. Clean and sterilize jars thoroughly. You can leave them clear, paint the lids, or even spray-paint the entire jar (from the inside for a glossy finish, or outside for a matte look). These are perfect for organizing spices, craft supplies (beads, buttons), cotton balls in the bathroom, office clips, or even small snacks. Attach your DIY labels to the front or lid for easy identification.
Thrifted Wicker Baskets: Natural and Versatile
Keep an eye out for wicker, rattan, or seagrass baskets at thrift stores or flea markets. These natural materials add warmth and texture to any space. With a simple coat of spray paint in a fresh spring color, or by adding a custom fabric liner, you can elevate a plain basket into a beautiful storage solution. They are ideal for storing blankets, magazines, shoes by the entryway, or even as decorative planters. Baskets help corral clutter while maintaining an open, airy feel.
Zone-by-Zone Decluttering Strategies for Your Home
To make spring organizing less daunting, tackle your home one zone at a time. This targeted approach allows for focused effort and visible progress, keeping motivation high.
The Heart of the Home: Kitchen Organization
The kitchen often becomes a magnet for clutter. Start by decluttering your pantry, applying the “first-in, first-out” rule for food items and discarding anything expired. Use clear containers for dry goods, labeled with your DIY creations. Implement drawer dividers for utensils and gadgets. Maximize under-sink storage with pull-out shelves or tiered organizers for cleaning supplies. Consolidate small appliances and clear your countertops to create more functional prep space.
Relax and Recharge: Bedroom Decluttering
Your bedroom should be a sanctuary. Begin with your closet: purge clothing you haven’t worn in a year, donate items that no longer fit, and organize remaining garments by type or color. Use drawer organizers for socks, underwear, and accessories. Maximize under-bed storage with flat bins for seasonal items or extra linens. Keep nightstands clear, perhaps with a decorative tray for essentials, and remove any items that don’t contribute to a calming atmosphere.
Inviting Spaces: Living Room Organization
The living room is for relaxation and connection, not clutter. Use decorative baskets for throw blankets and magazines. Employ attractive boxes for remote controls and gaming accessories. Consider floating shelves or a stylish media console to house electronics and hide wires. Declutter bookshelves, keeping only books you love and displaying decorative items intentionally, ensuring every piece adds to the room’s aesthetic rather than detracting from it.
Serenity and Cleanliness: Bathroom Refresh
Bathrooms can quickly become cluttered with toiletries. Start by decluttering medicine cabinets and vanity drawers, discarding expired products. Use small bins or drawer organizers to separate makeup, skincare, and hair products. Install shower caddies for easy access to shower essentials. Organize your linen closet by folding towels and sheets uniformly, perhaps using labeled fabric bins for different sizes or types of items. This creates a spa-like tranquility.
Essential Tips for Long-Term Organization and a Clutter-Free Life
Once you’ve poured your creativity into crafting beautiful DIY labels and stylish storage boxes, the next crucial step is maintaining your organized space. Implementing consistent habits and smart strategies will help keep your home clutter-free, functional, and inviting throughout the entire year, not just in spring.
- Purge Frequently with Intention: Decluttering shouldn’t be a once-a-year event. Make it a regular practice to review your belongings. Designate a “donate” box in a discreet spot and add items to it as you realize you no longer need or use them. Schedule quarterly mini-purges for specific areas, such as a closet or a drawer. Embrace the “one-in, one-out” rule: when you bring a new item into your home, consider donating or discarding a similar old one to prevent accumulation.
- Assign a Designated Home for Every Item: The golden rule of organization is that everything must have a place. If an item doesn’t have a clear home, it’s prone to becoming clutter. Group similar items together – all batteries in one bin, all craft supplies in another. This not only makes things easy to find but also simple to put away, streamlining your daily tidying efforts and making your organizational system intuitive.
- Use Labels Consistently and Clearly: Labels are not just for aesthetics; they are powerful tools for functionality, especially in shared household spaces. From snack bins and pantry jars to toolboxes and linen closets, clear and consistent labeling ensures that everyone in the household knows where items belong and where to find them. This eliminates guesswork, saves time, and significantly reduces the chance of items being misplaced.
- Tidy Daily with the “10-Minute Rule”: Small, consistent efforts yield significant results over time. Dedicate 10-15 minutes each day to putting things back in their proper places. This could be a quick tidy-up before bed, after a meal, or upon returning home. This micro-organizing prevents small messes from escalating into overwhelming clutter and maintains the overall order you’ve worked so hard to achieve.
- Maximize Vertical Space: Look up! Walls offer valuable storage opportunities. Install shelves, wall-mounted organizers, or pegboards in kitchens, offices, and garages. Utilize stackable bins and drawer dividers to make the most of cabinet and drawer interiors. Thinking vertically can double or triple your usable storage capacity, especially in smaller homes.
- Conduct Regular Maintenance Checks: Your organizational systems aren’t static; they need occasional review. Periodically assess if your current systems are still working for your lifestyle. As your needs change (e.g., new hobbies, growing family), your organization should adapt. Tweak and refine your methods as needed to ensure they remain efficient and effective for your evolving home.
Spring Organizing: Cultivating a Fresh and Inviting Home
Ultimately, spring organizing transcends the mere act of cleaning up. It’s a purposeful journey toward cultivating a living space that feels perpetually refreshed, highly functional, and authentically reflective of your personal style. By thoughtfully incorporating charming DIY labels, crafting innovative and beautiful storage solutions, and diligently maintaining simple yet effective organizational systems, you embark on a transformative process. The result is a home that evolves from potential chaos into a serene and inviting haven, a true sanctuary where you can thrive.
With just a touch of creativity and a willingness to get hands-on, the act of organizing becomes much more than a mundane task. It blossoms into a delightful opportunity to infuse your surroundings with beauty, instill a profound sense of order, and imprint your unique personality onto every corner. Start with small, manageable steps, stay consistent in your efforts, and soon you’ll discover the profound and peaceful rewards that come with a thoughtfully organized, clutter-free home. Embrace this spring as your catalyst for a more harmonious and beautiful living environment.
Frequently Asked Questions About Spring Organizing
Q1: Where should I begin my spring organizing journey?
Start small to avoid feeling overwhelmed. Choose a single, manageable space like a drawer, a pantry shelf, or one closet. Focus on completing that area entirely before moving on to the next. This builds momentum and provides quick satisfaction.
Q2: What essential materials do I need for creative DIY labels?
You can use a variety of materials: chalkboard paint with cardstock, adhesive printable paper for floral designs, or kraft paper for rustic tags. Don’t forget fine-tip markers, decorative stamps, twine, ribbon, or small clips to enhance your designs.
Q3: How can I repurpose common household items for storage?
Look around your home for potential storage solutions. Shoeboxes are excellent for small items when covered decoratively. Mason jars can store pantry goods or craft supplies. Wooden crates can become versatile bins for books or blankets. Cereal boxes can be cut and covered to make drawer dividers.
Q4: What are the best strategies for keeping my home organized long-term?
Consistency is key. Develop daily tidying habits (like the 10-minute rule), conduct monthly or quarterly purges, and ensure every single item in your home has a designated ‘home.’ Revisit your systems periodically to ensure they still meet your needs.
Q5: What if I have very limited time for organizing?
Break down tasks into even smaller, more manageable steps. Instead of tackling a whole room, focus on one shelf, one drawer, or one counter segment. Dedicate just 10-15 minutes each day; these small bursts of effort accumulate into significant progress over time.
Q6: How can I effectively involve my family in the organizing process?
Make it a team effort! Assign age-appropriate tasks, such as having kids decorate their own toy bins or helping sort clothes. Turn it into a fun activity or even a game. When everyone contributes, the burden is lighter, and the results are more sustainable.
Q7: Are there eco-friendly ways to declutter and organize?
Absolutely. Prioritize donating usable items to charities or thrift stores. Recycle paper, plastic, and glass items. Repurpose old containers, jars, and boxes for storage instead of buying new ones. Consider composting organic waste to reduce landfill contributions.
Q8: What’s the best way to label pantry containers, especially those with food?
For pantry containers, waterproof labels, chalkboard tags that can be wiped clean, or durable vinyl stickers are ideal. These options withstand spills and moisture, ensuring your labels remain legible and hygienic for food storage.
Q9: How can I ensure my DIY storage solutions match my existing home decor?
When creating DIY storage, select materials, colors, and textures that complement your current aesthetic. For a modern home, choose sleek, monochromatic finishes. For a farmhouse look, opt for natural materials like wood, jute, and neutral tones. Harmony in design creates a cohesive and inviting space.
Q10: What items or areas should I prioritize during a thorough spring cleaning?
Focus on high-traffic and high-impact areas first, such as kitchens, entryways, and bathrooms. These spaces often accumulate clutter quickly and can significantly impact the overall feel of your home. Addressing them first provides the biggest immediate sense of accomplishment and cleanliness.
Q11: How do I manage sentimental items when decluttering?
Sentimental items can be challenging. Create a dedicated “memory box” for cherished mementos. For larger items, consider if they can be repurposed or displayed meaningfully. If an item holds strong emotional value but serves no current purpose, photograph it and then consider letting it go.
Q12: What should I do if I get overwhelmed during the organizing process?
It’s okay to feel overwhelmed. Take a break, step away, and return with a fresh perspective. Remember to focus on one small area at a time. If needed, enlist the help of a friend or a professional organizer to help you through the tougher spots.
Share Your Spring Organizing Journey!
What spring organizing projects are you currently tackling in your home? Have you discovered a favorite DIY label technique or repurposed a storage box in a uniquely clever way? I’d love to hear your creative ideas, personal tips, and inspiring stories! Please leave a comment below and let’s ignite a wave of inspiration to make this spring our most organized and beautiful season yet.
For additional insights and innovative ideas, explore resources like The Spruce or delve into Marie Kondo’s KonMari Method for transformative decluttering and organizing strategies.