
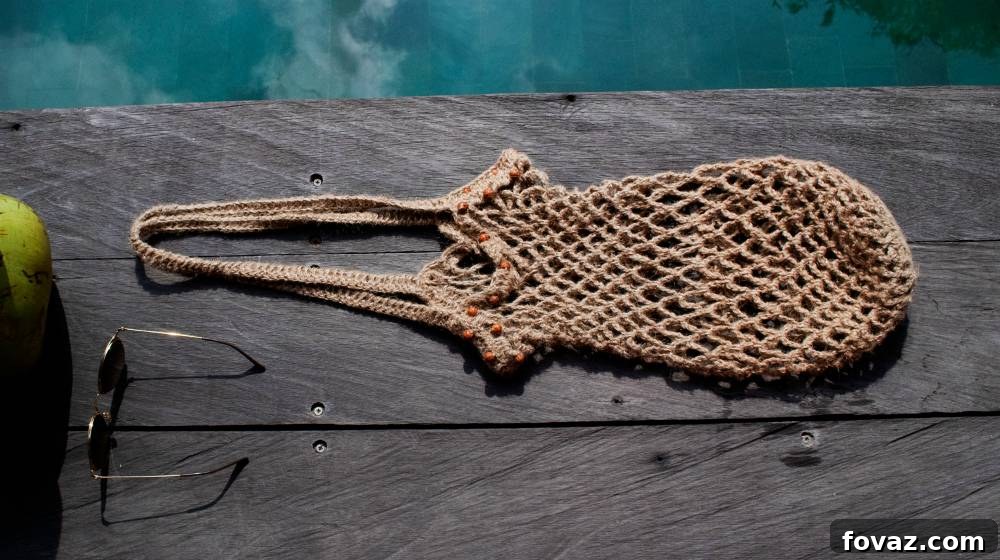
Are you looking for a fulfilling new hobby that combines creativity with practicality? Or perhaps you’re seeking a stylish and sustainable alternative to plastic bags for your weekly grocery runs? Look no further! This comprehensive guide will walk you through creating your very own DIY French market crochet bag. Perfect for beginners and seasoned crocheters alike, this project results in a beautiful, durable, and incredibly versatile bag that you’ll be proud to carry everywhere from the farmer’s market to the beach.
The charm of a French market bag lies in its unique mesh design, which is not only aesthetically pleasing but also highly functional. It allows for breathability, preventing produce from spoiling quickly, and its stretchy nature means it can hold a surprising amount of items. Beyond groceries, it’s ideal for carrying craft supplies, beach essentials, or even as a chic everyday accessory. Plus, by making it yourself, you’re contributing to a more sustainable lifestyle, reducing your reliance on single-use bags.
This tutorial is designed to be easy to follow, with clear instructions and helpful tips to ensure your success. We’ll cover everything from the very first knot to adding the perfect strap, transforming simple yarn into a gorgeous, handcrafted piece. Get ready to embark on a delightful crochet journey and create a bag that’s as unique as you are!
RELATED: DIY Sewing Projects: How to Make a Drawstring Bag
Mastering the French Market Crochet Bag: Your Essential DIY Guide for Groceries and Beyond
What You’ll Need to Get Started:
Before diving into your crochet project, gather your materials. Choosing the right yarn and hook is crucial for the success and durability of your market bag. For this pattern, we recommend:
- A size 4 yarn (worsted weight): Worsted weight yarn is a popular choice for its balance of strength and flexibility, making it ideal for a bag that needs to hold various items. It’s also widely available in a vast array of colors, allowing you to personalize your bag. Consider natural fibers like cotton or a cotton blend for a sturdy, breathable, and easily washable bag, perfect for carrying fresh produce.
- A size 5mm hook (H/8 US): A 5mm hook creates a good tension with worsted weight yarn, resulting in a fabric that’s strong enough to hold shape but still flexible and open enough for the market bag’s signature mesh design. If you tend to crochet very tightly, you might consider going up a hook size (e.g., 5.5mm) to ensure your bag has the desired stretch and drape. Conversely, if you crochet loosely, a slightly smaller hook might be beneficial.
Ensuring you have these basic tools will set you up for a smooth and enjoyable crocheting experience. Now, let’s begin crafting!
Step 1: Create a Foundation – The Slip Knot and Chain
Every crochet project begins with a foundational knot and chain. Start by creating a slip knot on your hook. This is the very first loop that secures your yarn. If you’re new to slip knots, there are many excellent visual guides online to help you master it. Once your slip knot is securely on the hook, gently pull the working yarn to tighten it without making it too stiff. Then, proceed to chain four stitches. These initial four chains will form the very center of your bag’s base, so ensure they are consistent in size.
Step 2: Connecting the Circle – Slip Stitch into the First Chain
Now, to form a small ring, take your hook and carefully insert it into the very first chain you made. Make sure not to twist your chain. Once your hook is inserted, perform a slip stitch. This action connects the last chain to the first, creating a small, sturdy loop of yarn. This tiny cluster or ring serves as the robust foundation for the bottom of your French market bag. Take a moment to admire your work – you’ve just completed the very first closed loop of your project!
Step 3: Building the Base – Turning the Cluster Into a Small Crocheted Disk
With your small ring formed, it’s time to build out the first proper row of your bag’s base. Gently pull on the sides of the cluster you’ve created to clearly locate its center opening. This central hole is where all your stitches for this row will be worked. You will be making double crochets through this center. Begin by chaining two or three (depending on your preference for height, three is standard for double crochet) as your turning chain; this often counts as your first double crochet stitch.
Now, create a total of 10 double crochets directly into the center opening of the cluster. Count carefully to ensure you have exactly 10 stitches (or 9 if your turning chain counts as one). These stitches will fan out, forming a small, flat circle. To complete this first row and join it into a neat circle, slip stitch into the very first double crochet you made (or the top of your turning chain if it counted as a stitch). You should now have a distinct, flat, and robust little crocheted disk, which will form the very bottom center of your market bag. This disk is the starting point from which the bag will grow.
Step 4: Expanding the Foundation – Finishing the Second Row
To continue expanding your bag’s base, the second row requires an increase in stitches to keep the disk flat and prevent it from cupping. For this row, you will create two single crochets into every double crochet stitch from the previous row. This means for each of the 10 double crochets you made in Step 3, you will work two single crochets into the top of it. Begin with a chain one (this typically doesn’t count as a stitch for single crochet, but always check your preferred method). Work your way around the entire disk, making two single crochets into each stitch. By the time you complete this row, you should have 20 single crochets in total. Finish the row by slip stitching into the first single crochet you made.
At this point, you will have a slightly larger crocheted disk. You have a crucial decision: you could choose to stop here and proceed to the next step, which will result in a more compact market bag. However, if you desire a bigger bag – perhaps for larger grocery hauls or beach trips – then you should repeat the process of adding more rows, continuing to increase stitches evenly to maintain a flat circle. A common method for flat circles is to increase in each stitch in the first round (as you’ve done), then increase in every second stitch in the next, then every third, and so on, until your base is the desired diameter. For this demonstration, however, we are proceeding with just one row of single crochets on top of the initial double crochet round for the base.
Step 5: Introducing the Mesh Pattern – Completing the Knitting Design of Your Crochet Bag
Now that the solid base of your bag is complete, it’s time to transition to the distinctive open mesh or “knitting design” that gives the French market bag its characteristic look and stretch. This pattern is formed by a series of chain loops. Begin by chaining four stitches. Then, skip the next stitch from your hook and slip stitch into the stitch after that. This creates your first arching loop.
Next, chain another four stitches and again, skip the next stitch and slip stitch into the following one. Continue to repeat this process – chain four, skip one stitch, slip stitch into the next – until you have worked your way around the entire circumference of your crocheted disk. This completes your first row of loops. You’ll notice that these initial loops are relatively close together, creating a somewhat dense, snowflake-like pattern. This is normal and intentional, as the bag will gradually widen with subsequent rows.
Essentially, this chain-and-slip-stitch technique will form the backbone of your bag’s body. If you decided to make your base bigger in the previous step, your “snowflake” will naturally be larger but will still have the same captivating pattern. This step marks the beginning of the bag’s distinctive texture and flexibility.
Step 6: Building Upwards – Adding a Few More Loops for Expansion
To continue expanding the bag and creating its open, airy structure, you’ll now make more loops on top of the first row of loops. However, this time, we need to make the loops slightly larger to accommodate the increasing circumference and prevent the bag from cinching inward. Instead of chaining four, you will now start chaining five stitches for each loop.
The method remains similar: chain five, but instead of slip stitching into the very next stitch on the base, you will reach over and slip stitch into the *center of the next loop* from the previous row. This effectively stretches the new, longer loop across the existing one, promoting the natural expansion of the bag’s mesh. The purpose of increasing to five chains is to ensure that your loops are large enough to comfortably span the distance between the previous loops without causing tension or pulling. This gradual increase in chain length is crucial for creating the beautiful drape and spaciousness of a market bag.
Continue this pattern of chaining five and slip stitching into the next loop for a number of rows. There isn’t a hard and fast rule for how many rows, as it often depends on your personal tension and the desired outcome. The key is to keep an eye on the bag’s shape, which brings us to the next important step.
RELATED: How To Crochet Stitches | Crocheting For Beginners
Step 7: Shaping the Bag – Checking for Curving or Ruffling
One of the most valuable tips in crochet, especially for items like bags, is to regularly check your work rather than rigidly following a specific stitch count. Your tension can vary, and what works for one person might need slight adjustments for another. As you continue adding rows with five-chain loops, periodically lay your work flat or hold it up to observe its shape. Look for any signs of curving or ruffling.
If your crochet bag appears to be “ruffling” (meaning it’s waving or puckering around the edges), it generally indicates that you have too many stitches or your loops are too long for the current diameter. However, at this stage, with the five-chain loops, a slight ruffle or a very flat appearance is usually fine, meaning you should just keep going with the five-chain loops. It suggests that your base is expanding correctly, and the current loop size is suitable for continuing the flat expansion or very gentle curve upwards.
On the other hand, if you notice the crochet bag beginning to “curve” strongly upwards on its own, forming a bowl-like shape, this is your signal that the expansion of the base is complete. This natural curving indicates that the foundation of your bag has reached its intended diameter, and it’s now ready to form the vertical sides. This is a crucial visual cue that tells you it’s time to adjust your loop size for the body of the bag.
Step 8: Creating the Body – Crocheting the Main Structure of the Bag
Once your bag’s base naturally begins to curve upwards, transitioning from a flat disk to a bowl shape, it’s time to establish the main “body” of the bag. This section will give your market bag its height and carrying capacity. To achieve the necessary vertical stretch and open mesh for the body, you’ll need to significantly increase the length of your chain loops. Switch from making five-chain loops to creating seven-chain loops.
The technique remains consistent: crochet seven chains, then reach over and slip stitch into the next loop from the previous row. This larger chain count allows the sides of the bag to grow vertically without adding circumference, creating the characteristic stretchy mesh. Continue repeating this pattern for as many rows as you desire, until you’re satisfied with the overall height of your bag. Keep in mind that crochet market bags are known for their incredible stretchiness. A bag that appears “relatively small” on your workspace might expand significantly once you start filling it with groceries or other items. So, aim for a height that might seem a little shorter than your final desired size, knowing it will stretch out considerably with use.
This phase is where your market bag truly takes shape, evolving from a simple base into a functional and fashionable carrier.
Step 9: Reinforcing the Opening – Give It a Solid Lining
To provide a neat, sturdy, and well-defined opening for your market bag, it’s essential to add a solid lining row at the top. This step helps reinforce the rim of the bag, making it more durable and preventing it from stretching out excessively or losing its shape over time. It also creates a clean edge from which to attach your straps.
For this lining, you will make a row of single crochets. Work four single crochets into every loop around the entire top circumference of your bag. This number (four single crochets per loop) provides a good density, filling the gaps of the loops and creating a solid band. Be consistent with your tension to ensure an even and attractive finish. Continue this pattern all the way around the top of the bag until you return to your starting point. Finish the row with a slip stitch into the first single crochet. This solid lining will provide excellent stability and a polished look, significantly enhancing the longevity and functionality of your handmade market bag.
Step 10: Attaching the Handle – Add a Strap to Your Crochet Bag
No functional bag is complete without a comfortable and sturdy strap! This step brings your market bag closer to completion and ready for use. First, you need to decide where you want to attach your first strap. This is a matter of personal preference, but generally, straps are placed directly opposite each other for balance. Once you’ve identified the starting point on the bag’s rim, crochet your way with single crochets (or slip stitches, if preferred) to that exact spot, ensuring you maintain a continuous flow from your last stitch.
When you’ve reached your desired attachment point, begin making the strap itself by creating a chain of 100 stitches. This length typically provides a comfortable shoulder strap for most individuals. However, if you prefer a longer strap (e.g., for cross-body wear) or a shorter handle, simply adjust the number of chains accordingly – chain more for a longer strap and fewer for a shorter one. Once your chain of 100 (or your chosen number) is complete, carefully bring the end of the chain across the top of the bag to the opposite side where you want to attach the other end of the strap. Make sure the chain isn’t twisted. Slip stitch it securely to the bag’s rim, allowing a decent amount of space for your arm and shoulder to fit comfortably through.
Step 11: Balancing Act – Add Another One
For a well-balanced and aesthetically pleasing market bag, it’s essential to add a second strap that mirrors the first one. This ensures that the bag hangs evenly when carried and distributes weight properly. To do this, simply single crochet (or slip stitch) your way across the top of the bag from where you attached the first strap, moving towards the exact opposite side. You want to make sure the second strap aligns perfectly with the first.
Once you reach the corresponding attachment point on the opposite side of the bag, repeat the process from Step 10: chain a hundred stitches (or the same number you used for the first strap to ensure symmetry). Double-check that this new chain is not twisted, and then securely slip stitch it to the bag’s rim, attaching it directly opposite the other strap. This creates a balanced and functional two-strap design for your French market bag, ready for all your carrying needs.
Step 12: Enhancing Comfort and Durability – Make Your Crochet Bag’s Straps a Bit Thicker
While a single chain strap is functional, it can sometimes feel thin and dig into your skin, especially when the bag is loaded with groceries. To significantly enhance the comfort, strength, and overall durability of your market bag’s straps, we highly recommend making them thicker. This final touch provides a more robust handle that is much more comfortable to carry, even with heavier loads, and also adds a more professional, finished look to your handmade creation.
To achieve this, simply work a row of single crochets directly on top of the chain stitches that make up each strap. Starting at one end of a strap, insert your hook into each chain stitch and make a single crochet. Work your way along the entire length of the strap, from one attachment point to the other. Repeat this process for the second strap. This effectively creates a thicker, more padded strap that won’t twist or cut into your shoulder. Once both straps are reinforced, fasten off your yarn securely and weave in any loose ends for a neat finish.
Congratulations! Your beautiful, handmade French market crochet bag is now complete. Put it on your shoulder, head to the grocery store, the farmer’s market, or even the library, and proudly show off your new, eco-friendly, and stylish creation. You’ve not only crafted a functional item but also honed your crocheting skills!
Want to see how it’s done visually? Follow along with this comprehensive video tutorial on how to make a French market crochet bag by Krystal Everdeen, offering real-time guidance and tips:
Making your very own DIY French market crochet bag is an excellent and rewarding project, especially if you’re looking to delve into crocheting as a hobby. It’s a fantastic way to learn fundamental stitches and techniques while creating something truly useful. Who knows, this might just be the beginning of your crafting journey – you might soon find yourself stitching cozy Christmas sweaters for your kids or intricate blankets for your home! Embrace the joy of handmade creations and the endless possibilities that crochet offers.
Did you find this crochet bag project challenging or surprisingly easy? We’d love to hear about your experience! Share any tips, tricks, or creative variations you might have to make this DIY craft even easier or more unique in the comments section below! Your insights could help fellow crafters on their journey.
UP NEXT: Discover More Exciting DIY Projects!
- 20 Simple Sewing Projects That Any Beginner Can Make
- Learn to Make this Cute Mermaid Cosmetics Bag
- DIY Iron On Picture Phone Case Project While On Home Quarantine
Calling all crafting DIYhards, DIY Projects needs YOU! Click here if you want to contribute for us and share your passion.
Don’t forget to stay connected with us on Facebook, Twitter, and Instagram for daily inspiration, tips, and project ideas!