
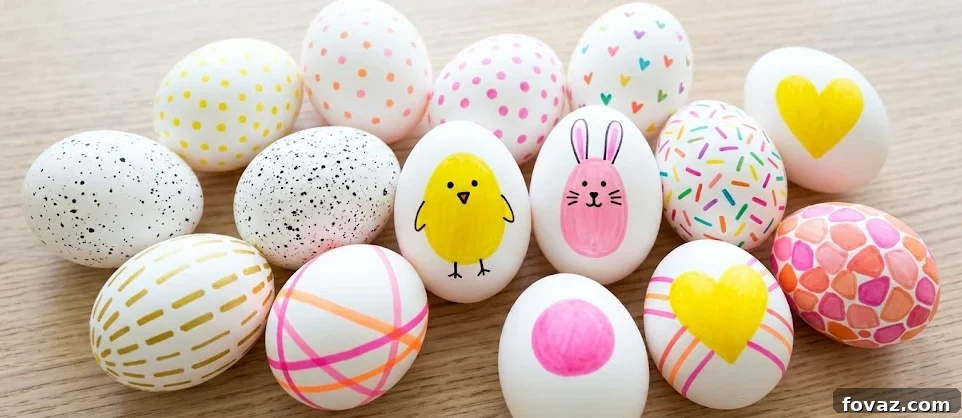
Easter is a time for joy, celebration, and, for many, the delightful tradition of decorating Easter eggs. However, the thought of messy dyes, complex techniques, and expensive supplies can often dampen the festive spirit. What if you could create stunning, vibrant Easter eggs without the usual fuss or hefty price tag? This guide is designed for exactly that – offering a collection of easy, budget-friendly, and surprisingly mess-free Easter egg decorating ideas that use common materials like markers, Sharpies, and a touch of creativity.
Forget the stress and embrace the fun! We’ve gathered seven of our favorite Easter egg designs that are simple enough for anyone to recreate, from kids to adults, and promise colorful, special results perfect for your holiday display or Easter basket. Let’s dive into a world of vibrant patterns, adorable characters, and dazzling finishes, all achievable with minimal effort and maximum enjoyment.
Jump to:
- Bunny Face Easter Eggs
- Sprinkle Easter Eggs
- Tie-Dye Eggs
- Thumbprint Bunny Eggs
- Bedazzled Easter Eggs
- Decoupage Floral Easter Eggs
- Gold-Speckled Galaxy Easter Eggs
MORE SEASONAL PROJECTS: 7 CLEVER SPRING ORGANIZATION HACKS
1. How to Make Adorable Bunny Face Easter Eggs with Markers
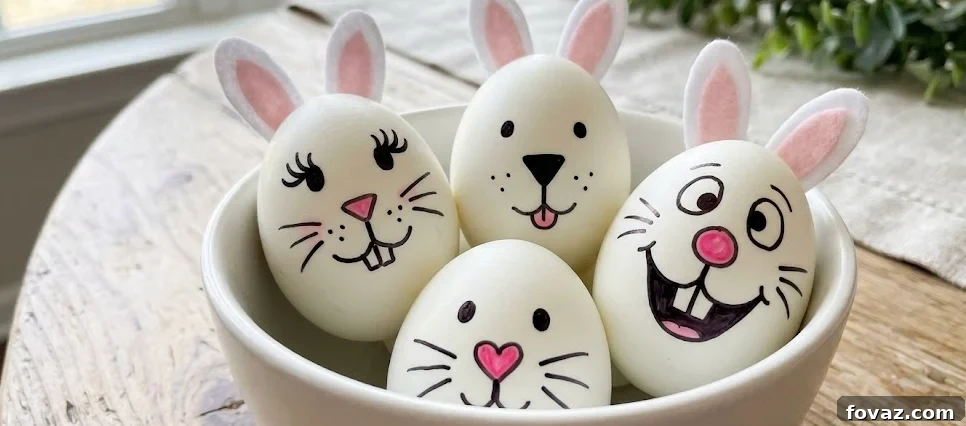
These delightful bunny face Easter eggs are a timeless classic, bringing an instant smile to anyone who sees them. Perfect for all ages, this craft uses simple markers to transform plain white eggs into charming little characters.
Materials Needed:
- White hard-boiled eggs (or craft eggs for long-lasting display)
- Fine-tip black permanent marker
- Pink permanent marker
- White paint pen (optional, for adding teeth or highlights)
Steps:
- Prepare Your Eggs: Begin with clean, completely dry white eggs. If using real hard-boiled eggs, ensure they are at room temperature. This prevents condensation which can cause the ink to bleed or smudge.
- Add the Pink Nose: Using your pink permanent marker, draw a small, simple shape in the upper-center area of the egg. You can opt for a classic triangle, a cute heart, or a gentle oval to give each bunny its unique personality.
- Draw the Eye Dots: Position two solid black circles just above the pink nose using your fine-tip black marker. Aim to keep them level and symmetrical for a balanced look. These will form the basic eyes of your bunny.
- Create Expressive Eyebrows: Above each eye dot, draw a simple, arched black line. Varying the curve or angle of these eyebrows can give your bunny different expressions, from curious to happy.
- Add Whiskers: Extend three thin, delicate black lines from each side of the nose. Keep these lines light and not too long to maintain a cute and realistic appearance.
- Form the Muzzle (The ‘W’ Shape): Directly below the nose, draw the classic “W” shape (which resembles two connected “U”s). This forms the bunny’s muzzle and mouth.
- Enhance Muzzle Dots & Lashes: Add tiny pin-prick dots just above the mouth line on the muzzle. For an extra touch of cuteness, you can also add subtle lash flicks to the outer edges of the eye dots.
- Final Touches: Teeth & Ears: For a truly adorable finish, use your white paint pen (if desired) to add one or two small square teeth hanging from the center of the ‘W’ mouth. You can also add a tiny pink inner ear spot (though the ears themselves are implied by the face design on the egg’s natural curve) or other small details to complete your unique bunny creation!
For vibrant colors that really pop and stay put, I highly recommend Artistro paint pens. They’ve become my go-to for almost every craft project, especially when crafting with kids. We use them annually for Easter because their colors maintain vibrancy on eggshells without fading or bleeding into a muddy mess. If you’re looking for an easy, smudge-free art session, these are definitely worth adding to your craft kit!
- BRUSH + FINE DUAL TIP: Our acrylic paint markers come with 2 tips for 2x the fun. The acrylic paint…
- PREMIUM QUALITY: This pack of paint pens features high-quality acrylic paint that dries opaque, so…
As an Amazon Associate I earn from qualifying purchases.
2. How to Create Vibrant Tie-Dye Easter Eggs Using Sharpie Markers
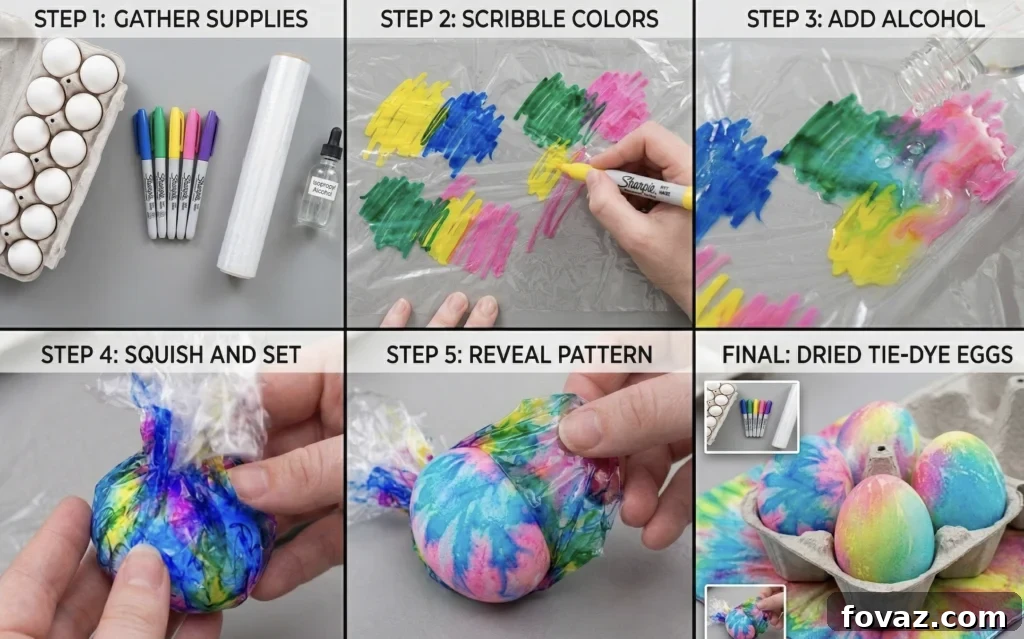
Bring the groovy fun of tie-dye to your Easter eggs with this incredibly simple yet stunning Sharpie and alcohol technique. The bleeding and blending of colors create unique marbled patterns, making each egg a miniature work of art.
Materials Needed:
- White hard-boiled eggs
- Multi-colored permanent markers (e.g., Sharpies, or Artistro markers for excellent vibrancy)
- Clear plastic wrap
- Isopropyl alcohol (91% concentration works best for optimal blending)
- Dropper bottle or pipette
Steps:
- Organize Your Workspace: Lay out all your materials on a protected surface. Ensure your white hard-boiled eggs are completely dry and at room temperature. Prepare your multi-colored permanent markers, clear plastic wrap, and the dropper bottle filled with isopropyl alcohol.
- Scribble the Colors: Tear off a square of clear plastic wrap, roughly 8×8 inches. Lay it flat on your work surface. With your chosen markers, generously scribble overlapping patches of various colors—think blues, greens, yellows, and pinks—directly onto the plastic wrap. Don’t leave too much empty space, as this is where your vibrant pattern will come from.
- Activate the Ink: Using your dropper bottle or pipette, carefully squeeze a few droplets of isopropyl alcohol onto the colored patches on the plastic wrap. Watch in amazement as the alcohol causes the permanent marker inks to bleed, spread, and blend into a beautiful, liquid tie-dye effect.
- Wrap and Transfer the Design: Place a room-temperature egg directly in the center of the wet, activated ink on the plastic wrap. Carefully gather the edges of the plastic wrap, bundling it tightly around the egg. Gently massage and press the plastic wrap against the eggshell, ensuring the vibrant, blended colors transfer and adhere to every curve and contour of the shell.
- Peel and Reveal: After a minute or two of pressing, carefully unwrap the plastic bundle from around the egg. You’ll reveal a mesmerizing, one-of-a-kind marbled pattern that mimics a classic tie-dye design.
- Dry and Showcase: Place your newly tie-dyed eggs in an empty egg carton or on a drying rack to allow them to dry completely. Once dry, these unique creations are ready to be displayed in a basket, on a festive napkin, or as part of your Easter centerpiece.
3. How to Make Festive Sprinkle Easter Eggs with Markers
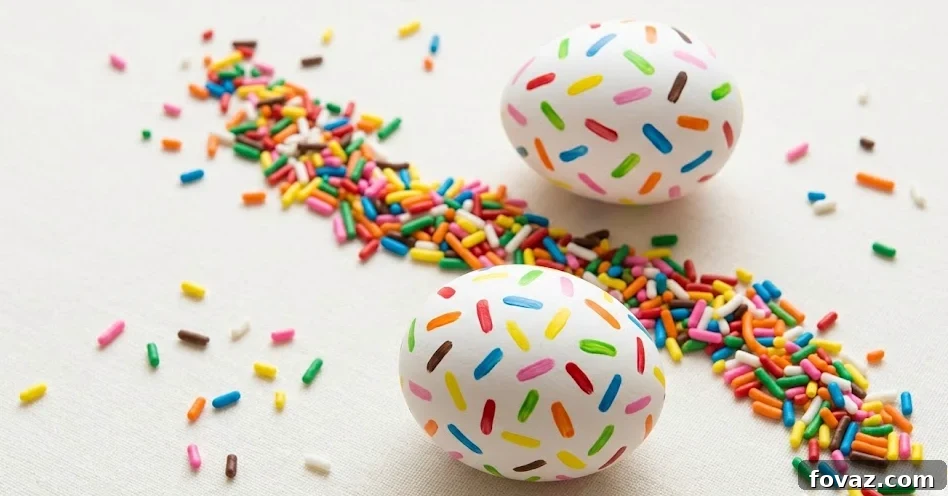
For a whimsical and incredibly easy Easter egg design, these sprinkle eggs are a delightful choice. They resemble tiny confectionery treats and bring a playful burst of color to your Easter display. The key is using multiple vibrant markers and maintaining a consistent stroke.
Materials Needed:
- White hard-boiled eggs (or smooth craft eggs)
- Bright, multi-colored Artistro markers (or similar quality permanent markers)
Steps:
- Prepare Your Egg Canvas: Gather your white hard-boiled eggs and your selection of bright, multi-colored markers. It’s crucial that the eggs are completely dry and at room temperature to ensure the markers apply smoothly and don’t smudge.
- Draw the First Layer of Sprinkles: Choose your first color. Begin drawing short, uniform “dash” marks—think small rectangles or lines, about half an inch long—randomly across the surface of the eggshell. As you draw, leave plenty of white space between each dash; you’ll fill these in with other colors later.
- Scatter New Colors: Switch to a second marker color. Now, fill in some of the empty gaps you left in the previous step. To create a more natural, scattered look, try to angle these new lines differently than the first set. This adds depth and organic movement to your “sprinkles.”
- Layer the Rainbow: Continue this process, adding 3–4 more colors one by one. The goal is to build up layers of vibrant sprinkles. Maintain a consistent size for your strokes, and try to avoid letting different colors touch or overlap excessively. This helps keep the individual sprinkle shapes crisp and distinct.
- Fill Any Remaining Gaps: Rotate the egg slowly and carefully inspect for any larger white patches that still remain uncovered. Add a final few dashes with various colors until your colorful “sprinkles” evenly cover the entire egg, creating a festive, speckled effect.
4. DIY Adorable Thumbprint Bunny Easter Eggs
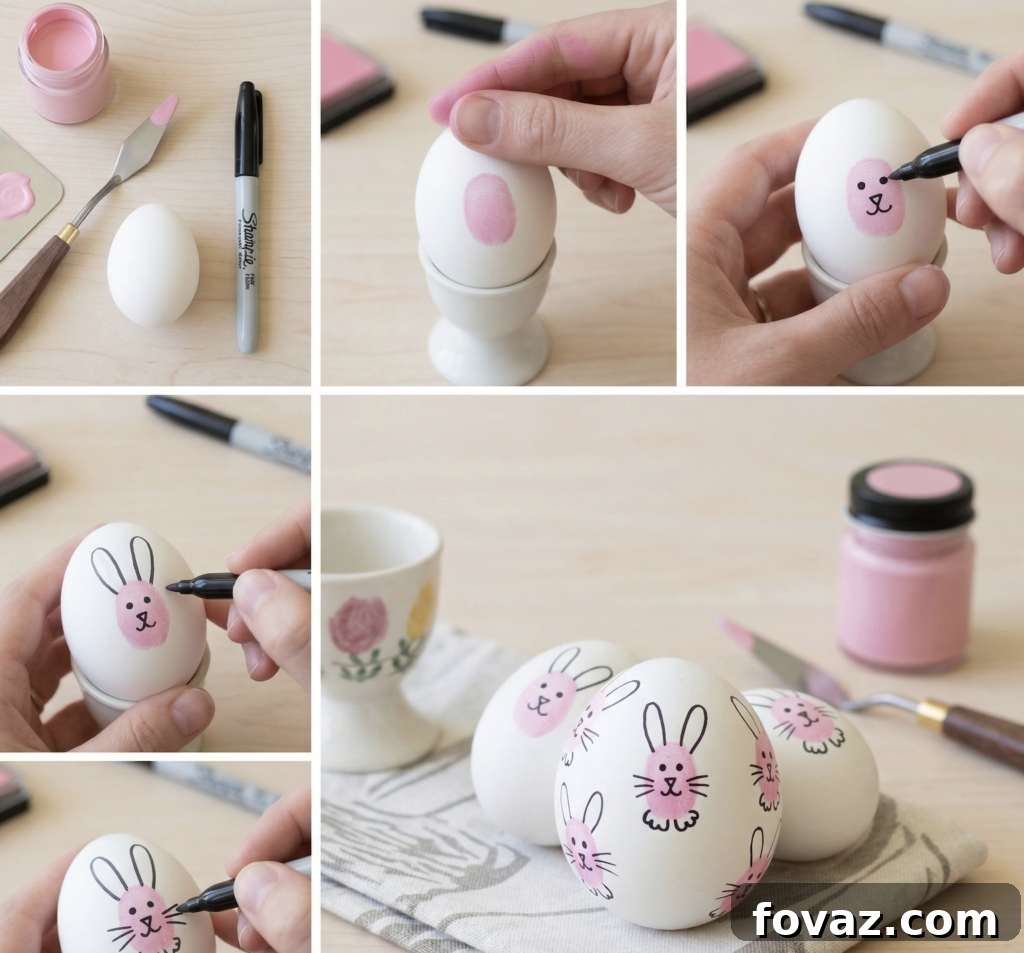
This is a wonderfully personal and endearing Easter egg craft, especially perfect for involving younger children. Using their own thumbprints to form the bunny bodies makes each egg a unique and cherished keepsake.
Materials Needed:
- White hard-boiled eggs (or craft eggs)
- Pink ink pad (ensure it’s washable if crafting with kids)
- Fine-tip black marker
Steps:
- Prepare Your Workspace and Supplies: Lay out your clean, dry white eggs, the pink ink pad, and your fine-tip black marker on a protected surface.
- Dip and Stamp the Thumbprint: Press your fingertip (or your child’s fingertip) firmly onto the pink ink pad to get a good, even coating of ink. Then, press the inked fingertip equally firmly onto the eggshell, holding it for a few seconds to ensure a clear transfer. This pink oval will form the body of your bunny.
- Add the Bunny Faces: Once the ink print is dry (this usually takes just a few seconds), use your fine-tip black marker. On the upper part of the pink thumbprint, draw two simple eye dots. Below the eyes, add a small ‘Y’ shape for the nose and mouth.
- Draw the Bunny Ears: Above the thumbprint face, draw two long, wobbly loop shapes. These will be your bunny’s adorable ears. You can make them tall, floppy, or slightly curved to give each bunny character.
- Add Whiskers and Feet: For the finishing details, draw three thin lines extending from each side of the bunny’s nose for whiskers. Below the thumbprint body, add two tiny, simple looped shapes to represent the bunny’s feet. Let the ink dry completely before handling extensively.
5. How to Create Sparkling Bedazzled Easter Eggs
Elevate your Easter eggs to a new level of glamour with this dazzling bedazzling technique. Using self-adhesive rhinestones, you can transform ordinary eggs into sparkling jewels perfect for a sophisticated Easter display. This craft offers precision and a luxurious finish.
Materials Needed:
- White hard-boiled eggs (or, for a lasting decoration, use ceramic or plastic craft eggs)
- Self-adhesive rhinestones or gems (available in various sizes and colors)
- Tweezers (fine-tipped tweezers are ideal for precise placement)
Steps:
- Ensure Eggs are Clean & Dry: For the best adhesion, ensure your white eggs are completely at room temperature and free of any moisture or condensation. This allows the adhesive on the rhinestones to grip firmly to the shell.
- Choose Your Embellishment Pattern: Before you start applying, decide on a design. Will you create a dazzling “belt” around the egg’s equator, arrange tiny floral clusters, form a sleek diagonal line, or go for a full, glittering coverage? Having a plan helps achieve a polished look.
- Precisely Position the Gems: Using your tweezers, carefully pick up each self-adhesive rhinestone. Place it precisely onto the chosen spot on the eggshell according to your desired pattern. The tweezers give you much better control than your fingers.
- Press and Secure Firmly: Once positioned, gently but firmly push down on each rhinestone for about three seconds. This pressure helps activate and lock the adhesive, ensuring the gems stay securely in place on the curved surface of the egg.
For my own bedazzled eggs, I often use leftover rhinestones from other craft projects, like sewing or costume embellishments – it’s a great way to use up supplies! A quick word of caution: due to the tiny size of these gems, this isn’t a project I’d recommend for little kids, as they pose a choking hazard. However, if you’re looking for a relaxing, adult-friendly craft to create a truly fancy and sparkly egg for yourself, this is absolutely perfect. If you’re curious where I get my rhinestones, I usually find a great selection online, like these:
- Pack of 1440 Pieces Crystal AB Rhinestones SS12,Size 3.0-3.2mm.
- Hight Quality Glass Rhinestones Flatback,Prefect Cutting, Add Sparkle to Your Crafts.
6. How to Decoupage Elegant Floral Easter Eggs
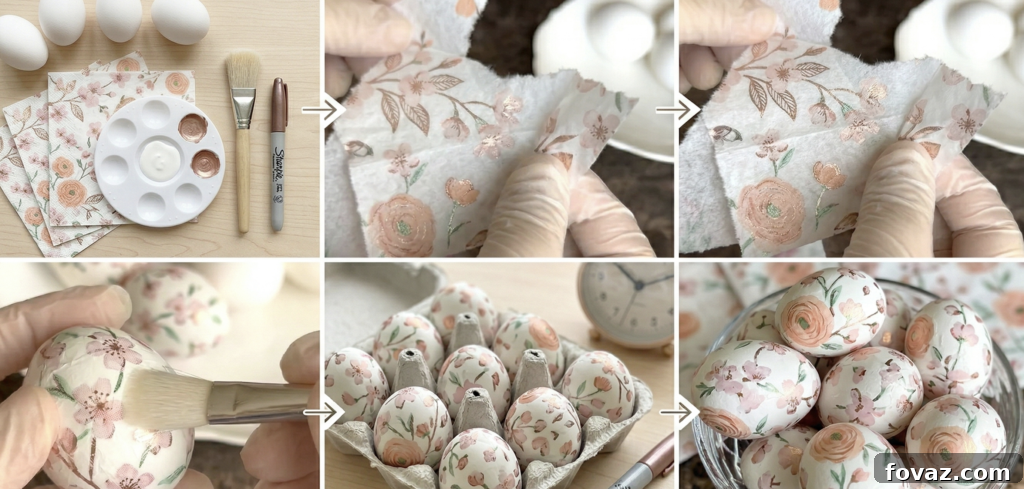
Decoupage offers a sophisticated way to decorate Easter eggs, allowing you to transfer intricate patterns from paper napkins onto your shells. This method results in beautifully adorned eggs that look professionally painted, yet are surprisingly simple to achieve.
Materials Needed:
- White hard-boiled eggs (or craft eggs for a lasting decoration)
- Decorative paper napkins (choose elegant floral or other intricate printed designs)
- Mod Podge (for a durable, classic finish) or whisked egg white (for a natural, food-safe option)
- Small, soft paintbrush
Steps:
- Prepare Your Napkin Layers: Most decorative paper napkins have two or three plies. Carefully peel away the plain white back layers until you are left with only the single, tissue-thin top layer that has the printed design. This thinness is crucial for a seamless decoupage effect.
- Tear Your Designs: Instead of cutting, gently tear out the individual flowers, leaves, or desired patterns from your single ply of napkin. Tearing creates soft, feathery edges that blend almost invisibly into the eggshell once applied, giving a much more natural and painted look than crisp cut edges.
- Apply the Adhesive: On a clean, dry white egg, use your small paintbrush to apply a thin, even layer of your chosen adhesive. If you plan to eat the eggs later, opt for whisked egg white as a natural, food-safe “glue.” For display eggs, Mod Podge provides excellent adhesion and a protective finish.
- Smooth and Seal the Design: Carefully place your torn napkin piece onto the wet adhesive spot on the egg. Gently brush more adhesive over the top of the napkin piece, working from the center outward. This action helps to smooth out any wrinkles or trapped air bubbles, ensuring the design lies flat and seamlessly integrates with the eggshell.
- Allow to Dry and Set: Once all your designs are applied, place the eggs in an empty carton or on a drying rack. Allow them to dry completely, which can take several hours. Once fully dry, the paper will be firmly fused to the shell, creating a beautiful, custom-painted masterpiece that’s ready for display.
7. How to Make Dazzling Gold-Speckled Galaxy Easter Eggs
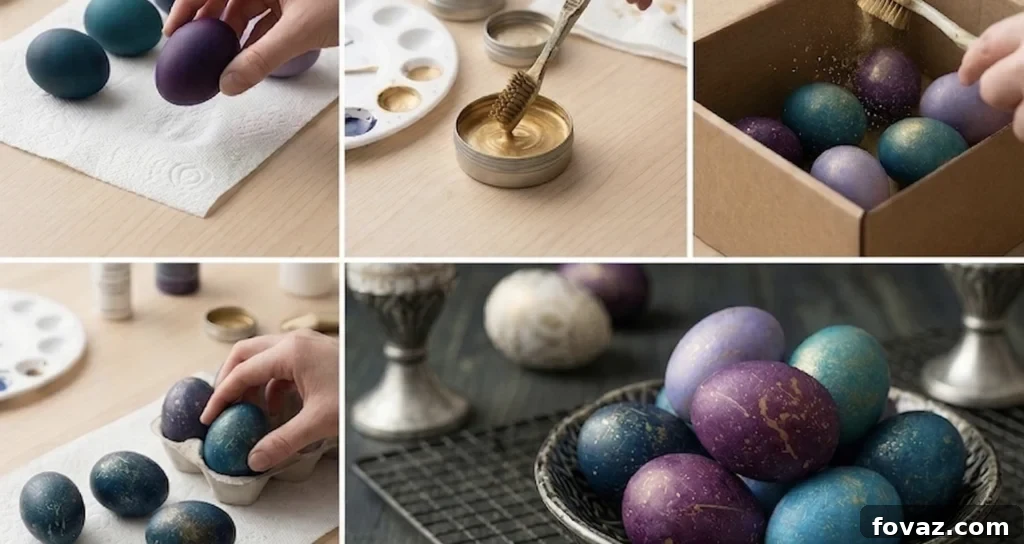
Transform your Easter eggs into miniature cosmic wonders with this stunning galaxy-themed craft. Using deep, rich dyes and a flick of metallic gold paint, you can create eggs that evoke the mystery and beauty of a starlit night sky, complete with shimmering constellations.
Materials Needed:
- Hard-boiled eggs
- Boiling water
- White vinegar
- Heavy-duty liquid food coloring (colors like indigo, teal, deep purple, or even black work best for a galaxy effect)
- Paper towels or a drying rack
- Old toothbrush (or any stiff-bristled brush)
- Metallic gold acrylic paint
Steps:
- Create the “Midnight” Base: Prepare your dye bath by mixing boiling water, a generous splash of white vinegar, and a heavy concentration of your chosen food coloring (indigo, teal, or purple are excellent choices for a rich, moody “midnight” base). Submerge your hard-boiled eggs in this intense dye mixture and let them soak for 5–10 minutes, or longer for a deeper color.
- Ensure Complete Dryness: Once dyed, carefully remove the eggs and place them on paper towels or a drying rack. It’s absolutely essential that the eggshells are bone-dry before proceeding to the next step. Any residual moisture will prevent the metallic paint from adhering properly.
- Prepare the Gold “Stars”: Squeeze a small amount of metallic gold acrylic paint onto a disposable surface, like a paper plate. Dip the bristles of your stiff-bristled brush (an old toothbrush is surprisingly effective for this!) into the paint, picking up a moderate amount.
- Flick the Splatter for Stars: Hold the paint-loaded brush a few inches above the dry, dark-colored eggs. With your thumb, gently but firmly flick the bristles of the brush. This action will create a fine mist of gold paint speckles, mimicking distant stars and nebulae across your galaxy eggs. Experiment with distance and flicking intensity for varied effects.
- Set and Dry Thoroughly: Once you’ve achieved your desired starry effect, allow the gold splatters to dry completely for at least 10 minutes (or longer, depending on paint thickness) before handling or moving the eggs. This prevents smudging and ensures your celestial masterpieces are preserved.
BONUS: How to Use the EggMazing Decorator for Striped Eggs
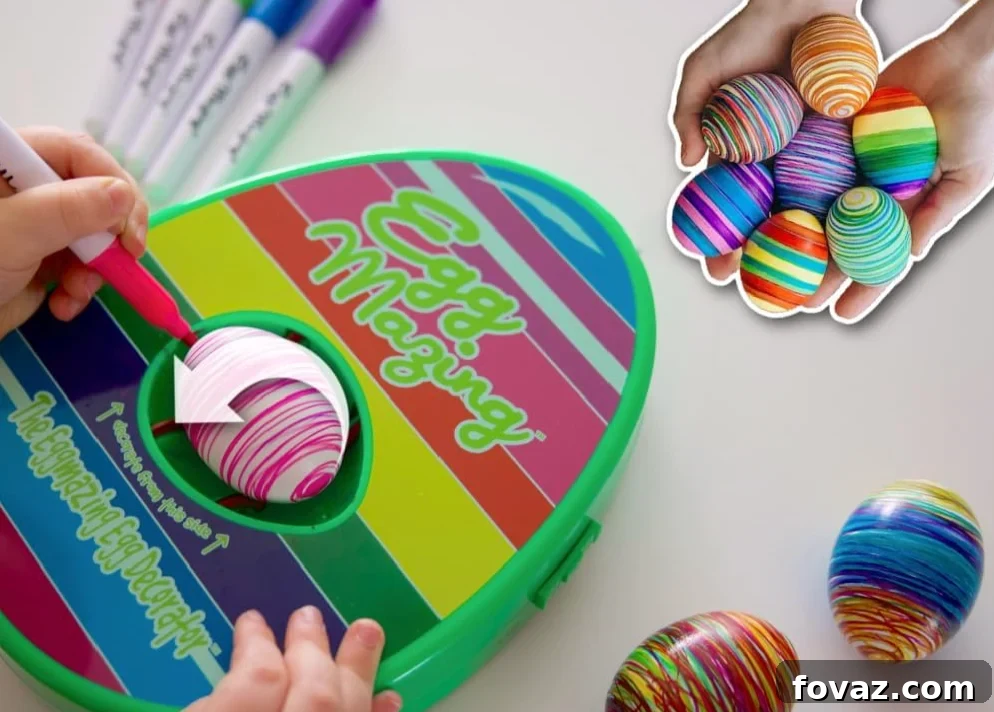
For a truly mess-free and fun Easter egg decorating experience, especially with younger children, the EggMazing Decorator is a game-changer. This innovative machine allows you to create perfectly striped, multi-colored eggs with incredible ease and no dye-related clean-up.
Materials Needed:
- EggMazing Decorator machine (usually comes with markers)
- 8 quick-dry markers (typically included with the kit)
- 4 AA batteries (for the machine)
- Hard-boiled eggs (ensure they are dry and at room temperature for best results)
Steps:
- Power Up and Load the Egg: Insert 4 AA batteries into the base of the EggMazing Decorator. Gently nestle a dry, hard-boiled egg into the center rollers of the machine. Flip the “on” switch, and watch as the egg begins to spin smoothly and continuously.
- Stripe and Style with Markers: Select one of the 8 quick-dry markers provided in the kit. Gently touch the tip of the marker to the surface of the spinning eggshell. The machine’s rotation will automatically create perfectly straight, continuous 360-degree stripes as you hold the marker in place.
- Layer a Rainbow of Colors: Feel free to swap marker colors frequently to build up vibrant and intricate patterns. Since the special ink dries almost instantly upon contact, you can overlap colors or apply new stripes immediately without any worry of smudging or colors bleeding into one another.
- Remove and Play Instantly: Once your egg is fully decorated to your liking, simply switch the machine off and carefully lift out your colorful masterpiece. The egg will be 100% dry and ready to be placed directly into an Easter basket or used for an egg hunt right away, with absolutely no drying time required.
I was genuinely surprised by how brilliant this spinning egg decorator turned out to be. Expecting the usual kitchen table chaos from dyes, instead, my toddler simply held a marker to the spinning shell, and we ended up with perfectly striped eggs without a single drop of dye to clean up. It’s a fantastic tool not just for hassle-free Easter decorating, but also for creating memorable bonding time with the kids!
- ENDLESS EGGMAZING FUN: Have hours of excitement decorating eggs in an original way at Easter or all…
- FUN WITHOUT THE MESS: No dyes means no smells and no messy clean up with the self-contained…
FAQs About Easter Egg Decorating
Here are some common questions to help you master your Easter egg decorating projects and ensure they turn out perfectly.
1. Are eggs decorated with permanent markers and acrylic paint safe to eat?
Generally, if you’re using permanent markers, acrylic paint pens, or standard Mod Podge for decorating, it’s best to use these eggs strictly for display purposes. The inks, paints, and chemicals can potentially seep through the porous eggshells, making the eggs unsafe for consumption. If your goal is to eat your beautifully decorated creations later, always stick to food-safe options. This includes using traditional food coloring dyes or opting for natural adhesives like the whisked egg-white method described in our Decoupage tutorial.
2. Why is my marker ink smudging and bleeding on the eggshell?
The most frequent culprit behind smudging and bleeding ink is condensation! If your hard-boiled eggs have just come out of the refrigerator, they will “sweat” as they warm up to room temperature. This moisture on the shell’s surface causes permanent marker and paint pen inks to bleed, spread, and smudge uncontrollably. To avoid this common issue, always ensure your eggs are thoroughly dry and have reached room temperature before you begin any drawing or painting.
3. Can I use fake eggs for these crafts instead of real ones?
Absolutely! With the fluctuating prices of groceries, especially eggs, opting for wooden, ceramic, or matte plastic craft eggs is an excellent and increasingly popular alternative. All of the tutorials presented here, particularly the Sharpie, paint pen, and bedazzling methods, work perfectly on craft eggs. This not only saves money but also allows you to keep and cherish your beautiful creations for many Easters to come, making them part of your enduring holiday decor.
4. How can I ensure my decorated eggs last longer?
If you’re using real hard-boiled eggs for decoration, they typically last about a week in the refrigerator. For longer-lasting display eggs (especially if they’re not for eating), you can gently blow out the contents before decorating. Pierce a small hole at both ends of the egg, insert a pin or skewer to break the yolk, and blow through one hole to expel the contents from the other. Once clean and dry, these empty shells can be decorated and stored indefinitely.
5. What are some good tips for decorating Easter eggs with kids?
When crafting with children, embrace the process over perfection! Lay down plenty of newspaper or an old tablecloth to protect your surfaces. Use washable markers when possible, or dedicate specific “craft clothes.” For younger children, simpler designs like thumbprint bunnies or sticker decorations are ideal. Encourage them to experiment with colors and patterns, and praise their efforts. The EggMazing decorator is also fantastic for kids, as it minimizes mess and helps achieve neat results easily.
QUICK POLL: With current egg prices, is Easter egg decorating still a sacred tradition or just a total waste of money?
Sacred Tradition: You can’t put a price on creating cherished memories. Those who call this a “waste” are simply looking for an excuse to be lazy parents.
Total Waste of Money: It’s ten dollars for a dozen eggs they’ll forget about in five minutes. Just throw some stickers on plastic eggs and stop pretending this is “sacred.”
Practical Choice: We usually decorate a few eggs for display on the table and consider it a day well spent, balancing tradition with practicality.
Vote above, then sound off in the comments! How are you handling the great egg inflation? Are you switching to plastic, scaling back, or buying the real deal no matter the cost? Share your strategy with us!
We hope these creative and easy Easter egg decorating ideas inspire you to craft some beautiful holiday memories without the usual fuss. From cute bunnies to sparkling galaxies, these budget-friendly and mess-free techniques ensure that your Easter celebration is as colorful and joyful as possible. Happy Easter and happy crafting!