
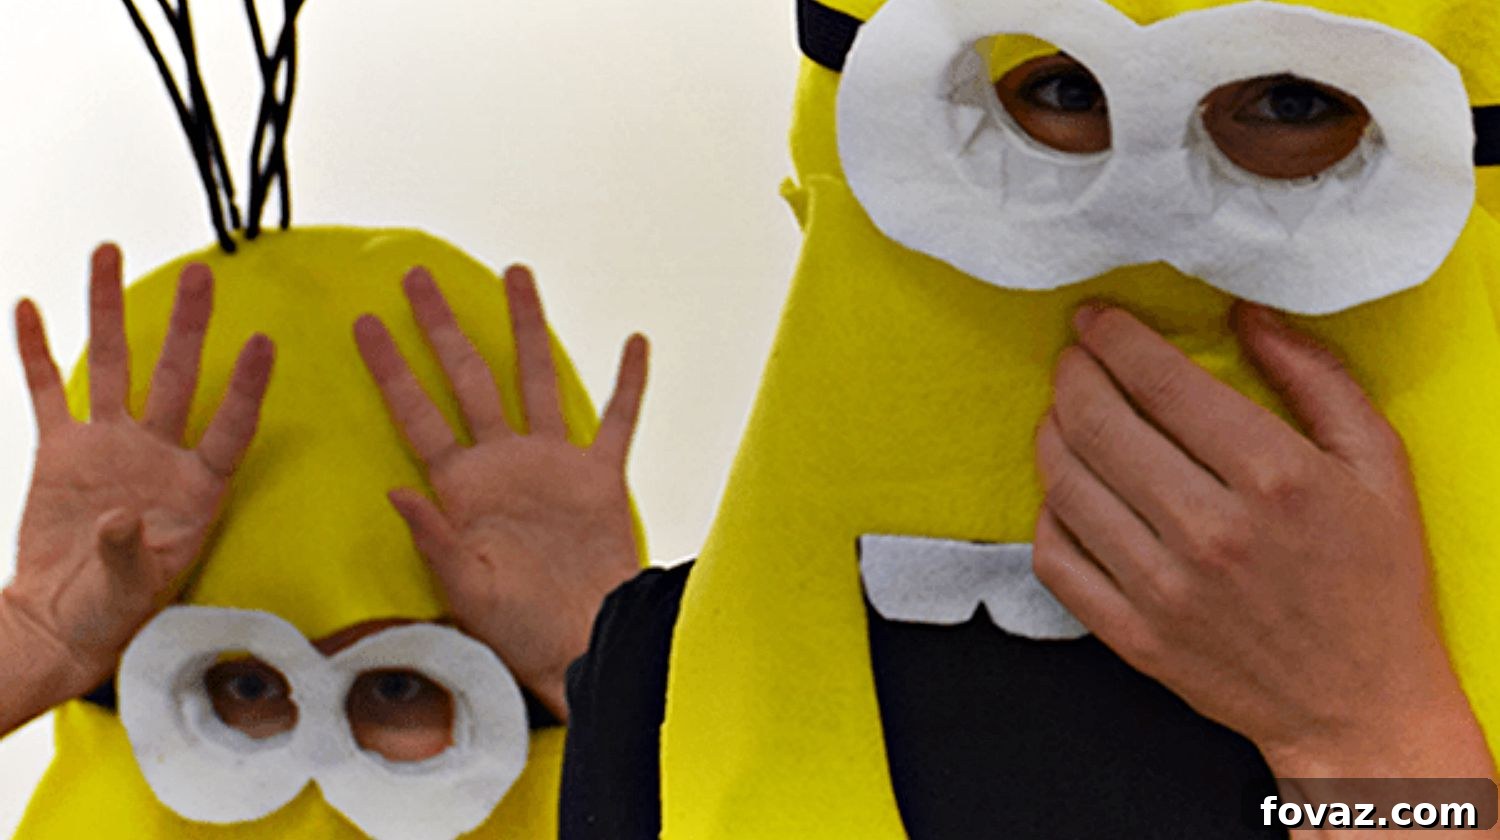
Want to unlock your inner mischievous minion? Get ready to transform into one of Gru’s lovable yellow helpers with this comprehensive DIY guide! Creating your own minion costume is not only a fun project but also guarantees a unique and memorable look for Halloween, themed parties, or any event where a touch of adorable villainy is required. Follow our detailed step-by-step tutorial, gather your supplies, and prepare to bring a little “BEE DO BEE DO” into the world!
RELATED: 13 DIY Minions Costume Ideas You Have To Check Out
In this article, you’ll discover:
-
- Crafting Your Own DIY Minion Costume
- Step-by-Step Minion Costume Mask Creation
- Detailed Minion Goggle Tutorial
How to Make a Minion Costume: Your Ultimate DIY Guide
Crafting Your Own DIY Minion Costume
To embark on the journey of creating a DIY Minion Costume, it’s essential to first understand the essence of these endearing characters. Minions are the iconic, clever, and endlessly amusing yellow creatures from the beloved Despicable Me franchise. They are best known as the loyal, albeit chaotic, assistants in the evil scientist Gru’s lab. Despite their affiliation with villainy, minions possess an undeniable charm, full of pushing, shoving, but also an abundance of hugging and loving. Their mischievous yet intoxicatingly affectionate nature makes them incredibly appealing, sparking a desire in many to embody their playful spirit.
Ever since their cinematic debut, becoming a minion has been a dream for countless fans. There’s a special joy in crafting your own disguise, allowing you to perfectly capture their iconic look. This tutorial will guide you through making a recognizable minion mask, complete with their signature giant smile and distinctive goggles. Once you don this homemade hood, you’ll instantly resemble one of these cherished creatures, ready for whatever adventures await. The best part? You can even customize your minion’s features to reflect your unique personality, ensuring your costume stands out from the crowd!
Beee boop Bee Bop. Potato!
Essential Supplies for Your Homemade Minion Costume:
This comprehensive costume project is divided into two primary parts: the head-turning minion mask and the instantly recognizable minion goggles. To ensure a smooth crafting process, we’ve provided two separate lists of supplies, making it easy for you to gather everything you need. Additionally, we’ve included a helpful list of clothing items to complete your transformation, ensuring you look like you just stepped out of Gru’s lab.
Despicable Me Minion Costume Mask Supplies:
- Yellow Felt: Approximately 1 yard by 1.5 yards. This vibrant fabric is key to achieving the minion’s signature color and offers excellent versatility for cutting and shaping.
- Sharp Scissors: Essential for precise cutting of felt and pattern pieces. A good pair of fabric scissors will make a significant difference.
- Black Pipe Cleaners: These flexible wires will be used to create your minion’s signature spiky hair, adding an authentic touch to the mask.
- Hot Glue Gun (and Glue Sticks) or a Sewing Machine with Yellow Thread: Depending on your preference and skill level, either method will securely assemble your felt pieces. A hot glue gun offers speed and ease, while a sewing machine provides a more durable finish.
- Minion Pattern Piece PDF: These printable patterns are crucial for accurate sizing and shaping of your mask. You can choose between an adult size or a child size to perfectly fit your needs.
Minion Costume Goggles Supplies:
- Plastic Cup: A sturdy plastic cup will form the base of your minion goggles, providing a perfect circular shape for the lenses.
- Silver Material to Cover the Cup: Get creative here! Options include a silver marker, silver paint, silver duct tape, or even pre-made silver cups. The goal is to give your goggle lenses a metallic, authentic look.
- Black Elastic: This will serve as the strap for your goggles, ensuring a comfortable and secure fit around your minion mask.
- Hot Glue Gun (and Glue Sticks): For attaching felt and elastic securely to your goggle lenses.
- Stapler: An alternative or additional fastening method for securing the elastic strap.
- White Felt: Used to create the white eye bases for your goggles, providing contrast and detail.
Clothing Needed to Complete Your Minion Costume:
- Blue Overalls: The classic minion attire! This is the most iconic piece to instantly transform your lower half.
- OR Blue Suspenders with Blue Bottoms: If overalls aren’t available, blue suspenders paired with blue pants, shorts, skirts, or leggings will achieve a similar iconic look. The key is the vibrant blue color!
- Yellow Long-Sleeved Shirt: To perfectly match your mask and complete the all-important yellow body of your minion.
- Black Gloves: Adding a pair of black gloves enhances the cartoonish aesthetic and makes your hands appear more minion-like.
- Black Shoes: Simple black shoes will complete the practical and authentic minion footwear.
The Minion Costume Mask: A Step-by-Step Guide
Creating the minion mask is the heart of your costume, bringing the character to life. Follow these detailed steps carefully for a fantastic result.
Step 1: Print Your Minion Mask Pattern
The very first step is to accurately print out the provided PDF pattern. Precision here is key to ensuring your mask pieces are correctly sized. Once printed, use your scissors to carefully cut along the edges of each pattern piece. Pay close attention to the colored circles on the pattern; these are your guides for lining up the pieces later. Remember, we’ve thoughtfully provided both child and adult sizes to ensure a perfect fit for any aspiring minion. Take your time with this initial cutting, as it forms the foundation for the entire mask. You can download your preferred size using the links below:
Minion Costume Pattern – Adult (pdf)
Minion Costume Pattern – Child (pdf)
Step 2: Trace Minion Costume Pattern Pieces onto Felt
With your paper pattern pieces cut, it’s time to transfer them onto your vibrant yellow felt. Lay your felt flat and place the paper patterns on top, arranging them efficiently to minimize fabric waste. Using a permanent marker, carefully trace around each pattern piece. Be sure to include all markings, especially the small triangular notches on the side of each piece – these are crucial for proper alignment during assembly. Remember that the front and back pieces of the mask are designed to be cut “on the fold,” meaning you’ll fold your felt in half and place the pattern’s straight edge along the fold line before tracing. This ensures symmetrical and seamless pieces.
Step 3: Carefully Cut Out Minion Costume Pieces
Now, take your fabric scissors and meticulously cut out all three traced felt pieces. The goal is to cut precisely on the inside edge of your permanent marker lines. This ensures that the final product will be clean and free of visible marker marks. Strive for smooth, continuous lines rather than jagged cuts. Accuracy in this step contributes significantly to the overall professional look of your finished minion mask.
Step 4: Finish Cutting and Set Scraps Aside (Crucial!)
Once all your main mask pieces are cleanly cut, you can tidy your workspace. However, resist the urge to discard the yellow felt scraps! These seemingly insignificant remnants are vital for a later stage of this project. Keep them in a designated pile, perhaps humming a mischievous minion tune to ward off any actual minion who might try to snatch them! You’ll be surprised how useful these scraps become. For now, ensure your three main mask pieces – the front, back, and mouthpiece – are ready for the next step, and your scraps are safely stored.
Step 5: Match Sides Together for Assembly
This step prepares your felt pieces for joining. Take your front, back, and mouthpiece felt pieces. You’ll want to align the “right sides together.” The “right side” refers to the clean, unmarked side of your felt, while the side you traced on with the permanent marker is the “wrong side.” To achieve this, lay the back piece with its right side facing up on your table. Place the mouthpiece piece face down (wrong side up) over the back piece, aligning the triangular notches. Finally, position the front piece face down (wrong side up) over the others. Crucially, only pin the side of the mouthpiece that will be attached to the back and front pieces; leave the other side of the mouthpiece unattached for now, as it will form a functional flap later.
Step 6: Pin Minion Costume and Manipulate Fabric to Fit
Carefully align all the triangular notches on the right side of these three pieces. You might notice that the front piece is slightly narrower than the back piece. Don’t worry, this is intentional! Gently manipulate and ease the fabric of the wider back piece to accommodate the front piece, allowing for a slight gap or gather that will create the desired rounded shape of the minion’s head. Once aligned, carefully pin along the sides and around the top curve of the mask. It is critical at this stage to avoid pinning the very bottom edge of the mask; this opening is necessary for turning and stuffing later.
Step 7: Sew or Glue Minion Costume Together
Now it’s time to secure your mask pieces. You have two excellent options: using a sewing machine for a durable finish or a hot glue gun for a quicker, equally effective method. If sewing, use a 1/2-inch seam allowance along each pinned side and around the top curve. When sewing the mouthpiece, ensure you only catch one side of it, allowing the other side to remain a flexible flap that can open and close. Regardless of your chosen method, remember to leave the entire bottom edge of the mask open – this is essential for turning the mask right side out and for subsequent stuffing.
Step 8: Turn Minion Costume Right Side Out
Once you’ve finished sewing or gluing your three main mask pieces securely, carefully remove it from your machine or work surface. Gently turn the entire mask right side out. Take your time to work your fingers along the inside edges and seams, pushing them out smoothly to help define the rounded, domed shape of the minion’s head. This step reveals the clean, finished exterior of your mask and is incredibly satisfying as your minion begins to take form.
Step 9: Create Stuffing for Minion Costume Dome
With your mask sewn and turned, the next step is to prepare the stuffing that will give your minion mask its characteristic round, dome-like head. This is where those “insignificant” yellow felt scraps become incredibly important! Go find that pile of scraps you wisely set aside earlier. (If you hear any suspicious giggling, blame the actual minions – they have a known fondness for collecting discarded craft materials!) Once retrieved, take your fabric scissors and cut the felt scraps into strips, each approximately 4 inches wide. These strips will be the building blocks for your mask’s shape.
Step 10: Roll Up the Strips to Stuff the Minion Costume
Now, take each of your 4-inch wide yellow felt strips and begin to tightly roll them up. Once rolled, apply a small dab of hot glue to the end of each roll to secure it, ensuring it stays shut and maintains its compact shape. The consistency of these rolls is important, as they will define the smooth curvature of your minion’s head.
Step 11: Make More Rolls Until Sufficient
Continue the process of cutting, rolling, and gluing the yellow felt scraps until you have a sufficient number of rolls for stuffing. Generally, aiming for around 10 to 12 pieces should provide ample stuffing to give your minion mask a wonderfully plump and rounded dome. The exact number may vary slightly based on the thickness of your felt and how tightly you roll them.
Step 12: Glue and Place Rolls into Minion Costume
With your felt rolls ready, take one and apply a line of hot glue along its outer surface. Carefully insert this glued roll into the inside seam of your mask, starting from the bottom opening. Line it up along the length of your side seam and continue along the curve of the mask. Continue this process, inserting and gluing rolls along both side seams and the top curve. Distribute them evenly to create a smooth, rounded dome. However, STOP before you place the very final top piece of stuffing – you have a crucial step to complete first: adding your minion’s signature hair!
Step 13: Poke Holes on Top of Minion Costume for Hair
Before completing the stuffing, grab a sharp pair of scissors and carefully poke several holes in the top of your minion costume. The number and placement of these holes are entirely up to your creative vision! Minions, as we know, come in all shapes and sizes, and their hairstyles are no exception. Some minions sport a neat clump of hair in the center of their head, others have a more scattered, wild look, while some even rock a mohawk or adorable pigtails. This is your chance to personalize your minion – feel free to get as creative as you like with the hair design!
RELATED: 17 DIY Scarecrow Costume Ideas From Clever to Creepy
Step 14: Add Black Pipe Cleaner to Minion Costume for Hair
Now for the hair! Take your black pipe cleaners and, one by one, insert one end into a hole you’ve just made on the top of the mask. Once through, bend the pipe cleaner in half and poke the other end back through the same hole (or a nearby one). Bending the pipe cleaners in half like this creates a loop inside the mask and helps to secure the “hairs” firmly in place, preventing them from easily pulling out as your minion bounces around.
Step 15: Securely Glue the Hair In Place
Once all your minion’s hair strands are in their desired positions, it’s time to ensure they stay put! You certainly don’t want your minion suddenly going bald mid-party. Carefully apply a generous amount of hot glue to the underside of each pipe cleaner where it emerges into the interior of the mask. Press the pipe cleaner firmly into the glue to create a strong bond. This step is crucial for making sure the hair is durable and can withstand any playful tugs from other enthusiastic minions.
Step 16: Finish Stuffing Your Minion Costume
With all the hair firmly glued and in place, you can now proceed to attach any remaining pieces of stuffing. This final step completes the dome shape of your minion’s head, giving it a plump and perfectly rounded appearance. Ensure the stuffing is evenly distributed for a smooth, natural curve.
Step 17: Craft Your Minion Costume Smile
A minion costume simply isn’t complete without their characteristic grin! To create this iconic smile, take your black felt and carefully cut out a large, happy, crescent-shaped smile. However, remember that minions have a wide range of emotions! Perhaps you’re feeling a sly smirk, a playful frown, or even a shocked gasp? Consider the personality you want for your minion and cut out the mouth shape accordingly. This personal touch adds character and uniqueness to your costume.
Step 18: Cut Out Minion Teeth
Just like their varied expressions, minions also boast a mouth full of chunky, slightly uneven white teeth. To replicate this charming feature, grab your white felt. It’s often helpful to use the black felt mouthpiece you previously cut out as a guide for sizing. Lay the mouthpiece over the white felt and carefully cut out a row of blocky, white teeth. Aim for a slightly irregular, playful look that perfectly complements your minion’s smile.
Step 19: Glue in Your Minion’s Teeth
Time to play dentist for a moment! Using your hot glue gun, carefully attach the white felt teeth to the back of your black felt mouth shape. Arrange them neatly along the inner curve of the smile. Once the teeth are secure, apply glue to the back of the entire mouth piece and carefully attach it to the minion’s face. For optimal placement, we highly recommend trying on your mask to find the perfect height and position for your minion’s mouth, ensuring it’s visible and expressive.
Step 20: Velcro the Mouth Flap to the Front Piece of Minion Costume
To add a fantastic practical feature to your minion mask, attach Velcro to both the mouth flap (the unattached side of the mouthpiece from Step 5) and the corresponding area on the front piece of your minion costume. Use your hot glue gun to securely fasten both sides of the Velcro. This ingenious addition allows you to easily open and close the mouthpiece! This is incredibly handy for when you or your little minions need to eat, drink, or simply communicate without having to completely remove the mask. Your mask is now officially complete – a vibrant, smiling minion face ready for action. But wait, you’re not quite a minion yet… it’s time to make the goggles!
Minion Goggle Tutorial: Crafting Their Iconic Eyewear
The goggles are arguably the most distinctive feature of a minion, completing their instantly recognizable look. Let’s create these essential accessories with precision and care.
Once again, here is our supply list for Minion Costume Goggles:
- Plastic cup
- Something silver to cover cup: (pen, paint, duct tape, silver cup)
- Black elastic
- Glue gun
- Stapler
- White felt
Step 21: Cut Cups into Minion Goggle Lenses
Take your plastic cup and start by cutting straight down the middle from the rim towards the base. Once you’ve made this initial cut, rotate your scissors 90 degrees and carefully cut around the cup, leaving only about an inch-high ring of the silver-covered cup at the bottom. This ring will form the frame of your goggle lens. If you haven’t already, ensure the plastic cup is covered in your chosen silver material (paint, duct tape, etc.) before or during this step to give it that metallic sheen.
Step 22: Carefully Cut Out the Base of the Cup
Now, with your cup cut down to an inch-high ring, you need to remove the solid bottom portion. For this step, using an Exacto blade is often the most effective and precise method, though sharp scissors can also work. For safety and stability, place the cup opening-side down on a stable table surface. Carefully poke the blade through from above and slowly cut around the inner circumference of the cup’s base, detaching it completely. Take your time to ensure a clean, smooth cut, as this will be the inner edge of your goggle lens.
Step 23: Make Minion Eyes with White Felt
With your silver goggle frames ready, it’s time to create the white eye base. Place the cut-open silver cup rings face down over your white felt. Using a marker, trace the inner circle of the goggle frame onto the white felt. Cut out these white felt circles; these will serve as the whites of your minion’s eyes, providing a bright and contrasting background for the pupil (which we’ll address in the final outfit assembly).
Step 24: Cut Open Middle of Minion Eye (Pie Method)
Take each of your white felt circles. To create a neat and secure attachment point to the goggle frame, you’ll need to cut out the middle of the felt circle in a “pie slice” fashion. Start by cutting a small slit from the edge towards the center. Then, continue cutting from the center outwards, creating a total of eight evenly spaced “pie slices” or triangles. Repeat this process for both of your white felt eye pieces. This method allows the felt to conform perfectly to the curved goggle frame.
Step 25: Glue Felt to Cup for Eyes
Now, take your hot glue gun and begin attaching the white felt “pie slices” to the inside of your silver goggle frames. Apply a small drop of hot glue to the underside of one felt triangle, then press it firmly against the inside curve of the silver cup with your finger, holding it in place until the glue sets. Repeat this meticulously for every single felt fragment around the entire circumference. This careful process ensures that your white felt eyes will sit nice and flat against the goggle frames, creating a smooth and professional finish for your minion’s gaze.
Step 26: Measure Elastic for Minion Goggles
To ensure a comfortable and secure fit, it’s crucial to measure the elastic strap correctly. Wrap a strip of black elastic around the finished minion mask, positioning it where the goggles would naturally sit (typically across the forehead, just above the eyes). Mark or snip the elastic to the appropriate length, leaving an extra inch on each end. This additional inch of elastic is essential for securely attaching the strap to your newly crafted goggle lenses.
Step 27: Staple the Elastic to Minion Goggles
With your elastic strap measured, it’s time to attach it to the goggle lenses. Take one end of the elastic and double it under itself, ensuring the short, raw end is facing inwards towards what will be the wearer’s head. Place the doubled elastic firmly against the outside edge of one of the silver cup goggle frames. Use your stapler to securely fasten the elastic to the goggle frame, placing two or three staples for added strength. Repeat this exact process for the other side of the elastic strap, attaching it to the second goggle frame. Ensure the elastic is straight and not twisted to guarantee a comfortable fit.
To complete the iconic minion look, gather these final clothing items:
- Blue overalls
- OR Blue suspenders with blue bottoms… pants, shorts, skirts, leggings, whatever you want as long as it’s blue!
- Yellow long sleeves
- Black gloves
- Black shoes
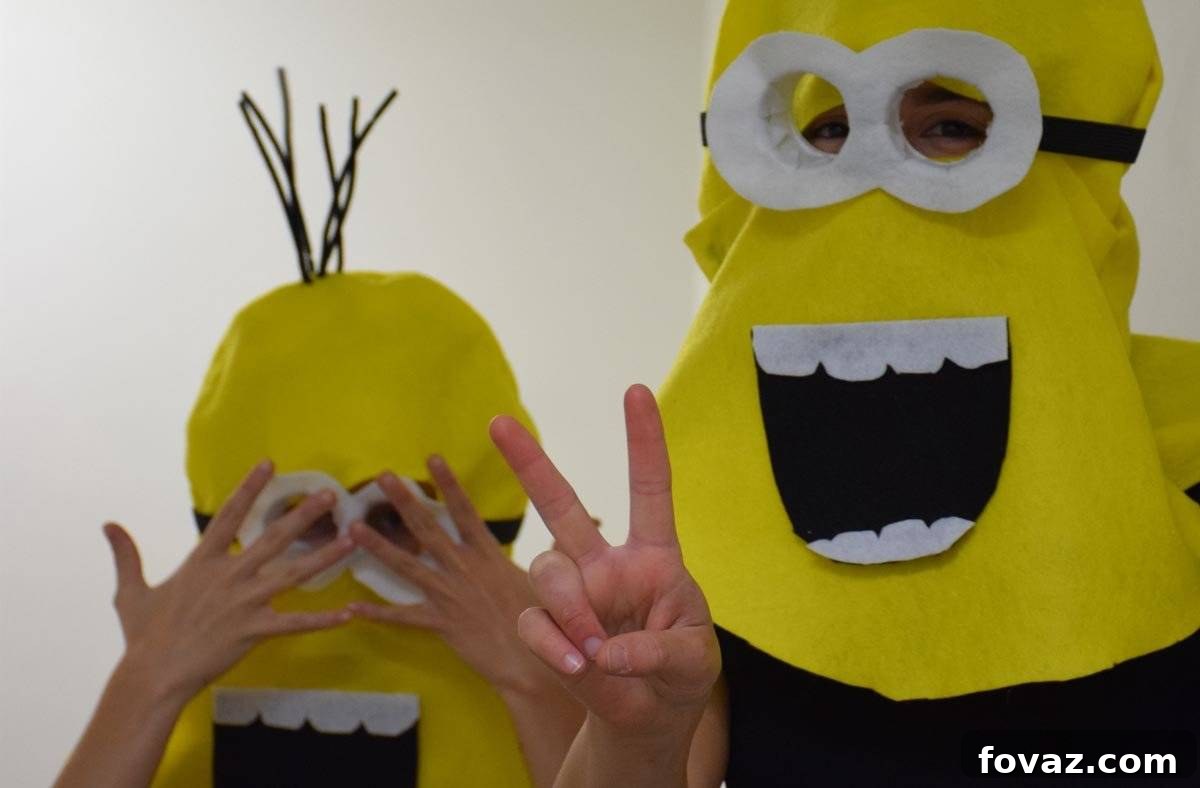
Congratulations! You did it! You have successfully crafted your very own minion costume, complete with a charming mask and authentic goggles. Try it on and behold your amazing transformation. Remember, the true essence of a minion lies in their signature yellow hue and those unmistakable blue overalls. We hope you thoroughly enjoy embodying the playful and mischievous spirit of a minion. We just have one small favor to ask of you…
Try not to get into too much trouble while wearing your fantastic new costume! 🙂
For a visual guide, check out this helpful video from DIY Projects on how to make a minion costume step by step:
Think you have what it takes to complete this DIY minion costume challenge? Share your thoughts, tips, and experiences with us in the comments section below! We’d love to hear from you!
UP NEXT:
- 12 DIY Snow White Costume Ideas For Halloween
- Easy DIY Mermaid Tail Crochet Pattern: Perfect Blanket For Winter
- Healthy Halloween Recipes | 13 Easy Recipes For A Healthier Halloween
Editor’s Note: This post was originally published on May 9, 2014, and has been updated for quality, relevancy, and to provide a more comprehensive, user-friendly crafting experience.