
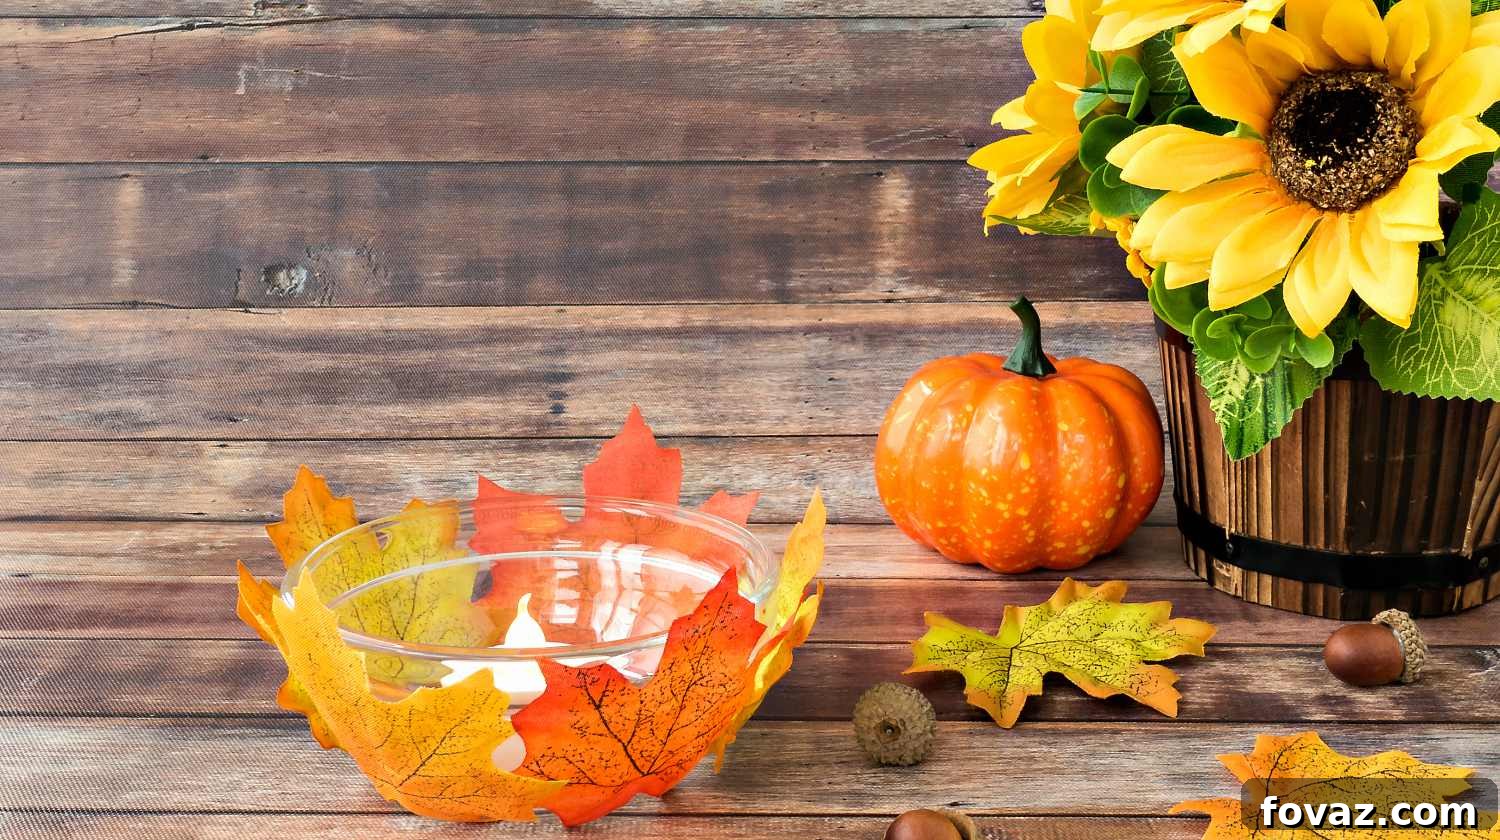
Embrace the vibrant hues of autumn and infuse your home with seasonal charm by crafting this chic, simple, and incredibly easy DIY leaf bowl. It’s the perfect decor piece to elevate your space throughout the fall holidays and beyond.
RELATED: 10 Beautiful and Outstanding DIY Projects to End Fall With
In this article:
- Craft Your Own Stunning DIY Leaf Bowl for Fall
- Gathering Your Essentials: What You’ll Need
- Your Step-by-Step Guide to Crafting a Gorgeous Leaf Bowl
- Elevating Your Leaf Bowl: Creative Decor Ideas
- Tips for Success & Troubleshooting Your Leaf Bowl
Craft Your Own Stunning DIY Leaf Bowl: The Ultimate Guide to Effortless Fall Decor
As the days grow shorter and a crisp breeze fills the air, there’s no better time to immerse yourself in the warmth and beauty of the fall season. And what better way to celebrate autumn’s arrival than with a charming, handmade decorative accent? This DIY leaf bowl project offers a wonderfully accessible and enjoyable way to bring the essence of fall right into your home. With the festive fall holidays quickly approaching, adding this elegant leaf bowl to your crafting agenda is an absolute must.
Imagine transforming a handful of readily available artificial leaves and a simple balloon into a captivating, festive decorative bowl. This project is not just easy; it’s incredibly versatile. For Halloween, craft several of these unique pieces to hold candies and treats, adding a delightful touch to your trick-or-treating setup. As Thanksgiving approaches, repurpose your decorative leaf bowl into a stunning centerpiece, gracefully holding a bounty of seasonal fruits or even warm bread rolls for your holiday feast.
The beauty of this decor piece extends beyond Thanksgiving. With a bit of creativity, you can even adapt it for Christmas, perhaps filling it with small ornaments or glittering accents. In fact, due to its adaptability and the sheer simplicity of its creation, you’ll find decorative uses for this DIY leaf bowl throughout the entire year. It’s a project that promises not only a beautiful end product but also a rewarding crafting experience.
Are you ready to embark on this creative journey and craft your very own exquisite leaf bowl? Dive into the detailed steps below and prepare to be amazed by how easily you can create this fun and functional decorative piece!
Gathering Your Essentials: What You’ll Need for Your DIY Leaf Bowl
One of the most appealing aspects of this DIY leaf bowl project is the minimal list of materials required. Most items can be found at your local craft store, and you might even have some of them lying around your house already. Gathering your supplies is the first exciting step towards creating your unique autumn decor.
- Balloon: A standard round balloon works best, typically 9-12 inches when inflated. The size of the inflated balloon will directly determine the size and shape of your finished bowl, so choose accordingly.
- Medium Bowl: This is essential for holding your inflated balloon steadily in place while you work. A cereal bowl or mixing bowl should suffice.
- Artificial Leaves: Opt for a selection of mixed fall colors to capture the true spirit of autumn. Fabric or silk leaves are ideal for their flexibility and realistic appearance. Look for leaves in shades of red, orange, yellow, and brown.
- Mod Podge: This incredible all-in-one glue, sealer, and finish is the star of the show. It will bind your leaves together and provide a durable, clear coating.
- Paintbrush or Sponge Applicator: A medium-sized brush or foam sponge is perfect for applying the Mod Podge smoothly and evenly over your leaves and balloon surface.
RELATED: DIY Decorating Ideas With Actual Fall Leaves
Your Step-by-Step Guide to Crafting a Gorgeous Leaf Bowl
Creating your DIY leaf bowl is a surprisingly straightforward process that yields stunning results. Follow these simple steps to bring your autumn vision to life.
Step 1. Prepare Your Foundation: Inflate and Secure the Balloon
Begin by inflating your balloon to your desired bowl size. Remember, the larger the balloon, the larger your final leaf bowl will be. Once inflated, securely tie off the balloon to prevent air leakage. Next, place the inflated balloon into your medium bowl with the tied knot facing downwards. This will stabilize the balloon, making it much easier to work on. Before you start, gather your selection of artificial leaves in mixed fall colors, ensuring they are easily accessible.
While artificial leaves offer convenience and durability, if you prefer a more natural aesthetic and have access to beautifully preserved fall leaves, you can certainly try using real ones. Ensure they are dry, flat, and treated (if necessary) to prevent decay.
These artificial leaves are perfect for this project – click HERE to get your own!
Step 2. The Art of Leaf Application: Gluing Leaves to the Balloon
Dip your paintbrush or sponge applicator into the Mod Podge. Apply a generous, leaf-sized spot of Mod Podge onto the top half of the balloon. Carefully press one of your artificial leaves onto this Mod Podge-covered spot. Once the leaf is in place, apply another coat of Mod Podge directly over the leaf, ensuring it’s fully saturated and sealed. Continue this process, overlapping the leaves slightly as you go, to create a strong, continuous surface. Work your way around the balloon, gradually building up layers to form the desired bowl shape. Aim for full coverage, ensuring no gaps, and create a rim that’s as high or low as you prefer for your bowl.
Mod Podge is the ideal crafting glue and sealer for DIYers – click HERE to get your own!
Step 3. Sealing the Autumn Beauty: Applying the Final Mod Podge Coat
Once you’ve arranged all your leaves to form the bowl shape, it’s time for a final, crucial sealing step. Using your paintbrush, apply a thick, even coat of Mod Podge over the entire leaf-covered surface. Don’t be concerned if it appears too wet or milky white; this is perfectly normal. Mod Podge dries clear, leaving a beautiful, glossy, and protective finish. This final layer helps to strengthen the bowl structure and ensures all leaves are securely sealed.
Step 4. The Waiting Game: Drying to Perfection
After applying the final coat of Mod Podge, gently set your leaf bowl aside in a dry, well-ventilated area. It’s crucial to allow the Mod Podge to dry completely and thoroughly. Depending on the thickness of your Mod Podge layers and the humidity in your environment, this can take anywhere from 12 to 24 hours. For best results and maximum durability, it’s often recommended to let it dry overnight. Ensure the surface is hard and no longer tacky before moving to the next step.
Step 5. The Grand Reveal: Popping the Balloon!
Once your leaf bowl is completely dry and firm, it’s time for the most satisfying part of the process! Carefully pop the balloon with a sharp object, such as a pin or the tip of scissors. As the balloon deflates, it will slowly peel away from the hardened leaf structure. Gently and slowly remove any remaining bits of the balloon from the inside of your newly formed leaf bowl. Handle your delicate creation with care during this step to ensure it retains its beautiful shape.
Congratulations! Your brand new, stunning DIY leaf bowl is complete and ready to be enjoyed. Fill it with candies for a charming trick-or-treating station, or transform it into an elegant table centerpiece adorned with seasonal delights.
Elevating Your Leaf Bowl: Creative Decor Ideas
Your finished DIY leaf bowl is more than just a craft; it’s a versatile piece of seasonal art waiting to be personalized. Here are some inspiring ideas to help you integrate it seamlessly into your home decor:
Festive Holiday Displays:
- Halloween Treat Holder: Fill it with individually wrapped candies, mini chocolates, or small festive toys for a stylish trick-or-treat display.
- Thanksgiving Centerpiece: Arrange mini pumpkins, gourds, acorns, cranberries, or even small loaves of artisan bread inside. It can also serve as a unique holder for potpourri, infusing your home with autumn scents.
- Christmas Accent: Transition it into winter decor by adding small pinecones, faux snow, or tiny decorative ornaments. A string of delicate battery-operated fairy lights can add a magical glow.
Everyday Elegance:
- Entryway Catch-All: Place it by your front door or on a console table to hold keys, loose change, or small notes, adding a touch of seasonal warmth to your welcoming space.
- Coffee Table Accent: Use it as a decorative holder for fragrant potpourri, small flameless candles (for safety), or a collection of natural elements like polished stones or dried flowers.
- Seasonal Fruit Bowl: Display small fruits such as mandarins, apples, or plums, bringing a natural and colorful element to your kitchen or dining area.
- Bedroom Organizer: Ideal for holding jewelry, hair ties, or other small trinkets on your dresser or nightstand.
Personalization Tips:
- Add Glitter: For extra sparkle, sprinkle fine glitter onto the wet Mod Podge layers before drying.
- Metallic Accents: Lightly brush the edges of some leaves with gold or copper metallic paint for an opulent touch.
- Vary Leaf Types: Experiment with different types and sizes of artificial leaves to create unique textures and patterns.
- Theme Colors: Stick to a monochromatic theme (e.g., all gold or all deep red) for a sophisticated look, or mix and match for a vibrant, eclectic feel.
Tips for Success & Troubleshooting Your Leaf Bowl
While this project is designed to be easy, a few tips can ensure a perfect outcome, and knowing how to troubleshoot common issues can save the day!
Tips for Success:
- Choose the Right Balloon: The size and shape of your balloon dictate the final bowl. Experiment with different balloon types for varied results (e.g., elongated balloons for a boat-like shape).
- Quality Leaves Matter: Fabric or silk artificial leaves tend to work best as they are pliable and absorb Mod Podge well. If using real leaves, ensure they are thoroughly dried and possibly pressed flat beforehand.
- Layering for Strength: Don’t be afraid to overlap your leaves generously. Multiple layers will result in a sturdier, more durable bowl. You can even apply an additional full layer of Mod Podge after the first set of leaves has dried slightly for extra reinforcement.
- Patience is Key: Rushing the drying process can lead to a flimsy or sticky bowl. Allow ample time for the Mod Podge to cure completely.
- Work in a Well-Ventilated Area: Mod Podge has a slight odor, so ensure good airflow during application and drying.
Troubleshooting Common Issues:
- My Bowl is Collapsing/Too Flimsy: This usually means there weren’t enough layers of leaves or Mod Podge, or it didn’t dry completely. To fix, you can try gently reinforcing the inside with another layer of leaves and Mod Podge, allowing it to dry thoroughly on the balloon before removal.
- Leaves are Peeling Off: Ensure each leaf is pressed firmly onto the balloon and thoroughly covered with Mod Podge, both underneath and on top. If a leaf peels after drying, you can reattach it with a dab of Mod Podge and allow it to dry again.
- The Bowl is Still Sticky After Drying: This indicates that the Mod Podge hasn’t fully cured, likely due to high humidity or insufficient drying time. Place it back in a dry, well-ventilated area for another 24-48 hours. A light coat of clear acrylic sealant spray (after the Mod Podge is completely dry) can also help eliminate stickiness and add more durability.
- Uneven Rim: Small imperfections can be trimmed with sharp scissors once the bowl is completely dry and hardened.
Check out the video below to see this DIY leaf bowl in action:
With fewer than half a dozen simple steps and minimal supplies, no decor project could be easier or more rewarding than crafting this exquisite DIY leaf bowl. So, what’s holding you back? Gather your materials and create a couple of these simple yet stunning decorative pieces. Not only will they make fabulous decor accents or captivating centerpieces, but they also serve as intriguing conversation starters, showcasing your creativity and love for handmade items. Happy fall crafting, DIY buddies!
Do you have any fall-inspired projects of your own that you’re particularly proud of? We’d love to hear about them and see your unique creations! Leave a comment below to let us know and share your crafty insights!
Up Next:
- 21 Easy And Fun DIY Crafts For Fall | Fall Decor Ideas
- Homemade Balloon Bowl For Your Kids To Try This Weekend
- Fun DIY Projects For Everyone: Basic Guide on Building Your Own Hobbit House
Stay connected with us on Facebook, Twitter, Pinterest, and Instagram for more creative inspiration and DIY ideas!
Editor’s Note: This post was originally published on November 11, 2016, and has been updated for quality, relevancy, and comprehensiveness to provide you with the best crafting experience.