
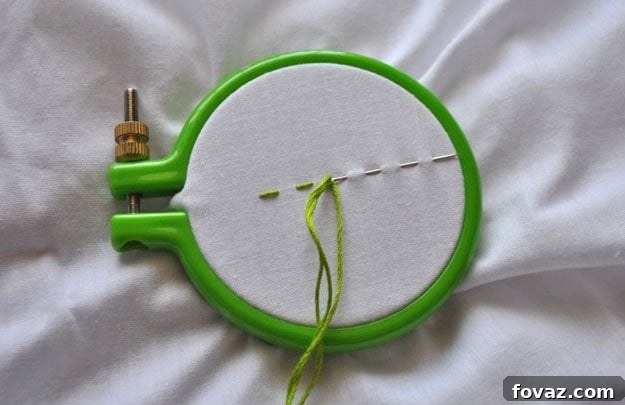
Mastering the Running Stitch: Your Essential Guide to Hand Embroidery
Welcome to the enchanting world of hand embroidery! Every beautiful design, every intricate pattern, begins with fundamental techniques. Among these, the running stitch stands out as the most basic, yet incredibly versatile, of all embroidery stitches. Often referred to simply as a “straight stitch,” it’s the perfect starting point for anyone new to needlework, offering a simple rhythm and rewarding results. This comprehensive guide will walk you through everything you need to know to master this foundational stitch, from gathering your materials to applying it in creative projects.
The running stitch is characterized by its simplicity: a series of short, even stitches that appear and disappear along a straight or curved line. It forms a dashed line, making it ideal for outlining shapes, creating subtle textures, or even gathering fabric. Its ease of execution makes it a favorite for quick repairs, basting, and adding delicate details to garments, home decor, and personalized gifts. Whether you dream of embellishing a pillow, personalizing a tote bag, or creating intricate textile art, understanding the running stitch is your first crucial step on this creative journey.
Before You Begin: Essential Materials for Your First Running Stitch Project
Embarking on any new craft is always exciting, and having the right tools can make all the difference. For the running stitch, you won’t need an elaborate setup, just a few essential items. Quality materials can significantly enhance your experience and the final appearance of your embroidery.
- Blank Piece of Fabric (Cotton is Best): While various fabrics can be used, cotton is highly recommended for beginners. Its stable weave and moderate thickness make it easy to pierce with a needle without fraying excessively. Choose a plain, light-colored fabric like muslin, linen, or a simple cotton blend, as this will allow your stitches to stand out clearly. Avoid very thin or stretchy fabrics initially, as they can be more challenging to work with.
- Embroidery Hoop (Optional, but Recommended for Stability): An embroidery hoop isn’t strictly necessary for a running stitch, but it is incredibly helpful, especially when you’re starting out. The hoop holds your fabric taut, preventing it from puckering and ensuring your stitches are even and neat. This stability gives you better control over your needle and thread, leading to a much more satisfying result. Hoops come in various materials (wood, plastic) and sizes; a 6-inch or 8-inch hoop is usually a good all-around choice.
- Embroidery Thread: Also known as floss, embroidery thread is specially designed for needlework. It typically comes in skeins, comprising six individual strands that can be separated. For most running stitch projects, using two or three strands will give a nice, visible line without being too bulky. Experiment with different numbers of strands to see how it affects the look of your stitch. DMC and Anchor are popular, high-quality brands offering a vast array of colors.
- Needle: You’ll need an embroidery needle, also called a crewel needle. These needles have a sharp point for piercing fabric and a larger eye than regular sewing needles, making it easier to thread with embroidery floss. They come in various sizes; a size 7 or 8 is a good general-purpose choice for most embroidery threads.
- Scissors: A small pair of sharp embroidery scissors or snips will be invaluable for cleanly trimming your thread ends. Precision is key in embroidery, and clean cuts prevent fraying.
- Fabric Pencil or Erasable Marker (Highly Recommended for Beginners): While not strictly a “tool” for stitching, a fabric pencil or erasable marker is immensely helpful when you’re first beginning. Drawing your desired line or shape directly onto the fabric provides a clear guide to follow, ensuring your stitches are placed accurately and consistently. These marks can be easily removed with water or by simply brushing them away once your embroidery is complete.
Getting Started: Preparing Your Thread and Fabric
Preparation is key to a smooth and enjoyable embroidery experience. Taking a moment to set up correctly will save you frustration later on.
First, cut a comfortable length of embroidery thread. About 18-24 inches (45-60 cm) is ideal; too long, and it’s prone to tangling and knotting; too short, and you’ll be re-threading frequently. Separate the desired number of strands (e.g., two or three) from the six-strand floss. Thread one end of this length through the eye of your needle. To secure the thread, tie a small, neat knot at the far end. Trim any excess tail from the knot to prevent it from catching on your work.
If you’re using an embroidery hoop, place your fabric securely within it. Ensure the fabric is taut like a drum, but not stretched out of shape. This provides a stable surface for stitching. If you plan to use a fabric pencil, now is the time to draw your guiding line or shape onto your fabric. This initial outline is crucial for maintaining an even path and consistent stitch length, especially when practicing the running stitch.
The Art of the Running Stitch: Step-by-Step Instructions
The running stitch is wonderfully straightforward, but understanding the subtle techniques can elevate your work from good to great. There are two primary methods for executing this stitch, both yielding the same beautiful result.
Method 1: The “Stabbing” or Individual Stitch Method
This method involves completing each stitch individually, one at a time. It offers maximum control and is often preferred for intricate details, sharp corners, or when working with thick fabrics.
- Bring Thread Up: Begin by bringing your threaded needle up from the back (wrong side) of the fabric to the front (right side) at your desired starting point. Pull the thread all the way through until the knot catches on the back of the fabric.
- Make First Stitch: Insert the needle back down through the fabric a short distance away from where you came up. This distance determines the length of your first stitch. Pull the thread through to the back.
- Start Next Stitch: Bring the needle up again a short distance from where you just went down. This new starting point is where your next stitch will begin. The gap between where you went down and where you came up again will be the “space” in your dashed line.
- Repeat: Continue this rhythm – needle down, then needle up – maintaining consistent stitch lengths and spaces between them. The goal is to create a series of uniform dashes.
Method 2: The “Weaving” or Sewing Method
This method is faster and often used for longer, straighter lines. It involves loading multiple stitches onto the needle before pulling the thread through.
- Bring Thread Up: Just like with Method 1, bring your threaded needle up from the back of the fabric to the front at your starting point.
- Weave the Needle: Instead of pulling the thread all the way through after the first stitch, keep the needle on the fabric surface. Push the needle down through the fabric, then bring it back up a short distance away. Repeat this motion, pushing the needle down and bringing it back up multiple times, “weaving” it through the fabric. You’ll essentially be loading several small stitches onto your needle.
- Pull Thread Through: Once you have a few stitches loaded (typically 3-5, depending on your comfort and the fabric thickness), pull the needle and thread all the way through. You will see a series of running stitches appear on the fabric.
- Continue: Re-insert the needle at the point where your last stitch ended and repeat the weaving process.
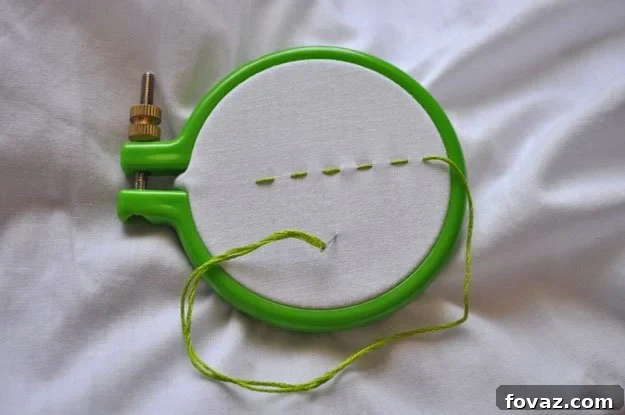
The image above beautifully illustrates the visual outcome of a well-executed running stitch. Notice the consistent length of the stitches and the uniform gaps between them – this is the hallmark of a neat running stitch, a popular and fundamental embroidery technique.
Tips for a Perfect Running Stitch
- Consistency is Key: Strive for even stitch lengths and consistent gaps between stitches. This creates a clean and professional look. Practice will naturally improve your consistency.
- Maintain Even Tension: Pull your thread just enough so that the stitch lies flat on the fabric without being too loose (creating loops) or too tight (causing the fabric to pucker).
- Mind Your Thread Length: As mentioned, 18-24 inches is a good length. Longer threads are more prone to tangling and wear, which can weaken the thread and cause fraying.
- Use a Hoop (if you have one): The hoop stabilizes the fabric, making it easier to maintain even tension and stitch length.
- Start Small: Begin with straight lines before attempting curves. Once comfortable, try gentle curves, then more intricate shapes.
- Finish Neatly: When you run out of thread, or complete a section, flip your work over to the back. Weave your needle under a few existing stitches and make a small knot close to the fabric. Trim any excess thread. Avoid carrying thread long distances across the back of your work, as it can show through or get snagged.
Beyond the Basics: Creative Applications of the Running Stitch
While simple, the running stitch is incredibly versatile and forms the basis for many other techniques and designs.
- Outlining: It’s perfect for creating simple outlines of shapes and letters.
- Filling: By stitching rows of running stitches close together, you can fill in areas to create a textured, shaded effect.
- Basting: Before machine sewing, a running stitch can be used to temporarily hold two pieces of fabric together. Its ease of removal makes it ideal for this purpose.
- Gathering: For a simple gather, make two parallel rows of running stitches and then pull the threads simultaneously to cinch the fabric.
- Quilting: In hand quilting, the running stitch is often used to join layers of fabric and batting, creating functional and decorative patterns.
- Decorative Effects: Experiment with different thread colors, varying stitch lengths, or even adding beads between stitches to create unique decorative borders and embellishments. The “double running stitch” (also known as Holbein stitch or two-sided running stitch) is an advanced variation where a second row of running stitches fills in the gaps of the first, creating a solid line that looks identical on both sides of the fabric.
Why the Running Stitch is Essential for Every Embroiderer
The running stitch isn’t just for beginners; it’s a fundamental technique that even experienced embroiderers rely on regularly.
- Foundation Skill: Mastering this stitch builds confidence and develops essential hand-eye coordination, tension control, and consistency – skills that are transferable to every other embroidery stitch you learn.
- Versatility: Its adaptability for outlining, filling, gathering, and quilting makes it a workhorse in the embroiderer’s toolkit.
- Speed and Efficiency: Particularly with the “weaving” method, the running stitch can be executed relatively quickly, allowing you to cover larger areas or complete projects in less time.
- Mindfulness and Relaxation: The repetitive motion of stitching can be incredibly meditative and calming, offering a wonderful way to unwind and express creativity.
- Cost-Effective Craft: Embroidery requires minimal initial investment, making it an accessible hobby for everyone.
By truly understanding and practicing the running stitch, you’re not just learning a single stitch; you’re unlocking the potential for countless creative projects. It’s the silent hero of many beautiful embroidery pieces, often underestimated but always vital.
Explore More Basic Embroidery Stitches and Expand Your Skills:
Once you’re comfortable with the running stitch, a whole world of other fascinating stitches awaits! Each stitch offers unique textures and possibilities, allowing you to expand your design repertoire. Here are some other foundational stitches you might want to try next to further your embroidery journey:
How to Back Stitch
A solid, continuous line stitch, excellent for outlining.
How to Cross Stitch
A popular, X-shaped stitch, fundamental for many counted thread projects.
Hand Sew The French Knot
Creates a small, textured knot, perfect for adding dots and small details.
Hand Sew The Running Stitch
A quick reminder of the stitch you’ve just mastered, perhaps for a different project!
How to Satin Stitch
Used for filling areas with a smooth, glossy surface.
How to Split Stitch
Creates a textured, rope-like line, ideal for outlines that need a bit more substance.
How to Stem Stitch
Another excellent outlining stitch, perfect for creating smooth, flowing lines, especially stems and curved elements.
Embrace the journey of learning these stitches, and soon you’ll be creating intricate and beautiful hand-embroidered masterpieces! Happy stitching!