
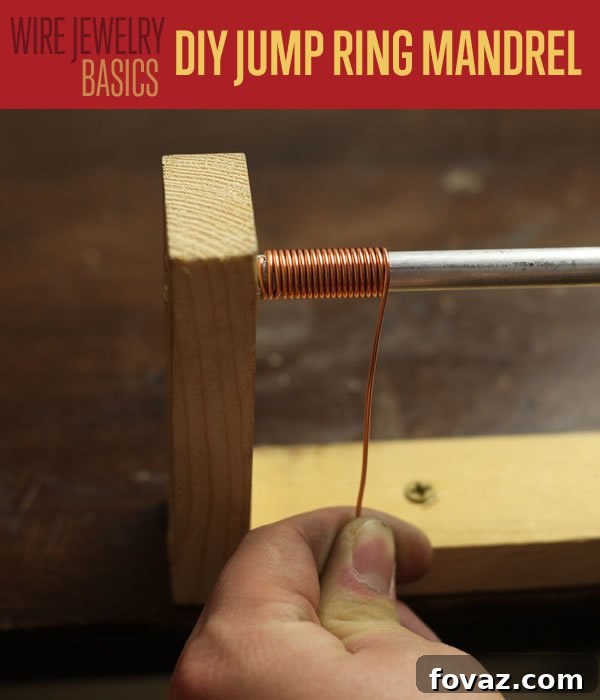
Are you eager to delve into the captivating world of jewelry making but unsure where to begin your creative journey? You’ve landed in precisely the right place! Our comprehensive guide will walk you through one of the fundamental processes: crafting your very own jump rings. These tiny, essential metal rings are the unsung heroes of jewelry, often serving as the crucial connectors that bind elements together. In many popular wire jewelry designs, jump rings aren’t just connectors – they are the primary building blocks themselves. Mastering the art of making jump rings opens up a universe of design possibilities, empowering you to create unique and personalized pieces.
This DIY project is remarkably straightforward and can be completed in a mere 20-30 minutes of focused work. The design of this jump ring mandrel tool is rooted in ancient practicality, mirroring tools used by blacksmiths in medieval times. Imagine the sheer volume of jump rings required to produce chainmaille armor for knights; these artisans would craft thousands daily. Our modern adaptation streamlines this age-old technique, making it accessible for today’s crafters.
While you might find pre-made jump ring mandrels in craft stores, they often come with limitations. Typically, these commercial versions can only produce small, 1-inch coils at a time, yielding a modest 20 to 30 jump rings per session. This restricted capacity can be a significant bottleneck, especially for larger projects. However, our DIY solution addresses this challenge head-on. By following this tutorial, you’ll learn how to build a robust mandrel capable of producing hundreds, or even thousands, of jump rings with greater efficiency and ease.
Why spend around $10 on a small bag of pre-made jump rings from the craft store when you can create a vast supply for a tiny fraction of that cost? This project is not only economical but also incredibly satisfying. As an added bonus, be sure to watch the exclusive video at the end of this tutorial, showcasing your new DIY jump ring mandrel in action!
DIY Jump Ring Mandrel: Essential Jewelry Making Tool
Supplies You’ll Need for Your Custom Jump Ring Mandrel:
- (1x) 11-inch long piece of scrap wood, approximately 2-inches wide and 3/4-inches thick. (Sizes are flexible; refer to supply notes for guidance.)
- (2x) 4-inch long pieces of scrap wood, matching the thickness and width of your main 11-inch piece.
- (1x) Aluminum metal rod, 16-inches in length with a 1/2-inch diameter. (Rod diameter can vary; see notes below for details.)
- (6x) 1-inch wood screws. (Screw length should correspond to the thickness of your wood pieces.)
- Drill with suitable bits: one 1/8-inch bit for pilot holes (for screws) and one 1/2-inch bit (or matching your chosen rod diameter) for the mandrel rod hole.
- Handsaw, power saw, or chop saw of your preference. (Lumber yards often offer cutting services if you lack tools.)
- Wire cutter or jewelry clippers. (Widely available at hardware stores.)
- Clamps (optional, but highly recommended for safety and precision).
Important Supply Notes for Your DIY Mandrel:
The beauty of this project lies in its flexibility regarding wood size. Almost any long, straight pieces of scrap wood will suffice. The dimensions provided are merely suggestions based on a convenient, beginner-friendly size. When selecting your wood, consider the overall size you desire for your finished tool. For our demonstration, we utilized small scraps from previous workshop projects. If this is your first time embarking on such a build, starting with a smaller mandrel like the one detailed below is advisable. You can always construct a larger, more specialized version later as your confidence grows and your needs evolve.
Your aluminum metal rod is a readily available item, typically found in the welding or metalworking section of any well-stocked hardware store. These rods are usually quite affordable, often costing around $4. Aluminum is an excellent choice for this project due to its relative softness, which makes it easier to bend and drill without specialized equipment, a significant advantage for DIY enthusiasts.
Regarding drill bits, you will need two distinct sizes. The first should be slightly smaller than the diameter of your wood screws; this is for creating pilot holes. Drilling pilot holes is a crucial step, especially when screwing near the edges of wood, as it significantly reduces the risk of the wood splitting. The second drill bit’s diameter must precisely match the diameter of the metal rod you’ve chosen. Remember, the larger the diameter of your metal rod, the larger your finished jump rings will be. This allows for customization based on your jewelry design requirements.
Step 1: Precisely Cutting Your Wood Components
The most efficient method for preparing your wood pieces is to cut them all from a single, longer plank. For this tutorial, I utilized a chop saw to cut my 11-inch base and the two 4-inch side walls. However, please note that these dimensions are adaptable, and you can certainly opt for larger pieces to suit your specific needs or preferences. If you don’t have access to larger power tools, don’t fret! Simple hand tools like a handsaw or a Japanese furniture saw are perfectly adequate for making these straightforward cuts with precision. Safety first: always ensure your wood is securely clamped before cutting, and wear appropriate safety gear.
Step 2: Drilling Pilot Holes in Your Wall Boards
For the next phase of assembly, take your longer base wood piece and one of your shorter wall pieces. These two components will be joined together using screws. Before fastening them, it’s essential to drill two pilot holes into the bottom face of one of your wall pieces. These pilot holes will guide your screws, preventing the wood from splitting and ensuring a secure, flush attachment. Position these holes strategically, typically about 1/2 to 3/4 inches in from each end of the wall piece, centered along its width.
Step 3: Securely Attaching the Base to the First Wall
Once you have successfully drilled the pilot holes in your wall board, carefully align it flush against the side of the longer base piece. The goal is to form a precise “L” shape. Maintain this alignment firmly as you extend the drill holes from the wall board into the base. While it might be tempting to simply hold the pieces together by hand, as I’ve done in some instances, this can lead to imprecise results and, more importantly, poses a safety risk to your fingers. A slightly misaligned attachment can affect the overall stability and function of your mandrel.
The safest and most effective method for this step is to utilize a wood clamp. If you have a clamp long enough, secure the wall piece firmly against the base while you drill. This will prevent any movement and ensure your pilot holes in the base are perfectly aligned with those in the wall. Once the holes are drilled, drive in one screw to temporarily hold the pieces together. This way, when you release the clamp to drill and screw the second hole, the wood pieces will remain securely in position, guaranteeing a strong and neat joint.
Step 4: Repeating the Process for the Second Wall Piece
With the first wall securely attached, carefully flip your base assembly over. Now, retrieve your second wall section of wood. You will repeat the exact process from Step 3: drill pilot holes into the bottom edge of this second wall piece, align it flush against the opposite side of the base, and then secure it firmly with screws. Ensure that both wall pieces are parallel and at a true 90-degree angle to the base. This precision is critical for the smooth operation of your jump ring mandrel, as it ensures the metal rod will spin freely and without obstruction. Take your time to achieve a sturdy and accurate attachment.
Step 5: Creating the Passage Hole for Your Mandrel Rod
Now, select the larger drill bit that perfectly matches the diameter of the metal rod you intend to use for your mandrel. In our example, we’re working with a 1/2-inch diameter aluminum rod, hence the use of a 1/2-inch drill bit. You will need to drill two corresponding holes, one on each of the vertical wall pieces you just attached. While absolute perfection isn’t strictly necessary, aim for consistency. A good target is approximately 1 inch down from the top edge of each wall and dead center along its width. Carefully mark these points on both walls before drilling. Drilling these holes accurately ensures that your mandrel rod will pass through smoothly and remain stable during operation.
Step 6: Inserting the Rod and Marking for the Handle Bend
Once both holes are drilled, gently slide your metal rod through the openings in the wall pieces to confirm a proper fit. The rod should pass through freely without binding or excessive play. This initial test ensures that your drilling was accurate and the walls are parallel. Next, with the rod still inserted, extend it beyond one of the walls and make a distinct mark approximately 1 inch outside from the outer face of that wall. This specific mark is crucial; it designates the precise location for the first bend that will form your handle. Use a permanent marker or even score the soft aluminum lightly with a drill bit for clear visibility.
Step 7: Crafting Your Ergonomic Handle
To create the handle, we will employ a method of bending the aluminum rod using brute force. Position the marked spot of your rod precisely on the edge of a sturdy surface, such as a workbench or a heavy table. Ideally, secure the marked area right at the edge using a robust clamp. This provides stability and leverage, making the bending process much easier and safer. If you don’t have a clamp, don’t worry—it can still be done by hand, though it will require more effort. Consider it your arm workout for the day!
For those with experience and proper safety equipment, heating the metal with a small plumber’s or jewelry fire torch at the bend point would make it incredibly pliable, bending “like butter.” However, as this is a beginner’s tutorial focused on safety and accessibility, we will stick to cold bending methods. Always prioritize safety if you choose to experiment with heat in other projects.
The second bend is where a clamp truly becomes invaluable. As demonstrated below, once you have your initial L-shaped bend, slide the end of the newly bent rod back into the clamp, securing it approximately 3 inches from the bend point. This setup allows you to create a second, opposing bend, transforming the rod’s end into a comfortable “S” shape. This ergonomic design makes for an ideal handle, providing a secure and comfortable grip for efficiently spinning the mandrel and winding your jewelry wire.
With the now L-shaped rod firmly clamped as illustrated, exert force to push the free end upwards. This action will create the second bend, forming the characteristic “S” shape at the end of your rod. This double-bend design significantly enhances the grip and ease of use, making the process of coiling wire much more comfortable and efficient.
Step 8: Drilling the Essential Wire Attachment Hole
At this stage, you have a fully assembled wooden base and a metal rod shaped with a functional handle for spinning. The next crucial step is to drill a small hole approximately 1 inch from the very end of the rod, specifically on the side *opposite* your newly crafted handle. This small, yet vital, hole is where your jewelry wire will be inserted and held securely as you rotate the rod. This mechanism is what allows you to consistently wrap the wire into tight, uniform coils, which will then be cut into your individual jump rings. It’s all coming together, isn’t it?
PRO TIP for Drilling into Round Rods:
If you find yourself struggling to drill a clean pilot hole directly into the round surface of the metal rod, here’s a professional trick. Orient your drill horizontally and, using the side of your drill bit, carefully machine a small, flat area onto the soft aluminum rod. This flat surface provides a stable starting point for your drill bit, preventing it from wandering or “walking” off-center. Once this small flat spot is created, you can then carefully proceed to drill your wire attachment hole into the flattened area, ensuring a precise and clean result. Always wear safety glasses and use appropriate clamping when performing this operation.
Step 9: Mounting Your Jump Ring Mandrel for Stability
For optimal performance and ease of use, your newly constructed jump ring mandrel needs to be securely mounted. Drill two pilot holes into the base of your wooden assembly, positioned approximately 1 inch in from either end. These holes will serve as anchoring points. Then, using appropriate screws, firmly secure your jump ring mandrel to your workbench, a sturdy table, or any other stable surface where you plan to operate it. Permanent mounting is highly recommended because operating the mandrel effectively requires both hands: one to turn the handle and the other to guide the wire. A firmly affixed tool ensures stability, prevents movement, and allows for consistent, smooth coiling, making your jewelry-making process much more efficient and enjoyable.
Step 10: Threading the Mandrel and Coiling Your Wire
Now that your custom jump ring maker is complete and securely mounted, it’s time for the exciting part: turning out perfectly uniform coils. Take one end of your chosen jewelry wire and carefully insert it into the small hole you drilled near the end of the mandrel rod. Push the wire through until it almost—but not quite—emerges from the other side. With one hand, begin to slowly and steadily turn the handle of your mandrel rod. Simultaneously, use your other hand to guide and maintain constant pressure on the wire. It’s crucial to keep the wire taut and at a slight angle behind the point where it’s being turned. This continuous tension and angle are key to creating tight, consistent coils, which will ensure your jump rings are uniform in size and shape once cut. Remember, like any craft, practice makes perfect; your coiling technique will improve with each turn.
Step 11: Gently Removing Your Coils from the Mandrel
Once you have wound a coil of the desired length, suitable for your planned number of jump rings, it’s time to prepare it for removal. Using your wire cutters or clippers, carefully snip away the small section of wire that is currently anchored through the hole in your mandrel rod. Ensure this small piece is completely detached from the main coil and pull it clear of the hole. This prevents it from snagging or deforming your meticulously wound coil as you slide it off. Next, gently pull the mandrel rod out slightly from the wooden support structure, just enough to create space. With a smooth motion, slide your perfectly formed wire coil directly off the rod. Handle the coil carefully to maintain its shape.
Step 12: Precision Clipping Your Jump Rings
Now that you have a beautifully wound coil, the final step is to transform it into individual jump rings. Take your wire clippers – smaller, flush-cut clippers are ideal for this task – and begin carefully clipping off each jump ring from the coil. Aim for a clean, straight cut across one side of each loop. For beginners, cutting one loop at a time offers the best control and helps ensure consistent results. As you advance in your jewelry-making skills, you might consider investing in specialized tools like a jeweler’s saw. A jeweler’s saw allows you to cut through multiple layers of the coil simultaneously, resulting in a shower of perfectly cut jump rings with minimal effort. However, for now, simple wire clippers are more than sufficient to get started. Always wear safety glasses to protect your eyes from flying wire snippets.
BONUS VIDEO: How to Use Your DIY Jump Ring Mandrel!
To provide an even clearer understanding of how to operate your fantastic new jump ring mandrel, we’ve prepared a concise video demonstration. This short tutorial visually guides you through the process of winding wire onto your mandrel to create perfect coils. Additionally, the video highlights an alternative mounting method: effectively securing your mandrel to your worktable using a sturdy clamp instead of permanent screws. This offers flexibility if you prefer not to permanently affix your tool. Watch the video below to see your new creation in action!