
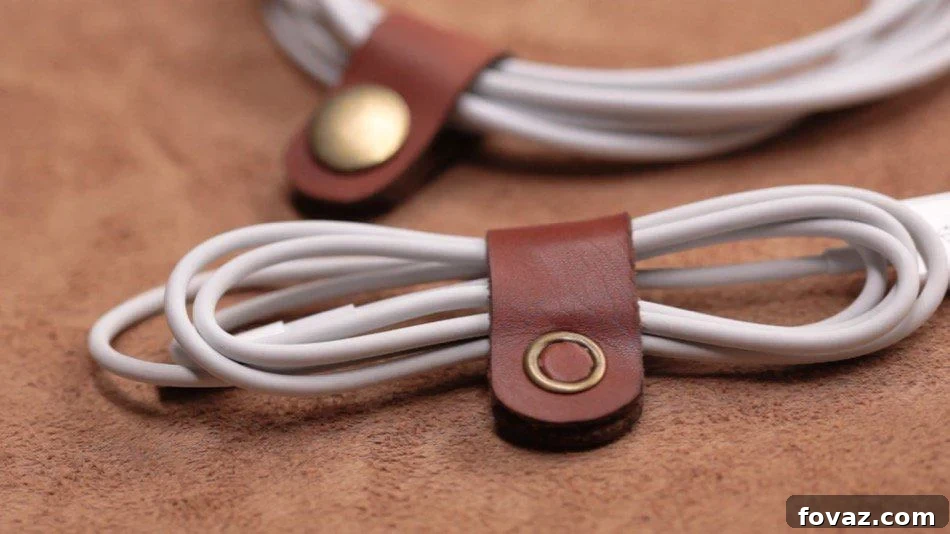
Master the Art of DIY: Craft Your Own Elegant Leather Cable Holder
Are you tired of constantly battling with tangled charging cables, headphone wires, and other electronic cords? Do you dream of a desk or bag that is neatly organized and free from clutter? Look no further! This comprehensive guide will walk you through the exciting process of crafting your very own stylish and functional leather cable holder. Perfect for both seasoned DIY enthusiasts and those just beginning their journey into the rewarding world of leatherworking, this project promises not only organization but also the satisfaction of creating something beautiful and practical with your own hands.
A handmade leather cable holder isn’t just a solution for cord management; it’s a statement piece that adds a touch of rustic elegance and personalized charm to your everyday essentials. Imagine pulling out your headphones or charger, neatly secured within a handcrafted leather wrap, instead of fumbling through a chaotic knot of wires. This tutorial is designed to be accessible, using a blend of traditional leatherworking techniques and modern tools to ensure a polished, professional-looking result. Whether you opt for genuine leather for its timeless appeal and durability or prefer a high-quality faux leather alternative, this project is highly customizable to suit your personal style and ethical preferences.
Beyond the practical benefits, engaging in a craft like leatherworking offers a unique sense of accomplishment. It’s an opportunity to slow down, focus on detail, and produce a tangible item that serves a real purpose. This DIY cable holder is an ideal entry point for learning fundamental leather craft skills, such as precise cutting, edge treatment, and snap setting. By the end of this guide, you’ll not only have a fantastic new accessory but also a newfound confidence in your crafting abilities. Let’s gather our materials and embark on this creative adventure to transform unruly cables into organized elegance!
Why a Handmade Leather Cable Holder is a Must-Have Accessory
In our increasingly digital world, the proliferation of electronic devices means an equal surge in cables. From smartphone chargers to laptop power cords, earbud wires, and USB cables, the mess can quickly become overwhelming. This is where a dedicated, handmade leather cable holder shines, offering numerous advantages over generic plastic ties or temporary solutions.
Unparalleled Organization and Efficiency
The primary benefit is, of course, superior cable management. A leather cable holder neatly wraps around your cords, keeping them coiled and secure. This not only prevents tangles that can damage wires but also makes it incredibly easy to find and retrieve the exact cable you need, when you need it. No more wasted time untangling knots or searching for a specific charger in a messy drawer or bag.
Durability and Longevity
Leather is renowned for its strength and resilience. Unlike flimsy plastic or fabric alternatives, a well-made leather cable organizer will withstand daily wear and tear, protecting your cables for years to come. The robust nature of leather ensures that your holder remains functional and attractive, even with constant use and travel. This makes it a sustainable choice, reducing the need for frequent replacements.
Aesthetic Appeal and Personal Style
Beyond functionality, a leather cable holder exudes a timeless charm and sophisticated aesthetic. The natural textures, rich colors, and unique patina that genuine leather develops over time add a touch of luxury and personality that mass-produced items simply cannot match. Crafting your own allows you to choose the leather type, color, and finish, creating an accessory that perfectly complements your personal style or serves as a thoughtful, customized gift.
Protection for Your Cables
Constantly bending, twisting, and pulling tangled cables can shorten their lifespan. A leather holder provides a protective barrier, reducing strain on the wires and connectors. This preventative measure can save you money in the long run by extending the life of your expensive electronic accessories.
The Joy of DIY and Personalization
There’s immense satisfaction in creating something with your own hands. This project allows for significant personalization, from choosing your preferred leather to adding unique finishes, stamps, or even engravings. The process itself is a therapeutic break from daily routines, offering a creative outlet and a tangible reward for your efforts. Plus, the compliments you’ll receive on your custom-made organizer are an added bonus!
Essential Tools and Materials for Your Leather Cord Organizer
Before diving into the crafting process, it’s crucial to gather all the necessary tools and materials. Having everything ready at hand ensures a smooth workflow and helps you achieve the best possible results. Many of these items are foundational for basic leatherworking and will serve you well in future projects.
Premium Materials for a Quality Finish
- Leather (or Faux Leather): The star of our project! For beginners, a medium-temper vegetable-tanned leather (around 2-3 oz or 0.8-1.2mm thickness) is ideal as it’s easy to cut, shape, and burnish. If you prefer, a good quality faux leather works just as well. Consider the color and texture that best suits your aesthetic vision for your new cord organizer.
- Snap Set: You’ll need a set of durable metal snaps. These typically come in two parts (a cap and a socket, and a post and a stud) that fasten together. Choose a size appropriate for your cable holder; a common size is 10mm or 12mm.
Indispensable Tools for Precision and Professionalism
- Cutting Mat: A self-healing cutting mat is non-negotiable. It protects your work surface and your blades, ensuring clean cuts and extending the life of your tools.
- Metal Ruler: For precise, straight cuts and accurate measurements. Avoid plastic rulers, as a rotary cutter can easily shave off their edges.
- Rotary Cutter: An invaluable tool for making clean, straight cuts through leather. While sharp utility knives can also work, a rotary cutter often yields a smoother edge, especially for longer cuts.
- Metal Washer: This humble item serves as a perfect template for rounding the corners of your leather strip, ensuring consistent and aesthetically pleasing curves.
- Leather Edge Slicker: Used to smooth and compress the raw edges of your leather. This tool, often made of wood or plastic, helps create a professional, finished look by compacting the fibers.
- Dremel Leather Burnisher: While not strictly essential (you can hand-burnish), a Dremel with a specialized leather burnishing attachment significantly speeds up and refines the edge finishing process, giving a mirror-smooth, professional edge.
- Eco Flo Gum Tragacanth and Wool Dauber: Gum tragacanth is a natural gum used as an edge-finishing agent. When applied and then burnished, it helps to seal and smooth the leather fibers, creating a durable and attractive edge. The wool dauber is used for applying the gum evenly.
- Snap Setting Tool: This specialized tool kit includes various dies that match your snap sizes, allowing you to securely set the snaps into the leather without damaging them.
- Double-Face Soft Mallet: A mallet with soft faces (often nylon or rawhide) is used with the snap setting tool to apply force without deforming or damaging the leather or the metal snaps.
Safety Note: Always exercise caution when using sharp cutting tools. Keep your fingers clear of the blade and work on a stable surface. Proper ventilation is also recommended when working with any glues or finishing agents.
Step-by-Step Guide: Crafting Your Elegant Leather Cable Management Solution
With your materials and tools at the ready, let’s begin the hands-on process of creating your custom leather cable holder. Each step is designed for clarity, ensuring even beginners can follow along and achieve fantastic results.
Step 1: Precision Cutting Your Leather into a Small Rectangular Strip
The foundation of your cable holder is a perfectly sized leather strip. Lay your chosen leather or faux leather flat on your cutting mat. Using your metal ruler and rotary cutter, carefully cut a rectangular strip. A good starting dimension is approximately 6 inches (15 cm) long and 1 inch (2.5 cm) wide. For larger cables, you might want to increase the length to 7-8 inches. Ensure your cuts are as straight and clean as possible, as this will impact the final appearance of your holder. Measure twice, cut once!
Step 2: Achieving Smooth, Rounded Corners Using a Washer and Rotary Cutter
Sharp corners can fray over time and don’t offer the polished look we’re aiming for. Place a metal washer at each corner of your leather strip, aligning its curve with the edges. Use the washer as a guide for your rotary cutter (or a sharp utility knife), carefully trimming away the sharp corner to create a smooth, consistent curve. Repeat this for all four corners. This small detail significantly enhances the aesthetics and durability of your cable holder.
Step 3: Initial Edge Smoothing with the Leather Edge Slicker
Before applying any finishing agents, it’s beneficial to physically compress the leather fibers on the raw edges. Take your leather edge slicker and firmly rub it along all the cut edges of your strip. Use moderate pressure and a back-and-forth motion. You’ll notice the fibers start to compact and smooth out. This initial slicking prepares the leather for the burnishing agent and helps achieve a more professional finish.
Step 4: Applying Gum Tragacanth for a Polished Edge
Now it’s time to apply the edge finishing agent. Dip your wool dauber into the Eco Flo Gum Tragacanth, ensuring it’s evenly coated but not dripping. Gently and evenly rub the gum along all the outside edges of your leather strip. The gum should lightly coat the raw edge. Allow it to sit for a minute or two, letting the gum slightly penetrate the leather fibers. This acts as a binder, preparing the edges for superior burnishing.
Step 5: Burnishing for a Professional, Mirror-Smooth Finish
This step is where the magic happens, transforming rough edges into a sleek, professional finish. If you’re using a Dremel with a leather burnishing attachment, set it to a medium speed. Gently run the burnisher along the gum-coated edges of your leather strip. Apply light pressure and keep the Dremel moving to avoid overheating the leather. You’ll quickly see the edges become smooth, shiny, and almost glass-like. If you don’t have a Dremel, you can achieve a similar effect by vigorously rubbing the edge slicker on the gum-coated edges until the desired smoothness is achieved, though it will require more effort and time.
Step 6: Strategic Positioning of the First Snap Component
Deciding where to place your snaps is crucial for the functionality and look of your cable holder. Take one part of your snap (usually the cap and socket side) and position it about 0.5 inches (1.25 cm) from one end of your leather strip, centered along the width. Use a pencil or an awl to mark the exact spot where the snap post will go through the leather. Accuracy here ensures the holder closes neatly.
Step 7: Securely Setting the First Snap Element with the Setting Tool and Mallet
Place the marked spot on a stable, hard surface (often an anvil or a specialized setting base that comes with your snap setting kit). Insert the post of the snap through the hole you made. Place the appropriate snap setting tool over the snap cap. Using your double-face soft mallet, strike the setting tool firmly and squarely a few times until the snap is securely fastened into the leather. Check that it feels tight and is flush with the leather surface.
Step 8: Flipping the Strip Over and Aligning the Corresponding Snap Piece
Now, gently fold the leather strip as if it were going to snap closed, but don’t force it. Place the other half of your snap (the post and stud side) directly on top of the already installed snap, ensuring perfect alignment. Mark the spot on the *other side* of the leather where this second snap component will be installed. This method guarantees that your snaps will align perfectly when the holder is closed.
Step 9: Hammering the Second Snap Piece into the Leather Using the Setting Tool
Similar to Step 7, position the marked spot on your setting base. Insert the post of the second snap component through the leather. Place the corresponding setting tool over it and use your soft mallet to strike it firmly until it’s securely set. Once both parts of the first snap are installed, test them by snapping them together to ensure a firm connection.
Step 10: Repeating the Snap Installation Process on the Opposite End
To create a fully functional cable holder that can be wrapped around a cable, you’ll need a second set of snaps on the opposite end of the leather strip. Repeat steps 6 through 9 for the other end of your leather strip. Ensure symmetrical placement and alignment with the first set of snaps. This provides the flexibility to adjust the tightness of the wrap depending on the cable’s thickness.
Step 11: The Grand Reveal: Snap It Closed and Keep Your Cables Organized with Style!
Congratulations! You’ve successfully crafted your own leather cable holder. Now, take a cable, wrap it neatly, and snap your new creation closed. Admire your handiwork and revel in the satisfaction of organized cables and a beautiful, custom-made accessory. Your desk, bag, and travel kit will thank you for the newfound order!
Beyond the Basics: Tips for Aspiring Leatherworkers and DIY Enthusiasts
This cable holder project is an excellent introduction to leatherworking, but there’s always more to learn and explore. Here are some tips to help you on your crafting journey:
- Practice Makes Perfect: Don’t be afraid to experiment with scrap pieces of leather before making your final cuts on your main project. This helps build muscle memory and confidence.
- Keep Your Tools Sharp: A dull blade is more dangerous and less effective than a sharp one. Regularly sharpen or replace your rotary cutter blades and utility knife blades for cleaner cuts.
- Patience is a Virtue: Leatherworking is not a race. Take your time with each step, paying attention to detail. Rushing can lead to mistakes and frustration.
- Explore Different Leathers: Once comfortable with the basics, try working with different types of leather, such as chrome-tanned, oil-tanned, or exotic leathers, to discover new textures and properties.
- Invest in Quality Tools: While you can start with basic tools, investing in higher quality tools as your skills grow will improve your results and make the crafting process more enjoyable.
- Join a Community: Connect with other leatherworkers online or in local clubs. Sharing tips, tricks, and project ideas can be incredibly inspiring and educational.
Customization Ideas for Your Unique Leather Cable Holder
One of the greatest joys of DIY is the ability to personalize your creations. Here are some ideas to make your leather cable holder truly one-of-a-kind:
- Stamping and Embossing: Use leather stamps to add initials, a small logo, or decorative patterns to your holder. This is a classic way to personalize leather goods.
- Dyeing and Antiquing: Experiment with different leather dyes to create unique color combinations. An antique gel can highlight stamped designs and give your leather a worn, vintage look.
- Edge Painting: Instead of burnishing, you can apply edge paint for a very clean, modern finish. This requires a steady hand and multiple thin coats.
- Decorative Stitching: For a more advanced touch, consider adding some hand-stitched details around the edges or a decorative seam in the middle of the strip.
- Hardware Variations: Explore different types of snaps (e.g., magnetic snaps) or even add small rivets for an industrial aesthetic.
- Shape and Size Variations: Don’t limit yourself to a simple rectangle. Experiment with different shapes, such as tapering the ends or adding a unique cut-out design.
Caring for Your Handmade Leather Cord Organizer
To ensure your beautiful leather cable holder lasts for years, a little care goes a long way:
- Keep it Dry: Leather and excessive moisture don’t mix. If your holder gets wet, gently pat it dry with a soft cloth and let it air dry away from direct heat.
- Condition Regularly: Over time, leather can dry out. Apply a small amount of good quality leather conditioner every few months to keep it supple and prevent cracking.
- Clean Gently: For minor dirt or smudges, wipe with a damp (not wet) cloth. For tougher stains, use a specialized leather cleaner, following the product instructions carefully.
- Avoid Direct Sunlight and Heat: Prolonged exposure to direct sunlight or extreme heat can fade the leather’s color and cause it to dry out and become brittle.
Frequently Asked Questions (FAQ) about DIY Leather Cable Holders
Q: Can I use different types of leather for this project?
A: Absolutely! While vegetable-tanned leather is often recommended for beginners due to its workability and ability to be burnished, you can experiment with chrome-tanned leather, oil-tanned leather, or even thicker upholstery leathers. Just be aware that different leathers will react differently to cutting, edge finishing, and snap setting.
Q: How long does this project typically take for a beginner?
A: For a complete beginner, making one cable holder might take anywhere from 45 minutes to 1.5 hours, including gathering tools and understanding each step. With practice, you can easily make several in under an hour.
Q: What if I don’t have a Dremel for burnishing?
A: No problem at all! The Dremel simply speeds up and refines the burnishing process. You can achieve excellent results by hand-burnishing with a wooden edge slicker. Apply the gum tragacanth and then vigorously rub the slicker along the edges until they are smooth and shiny. It might require a bit more elbow grease but is just as effective.
Q: How can I ensure my snaps are perfectly aligned?
A: The trick is to install one half of the snap first. Then, fold the leather over, aligning where the second snap should go. You can use a bit of ink on the first snap’s post to transfer a mark to the second location, or simply make a careful indentation. This “transfer” method ensures a perfect closure.
Q: Can I make this cable holder smaller or larger for different cables?
A: Yes, the dimensions are completely customizable! For thin earbud cables, you might want a shorter, narrower strip (e.g., 4-5 inches long, 0.75 inches wide). For thick laptop power cords, you’ll need a longer and wider strip (e.g., 8-10 inches long, 1.5-2 inches wide) and possibly larger snaps. Always test the wrap with your cable before setting the snaps.
Conclusion: Embrace Organized Living with Your DIY Leather Creation
You’ve now successfully completed your very own handmade leather cable holder – a testament to your creativity and attention to detail. This project is more than just about organizing wires; it’s about reclaiming control over clutter, embracing the satisfaction of craftsmanship, and adding a unique, personal touch to your everyday life. Each time you snap your cables into place, you’ll be reminded of the skills you’ve learned and the quality item you’ve produced.
We hope this detailed tutorial has inspired you to delve deeper into the fascinating world of DIY and leatherworking. This cable holder is just the beginning! There are countless other projects awaiting your touch, from wallets and keychains to more complex bags and accessories. Remember, every master craftsman started with a single step, and you’ve just taken a significant one. Don’t hesitate to share your finished projects and any leatherworking tips you discover in the comments below – your insights could inspire others!
Check out the video below to see the full tutorial!For more exciting DIY and craft news, along with fresh project ideas, follow us on Facebook, Twitter, Pinterest and Instagram!
LIKE this? You’ll LOVE these inspiring DIY projects and leather craft ideas:
Unlock Your Creativity: How to Make a Stunning Leather NecklaceAdvanced Leather Crafting: Make Your Own Awesome Cable OrganizerRetro Revival: Make Your Own ’90s-Inspired Cord Organizer for Ultimate Style