
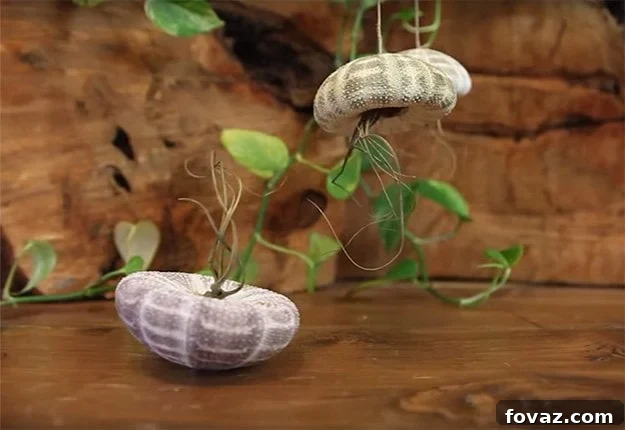
Discover the Magic of Jellyfish Air Plants: A DIY Guide to Suspended Living Art
Are you looking to infuse your home with a unique blend of natural beauty and captivating artistry? Dive into the enchanting world of jellyfish air plants! These delightful creations merge the minimalist elegance of Tillandsia (air plants) with the organic charm of sea urchin shells, resulting in stunning suspended displays that mimic the graceful movement of jellyfish drifting through water. Far from your typical houseplant, these living sculptures add an ethereal touch to any room, transforming ordinary spaces into extraordinary sanctuaries. Whether you’re a seasoned plant enthusiast or a curious beginner, this guide will show you how to craft your own mesmerizing collection of these unique suspended gravity plants, bringing a fresh, vibrant aesthetic to your decor.
The allure of these jellyfish-inspired air plant designs lies in their ability to elevate home decor beyond traditional potted greenery. Instead of the usual arrangement, you’re creating a piece of living art that floats effortlessly, capturing attention and sparking conversation. For this detailed tutorial, we’ll guide you through the process, which can be simplified by using a convenient all-in-one kit designed to help you craft these versatile and organic creations with ease. However, if you prefer a hands-on approach, you can also gather the necessary materials independently, allowing for full creative freedom.
One of the most fascinating aspects of air plants, scientifically known as Tillandsia, is their remarkable ability to thrive without soil. Unlike most plants, their roots serve primarily as anchors, allowing them to cling to rocks, trees, or other surfaces in their natural habitats. Instead of drawing nutrients from the soil, their specialized leaves are equipped to absorb all the moisture and essential nutrients they need directly from the air. This unique characteristic is precisely why they can literally live suspended, earning them the descriptive name “air plant” and opening up a world of creative display possibilities that traditional potted plants simply can’t offer.
Beyond their ethereal ability to “float” and their captivating aesthetic, air plant care is surprisingly simple, making them an ideal choice for busy individuals or those new to plant ownership. For the most part, their needs are straightforward: consistent bright, indirect light and regular hydration. Their lightweight nature further enhances their display versatility, allowing them to be showcased in myriad chic and unique ways. From hanging installations to delicate desk companions, these plants breathe new life into any room or corner you choose to adorn. Personally, I’m so enamored with my hanging air plants that I’ve begun gifting the DIY kit to all my crafty friends – and even to those I hope to inspire to embrace the rewarding world of DIY living!
How to Craft Your Own DIY Jellyfish Air Plants: A Step-by-Step Guide
Ready to transform humble sea urchin shells and vibrant Tillandsia into captivating home decor? This comprehensive, step-by-step tutorial will walk you through the entire process, showing you exactly how to create a stunning trio of gorgeous jellyfish air plants. Each step is designed to be clear and easy to follow, ensuring a successful and enjoyable crafting experience, even for beginners. Let’s get started on bringing these mesmerizing pieces of living art into your home.
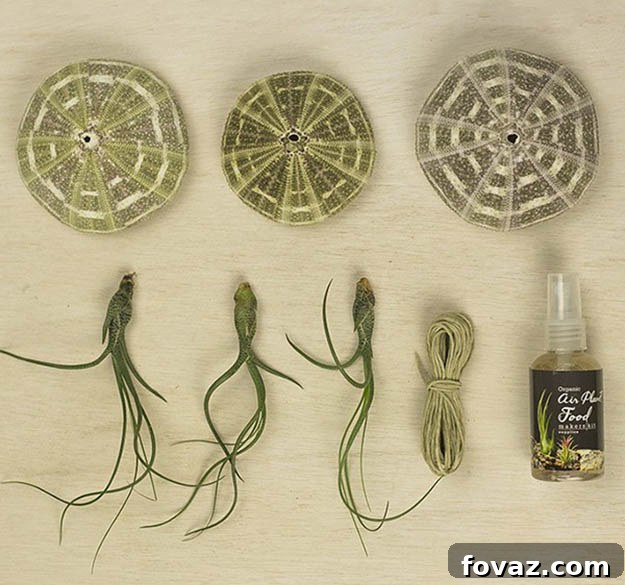
Materials You’ll Need (Included in most DIY kits, or source separately)
- 3 High-Quality Sea Urchin Shells, approximately 3-4 inches across (chosen for their unique dome shape and delicate texture)
- 3 Live Air Plants (Tillandsia species known for their graceful “tentacle-like” appearance when inverted, such as Tillandsia ionantha or Tillandsia capitata)
- Durable Hanging Twine (natural jute or hemp works beautifully for an organic look)
- Air Plant Food (a specialized, diluted fertilizer to promote healthy growth and vibrancy, often in a convenient spray bottle)
- Scissors (for cutting twine)
- Measuring tape or ruler (optional, for precise twine lengths)
Step 1: Prepare Your Materials and Workspace
Begin by carefully unpacking all the contents from your kit or laying out your individually sourced materials. Take a moment to inspect your sea urchin shells for any cracks or damage, and gently examine your air plants, ensuring they are healthy and vibrant. It’s a good practice to set up a clean, well-lit workspace to make the assembly process smooth and enjoyable. Having everything organized before you start will significantly streamline the crafting process and prevent any interruptions.
Step 2: Plan Your Display and Measure Twine Lengths
Before cutting, consider where your finished jellyfish air plants will ultimately reside. This crucial planning step will determine the ideal length of your hanging twine. Will they dangle gracefully from the ceiling at varying heights, creating a dynamic visual cluster? Or perhaps they’ll perch elegantly on a desk or bookshelf, requiring only a short loop for stability? If ceiling suspension is your goal, you’ll need significantly longer pieces of twine to achieve the desired drop. For desk or countertop displays, a shorter, more discreet loop will suffice. Consider creating a trio with staggered lengths for a more visually appealing arrangement.
Step 3: Secure the Twine and Attach Your Air Plant
Measure out the desired length of your hanging twine. Once measured, create a sturdy loop knot at one end. This loop will serve as the primary attachment point. Now, carefully thread the other end of the twine through the natural opening at the top (apex) of your sea urchin shell. The delicate air plant is surprisingly small and lightweight, allowing it to fit snugly and securely within the twine loop. Gently position the base of the air plant within the loop so that the plant’s “roots” (or base) are nestled inside the shell, and its leaves (or “tentacles”) cascade downwards, mimicking the graceful form of a jellyfish. Ensure the plant is secure but not overly constricted, allowing for future growth and easy removal for watering.
Step 4: Provide Initial Hydration and Nutrition
Immediately after assembly, it’s essential to give your new air plant a good drink. Use the specialized air plant food included in your kit or simply a fine mist of clean water. Generously spray the entire air plant, ensuring all its leaves are thoroughly moistened. This initial hydration is vital for helping the plant acclimate to its new environment and absorb essential nutrients. Remember, keeping your air plant adequately moist is paramount to its health and prevents it from drying out and perishing. This initial care sets the stage for a thriving, beautiful display.
Step 5: Repeat for a Stunning Trio and Customize Lengths
To create a captivating display, repeat Steps 2 and 3 for the remaining two sea urchin shells and air plants. As a creative hint: if you envision your finished jellyfish plant designs hanging at different elevations, consciously vary the lengths of your twine during this step. By doing so, you can create a dynamic, multi-tiered arrangement that adds depth and visual interest to your space, making each plant a unique part of a cohesive collection. Don’t be afraid to experiment with different heights to achieve your desired aesthetic.
Step 6: Choose Your Display Style: Hanging or Upright
This step offers full creative freedom and is entirely up to your personal aesthetic preference. Do you want your air plants to truly embody the jellyfish form, gracefully suspended and “floating” in mid-air? Or perhaps you prefer them as unique desk or countertop decorations, where the sea urchin shell acts as a whimsical base for the upright plant? For a hanging display, ensure the twine is securely fastened to a hook or suitable fixture. For an upright display, simply flip the shell over and gently insert the air plant so it stands proudly within the opening, allowing its leaves to reach upwards. Both options offer distinct charm and will enhance your space beautifully.
Step 7: Essential Ongoing Care: Keeping Your Air Plants Thriving
Ongoing care is crucial for the longevity and vibrancy of your jellyfish air plants. While they are low-maintenance, consistent attention to their needs will ensure they flourish. Don’t forget to regularly mist your air plants with the specialized air plant food from your kit or with clean, filtered water. Here’s a detailed guide to their care:
- Watering: The most critical aspect of air plant care.
- Misting: For typical home environments, misting 2-3 times a week with a spray bottle is often sufficient. Ensure the entire plant is wet, but avoid water pooling in the shell.
- Soaking: Once every 1-2 weeks, consider giving your air plants a thorough soak. Gently remove the plant from its shell (if easily detachable) and submerge it in a bowl of room-temperature water for 20-30 minutes. After soaking, gently shake off excess water and allow the plant to dry completely in an area with good air circulation before returning it to its shell. This prevents rot.
- Signs of Dehydration: Rolled or curled leaves, softer texture, or browning tips indicate your plant needs more water.
- Light: Air plants thrive in bright, indirect light.
- Place them near a window that receives ample light but avoids direct, harsh sunlight, especially during the hottest parts of the day, which can scorch their leaves.
- Fluorescent office lights can also sustain them, making them perfect desk companions.
- Air Circulation: Good air circulation is vital. After watering, ensure they dry out completely within a few hours to prevent fungal issues. Avoid placing them in enclosed, stagnant spaces.
- Temperature: They prefer temperatures between 50-90°F (10-32°C). Protect them from extreme cold or heat.
- Feeding: Use air plant specific fertilizer (like the one in the kit) once a month or every other month. Dilute it according to instructions and use it during misting or soaking.
Step 8: Final Placement & Enjoyment of Your Living Art
Congratulations! Your lovely jellyfish air plant creations are now complete and ready to enchant. This final step is all about artful placement. Hang them individually in a sunny window, group them in a cluster at varying heights from a ceiling hook, or arrange them on a floating shelf. Consider placing them in unexpected spots like a bathroom for a spa-like feel, or a home office for a touch of natural calm. These unique living sculptures will undoubtedly enhance any space, adding a touch of whimsical elegance and natural beauty that’s sure to delight both you and your guests. Enjoy the serene presence these captivating plants bring to your home.
See the steps in action and get inspired!
Click here to explore more about the DIY Jellyfish Suspended Gravity Air Plant Trio kit and make your crafting journey even easier.
Elevate Your Decor with Even More DIY Hanging Air Plant Fun!