
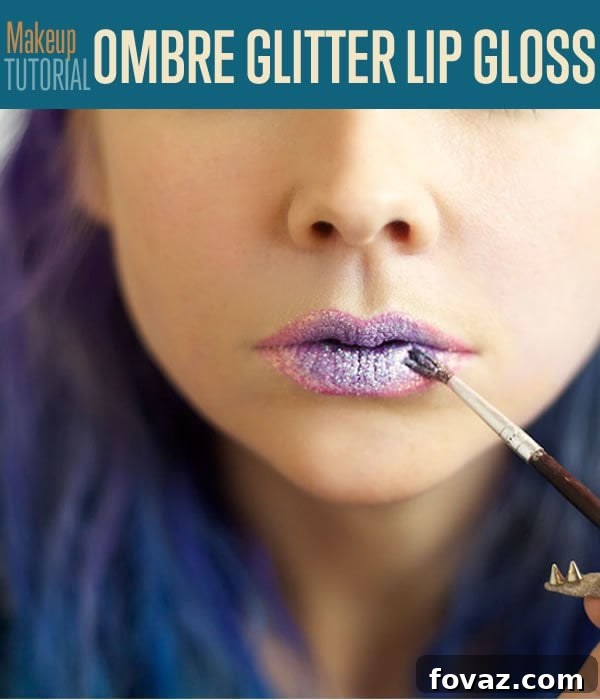
Step into the spotlight with a dazzling lip look that screams confidence and style. Forget your everyday lip gloss; we’re diving into the mesmerizing world of ombre glitter lips. This isn’t just a makeup trend; it’s a bold statement, perfect for those unforgettable nights out, glamorous events, or a special date where you want to leave an absolutely sparkling impression. Prepare to captivate and shine all night long with a pout that truly takes center stage. While these lips are designed to turn heads, the key to success lies in balance – pair them with a simpler eye makeup look to ensure your lips remain the undeniable star of your ensemble.
Master the Art of Ombre Glitter Lips: A Step-by-Step Tutorial
Creating the perfect ombre glitter lip is an art form that combines precision with a touch of magic. This comprehensive guide will walk you through every step, ensuring your lips not only sparkle but also maintain their dazzling effect for hours. Get ready to transform your makeup routine and unleash your inner glow with this show-stopping technique.
Why Ombre Glitter Lips? The Ultimate Statement Pout
The allure of ombre glitter lips extends far beyond simple aesthetics. This look offers a unique blend of sophistication and playful glamour, making it incredibly versatile for various occasions. The ombre effect adds depth and dimension, making your lips appear fuller and more luscious, while the glitter catches every light, creating an irresistible shimmer. It’s a powerful expression of individuality, allowing you to project confidence and a vibrant personality without saying a single word. Perfect for making an entrance, this style ensures you’re remembered long after you’ve left the room.
Essential Supplies for Your Ombre Glitter Lip Transformation
To achieve a flawless and long-lasting ombre glitter lip, using the right products is paramount. Quality ingredients not only ensure a stunning finish but also prioritize your safety and comfort. Here’s a detailed list of what you’ll need, along with tips for selection:
- Waterproof Foundation (Full Coverage): A crucial base for longevity and vibrant color. We highly recommend a full-cover cream foundation like Make Up For Ever Full Cover for its incredible staying power and ability to create an even canvas. This will help prevent your lip color and glitter from feathering or fading, securing your dazzling look for hours.
- Waterproof Makeup Gel/Mixing Medium: This is your secret weapon for adhering glitter effectively. Products like Anastasia Beverly Hills Beauty Genius work wonders by creating a durable, flexible bond that keeps glitter in place without feeling stiff or uncomfortable. Avoid using craft glue or anything not specifically formulated for cosmetic use on the delicate skin of your lips.
- Two Shades of Makeup Glitter: Choose two complementary or contrasting glitter shades to create your ombre effect. For safety and comfort, always opt for cosmetic-grade glitter. Craft glitter can contain sharp edges, glass particles, or dyes not safe for skin contact, especially near your mouth. For instance, a white or iridescent glitter for the base and a vibrant pink or fuchsia for the accent would create a stunning contrast.
- Lip Brush: A fine, synthetic lip brush is indispensable for precise application of foundation, lip liner, and glitter. Its firm bristles allow for smooth, even distribution and sharp lines. Ensure it’s clean before each step to prevent color mixing.
- Fuchsia Pink Lip Liner: A vibrant lip liner serves multiple purposes: defining the shape, preventing color bleed, and acting as a base color. We suggest Make Up For Ever 16c for its rich pigment and creamy texture. Choose a shade that either matches your accent glitter or provides a bold contrast.
Step-by-Step Instructions: Creating Your Radiant Ombre Glitter Lip Gloss
Step 1: Prepare Your Canvas with Foundation
The first step towards an enduring glitter lip is to create a clean, neutral base. Take a small amount of your waterproof full-coverage foundation on your lip brush. Gently apply this foundation all over your lips, extending slightly beyond your natural lip line if you desire a fuller look. This waterproof base is crucial for several reasons: it neutralizes your natural lip color, allowing the liner and glitter shades to appear more vibrant and true to color. More importantly, it creates a gripping surface for the subsequent layers, significantly enhancing the longevity of your glitter, ensuring your sparkling pout lasts all night without smudging or fading.
Step 2: Define and Shape with Lip Liner
Now it’s time to shape your pout. With your fuchsia pink lip liner, carefully outline your lips. Precision is key here, so take your time to ensure symmetry and create your desired shape. Many makeup artists, myself included, prefer to line slightly outside the natural lip line to give the illusion of fuller, more voluminous lips. However, if a natural look is what you’re after, simply trace along your natural lip contours. This outline will act as a barrier, preventing your glitter from migrating, and will also define the outer edge of your ombre effect. Remember, a well-defined outline is the secret to a polished and professional finish.
Step 3: Fill Your Lips with Lip Liner
After outlining, use the same lip liner to color in the entire surface of your lips. This step is essential as your lip liner now serves as a vibrant, opaque base beneath the glitter. It ensures that even if a speck of glitter shifts, you’ll still have a beautiful, consistent color underneath, preventing any peek-through of the foundation from Step 1. Apply it evenly, making sure no foundation spots are visible. If you accidentally go outside the lines, don’t fret! Simply take a tiny bit of foundation on your lip brush and gently clean up the edges, creating a perfect, crisp boundary for your glitter application.
Step 4: Prepare Your Base Glitter Mixture
This is where the magic truly begins! Glitter can be notoriously messy and prone to flaking. To ensure a dazzling, long-lasting look with minimal fallout, we’re going to create a custom glitter paste. On a clean surface (like the back of your hand or a mixing palette), dispense a tiny drop of your waterproof makeup gel. Next, add an equal amount of your first glitter shade (e.g., white or iridescent). Using a clean lip brush, thoroughly mix the gel and glitter until you achieve a smooth, creamy paste. The waterproof gel acts as a flexible adhesive, locking the glitter in place and preventing it from scattering. A little goes a long way, so start with small amounts and mix well to ensure an even consistency.
Step 5: Apply the First Layer of Glitter
With your glitter paste ready, load your clean lip brush with the mixture. Begin applying this first glitter shade to the outer edges of your lips, following the line you created with your lip liner. Work your way inwards, covering about two-thirds of your lip surface, leaving the very center portion of your lips free for the accent glitter. We used a shimmering white glitter for this step, as it beautifully complements the fuchsia pink liner, creating a stunning contrast and forming the foundation for our ombre effect. Apply in thin, even layers, gently pressing the glitter onto the lip liner base to maximize adhesion. This careful application sets the stage for a seamless gradient.
Step 6: Introduce the Accent Glitter for an Ombre Effect
Now it’s time to bring in the second glitter shade and complete the ombre effect. Clean your lip brush thoroughly to avoid mixing colors. Repeat Step 4, this time mixing your accent glitter (we used a vibrant pink) with a fresh drop of waterproof gel to create a new paste. Once your accent glitter paste is ready, apply it to the remaining, uncovered central portion of your lips. Gently blend the edges of this accent glitter with the first glitter layer, using light tapping motions to create a soft, gradient transition. The goal is to achieve a seamless shift from one glitter shade to the other, making your lips appear multidimensional and truly ombre-mazing! Ensure both layers are well adhered and there are no stark lines.
Pro Tips for Enduring Glitter Lips
To ensure your ombre glitter lips remain impeccable throughout your event, consider these additional tips:
- Blotting Technique: After applying each glitter layer, gently press a single ply of tissue paper onto your lips. This helps to absorb any excess moisture from the gel and presses the glitter more firmly onto the base, significantly reducing fallout.
- Setting Spray: A light mist of makeup setting spray can further lock in your glitter. Hold the bottle at arm’s length and spray once or twice over your lips and face.
- Minimal Movement: While the waterproof gel is designed for flexibility, try to avoid excessive lip rubbing or pressing. Be mindful when eating or drinking.
- Touch-Up Kit: For extended wear, carry your accent glitter and a small amount of gel with a lip brush for minor touch-ups, especially after eating or drinking.
- Lip Care: Prepare your lips before application by gently exfoliating and moisturizing. This creates a smooth canvas, allowing for better adhesion and a more comfortable wear.
Styling Your Dazzling Ombre Glitter Pout
With your lips shining bright like diamonds, the rest of your makeup should complement, not compete. A simple yet elegant cat eye or a subtle winged liner with defined lashes is the perfect partner for this statement lip. Keep your complexion clean and radiant with a soft blush, allowing all attention to be drawn to your sparkling smile. For your outfit, consider a sleek, monochrome ensemble or a classic little black dress to let your lips truly pop. This look is about confidence, so wear it proudly and own every moment!
Congratulations, gorgeous! Your lips are now transformed into a mesmerizing canvas of sparkle and color. This ombre glitter lip gloss look is designed for those who dare to shine, making every moment an opportunity to leave a lasting impression. Go forth and dazzle!
Watch the Tutorial: Ombre Glitter Lip Gloss Makeup
For a visual guide and to see these steps in action, watch this helpful video from Makeup Tutorials:
Loved This Makeup Guide? Explore More!
Expand your beauty and DIY skills with our other popular posts:
Discover how to sew your own adorable and functional makeup bags with our easy-to-follow sewing patterns – perfect for organizing your new glitter lip supplies!