
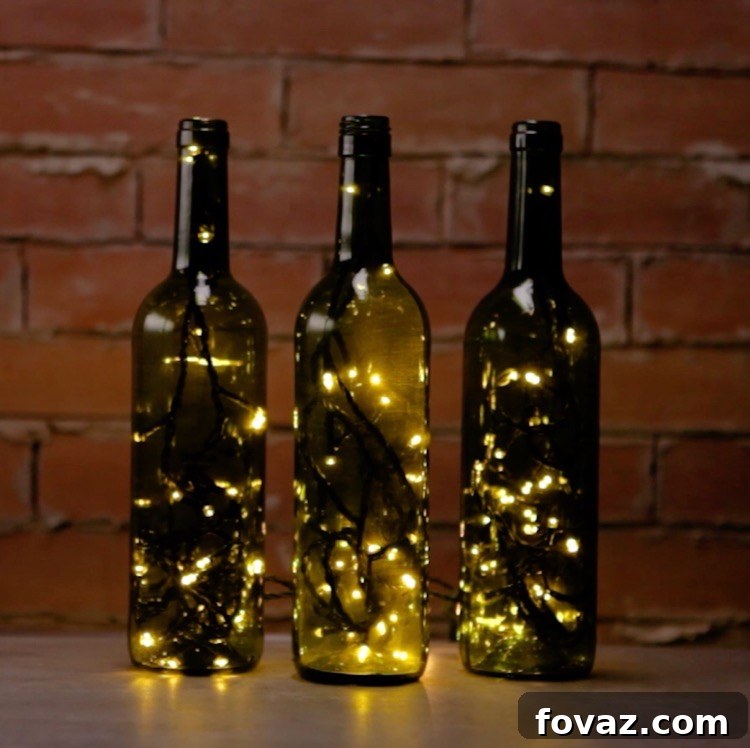
If you’re seeking a genuinely innovative and sustainable way to repurpose your empty wine bottles, you are about to discover your next favorite home decor project! These DIY accent lights transform discarded glass into captivating sources of illumination, adding a unique, personalized touch to any living space. Whether you envision them casting a warm glow for a festive holiday gathering or serving as year-round ambient lighting, these upcycled creations are both functional and breathtaking. This comprehensive guide will walk you through every step, ensuring you can craft your own stunning wine bottle lights with confidence. Beyond the practical instructions, we’ll explore creative variations and display ideas to inspire your inner decorator. Get ready to embark on a rewarding journey that combines craftsmanship, creativity, and conscious living!
Crafting Enchanting DIY Wine Bottle Accent Lights: A Comprehensive Guide to Upcycling and Illumination
There’s an undeniable charm in transforming something destined for the recycling bin into a beautiful, functional piece of home decor. Our latest DIY passion project perfectly embodies this spirit: turning empty wine bottles into mesmerizing accent lights. This isn’t just another craft; it’s an opportunity to infuse your home with personalized warmth, showcase your creativity, and embrace sustainable living. While the idea of drilling glass might sound daunting at first, this tutorial demystifies the process, making it accessible for enthusiastic DIYers. With the right tools and a little patience, you’ll discover that creating these radiant bottle lights is surprisingly straightforward and immensely satisfying. Imagine the delight of friends and family when they discover these unique lamps were handcrafted by you!
Beyond their aesthetic appeal, DIY wine bottle lights offer several compelling advantages. They are incredibly cost-effective, leveraging materials you likely already have or can acquire inexpensively. Environmentally conscious, they actively contribute to reducing waste by upcycling glass bottles. Furthermore, the creative possibilities are endless, allowing you to customize each light to perfectly match your decor or to create bespoke gifts for loved ones. In this detailed guide, we’ll cover everything from selecting the ideal bottle and essential safety measures to the precise steps of drilling, filing, and finally, threading your chosen string of lights. Prepare to illuminate your home with your own handcrafted brilliance!
Essential Tools and Materials for Your Wine Bottle Light Project
Before diving into the hands-on creation, gathering all necessary materials and understanding their purpose is key to a smooth and successful project. Safety should always be your top priority when working with glass and power tools, so ensure your protective gear is readily available.
- Battery-Operated LED Light String: The heart of your accent light! Choose a string length appropriate for your bottle size. Battery-operated options offer maximum flexibility for placement, as no external power outlet is needed. Look for warm white lights for a cozy glow, or colored LEDs for a more festive ambiance.
- Empty Wine Bottle: Any standard empty wine bottle will work, but clear glass bottles tend to showcase the lights best. Experiment with different shapes, sizes, and colors for varied effects. Ensure it’s thoroughly cleaned before you begin.
- Duct Tape or Painter’s Tape: This humble item plays a crucial role in preventing your drill bit from slipping at the start of the drilling process. Painter’s tape is often easier to remove without leaving residue.
- Dremel or Rotary Tool: A versatile power tool indispensable for drilling glass. Ensure it’s in good working order and you’re comfortable operating it.
- Diamond Drill Bit (Core Bit): Essential for drilling through glass. Diamond-tipped bits are designed to cut through hard, brittle materials like glass and ceramic. A common size for LED strings is around 1/2 inch (12-13mm) to allow easy threading of the lights and battery pack.
- Protective Gloves: Heavy-duty work gloves will protect your hands from glass dust and potential sharp edges.
- Safety Glasses or Goggles: Non-negotiable! Glass dust and tiny shards can become airborne during drilling. Eye protection is absolutely critical.
- Adhesive Remover: Products like Goo Gone or rubbing alcohol are excellent for removing stubborn label residue.
- Diamond File or Sandpaper (Fine-Grit): Used to smooth the edges of the drilled hole, preventing cuts and protecting the light string from damage.
- Chopstick or Long Toothpick (Optional but Recommended): A handy tool for guiding the string lights into the bottle’s neck and arranging them evenly inside.
- Warm Soapy Water: For thorough cleaning of your bottle.
- Razor Scraper or Scouring Pad: Useful for removing stubborn paper labels.
Step 1: Preparing Your Wine Bottle for Transformation
The foundation of a beautiful wine bottle light begins with a perfectly prepared bottle. This initial step ensures a clean canvas and a safer drilling process.
Begin by thoroughly cleaning your empty wine bottle. The first task is to remove any paper labels. There are several effective methods for this: soaking the bottle in warm, soapy water for an hour or two often loosens the adhesive enough to peel or scrub the labels off. For more stubborn labels, a razor scraper or a sturdy scouring pad can be used carefully to lift the paper. Once the paper is gone, you’ll likely find adhesive residue left behind. Apply an adhesive remover, such as Goo Gone, rubbing alcohol, or even cooking oil, to a clean cloth and vigorously wipe away any remaining sticky bits. This ensures a smooth surface for drilling and a pristine finish for your accent light. After removing all labels and adhesive, wash the entire bottle with warm, soapy water, both inside and out, to remove any contaminants, dust, or cleaning product residues. Rinse thoroughly and allow the bottle to air dry completely. Moisture inside or outside the bottle can interfere with drilling and proper adhesion in later steps, so patience here is key.
Step 2: Applying Duct Tape – Your Drilling Guide and Protector
This simple step is crucial for both precision and safety during the drilling process.
Once your bottle is spotless and dry, it’s time to apply a piece of duct tape or painter’s tape. Choose a flat section on the back or bottom side of the bottle, roughly 1 to 2 inches above the base, where you want your hole to be. Cut a 2-inch square or strip of tape and firmly press it onto the glass. The tape serves multiple vital functions: primarily, it provides a stable surface for your diamond drill bit to “bite” into, preventing it from skidding across the smooth glass at the start of drilling. This greatly reduces the risk of accidental slips and potential damage to the bottle or yourself. Secondly, the tape acts as a visual guide, helping you pinpoint the exact center of your desired hole. Thirdly, it can also help to contain some of the initial glass dust and prevent minor chipping around the entry point. Ensure the tape is applied smoothly and without air bubbles for optimal effect.
Step 3: Precision Drilling – Creating the Opening for Your Lights
This is the most critical step, requiring careful attention to safety and technique. Remember to prioritize your protection!
Before you even pick up your Dremel, put on your protective gloves and, most importantly, your safety glasses or goggles. Glass dust can be incredibly fine and harmful if it gets into your eyes or on your skin. Secure the diamond drill bit into your Dremel or rotary tool. If your Dremel has variable speed settings, start at a moderate speed; high speeds can generate excessive heat and crack the glass. Position the tip of the diamond drill bit at a 45-degree angle against the tape, directly where you wish to drill the hole. Begin drilling with gentle pressure. The angled start allows the bit to gain purchase and create a small initial groove without slipping. Once the bit has created a shallow indentation and is stable, slowly transition the Dremel to a 90-degree angle, flat against the glass surface. Continue drilling, applying consistent, light pressure. It’s crucial to let the diamond bit do the work; forcing it can lead to cracking or overheating. Throughout the drilling process, consider periodically dipping the bottle into a shallow pan of water or spraying the drilling area with water. This lubrication helps to keep the drill bit cool, reduces friction, and flushes away glass dust, significantly prolonging the life of your bit and preventing the glass from overheating and potentially cracking. You’ll know you’re making progress as you see a fine white slurry forming. Continue until the bit cuts all the way through the bottle, creating a clean, circular hole. Patience and a steady hand are your best allies here.
For optimal results and durability, using high-quality diamond drill bits is essential. These diamond drill bits are a great choice – click HERE to get your own and ensure a smooth drilling experience!
Step 4: Smoothing and Finishing the Drilled Edge
A safe and polished edge is vital, preventing injury and protecting your light string.
Once the hole is successfully drilled, carefully remove the duct tape from the glass bottle. Any residual adhesive can be wiped away with adhesive remover or rubbing alcohol. The edges of the freshly drilled hole will likely be sharp and uneven. To make your bottle safe to handle and to prevent the light string from snagging or getting cut, you must smooth these edges. Take your diamond file or a piece of fine-grit sandpaper and gently yet firmly file down the circumference of the hole, both on the inside and outside edges. Work around the entire opening until the edges feel smooth to the touch. You want to create a slightly beveled or rounded edge, eliminating any sharp points or burrs. This step is critical for safety and the longevity of your LED lights. Once you’re satisfied with the smoothness, rinse the bottle thoroughly under running water, both inside and out, to wash away any remaining glass dust and filing residue. This ensures a perfectly clean interior for your lights and removes any potentially harmful particles. Allow the bottle to dry completely before proceeding to the final step; any moisture could affect the electronics of your lights.
Step 5: Illuminating Your Creation – Inserting the LED String Lights
Now for the magical part: bringing your wine bottle to life with light!
With your bottle clean, dry, and its edges perfectly smooth, it’s time to thread the LED string lights into the bottle. Carefully feed the end of the light string through the drilled hole. Start by pushing a small section of lights into the bottle, then continue to feed the rest of the string through, gently coiling it inside. The goal is to fill the bottle with lights, leaving only the battery pack outside. For ease of insertion, especially as the bottle fills up, a chopstick or a long toothpick can be an invaluable aid. Use it to gently guide portions of the light bundle through the neck and arrange them to your liking inside the bottle. You can distribute the lights evenly for a uniform glow or cluster them in certain areas to create varied visual effects. Ensure the last light on the string (before the wire leads to the battery pack) is comfortably tucked inside the bottle. Once all the lights are inside, position the battery pack discreetly near the base of the bottle or behind it, allowing easy access for turning the lights on and off. These battery-powered LED lights are perfect for this project, offering flexibility and beautiful illumination!
Finally, activate the battery pack to test your new accent light. Watch as your formerly empty wine bottle transforms into a radiant beacon, casting a warm, inviting glow. Take a moment to appreciate your handiwork – you’ve successfully upcycled a bottle into a captivating piece of home decor!
Creative Variations and Display Ideas for Your Wine Bottle Lights
The beauty of DIY projects lies in their endless potential for customization. Once you’ve mastered the basic technique, you can further personalize your wine bottle accent lights to match any theme or decor style.
- Decorate the Bottle Itself: Consider painting the exterior of your bottle with glass paint for a colored or frosted effect. You could also etch designs into the glass, apply stencils, or even wrap it with twine, lace, or ribbon for a rustic or elegant touch. Adding glitter or adhesive gems can create a truly glamorous statement piece.
- Vary the Light String: Experiment with different LED light colors (warm white, cool white, multi-colored), lengths, or even those with built-in twinkle or fade functions. Copper wire lights are particularly popular for their delicate, almost invisible appearance.
- Different Bottle Types: Don’t limit yourself to wine bottles! Beer bottles, liquor bottles, unique olive oil bottles, or even mason jars can be transformed using the same drilling technique, each offering a distinct aesthetic.
- Themed Decor: For holidays, fill bottles with themed items before adding lights – mini ornaments for Christmas, small plastic spiders for Halloween, or faux flowers for spring.
- Display Ideas:
- Centerpieces: Group several illuminated bottles of varying heights as a dazzling centerpiece for dining tables or coffee tables.
- Mantel Decor: Line them along a mantelpiece for a cozy and inviting glow.
- Shelf Accents: Use them to brighten up bookshelves or display cabinets.
- Outdoor Ambiance: If using weather-resistant LED strings, these can create magical lighting for patios, decks, or garden parties (ensure battery packs are protected from moisture).
- Bedroom Nighlights: Provide a soft, comforting glow in a bedroom or nursery.
- Unique Gifts: A handcrafted wine bottle light makes a thoughtful and personalized gift for weddings, housewarmings, or birthdays.
The possibilities are truly only limited by your imagination. Each bottle you transform tells a unique story, blending eco-consciousness with artistic expression. These lights are more than just illumination; they are conversation starters and testaments to your creative spirit.
Watch how it’s done in the video tutorial below:
Congratulations on completing your stunning DIY wine bottle accent light! You’ve not only created a beautiful piece of home decor but also contributed to a more sustainable lifestyle by giving a new purpose to an otherwise discarded item. This project is a wonderful reminder that with a little creativity and effort, everyday objects can be transformed into something truly extraordinary. We encourage you to experiment with different bottles, light colors, and decorative elements to make each piece uniquely yours. Share your creations with friends and family, and inspire others to embrace the joy of upcycling and DIY craftsmanship. The satisfaction of seeing your handcrafted light illuminate a room is unparalleled.
Do you have any DIY home decor ideas of your own, especially involving upcycling or unique lighting? We’d absolutely love to hear about them! Share your insights, tips, or experiences in the comments section below – your ideas could inspire our next project!
And if you’re eager for another exciting wine bottle project that pushes the boundaries of glass crafting, be sure to explore these innovative DIY wine bottle glasses. It’s another fantastic way to give old bottles a new lease on life!
Stay connected with us for more creative inspiration and DIY tutorials on Facebook, Twitter, Pinterest, and Instagram! Your next favorite project is just a click away!