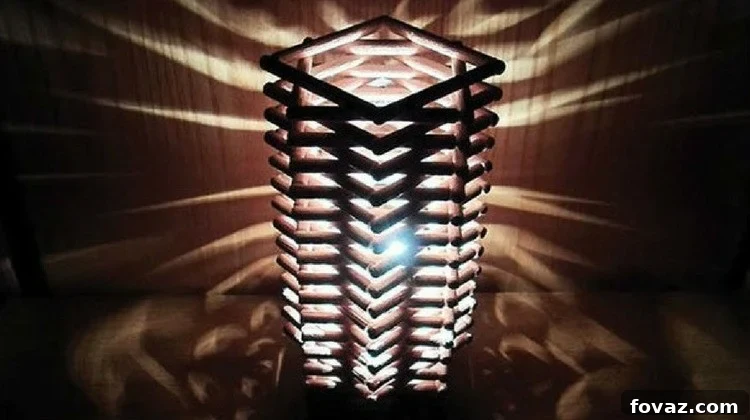
There’s an undeniable charm in handmade home decor, a warmth and personality that store-bought items simply can’t replicate. If you’re searching for a unique lighting solution that adds both functionality and aesthetic appeal to your space, and you enjoy a bit of creative crafting, then you’ve come to the right place. This guide will walk you through creating an exquisite wooden dowel lamp, a project that is as rewarding to make as it is beautiful to behold. It’s an excellent way to dip your toes into woodworking or enhance your existing crafting skills, all while producing a practical piece that truly lights up a room.
Craft Your Own: A Detailed Guide to Making a Stunning DIY Wooden Dowel Lamp
Illuminate Your Space with Unique, Handmade Home Decor
Wooden dowels, often seen as mere structural supports in furniture, possess an understated elegance when used creatively. This particular wood craft project celebrates the dowel in its own right, transforming simple cylindrical pieces of wood into a captivating lighting fixture. Beyond its primary function, this DIY lamp serves as a fantastic piece of room decor, perfect for adding a touch of modern, rustic, or minimalist charm to your bedroom, living area, or office.
The beauty of this project lies in its simplicity and the profound satisfaction it brings. You don’t need advanced woodworking skills or specialized tools; just a willingness to follow instructions and a creative spirit. Not only will you save money by crafting your own lamp, but you’ll also create a conversation starter, a unique item that perfectly reflects your personal style. It’s an engaging and fun process, yielding a stylish, functional lamp that stands out from mass-produced alternatives.
Why Choose a DIY Wooden Dowel Lamp?
Opting for a handmade wooden dowel lamp offers numerous advantages over purchasing a factory-made fixture:
- Personalization: You get to choose the exact dimensions, finish, and even the type of wood for your dowels, ensuring the lamp perfectly complements your existing decor.
- Cost-Effectiveness: Crafting your own lamp is often significantly cheaper than buying a comparable designer piece, especially when utilizing readily available and affordable materials like wooden dowels.
- Sense of Accomplishment: There’s immense satisfaction in seeing a project through from start to finish, especially when the end result is a beautiful, functional item you created with your own hands.
- Unique Aesthetic: The geometric pattern created by the dowels provides a contemporary yet timeless look, casting interesting shadows and adding textural depth to your room. It’s a versatile design that can fit into various interior styles, from modern minimalist to cozy Scandinavian.
- Skill Development: This project is a great way to practice precision gluing, measurement, and spatial reasoning, honing your crafting abilities.
What you’ll need for this enchanting DIY lamp:
- 124 Wooden Dowels (3 inches long or bigger): The core of our project. Longer dowels will create a taller lamp with fewer layers if desired, but 3-inch dowels are a good starting point for a tabletop lamp. Ensure they are uniform in length and diameter for a clean finish. You can find these at most craft stores or online.
Purchase wooden dowels here. - A Sturdy Piece of Cardboard: This will form the crucial base insert, providing stability and a platform for the bulb holder. Choose a type that is rigid enough to support the lamp’s weight.
- Hot Glue Gun and Hot Glue Sticks: Ideal for quick bonds and holding dowels in place while more permanent adhesives dry. Be sure to use a good quality hot glue gun and sticks for strong adhesion.
- White Glue (PVA Glue): For stronger, more permanent bonds, especially for the main structure. It offers a longer working time than hot glue, allowing for adjustments.
- Bulb Holder and LED Light Bulb: Essential for illuminating your lamp. Always opt for an LED bulb as they generate minimal heat, making them safer for enclosed wooden structures and highly energy-efficient. Ensure the bulb holder includes a cord and switch for convenience.
- Ruler: For precise measurements, which are critical for achieving uniform dowel squares and an even lamp structure.
- Scissors or Craft Knife: For accurately cutting the cardboard base. A craft knife can provide cleaner edges.
Step 1: Create the Dowel Squares – The Building Blocks
The foundation of your lamp’s unique design lies in the precise construction of numerous dowel squares. Begin by taking two wooden dowels and carefully applying a small amount of hot glue to one tip of each. Join these two tips together to form a perfect right angle. The hot glue will set quickly, allowing you to move on efficiently. Repeat this process with another pair of dowels, forming a second right angle. Then, connect these two L-shaped pieces to create a complete, perfect square. Precision is key here; use your ruler to ensure all angles are 90 degrees and the sides are perfectly straight and equal in length.
While hot glue offers speed, for a stronger and more lasting bond, you can reinforce these joints with white glue once the hot glue has set. Be aware that white glue takes significantly longer to dry completely – sometimes several hours – so you might need to clamp or hold the pieces in place until they are secure. For this particular lamp design, you will need to construct a total of 31 identical squares. Taking your time on this step will ensure the structural integrity and aesthetic appeal of your finished lamp.
Step 2: Cut a Cardboard Square – Establishing the Lamp’s Base
Next, we need to create a solid base for your lamp. Begin by measuring the exact length of one side of your perfectly constructed dowel square. Using this measurement, draw a square onto your piece of cardboard. Now, here’s a crucial detail for a neat finish: carefully redraw the square so it’s ever-so-slightly smaller than the actual dowel square. The goal is for the cardboard piece to fit snugly inside the dowel square, almost disappearing from view when placed, while still being large enough to provide a stable platform and prevent anything from falling through the center. This slight reduction ensures a clean, integrated look for your lamp’s base.
Once you’ve accurately marked your slightly smaller square, use sharp scissors or a craft knife to cut it out. Take care to achieve clean, straight edges for a professional finish. This cardboard piece will serve as the inner platform for your lamp’s electrical components and provide essential stability.
Step 3: Cut Out the Hole for Your Bulb Holder – Integrating the Light Source
With your cardboard base cut, it’s time to prepare it for the bulb holder. Take your chosen bulb holder and place its base squarely in the center of the cardboard square. Carefully trace its outline with a pencil. This traced circle will mark the opening for your bulb holder. Using a craft knife or sturdy scissors, meticulously cut out this circle. Ensure the hole is just big enough for the bulb holder to fit snugly, but not so large that it becomes loose. A tight fit is essential for safety and stability, as this opening will anchor the light source within the lamp structure. Double-check the fit by inserting the bulb holder briefly; it should hold firmly.
Step 4: Compose the Base – Laying the Foundation
Now, let’s assemble the sturdy base of your lamp. Take three of your pre-made dowel squares. Apply a generous amount of white glue to the top surface of one square and carefully place a second square directly on top, aligning them perfectly. For added visual interest, you can rotate the middle square by 90 degrees before gluing, creating a subtle diamond pattern within the base layers – though this is purely aesthetic and optional. Repeat the process, gluing the third dowel square on top of the second. Allow sufficient drying time for these layers to bond firmly, ensuring a robust foundation.
Once the three dowel squares are securely stacked, apply white glue to the top surface of the uppermost dowel square. Carefully center and glue your prepared cardboard square on top of this stack. The cardboard square should sit flush and provide a stable, flat surface to complete your lamp’s base. This assembly forms a substantial and stable platform for the entire lamp structure.
Step 5: Compose the Lampshade – Introducing Dynamic Design
With the base securely in place, it’s time to begin building the lampshade, introducing the signature geometric twist that makes this lamp so captivating. Start by gluing another dowel square directly on top of the cardboard piece, aligning it perfectly with the bottom-most square of the base. This will be your first layer of the lampshade, establishing the initial vertical alignment. Ensure the glue sets well before proceeding.
Now comes the unique design element: for the next layer, apply glue to the top of the square you just placed. Instead of stacking the new dowel square in the same orientation, rotate it by 45 degrees. This means its corners will align with the midpoints of the sides of the square below it, and vice-versa. This intentional rotation creates a visually dynamic pattern, allowing light to diffuse beautifully and adding significant architectural interest to your lamp. Take your time to align it perfectly centered above the previous layer, even with the rotation.
Step 6: Keep Adding the Other Squares – Building Up the Design
Continue building the lampshade by alternating the orientation of your dowel squares. The third dowel square for your lampshade (following the rotated one) should be placed directly on top of the second, mirroring the orientation of the first square. Then, the fourth square should again be rotated by 45 degrees, just like the second one. Maintain this alternating pattern – one square aligned straight, the next rotated 45 degrees – as you glue all the remaining dowel squares one above the other. This consistent pattern is what creates the distinctive “woven” or spiraling effect of the lamp’s body.
Throughout this process, it is paramount to keep each layer as centered as possible. Slight deviations can lead to a crooked lamp, so periodically step back and eye your progress. Using a ruler or a small level can help ensure vertical alignment. Patience is a virtue here, as waiting for the glue to sufficiently set between every few layers will prevent the structure from shifting. You are creating a beautiful, intricate tower of light, so steady hands and careful placement are your best allies.
Step 7: Insert Bulb Holder and Light Bulb – The Final Touch and Illumination
Once all 31 dowel squares are meticulously stacked and glued, and you are confident that the entire structure is completely dry and stable, it’s time for the electrical components. Carefully insert your bulb holder into the pre-cut hole in the cardboard base from the bottom of the lamp. Ensure it fits snugly and securely. If necessary, use a small amount of hot glue around the edges of the bulb holder inside the cardboard to keep it firmly in place. Always ensure the wiring is safely tucked away and not pinched.
Finally, from the top opening of your newly constructed lamp, screw in your LED light bulb. As a crucial safety reminder, always use an LED bulb for this project. LED bulbs produce very little heat compared to incandescent bulbs, significantly reducing any fire risk associated with enclosed wooden structures. Once the bulb is in, plug in your lamp, flip the switch, and marvel at your creation!
And just like that, your unique, handmade DIY wooden dowel lamp is done! Step back and admire the warm glow and captivating shadows it casts, a testament to your creativity and craftsmanship.
Safety Considerations for Your DIY Lamp
While this project is relatively straightforward, working with electrical components and adhesives requires attention to safety:
- Electrical Safety: If you are unsure about wiring, purchase a pre-assembled bulb holder kit with a cord and switch. Always ensure connections are secure and properly insulated. Never use a bulb holder with damaged wiring.
- Bulb Choice: As mentioned, use only LED bulbs. They produce minimal heat, making them safe for wooden enclosures and significantly more energy-efficient. Avoid incandescent bulbs, which generate excessive heat and pose a fire hazard in enclosed wooden structures.
- Glue Gun Safety: Be cautious when using a hot glue gun to prevent burns. Keep it away from flammable materials.
- Ventilation: When using glues and potentially paints or stains, ensure your workspace is well-ventilated.
- Stability: Ensure your lamp’s base is wide and stable enough to prevent it from easily tipping over.
Customization Ideas to Make Your Lamp Truly Yours
One of the greatest joys of DIY is the ability to personalize your creations. Here are some ideas to make your wooden dowel lamp even more unique:
- Stain or Paint: Before assembly, consider staining the dowels for a rich, natural wood finish, or painting them in a color that matches your room’s aesthetic. Matte black creates a modern, sophisticated look, while pastels can soften the geometric lines.
- Dowel Size and Length: Experiment with dowels of different diameters or lengths to create a chunkier or more delicate lamp. Taller dowels will create a more elongated, slender lamp, while wider dowels will give it more presence.
- Varying Rotation: Instead of a consistent 45-degree rotation, you could try alternating between 30 and 60 degrees, or even introducing sections where dowels are stacked straight for several layers before resuming the rotation.
- Base Material: Instead of cardboard, you could use a thin piece of plywood or acrylic for the base insert for increased durability and a more polished finish.
- Decorative Accents: While the lamp is beautiful on its own, you could sparingly add small decorative elements like metallic paint accents on certain dowel tips or integrate small fabric pieces between layers for diffused light effects.
Maintenance and Care for Your Wooden Dowel Lamp
To keep your handmade lamp looking its best, follow these simple care tips:
- Dust Regularly: Use a soft brush or a microfiber cloth to gently dust between the dowels and on the surfaces to prevent dust buildup.
- Check Electrical Components: Periodically inspect the bulb holder and cord for any signs of wear or damage. Replace them immediately if any issues are found.
- Avoid Moisture: Keep your wooden lamp away from areas with high humidity or direct contact with water to prevent warping or damage to the wood and glue.
Did you enjoy crafting this stunning DIY lamp and bringing a unique light source into your home? We would love to hear about your experience! Please let us know in the comments section below what your thoughts are on how to make a lamp, any challenges you faced, or your favorite part of the process. Do you have any other creative craft projects you’d like to share with our community? Share your ideas with us, and who knows, we might just feature your next brilliant DIY!
Want to explore more cool lighting projects and creative home decor ideas? Check out our guide on How to Make a DIY Mason Jar Chandelier for another dazzling lighting solution!
Stay connected with us on Facebook, Twitter, Pinterest and Instagram!