
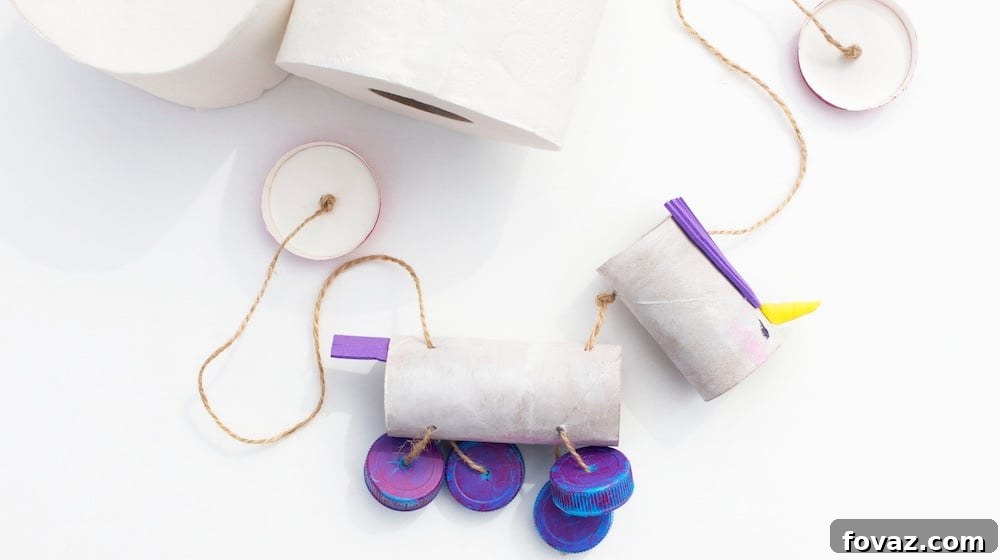
In a world increasingly focused on sustainability and creative expression, toilet paper roll crafts have emerged as a beloved activity for families everywhere. Beyond merely recycling, these simple yet versatile cardboard tubes offer a fantastic foundation for countless imaginative projects. They transform what would otherwise be discarded into opportunities for learning, artistic development, and hours of engaging play. If you’ve found yourself with a collection of empty toilet paper cores and are seeking a fun, eco-friendly way to ignite your children’s creativity, you’ve come to the right place.
This comprehensive guide will walk you through the delightful process of crafting an enchanting unicorn puppet using everyday household items. Not only will this project provide an entertaining activity, but it also results in a whimsical toy that your kids can cherish and animate for endless adventures. Get ready to turn humble toilet paper rolls into a magical creature that dances to the tune of your child’s imagination!
RELATED: 15 Fun & Easy Toilet Paper Roll Craft & Projects For Kids
Unleash Imagination: Crafting a Whimsical Toilet Paper Roll Unicorn Puppet
Creating a majestic unicorn puppet from recycled toilet paper rolls is a wonderfully rewarding project that combines crafting, storytelling, and eco-consciousness. This detailed tutorial will guide you through each step, ensuring a smooth and enjoyable crafting experience for both adults and children.
What Magical Supplies You Will Need:
- Toilet Paper Core Rolls: Two empty cardboard rolls. These form the main body and head of your unicorn.
- Popsicle Sticks: Two standard craft sticks. These will be essential for creating the puppet’s control mechanism.
- Yarn: A skein of yarn in your favorite colors. This will be used for the unicorn’s mane and tail, adding a touch of vibrant personality.
- Colored Paper: A selection of construction paper or colored craft paper. Choose hues that will bring your unicorn to life!
- Markers: Black or an assortment of colored markers for drawing facial features and adding intricate details.
- Adhesive Tape: Standard clear or masking tape for securing elements.
- Ruler: For precise measurements of paper and yarn.
- Scissors: A reliable pair for cutting paper, yarn, and toilet paper rolls.
- Craft Glue: A strong-holding craft glue or hot glue (with adult supervision) for permanent bonds.
- Hole Punch: A standard single-hole punch for creating attachment points.
- Beads or Pasta Tubes: Small beads, macaroni, or ditalini pasta. These will serve as the unicorn’s hooves, providing weight and detail to its legs.
- Additional Decorations (Optional): Glitter, sequins, stickers, googly eyes, ribbon, or any other embellishments to personalize your unicorn and make it truly unique.
Step 1: Constructing the Control Mechanism
Before we dive into assembling our unicorn, we first need to build its “control center.” This simple yet crucial component will allow you to manipulate your puppet with ease. Take one of your popsicle sticks and apply a small dot of strong craft glue precisely in the center. Next, carefully position your second popsicle stick perpendicular to the first, forming a perfect ‘X’ shape. Press firmly in the middle where the glue is applied to ensure a secure bond. This ‘X’ will serve as the handle from which your magnificent unicorn will hang and be controlled. Set this assembly aside in a safe place, allowing ample time for the glue to dry completely and create a robust structure.
Step 2: Preparing the Unicorn’s Body and Head
Now, let’s move on to shaping the core components of your unicorn puppet. Retrieve your two empty toilet paper rolls. With a pair of scissors, carefully cut one of the rolls precisely in half. This half-sized roll will become the unicorn’s head, while the full-sized roll will form its body. Next, select your colored paper. Measure the height of the smaller, half-cut toilet paper roll, then cut a strip of colored paper to match this dimension and long enough to wrap around the roll. Apply glue to the paper and carefully wrap it around the smaller roll, covering its entire surface. Repeat this process for the full-sized toilet paper roll, choosing a complementary or contrasting color for its body. Once finished, you should have two beautifully colored cardboard rolls: one full-sized for the body and one half-sized for the head.
Step 3: Preparing the Strings for Motion
With your colored toilet paper rolls set aside to dry, it’s time to prepare the strings that will give your unicorn its life and movement. Grab your chosen yarn and a ruler. Measure and cut two identical pieces of string, each precisely the length of your ruler (approximately 12 inches). These two shorter strings will eventually become the unicorn’s legs. Next, measure and cut a significantly longer piece of string, approximately 40 inches in length. This longer string will be used to connect the unicorn’s head to its body and, ultimately, to the control mechanism. At this point, you should have three distinct pieces of yarn: two 12-inch strings and one 40-inch string, all ready for assembly.
Step 4: Punching Holes for the Body
Take your full-sized, colored toilet paper roll (this is the unicorn’s body) and your hole punch. Carefully create six evenly spaced holes around the roll. Envision two sets of parallel holes near the bottom edge of the roll; these will serve as the attachment points for your unicorn’s front and hind legs. Then, punch a final set of two parallel holes directly on the top of the roll, towards one end. These top holes will be where the string connecting the head and the control mechanism will pass through. If you’re unsure about the exact placement, refer to the accompanying visual aid for a clear demonstration. The goal is to have six distinct holes that will allow for flexible movement.
Step 5: Punching Holes for the Head
Now, let’s prepare the unicorn’s head for attachment. Pick up your shorter, half-sized colored toilet paper roll. Using your hole punch, create two perfectly aligned holes on one side of the roll. These holes should be positioned relatively close to the edge and directly across from each other, allowing you to see clearly through both when held up to the light. These two critical holes are where your long 40-inch string will eventually pass. This string will form the vital connection, linking the unicorn’s head to its body and ultimately to the popsicle stick control that you crafted in the very first step. Precision here ensures your unicorn’s head can move freely and realistically.
RELATED: How to Make DIY Tissue Paper Pom Poms
Step 6: Threading the Unicorn’s Legs
It’s time to give your unicorn its legs! Take one of your 12-inch strings and carefully thread it through two of the parallel holes on the bottom of the unicorn’s body. Once threaded, you can adjust the string to determine the desired length for your unicorn’s legs. Feel free to cut the string to your preference, creating either short, stout legs or long, elegant ones. Ensure that both ends of the string hang evenly. Repeat this process with the remaining 12-inch string, threading it through the other pair of parallel holes on the opposite side of the body. It’s crucial that both sets of legs are leveled to prevent your unicorn from having an uneven gait. This step truly begins to bring your puppet to life!
Step 7: Adding the Hooves
With the leg strings now threaded, it’s time to add the finishing touch to your unicorn’s feet: the hooves! Gather your beads or pasta tubes. For each of the four string ends hanging from the body, thread a bead or a piece of pasta. Pasta, especially longer tube varieties like ditalini or macaroni, can often offer a more distinct and realistic hoof-like appearance compared to individual beads. Once the bead or pasta is in place, tie a secure knot at the very end of the string. You might want to tie a double or triple knot to ensure that the hooves are firmly secured and won’t slip off during play. This small detail adds a wonderful tactile element and completes the look of your unicorn’s legs.
Step 8: Connecting Head, Body, and Control
This is the pivotal step where your unicorn truly starts to take shape! Retrieve your 40-inch string. Thread one end of this long string through one of the top holes on the unicorn’s body, then through the other, so it forms a loop across the top. Next, take both ends of this string and thread them through the two aligned holes in the unicorn’s head (the smaller toilet paper roll). Now comes a creative opportunity: to create a distinct neck for your unicorn. You can thread a few beads onto the string between the head and the body, allowing them to act as a flexible neck. Alternatively, you can simply tie a series of knots in the string to create a stopper, providing separation and stability for the head. This choice allows for wonderful personalization and encourages your child to think about their unicorn’s unique anatomy. Once the head is securely attached, take the two free ends of the 40-inch string and tie them firmly to the center of the ‘X’ shaped popsicle stick control mechanism you created in Step 1. Your unicorn puppet is now fully assembled and ready for its finishing touches!
Step 9: Adding the Enchanting Finishing Touches!
The moment has arrived to infuse your unicorn with personality and magic! This step is all about unleashing creativity. Begin by crafting the mane and tail. Cut multiple lengths of yarn – varying colors can add extra charm. Gather these yarn strands into bunches and firmly glue them onto the back of your unicorn’s head for the mane, and to the back of its body for a flowing tail. For the iconic unicorn horn, cut a small triangular piece of paper (perhaps glittering or a contrasting color) and glue it securely to the top of the unicorn’s head. Next, give your unicorn its expression! You can use googly eyes for a playful look or simply draw expressive eyes and a sweet mouth with your markers. Encourage your child to take the lead in this stage. They can add stripes, spots, glitter, stickers, or even tiny drawn-on clothing details. The beauty of this step is its boundless potential for imagination, allowing each child to create a truly one-of-a-kind magical companion.
Witness the complete transformation! Watch the full tutorial video on how to create your very own tissue roll unicorn marionette by Wonderspark Puppets below for extra guidance and inspiration:
Engaging in toilet paper roll crafts, especially a project as imaginative as this unicorn puppet, offers a multitude of benefits. Beyond the sheer joy of creation, it significantly enhances a child’s fine motor skills, problem-solving abilities, and artistic expression. Moreover, it’s a fantastic way to introduce the vital concepts of recycling and sustainability, teaching children the value of repurposing materials and reducing waste. Every time you transform an empty toilet paper core into something new, you’re not just crafting; you’re contributing to a greener planet and fostering a lifelong appreciation for creativity and resourcefulness.
So, the next time you finish a roll of tissue paper, pause before you toss it in the bin. Consider the myriad of possibilities it holds for fun, education, and imaginative play. What magic will you create next?
What did you think of our whimsical unicorn marionette toilet paper roll crafts idea? We’d love to hear your thoughts and see your creations in the comments section below!
UP NEXT:
- DIY Projects And Creative Crafts To Keep You And Your Kids Busy At Home
- 60+ DIY Kids Crafts You Can Make In Under An Hour
- How To Repair Leaky Single And Double Handle Faucet Cartridges
Calling all crafting DIYhards, DIY Projects needs YOU! Click here if you want to contribute for us.
Don’t forget to stay connected with us on Facebook, Twitter, and Instagram!