
Repurpose Old Furniture: Creative Ways to Give New Life to Outdated Pieces
In nearly every home, there lies a piece of furniture that has seen better days. Perhaps it’s an old dresser tucked away in the attic, a forgotten coffee table, or a bookshelf that no longer fits your current decor. Instead of letting these items collect dust or worse, contributing to landfill waste, why not unlock their hidden potential?
Repurposing old furniture is more than just a trend; it’s a sustainable, cost-effective, and incredibly rewarding way to personalize your living space. With a little creativity and effort, simple modifications can transform outdated dressers, tables, and shelves into functional, stylish, and unique pieces that tell a story. Whether you’re seeking additional storage, extra seating, or a distinctive statement item, the possibilities for reinventing what you already own are truly endless. Embrace the journey of furniture upcycling and discover how to breathe new life into your home’s forgotten treasures.
Revitalizing Your Home: Creative Furniture Repurposing Ideas
Dresser Transformations: From Storage Unit to Stylish Centerpiece
The humble dresser, a common fixture in many bedrooms, holds immense potential for transformation. Its sturdy structure and multiple drawers make it an ideal candidate for various repurposing projects.
Convert a Dresser into a Practical Kitchen Island
Imagine the convenience of an extra prep surface and storage in your kitchen without the expense of a brand-new island. A dresser can become a highly practical kitchen island with just a few thoughtful adjustments. Begin by removing the top drawers, creating open shelving perfect for displaying cookbooks, storing serving dishes, or keeping frequently used kitchen essentials within easy reach. For the countertop, replace the existing surface with a durable and aesthetically pleasing material like a butcher block, a polished stone slab, or even a sealed concrete top. These options not only provide a robust work surface but also add a touch of elegance. To enhance functionality, consider attaching hooks to the sides for towels or utensils, or adding a sleek towel bar. For mobility, affix sturdy caster wheels to the base, allowing you to move your new island wherever it’s needed most. This simple update not only provides invaluable extra storage and workspace but also introduces a unique, custom-made focal point to your kitchen.
Transform a Dresser into a Chic Bathroom Vanity
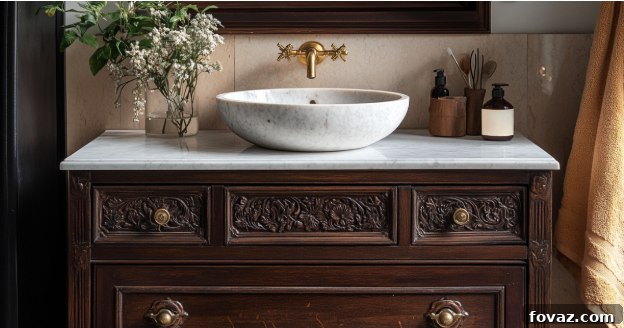
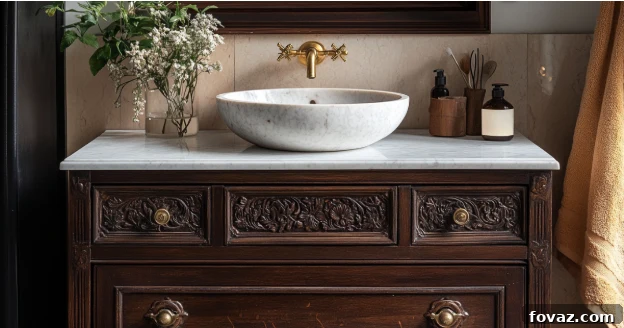
Another popular and highly effective repurposing idea is turning a dresser into a beautiful and functional bathroom vanity. This approach effortlessly blends antique charm with modern utility, making it a standout alternative to generic, store-bought vanities. The key steps involve carefully preparing the wood to withstand moisture and making precise cuts for plumbing. First, select a dresser with appropriate dimensions for your bathroom. Next, cut an opening in the top surface for your chosen sink—whether it’s a sleek vessel sink resting on top or a classic drop-in style. You’ll also need to cut openings in the back and perhaps the drawers to accommodate plumbing lines. Critically, seal the entire wooden structure, especially the top and interior of the cabinet, with a high-quality, waterproof varnish or marine-grade sealant to protect it from humidity and splashes. You might even consider lining the interior with a waterproof membrane. Add new hardware, a stylish faucet, and perhaps some decorative touches like wallpaper on the back panel of open shelves, and you’ll have a bathroom vanity that is as practical as it is personable.
For additional inspiration and detailed DIY furniture projects, explore the fantastic resources available on Ana-white, a treasure trove of woodworking plans and ideas.
Old Doors: Gateway to Unique Tables
An old wooden door, with its inherent character and robust structure, is often overlooked but can serve as the foundation for a truly distinctive table. This project allows you to create a piece that is both functional and a conversation starter, preserving a slice of history.
The transformation process begins with preparing the door. Thoroughly clean the door and remove any old hardware. If it’s a solid wood door, you’re in luck; these are generally more stable and durable. For a smooth, polished look, sand out any rough edges or imperfections with varying grits of sandpaper. Once prepared, you can apply a fresh coat of paint, a rich wood stain, or a clear varnish to highlight its natural grain. The choice of finish will dictate the table’s overall aesthetic, from a vibrant modern piece to a rustic, farmhouse-style table. Next, secure sturdy legs to the door. Options range from sleek metal hairpin legs for a contemporary feel, chunky wooden legs for a traditional look, or even industrial-style pipe legs for an edgy appeal. If the door features decorative panels or recessed areas, placing a custom-cut piece of tempered glass on top is an excellent way to create a perfectly level surface while showcasing the door’s original details and protecting them from wear and tear. For a polished, high-gloss finish, consider using an epoxy resin topcoat. If you prefer a softer, more subdued appearance, a matte sealant works beautifully. Either way, transforming an old door into a table is a budget-friendly way to refresh your space, adding unparalleled character and a unique story to your home.
Bookshelf Brilliance: Crafting a Sophisticated Bar Cabinet
A standard bookshelf, often seen as merely a storage unit for books, possesses the ideal framework to be reimagined as a stylish and functional bar cabinet. This clever repurposing project elevates entertaining by providing a dedicated, organized space for your spirits and barware.
To begin, assess your bookshelf and plan the layout. You may need to remove some shelves or adjust their height to comfortably accommodate taller bottles of liquor and wine. Next, consider installing a wine glass rack underneath an existing shelf; these are readily available and simple to attach, keeping your stemware organized and dust-free. For a touch of sophistication, apply a fresh coat of paint in a rich, complementary color, or adhere a striking wallpaper to the back panel of the bookshelf. This small detail can dramatically enhance its visual appeal, giving it a high-end, bespoke feel. To truly elevate the ambiance, install LED strip lights along the inside edges of the shelves or behind bottles. This soft illumination not only highlights your collection but also creates a refined display, making entertaining guests more stylish and enjoyable. You can also add small bins or trays for cocktail shakers, strainers, and other bar tools. With these modifications, your repurposed bookshelf will not only serve as a practical bar cabinet but also as a chic focal point in your living room, dining area, or even a cozy den.
Crib Conversion: From Nursery Essential to Versatile Bench
A wooden crib, brimming with sentimental value but no longer needed for its original purpose, can find a beautiful second life as a comfortable and charming bench. This project not only prevents a beloved item from being stored away or discarded but also transforms it into a highly functional piece for various areas of your home.
The conversion process is straightforward yet requires attention to safety and stability. Start by carefully removing one of the longer sides of the crib. This will form the open front of your bench. Next, it’s crucial to reinforce the base and any remaining structure to ensure the bench is sturdy and safe for sitting. You might need to add additional supports or braces underneath the crib mattress frame, which will now serve as the bench seat. Once the structure is sound, sand down any rough edges and apply a fresh coat of paint or stain to match your home’s decor. The final touch, and perhaps the most important for comfort, is to add a plush seat cushion. You can have a custom cushion made, or simply use large throw pillows for a more relaxed look. This practical update works wonderfully in entryways, providing a convenient spot to put on shoes; in sunrooms or patios as a cozy seating option; or nestled in a reading nook, offering a unique and comfortable place to relax. Beyond its practical benefits, repurposing a crib into a bench preserves its sentimental value, allowing memories to continue as part of your daily life.
Coffee Table Reimagined: The Cozy Ottoman
An old coffee table, especially one with a sturdy frame, is a prime candidate for a luxurious transformation into a comfortable and versatile ottoman. This ingenious repurposing project instantly adds both style and functionality to your living space, providing extra seating, a comfortable footrest, or even a soft surface for board games.
The conversion process is simpler than you might imagine. Begin by thoroughly cleaning and lightly sanding the coffee table frame, especially if you plan to paint or stain the legs. Next, attach a layer of high-density foam padding to the top surface. You can use spray adhesive to secure it firmly. For added comfort and a plush look, consider adding a second layer of softer foam or batting. Once the padding is in place, select a durable and attractive fabric that complements your existing decor. Upholstery fabric, faux leather, linen, or even outdoor fabric for high-traffic areas are excellent choices. Carefully drape the fabric over the padded top, ensuring it is taut and smooth, then secure it firmly to the underside of the table with a staple gun. Pay attention to neat corners and edges for a professional finish. You can also add decorative elements like tufting buttons or elegant piping for an even more sophisticated look. The right fabric choice is crucial; a bold pattern can introduce a pop of color and personality, while a textured fabric like linen adds warmth and depth. Faux leather is not only stylish but also remarkably easy to clean, making it ideal for busy households. This quick and rewarding update creates additional seating, a comfortable footrest, and can even offer hidden storage if your original coffee table had drawers or a lower shelf. Your repurposed coffee table will become a chic and functional center of your living room.
Beyond the Basics: General Tips for Successful Furniture Upcycling
Embarking on furniture repurposing projects can be incredibly rewarding, transforming unloved pieces into cherished household items. To ensure your projects are successful and enjoyable, consider these general tips.
Planning Your Project
- Assess the Piece: Before you begin, thoroughly examine the furniture’s structural integrity. Is it solid wood, particle board, or a mix? Are there any wobbly joints, extensive damage, or mold? Solid wood is generally easier to work with and more durable.
- Find Inspiration: Look to platforms like Pinterest, Instagram, DIY blogs, and home decor magazines. Create a mood board to visualize your desired outcome, considering colors, textures, and the overall style you want to achieve.
- Budget Wisely: While repurposing is cost-effective, material costs can add up. List all necessary supplies (paint, sandpaper, fabric, hardware, tools) and factor them into your budget.
Essential Tools and Materials
Having the right tools makes all the difference. While specific projects may vary, a basic toolkit for furniture repurposing should include:
- Preparation: Sandpaper (various grits), wood filler, primer, cleaner, painter’s tape.
- Application: Paint brushes, foam rollers, paint sprayer (optional), paint of your choice (chalk paint, latex, acrylic), wood stain, clear sealant or topcoat.
- Construction/Upholstery: Drill, screws, staple gun, staples, utility knife, measuring tape, safety goggles, gloves, dust mask.
- Optional: Fabric, foam padding, new hardware (knobs, pulls), decorative elements (stencils, decoupage paper).
Preparing Your Furniture
Proper preparation is key to a lasting finish. Don’t skip these vital steps:
- Clean Thoroughly: Remove all dirt, grime, and grease using a degreaser or mild soap and water. Ensure the piece is completely dry before moving on.
- Repair and Fill: Address any loose joints, cracks, or holes with wood glue and wood filler. Allow the filler to dry completely and then sand smooth.
- Sand Adequately: Sanding creates a smooth surface and helps paint adhere better. Start with a coarser grit (e.g., 80-120) for significant imperfections, then move to finer grits (e.g., 180-220) for a smooth finish. For a distressed look, sanding can also be applied strategically after painting.
- Prime Appropriately: A good quality primer is essential, especially when painting over dark wood, laminate, or pieces with existing stains. Primer helps with adhesion, provides an even base color, and prevents bleed-through.
Finishing Touches
These details can truly elevate your repurposed piece from DIY to designer quality:
- Hardware Upgrades: Swapping out old knobs, pulls, or hinges for new, stylish hardware can dramatically update the look of a dresser, cabinet, or even a door table.
- Decorative Elements: Consider adding decorative molding, stenciling patterns, or applying decoupage with patterned paper for a unique touch.
- Protect Your Work: Always apply a durable topcoat, sealant, or wax to protect your finished piece, especially surfaces that will see frequent use like tabletops and cabinet tops. This prevents scratches, moisture damage, and wear.
Embracing Imperfection and Personal Style
Remember that the beauty of repurposed furniture often lies in its unique character and history. Don’t be afraid to embrace a distressed look or minor imperfections, as they add to the piece’s story and charm. Most importantly, let your personal style shine through. Repurposing is an art form that allows you to create pieces that perfectly reflect your taste and needs.
Repurpose Old Furniture Instead of Replacing It
The decision to repurpose old furniture offers a multitude of benefits that extend far beyond simply saving money. It’s an act of conscious consumption, significantly reducing waste and lessening your environmental footprint. Every dresser, bookshelf, or coffee table that finds a new function is one less item contributing to overflowing landfills. The possibilities for creative transformation are genuinely endless, limited only by your imagination.
Before you consider discarding an outdated piece or rushing to buy something new, pause and envision its potential. Could that dusty trunk become a stylish coffee table with hidden storage? Might that old ladder transform into a chic display shelf? Giving furniture a new purpose not only injects personality and unique style into your home but also provides immense satisfaction from creating something beautiful and functional with your own hands. Unleash your creativity, explore the vast world of furniture upcycling, and discover the joy of giving new life to forgotten pieces.
What furniture have you repurposed? Share your ideas in the comments and inspire fellow DIY enthusiasts!
FAQs
- What are the easiest furniture pieces to repurpose for beginners?
Dressers, bookshelves, and simple tables are generally the easiest to start with. They often require minimal structural changes and offer immense flexibility for painting, adding new hardware, or basic upholstery. These pieces can easily be adapted for various functions, making them forgiving for those new to DIY furniture projects. - What basic tools do I need for most furniture repurposing projects?
A good basic toolkit should include sandpaper (various grits), a drill, a saw (hand saw or jigsaw), paint brushes, rollers, a primer, your chosen paint, and a clear sealant. For upholstery, a staple gun and staples are essential. Having safety gear like gloves, eye protection, and a dust mask is also crucial. - Can I repurpose old furniture without extensive woodworking experience?
Absolutely! Many rewarding projects, such as painting, distressing, reupholstering, changing hardware, or adding decorative elements (like stenciling or decoupaging), require little to no advanced woodworking skills. Focus on cosmetic upgrades and simple assembly for your first projects. - What type of paint works best for furniture and provides a durable finish?
Chalk paint, latex paint, and acrylic paint are all excellent options. Chalk paint provides a beautiful matte, often distressed finish with minimal prep. Latex and acrylic paints offer greater durability and come in various sheens, from flat to high-gloss. For high-traffic pieces, always use a primer and finish with a durable topcoat or sealant for maximum protection. - How can I make repurposed furniture look high-end and professional?
To achieve a high-end look, focus on quality finishes: use premium paint and apply multiple thin coats for a smooth, streak-free surface. Upgrade hardware to solid brass, bronze, or unique designs. Add decorative touches like intricate molding, wallpapering interior sections, or applying metallic accents. Paying attention to precise measurements and clean edges also significantly elevates the overall appearance. - Should I sand furniture thoroughly before painting, or can I skip this step?
Sanding almost always improves paint adhesion and creates a smoother, more professional finish, especially on glossy or previously finished surfaces. It helps the paint ‘grip’ the surface. While some chalk paints market themselves as “no-sand,” a light scuff-sanding is usually beneficial for any paint type to ensure longevity and prevent chipping. - Can I successfully repurpose particle board furniture, or is it too challenging?
Yes, particle board furniture can be repurposed, but it requires special considerations. It’s less durable than solid wood and doesn’t hold nails and screws as well. You’ll need specialized primers designed for laminate or particle board surfaces to ensure paint adhesion. Use appropriate adhesives and consider reinforcement for structural changes. It’s often best for cosmetic updates rather than major structural overhauls. - Where are the best places to find old furniture for repurposing at an affordable price?
Excellent sources for affordable old furniture include thrift stores, charity shops, flea markets, garage sales, estate sales, and online marketplaces like Facebook Marketplace or Craigslist. Don’t overlook curbside finds (if permitted in your area) or asking friends and family if they have pieces they’re looking to get rid of. - How can I protect repurposed furniture from daily wear and tear and general damage?
A high-quality sealant or topcoat is crucial for protecting your repurposed furniture. Options include clear polyurethane, polycrylic (water-based and non-yellowing), wax (for chalk paint), or even epoxy resin for very high-traffic surfaces like tabletops. Apply multiple thin coats according to the product instructions, especially on frequently used surfaces to guard against scratches, moisture, and fading. - How do I know if a piece of furniture is truly worth repurposing, or if it’s beyond repair?
Look for sturdy construction and quality materials. Solid wood pieces, even if cosmetically damaged, are often excellent candidates because they can be sanded, repaired, and refinished repeatedly. Avoid pieces with significant water damage, extensive wood rot, widespread mold, or extremely flimsy particle board construction, as these issues can be difficult, costly, or unsafe to fix. Assess the time, cost, and effort required versus the potential outcome. - What’s the difference between repurposing and upcycling furniture?
While often used interchangeably, ‘repurposing’ generally means using an item for a new purpose other than its original one (e.g., a dresser to a kitchen island). ‘Upcycling’ specifically refers to reusing an item in a way that increases its value, quality, or aesthetic appeal, often through creative modification, painting, or embellishment. All upcycling is repurposing, but not all repurposing necessarily increases value in the same way. - Are there any common mistakes beginners should avoid when repurposing furniture?
Common mistakes include skipping proper cleaning and sanding, not using primer, rushing the drying times between coats, using too much paint per coat (leading to drips), not reinforcing wobbly joints, and choosing inappropriate paint or finishes for the intended use (e.g., non-waterproof paint for a bathroom vanity). Patience and thorough preparation are your best friends.