
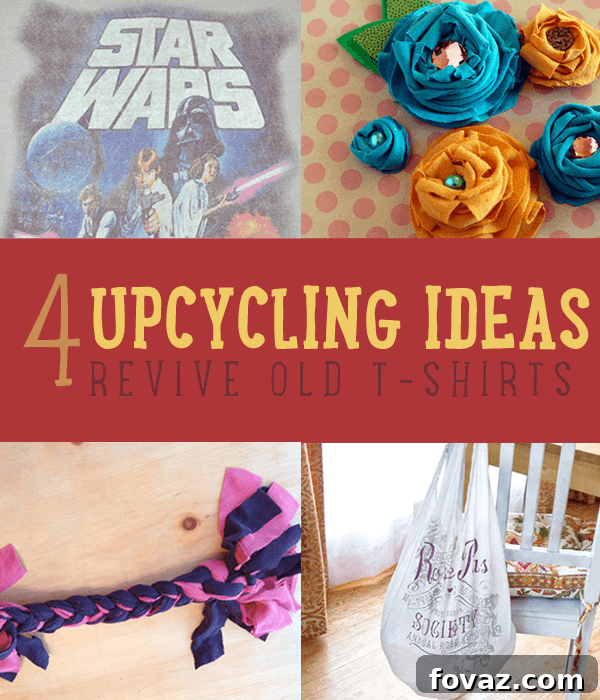
Transform Your Old T-Shirts: Creative DIY Upcycling Projects for a Sustainable Home
Do you have a closet overflowing with beloved T-shirts that no longer fit but hold too many precious memories to simply discard? We all understand the sentimental value attached to that concert tee, the winning team shirt, or the vintage find. At DIY Projects, we champion the philosophy of saving and upcycling, transforming forgotten items into functional and cherished new goods. Instead of letting those T-shirts gather dust or end up in a landfill, let us guide you through some of our favorite, most innovative ways to give them a vibrant second life. Embrace sustainability, unleash your creativity, and discover how to repurpose your old T-shirts into useful and beautiful items for your home and pets. It’s a true win-win: you declutter sustainably, save money, and create something uniquely yours!
Upcycling is more than just a craft; it’s a movement towards a more sustainable lifestyle. By repurposing materials, we reduce waste, conserve resources, and minimize our environmental footprint. Old T-shirts, often made from durable cotton, are fantastic candidates for upcycling due to their softness, flexibility, and availability. Whether you’re a seasoned crafter or a complete beginner, these simple yet rewarding DIY projects will inspire you to look at your textile waste in a whole new light. Get ready to turn those cherished memories into tangible, everyday treasures!
1. Unleash Playtime: DIY T-Shirt Dog Tug Toy
Give your furry friend a reason to wag their tail with a durable, homemade dog tug toy crafted from your old T-shirts. This project is not only incredibly simple but also a fantastic way to utilize those well-worn tees that might be too threadbare for other uses. Dogs love the familiar scent of their owners, and a toy made from your old clothes can provide extra comfort and enjoyment during playtime. Plus, you’re creating a robust, eco-friendly toy that stands up to enthusiastic tugging, saving you money on store-bought alternatives.
Materials:
- T-Shirts (3, preferably cotton for durability and stretch)
- Scissors (sharp fabric scissors work best)
Directions:
- Prepare Your Fabric Strips: Lay your T-shirts flat and smooth them out. Using your sharp scissors, cut 10 strips from each colored T-shirt. Aim for strips that are approximately 1.5 to 2 inches wide and about 20 inches long. Don’t worry if they aren’t perfectly even; the beauty of this project lies in its rustic charm. The cotton fabric will naturally curl slightly when stretched, adding to the toy’s texture. For thicker, more durable toys, you might opt for slightly wider strips or more T-shirts.
- Assemble the Bundle: Once you have all your strips cut, gather them together. To create a visually appealing toy, alternate the colors as you lay them out in one cohesive bundle. This creates a vibrant, multi-colored rope that will capture your dog’s attention. Ensure all strips are aligned at one end.
- Initiate the Knot: On one end of the assembled bundle of strips, tie a secure double knot. This first knot will form one end of your tug toy. Make sure to pull it tight to prevent unraveling during enthusiastic play. Leave several inches of fabric extra beyond the knot; these will form a playful tassel end for your dog to grip.
- Begin the Braid: Below the initial knot, separate the entire bundle of fabric strips into three equal sections. Just like braiding hair, begin to braid these three sections together. Braid for approximately 6 to 8 inches, creating a sturdy and appealing middle section for your dog to grip during play. Keep the braid tight and consistent to ensure durability. You can experiment with different braid lengths depending on the size of your dog and the desired length of the toy.
- Secure the End: Once you’ve braided to your desired length, gather all three sections together again and tie another strong double knot at the end of the braid. Similar to the first knot, pull it very tight to secure the braid and prevent it from coming undone. Trim any excessively long ends to create a neat tassel, or leave them long for extra flair. Your custom, handmade dog tug toy is now ready for action!
(See full article at OneGoodThingByJillee)
2. Bloom with Charm: T-Shirt Rag Flowers for Crafts and Decor
Add a delicate, handmade touch to your home decor or personal accessories with beautiful rag flowers crafted from old T-shirts. These charming fabric blooms are incredibly versatile and can be used to embellish headbands, brooches, gift wrapping, scrapbooking projects, or even as decorative accents on cushions and clothing. They offer a wonderful opportunity to play with color and texture, transforming simple fabric scraps into elegant floral motifs that reflect your unique style. This project is perfect for those smaller T-shirt scraps that might not be suitable for larger upcycling endeavors, ensuring maximum material utilization.
Materials:
- T-Shirt (any color or pattern will work beautifully)
- Scissors (fabric scissors are recommended for clean cuts)
- Hot Glue Gun and Glue Sticks (ensure it’s heated and ready)
- Optional: Buttons, Gems, Beads, or other embellishments for the center
Directions:
- Prepare the Main Petal Strip: Begin by cutting a long strip from your chosen T-shirt. Aim for a strip approximately 2 inches wide and at least 10 inches long. The longer the strip, the fuller your flower will be. You can easily adjust the width and length to create different sized flowers. For a more organic look, you don’t need to be perfectly precise with your cuts.
- Create the Folded Edge: Take the long strip you just cut and fold it lengthwise, slightly less than halfway down. This creates a softer edge for your petals and adds a bit of volume. The raw edge will be tucked away when you roll the flower, giving it a neater finish.
- Cut the Backing Circle: From an additional piece of T-shirt fabric (which can be a scrap or a different color for contrast), cut a small circle. This circle will serve as the sturdy backing for your rag flower, providing a base to which you will glue the rolled petals. The size of the circle should be appropriate for the size of your anticipated flower, generally 1.5 to 2 inches in diameter.
- Form the Flower Shape: Now, fold the long, prepared strip in half again, bringing the two ends together. Starting from one end, begin to roll this folded strip into a spiral, twisting the fabric gently as you go. This twisting motion helps create the natural, ruffled look of flower petals. Experiment with how tightly or loosely you twist to achieve different floral effects. Keep the bottom edge relatively flat to ensure it glues securely.
- Adhere to the Backing: Once you have rolled your strip into a pleasing flower shape, apply a generous amount of hot glue to the center of your fabric circle backing. Carefully press the base of your rolled T-shirt flower onto the hot glue, ensuring good contact between the fabric layers.
- Firmly Secure: Press down firmly on the flower and backing for about a minute. This allows the hot glue to cool and set, creating a strong bond that will hold your flower together. Be careful not to burn your fingers!
- Fluff and Shape Petals: Once the glue has dried, gently pull and manipulate the individual “petals” or layers of your flower. This helps to separate them and give the flower a fuller, more natural, and visually appealing appearance. Don’t be afraid to gently tug and arrange until you are happy with the shape.
- Refine Petal Details (Optional): For even more intricate petals, you can snip into the top edge of your rolled flower in two or three places. These small snips will create smaller, more defined petal sections, adding depth and texture to your bloom.
- Add a Decorative Center (Optional): To complete your rag flower and add a touch of sparkle or contrast, hot glue a button, gem, bead, or a small piece of contrasting fabric to the very center of the flower. This serves as the pistil and adds a professional, finished look.
(See full article at Fiskars)
3. Personalized Art: DIY T-Shirt Canvas Wall Art
Transform your cherished T-shirts into unique and sentimental wall art with this incredibly simple DIY T-shirt canvas project. This is a brilliant way to preserve memories from favorite band tees, travel souvenirs, sports jerseys, or graphic designs that you love but can no longer wear. Instead of letting them languish in a drawer, turn them into conversation-starting pieces that add personality and warmth to any room. It’s an inexpensive alternative to traditional art and offers a deeply personal touch that store-bought decor simply can’t match. Create a gallery wall of your memories, or give these personalized canvases as thoughtful, handmade gifts.
Materials:
- T-Shirt (the design or pattern you want to showcase)
- Scissors (for precise trimming)
- Thumbtacks or a staple gun (for securing the fabric)
- Blank Canvas (available at any craft store, choose a size that complements your T-shirt design)
Directions:
- Prepare the Canvas and Fabric: Lay your blank canvas on a clean, flat surface. Iron your chosen T-shirt to remove any wrinkles or creases; this ensures a smooth finish on your artwork. Carefully center the desired design or graphic of your T-shirt onto the front of the canvas. Take your time to align it perfectly, ensuring that the most important parts of the design are visible and centered within the canvas frame.
- Trim the Fabric: Once the T-shirt is perfectly positioned, trim the excess fabric around the edges of the canvas. Leave a generous margin of several inches (at least 2-3 inches, depending on the thickness of your canvas frame) beyond each edge of the canvas. This extra fabric is crucial for wrapping around the sides and back of the canvas frame, allowing you to pull it taut and secure it properly.
- Flip and Stretch: Carefully flip the canvas over so the T-shirt fabric is now underneath and the back of the canvas frame is facing upwards. Ensure the T-shirt design remains centered and flat on the front side as you do this.
- Secure the Fabric: Starting from the middle of one side, pull the T-shirt fabric tightly over the edge and onto the back of the canvas frame. Secure it in place with a thumbtack or a staple gun. Work your way around the canvas, pulling the fabric tautly on all sides before securing it. This step is critical for achieving a smooth, professional-looking finish. When you reach the corners, fold the fabric neatly, just like you would wrap a present, and secure those folds with additional thumbtacks or staples. Continue this process until the entire T-shirt fabric is securely fastened to the back of the canvas, with no sagging or wrinkles on the front.
(See full article by Nicole Olea)
4. Fashionably Functional: DIY No-Sew T-Shirt Bag

Say goodbye to single-use plastic bags and hello to your stylish, eco-friendly T-shirt tote! This incredibly popular no-sew project transforms an old T-shirt into a versatile and functional bag, perfect for grocery shopping, carrying books, a day at the beach, or even as a unique gift bag. It’s a fantastic way to make a tangible impact on reducing plastic waste while simultaneously extending the life of your beloved garments. The beauty of this project lies in its simplicity; no sewing machine or advanced skills are required, making it accessible to everyone. Choose a T-shirt with a fun graphic or a vibrant color to create a bag that’s as unique as you are!
Materials:
- T-Shirt (a sturdy cotton tee works best for durability)
- Scissors (sharp fabric scissors will make cutting easier)
- Ruler or straight edge (optional, but helpful for even cuts)
Directions:
- Prepare the T-Shirt: Lay your chosen T-shirt flat on a clean, hard surface. Smooth out any wrinkles. Carefully cut off both sleeves, following the natural curve of the shoulder seams. You want to cut just inside the seam, removing the entire sleeve. Next, cut off the entire neckband, creating a wide opening at the top. These openings will eventually become the handles of your bag. Try to make these cuts as smooth and symmetrical as possible for a neat finish.
- Flip and Align: Turn the T-shirt inside out. Lay it flat again, ensuring the bottom seam is closest to you and the side seams are perfectly aligned. This inside-out step is crucial for hiding the knots you’re about to make, giving your finished bag a clean exterior.
- Create the Fringe: With the T-shirt still inside out and laid flat, arrange the bottom edges together so they are perfectly aligned. Begin cutting vertical slits from the bottom hem upwards, stopping about 2 inches deep. Aim for slits that are approximately 1 to 1.5 inches apart. You can use a ruler to help you keep these cuts even and straight, resulting in a consistent fringe. Cut through both layers of the T-shirt (front and back) simultaneously.
- Address the Side Seams: Once you’ve created the fringe along the entire bottom edge, make a vertical cut along each of the two side seams, also about 2 inches deep. This will separate the front and back fringes at the corners, making the knotting process easier and more flexible.
- Knot the Base: Starting from one side, take the top fringe strip and its corresponding bottom fringe strip. Tie them together with a secure double knot. Pull each knot tightly to ensure a strong, durable base for your bag. Continue this process, working your way across the entire bottom edge, tying each top fringe strip to its matching bottom fringe strip. The double knot is key here to prevent your bag from unraveling, especially when carrying heavier items.
- Reinforce Corners (Optional): For extra durability at the corners, you might want to tie the outermost fringe strips to the adjacent side seam fringe strips. This creates a more enclosed and robust bottom for your bag.
- Final Flip: Once all the fringe strips are securely knotted, turn your new T-shirt bag right side out. The knots will now be neatly tucked away on the inside, and your bag is ready to use! Gently tug on the handles and the body of the bag to stretch the fabric slightly, giving it a more relaxed and functional shape.
(See full article at SavvySugar)
Upcycling your old T-shirts is a journey of creativity, sustainability, and personal expression. Each project you undertake not only gives a new purpose to an item that might otherwise be discarded but also reduces waste and contributes to a healthier planet. From playful dog toys that keep tails wagging, to delicate rag flowers that brighten your crafts, personalized wall art that tells your story, and practical tote bags that champion eco-friendly living, the possibilities are truly endless.
We encourage you to dive into these DIY projects, experiment with different colors and textures, and adapt the instructions to suit your unique vision. Share your creations with friends and family, inspiring others to join the upcycling movement. Remember, every old T-shirt holds potential for a beautiful new beginning. So, gather your scissors, unleash your imagination, and transform those forgotten fabrics into cherished treasures today!