
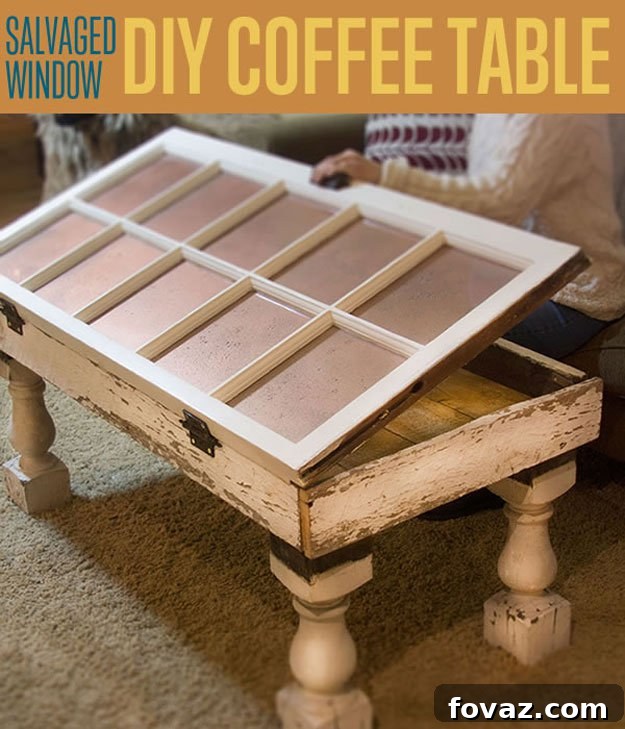
Transform an Old Window into a Charming DIY Coffee Table with Storage
Are you searching for a unique focal point for your living room, a conversation starter that brims with character and a fascinating backstory? Look no further! This delightful DIY salvaged window coffee table is an exceptional project, perfect for anyone eager to infuse their space with rustic charm and practical functionality. Imagine gathering around this warm, cozy, and distinctive piece, rich with history and offering ample hidden storage for all your living room essentials. It’s not just a table; it’s a testament to creative upcycling, turning forgotten materials into a cherished home decor item that will undoubtedly impress family and friends.
This comprehensive guide will walk you through every step of transforming an old architectural salvage window into a sturdy and stylish coffee table. You’ll learn how to construct a robust base, add a clever storage compartment, and even apply a beautiful mercury glass effect to the tabletop. Prepare to unleash your inner craftsman and create a custom furniture piece that is both eco-friendly and deeply personal.
Essential Supplies for Your Upcycled Window Coffee Table Project
From the Architectural Salvage Store (Embracing Vintage Charm):
- Architectural Salvage Window: The star of your project! Choose a window that complements your desired coffee table size and aesthetic. Look for interesting panes or a unique frame style.
- Old Hinges: Select hinges with a vintage look to match the salvaged aesthetic. These will allow your window top to open and close, revealing the storage compartment.
- Old Drawer Pull or Handle: A rustic pull will add character and serve as a convenient handle to lift the window lid.
- Old Pedestal or Spindle Feet (4): These will elevate your coffee table and complete its vintage appearance. Ensure they are sturdy enough to support the table’s weight.
- Old Wood Planks: Measure the perimeter of your chosen window. This measurement will determine the linear feet of old plank wood needed for the main frame of your coffee table base. Barn wood or reclaimed lumber works wonderfully for a rustic feel.
From Your Local Hardware Store (Building a Solid Foundation):
- Inexpensive Wood Planks: Opt for economical planks, approximately 1/2 inch x 4 inches x 6 feet, to construct the bottom of the storage base. These boards will be cut into strips to form a solid, hidden floor for your coffee table’s internal compartment. You’ll need enough to cover an area equivalent to the inside dimensions of your window.
- Assorted Screws: A variety pack including 1/2-inch, 1-inch, and 2-inch screws will ensure you have the right fasteners for different stages of assembly, providing maximum stability.
- “L” Brackets (16 with accompanying hardware): These robust metal brackets are crucial for securely joining the corners of your wooden frame and attaching the internal base.
- Metallic Copper Spray Paint: For creating the stunning mercury glass effect on your windowpane. Any metallic color can be substituted if copper isn’t your preference.
- Spray Bottle with Water: Essential for achieving the mottled, aged look of mercury glass.
Tools from Around the Craft Room & Garage (Your Workshop Essentials):
- Power Chop Saw: For precise and efficient cutting of your wooden planks. Always prioritize safety when operating power tools.
- Painter’s Tape: To mask off areas you don’t want painted, especially when working on the mercury glass effect.
- Sandpaper: For smoothing rough edges and preparing surfaces for assembly or finishing.
- Dropcloth: To protect your workspace from paint and sawdust.
- Power Drill: Indispensable for pre-drilling holes and securely driving screws.
Step-by-Step Guide to Crafting Your Salvaged Window Coffee Table
Embark on this rewarding DIY journey and watch your vision come to life!
Step 1: Constructing the Rustic Wooden Box Base
Our journey begins with the aged beauty of the barn wood planks from your architectural salvage store. The goal here is to create a sturdy, perfectly sized box that will serve as the structural base and outer walls for your coffee table’s storage compartment. This box must precisely match the dimensions of your salvaged window, ensuring a seamless fit for the tabletop. Using your power chop saw, carefully measure and cut your barn wood planks. Lay them out in a rectangular or square formation on your work surface, mimicking the shape of your window. Double-check all measurements before making any cuts – the adage “measure twice, cut once” is incredibly important here. The window itself isn’t attached at this stage; it’s simply placed on the assembled planks in the reference photo to illustrate the intended fit. Precision in this step will guarantee a professional-looking finished product.
Step 2: Assembling the Outer Frame for Enhanced Stability
Once all your barn wood planks are accurately cut and laid out in the desired box shape, it’s time to secure them. For maximum stability and durability, we will use “L” brackets at each corner. Position two “L” brackets on the inside of each corner, ensuring they are flush with both adjoining planks. Pre-drill pilot holes before driving screws to prevent splitting the wood, especially with older, drier planks. This dual-bracket approach significantly reinforces the frame, creating a robust structure capable of supporting the window top and any items stored inside. A strong frame is the backbone of any quality furniture piece.
Step 3: Crafting the Internal Storage Base
Now, let’s turn our attention to the interior of the coffee table, creating the functional storage base. Take your inexpensive wood planks from the hardware store. Measure the *inside* dimensions of the barn wood box you assembled in the previous steps. This measurement is critical for determining the size of the thin wood strips you’ll need. Using your chop saw, cut these planks into strips that, when placed side-by-side, will perfectly fit within the barn wood frame. Before securing them permanently, test-fit all the strips into the box. Crucially, ensure they can slide down past the raised “L” brackets installed in Step 2. Once satisfied with the fit, lay the strips out on the floor and temporarily join them together. You can use three scrap pieces of wood, cut to span the width of your base, and secure them underneath the strips with 3/4-inch screws. This creates a single, manageable panel that will form the floor of your storage compartment, making installation much easier.
Step 4: Securing the Storage Base Floor
With your storage base panel ready, it’s time for its permanent installation within the rustic frame. Flip your barn wood box onto its side. Carefully slide the assembled storage base panel into place. We’ll use more “L” brackets to firmly secure this “floor” to the inside walls of the box. Install 6 to 8 “L” brackets evenly spaced around the perimeter of the inside of the box, ensuring the panel is flush and level. Pre-drilling pilot holes for each screw is highly recommended to prevent wood splitting and ensure a tight, professional fit. The left side of the Step 4 photo, for instance, provides a view from the bottom of the box after installation, illustrating how the brackets secure the floor. This step guarantees a stable and functional bottom for your coffee table’s storage area.
Step 5: Attaching the Vintage Pedestal Feet
Adding the legs is where your coffee table truly begins to take shape. Carefully position each of the four pedestal or spindle feet at the corners of the table’s underside. Ensure they are perfectly flush with the ground and aligned straight up and down, both aesthetically and structurally. Using your power drill and appropriately long screws (typically 1-inch or 2-inch, depending on the thickness of your feet), securely attach each leg to the base of the coffee table. For optimal stability, use four screws per leg, arranged in a box pattern. This creates a robust connection, preventing wobbling and ensuring your coffee table can withstand daily use. A well-attached set of legs is crucial for both the longevity and safety of your furniture piece.
Step 6: Creating the Mesmerizing Copper Mercury Glass Effect
Now for the artistic touch that will transform your window into a dazzling tabletop! The beauty of mercury glass is its ability to add a vintage, reflective quality while subtly obscuring the view into the storage compartment below – perfect for hiding remotes, magazines, or other clutter. Here’s how to achieve this captivating effect:
- Prepare Your Window: Lay your salvaged window flat on a dropcloth. Importantly, you will be painting the *underside* of the glass panes – the side that will face down into the coffee table’s storage box. This protects the painted surface from wear and tear on the tabletop.
- Masking: Carefully apply painter’s tape to all the wooden areas of your window frame. You only want the spray paint to adhere to the glass panes.
- Apply Copper Spray Paint: Hold your metallic copper spray paint can about 6-8 inches from the glass and apply an even, light coat over the panes. Don’t aim for full opacity in the first pass.
- Mist with Water: Immediately after spraying the paint, grab your spray bottle filled with water. Adjust the nozzle to a fine mist setting (avoid a direct stream). Lightly mist the wet metallic paint all over the glass. You’ll notice the water droplets reacting with the wet paint, creating a beautiful, mottled, and aged appearance. Refer to the Step 6 photo for a visual guide on this technique.
Allow the paint to dry completely and the water to evaporate. As it dries, the paint will adhere in a unique pattern, leaving you with an absolutely gorgeous, mottled coat of copper that radiates beautifully from the top side of the glass. This technique is surprisingly simple yet yields incredibly radiant and professional-looking results.
Step 7: Final Assembly: Attaching the Window Top and Handle
With your base complete and the windowpane beautifully transformed, it’s time for the final assembly. Carefully position your window atop the wooden box base. Using the vintage hinges you acquired from the architectural salvage store, attach the window to one side of the base. Ensure the hinges are securely screwed into both the window frame and the wooden box. For an authentic vintage look, consider using black screws for dark hardware. If you only have gold or silver screws, a quick dab of brownish/black paint on the screw heads once installed can effectively age them to match your hardware. After the hinges are firmly in place, attach your vintage drawer pull to the opposite side of the window. This pull will serve as a convenient and stylish handle, allowing you to easily lift the window top and access the spacious storage area beneath. Take a moment to admire your handiwork! A final polish of the glass with a cleaner like Windex will complete your luxuriously rustic and functional coffee table. You’ve successfully created a unique piece of upcycled furniture that tells a story.
Share Your Upcycling Success and Discover More DIY Furniture Ideas!
Did you enjoy bringing this DIY salvaged window coffee table to life? We’d love to hear your thoughts and see your unique creations! Share your experience in the comments section below. What clever repurposed ideas have you tackled, or what upcycling projects are you dreaming of? Our community thrives on shared inspiration and creative endeavors. We’re passionate about empowering individuals to embrace their creative side through craft projects, home decor DIYs, smart upcycling ideas, delicious recipes, and comprehensive tutorials for anything you can do yourself. This platform was built to connect DIY enthusiasts, making every project just a click away.
Stay connected with us for daily inspiration, tips, and new project ideas on Facebook, Twitter, Pinterest, and Instagram!
Looking for More Exciting DIY Furniture Projects to Tackle?
If this upcycled coffee table has sparked your passion for creating unique furniture, explore some of our other popular tutorials:
Golden Tree Stump End Table | How to Build a Unique Side Table
Discover how to transform a simple tree stump into a glamorous and functional end table, adding a touch of natural elegance to your home decor.
DIY Bookcase Transformation | Furniture Rehab for a Fresh Look
Give an old, tired bookcase a dramatic makeover and breathe new life into your living space with our expert furniture rehab techniques.
How To Make A Table From A Repurposed Army Ammo Crate | Industrial Chic DIY
Learn to convert a rugged army ammo crate into a stylish and conversation-starting table, perfect for an industrial or rustic interior design theme.