
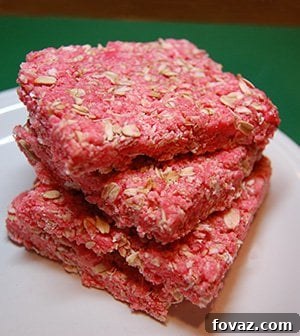
Mastering Emergency Preparedness: Your Guide to Homemade Survival Bars
In an unpredictable world, being prepared for any eventuality is not just a hobby—it’s a necessity. From natural disasters to unexpected emergencies, having a reliable food source is paramount. While commercial survival food options abound, there’s a unique satisfaction and peace of mind that comes from crafting your own emergency rations. Today, we’re diving deep into the world of homemade survival bars, a remarkably simple, delicious, and incredibly long-lasting solution for your emergency food supply. Forget bland, chalky bricks; these bars offer a delightful taste experience, reminiscent of your favorite fruity cereals, making preparedness a pleasure.
Why Homemade Survival Bars Are Your Ultimate Emergency Food Solution
My journey into making homemade survival bars began with a simple question: “Could I create a delicious, shelf-stable emergency food that my family would actually enjoy?” After experimenting with various recipes, I stumbled upon a formula that not only met but exceeded my expectations. These bars boast a perfect balance of texture and flavor, especially if you’re a fan of vibrant, fruity tastes. Imagine the nostalgic burst of Crunch Berries, or perhaps the playful medley of Trix or Fruity Pebbles, all packed into a convenient, nutrient-dense bar. They are genuinely good – not hard as bricks, nor dry and flavorless, which is a significant achievement for a survival food.
The beauty of these DIY survival bars lies in their simplicity and the control they offer. You select every ingredient, ensuring quality and avoiding unnecessary additives often found in store-bought alternatives. Moreover, the cost-effectiveness of making your own emergency rations cannot be overstated. With just a few common pantry staples, you can produce a substantial supply of these life-sustaining snacks, freeing up resources for other critical preparedness items.
Unrivaled Shelf Life: The Science Behind Longevity
One of the most compelling reasons to make these homemade survival bars is their astonishingly long shelf life. Through careful selection of ingredients, we eliminate common culprits that lead to spoilage. Unlike many conventional recipes, there’s no oil or perishable fats that can quickly go rancid. Furthermore, the baking process removes moisture, a primary factor in bacterial growth, while the unique properties of Jell-O help retain a pleasant, non-dry texture without introducing moisture that could compromise longevity.
I conducted extensive research into each ingredient’s individual shelf life, and the findings were incredibly reassuring. Dry gelatin (Jell-O) mix, for instance, is considered to have an “indefinite” shelf life, even past its printed expiration date, as long as it’s stored properly. Similarly, powdered milk, sugar, oats, and honey are all known for their exceptional stability when kept in cool, dry conditions. When combined and processed as per this recipe, these bars are projected to remain viable and palatable for at least 20 years. While I fully intend to test this claim over the coming months and years (and will keep you updated!), the scientific principles strongly support their long-term storage potential. Knowing you have a reliable food source that can last for decades provides unparalleled peace of mind.
Versatility and Future Innovations
While the fruity flavors are a definite hit, I’m always looking to expand the versatility of these survival staples. My next project involves developing a rich chocolate chia version, a recipe I’ve been refining in my head. Chia seeds are a nutritional powerhouse, offering exceptional sustenance and an equally impressive shelf life, making them an ideal component for emergency food. I also plan to tackle sugar-free options, bars with increased protein content for sustained energy, and a variety of other exciting flavors. Be sure to bookmark this page, or follow us on social media, to stay updated on these latest creations and recipes.
UPDATE: The Chocolate Chia Survival Bar Recipe is now complete and available! We appreciate your patience and can’t wait to hear what you think of this delicious, non-fruity alternative.
Beyond Emergencies: Practical Uses for Your Homemade Bars
While designed for crisis situations, these homemade survival bars are incredibly versatile and practical for everyday use as well. Their durable, non-crumbling nature makes them perfect for packing into backpacks for:
- Camping Trips: A lightweight, high-energy snack that requires no refrigeration.
- Hunting Expeditions: Fuel for long hours in the wilderness.
- Hiking Adventures: A compact and satisfying energy boost on the trail.
- Road Trips: A convenient, non-messy snack for travelers.
- Everyday Snacks: A quick, wholesome bite to keep you going between meals.
They stay intact under various conditions, making them an ideal, portable food source for anyone needing sustained energy on the go.
Step-by-Step Guide: Crafting Your Own Long-Lasting Survival Bars
Making these survival bars is surprisingly straightforward, requiring minimal culinary skills or specialized equipment. Follow these steps to create your own resilient and delicious emergency food supply.
Ingredients for Homemade Survival Bars:
- 2 cups rolled oats (either regular or quick-cooking variety work well)
- 2 1/2 cups powdered milk (full fat or skim both suitable for shelf life)
- 1 cup granulated sugar (provides energy and acts as a preservative)
- One (1) 3 oz package Jell-O mix (strawberry, cherry, orange, and lemon are popular choices, but feel free to experiment with any flavor you prefer for a unique taste experience)
- 3 Tablespoons water
- 3 Tablespoons honey (adds binding, sweetness, and contributes to preservation)
Step 1: Combine the Dry Ingredients
Mix the oats, powdered milk, and sugar together.
Begin by taking a large mixing bowl – ensure it’s spacious enough to comfortably accommodate additional ingredients later. Pour in the 2 cups of rolled oats, 2 1/2 cups of powdered milk, and 1 cup of granulated sugar. Using a sturdy spoon or spatula, mix these dry ingredients thoroughly until they are uniformly combined. There’s no need for any fancy equipment here; a simple stirring will suffice. This initial step ensures an even distribution of the base ingredients before the wet mixture is introduced.
Step 2: Prepare the Wet Jell-O Mixture
In a medium saucepan, combine the Jell-O mix, water, and honey, then bring to a boil.
Next, take a medium-sized saucepan and add the entire 3-ounce package of Jell-O mix. Remember, the flavor is entirely up to your preference – strawberry, cherry, orange, or lemon are fantastic starting points for that delightful fruity taste. Crucially, add only 3 tablespoons of water and 3 tablespoons of honey to the saucepan. It’s vital to note that this is significantly less water than typically called for on the Jell-O box instructions; we’re aiming for a highly concentrated binder, not gelatin for dessert. Place the saucepan over medium-high heat and stir continuously. Bring this mixture to a rolling boil, which is characterized by large, continuous bubbles that do not stop when stirred. This ensures all ingredients are well dissolved and properly activated.
Step 3: Combine Wet and Dry Mixtures
Add the hot Jell-O mixture to your dry ingredients and mix well.
Immediately after reaching a rolling boil, carefully pour the hot Jell-O mixture into the large bowl containing your dry ingredients. For optimal results and to thoroughly combine the sticky mixture, we highly recommend using a stand mixer with a sturdy paddle attachment. If you don’t have a mixer, you can achieve good results by mixing by hand. However, a spoon will prove too cumbersome; instead, use your clean hands to knead and press the ingredients together until they are uniformly moist and combined. The goal is to ensure every dry particle is coated with the sticky binder.
Step 4: Adjust Consistency for Perfect Binding
Check the consistency and add water, if needed.
At this stage, the dough should be crumbly but cohesive enough to stick together when pressed firmly. Take a small handful and squeeze it; if it holds its shape, you’re on the right track. If the mixture appears too dry and won’t bind, add water very sparingly, one teaspoon at a time, mixing well after each addition. Typically, anywhere from 1 to 5 additional teaspoons of water may be needed, depending on factors like humidity and the precise measurements of your dry ingredients. Continue adding minute amounts of water until you achieve the desired consistency: a dough that is crumbly yet sticks together firmly when pressure is applied. Over-wetting will compromise the shelf life, so err on the side of slightly drier rather than too moist.
Step 5: Press into a Pan
Press dough firmly into a large rectangular pan (9×13 inches is ideal) lined with parchment paper.
Prepare your baking pan by lining it completely with parchment paper. For added stability, especially if you plan to lift the entire batch out, you can first line the pan with foil and then parchment paper on top. This creates a non-stick surface that makes removal effortless. Evenly distribute the survival bar dough into the prepared pan. This is where firmness is key: press the dough down as much as possible. I often use my fists to compact it thoroughly, but you can also use the bottom of a glass, a rolling pin, or even another flat pan. The denser the bars, the less likely they are to crumble and the more robust they will be for long-term storage and portability. Ensure the surface is as flat and even as possible.
Step 6: Cut into Individual Bars
Cut the dough into bars before baking.
Before baking, use a pizza cutter or a sharp knife to score and cut the compacted dough into your desired bar sizes. Rectangles are most common, but you can opt for squares or any shape that suits your needs. It is crucial to cut all the way through the dough, ensuring clean, distinct separations. If the cuts aren’t deep enough, your bars may crumble when you try to separate them after baking. I recommend going over the lines with a butter knife or the tip of a spatula after using a pizza cutter to ensure a complete cut. This step makes individual bar separation much easier once they have dried and firmed up in the oven.
Step 7: Bake and Dry
Bake them for 1 1/2 to 2 hours in an oven set at 200 degrees Fahrenheit.
Preheat your oven to a low temperature of 200°F (93°C). Place the pan with the cut bars into the oven and bake for approximately 1 1/2 to 2 hours. The goal here is not to “cook” them in the traditional sense, but rather to gently dry them out, further reducing moisture content for maximum shelf life. The exact baking time may vary slightly depending on your oven’s calibration and the initial moisture level of your mixture. If your bars still feel a bit moist after 90 minutes, allow them to bake for the full two hours. It’s difficult to over-dry them at such a low temperature, so don’t worry about leaving them in a little longer. When finished, carefully remove the pan from the oven. Let the bars rest in the pan for about 10 minutes to set. Then, using the edges of the parchment paper, lift the entire block of bars out of the pan and transfer them to a wire rack to cool completely. Cooling outside the pan allows for better air circulation and ensures they become perfectly firm and dry.
Note: While you can dehydrate these bars, baking them at a low temperature tends to yield a more consistent and appealing texture.
Step 8: Store for Long-Term Preparedness
Pack your bars in an airtight container once completely cooled and dried.
Once your survival bars have cooled entirely and are completely dry and firm, it’s time to prepare them for long-term storage. Individual bars can be wrapped tightly in aluminum foil, or you can place multiple bars into heavy-duty Ziploc bags. For even greater protection against moisture, oxygen, and pests, consider using Mylar bags with oxygen absorbers, or sturdy plastic Tupperware-style containers. Label your containers with the date of preparation to track their longevity. Store them in a cool, dark, and dry place, such as a pantry, basement, or dedicated food storage area. Proper storage is crucial to ensure these homemade survival bars maintain their quality and extraordinary shelf life for years to come.
Continue Your Preparedness Journey
Crafting these homemade survival bars is just one excellent step in building a robust emergency food supply. The peace of mind that comes from knowing you have delicious, reliable sustenance for your family is invaluable.
Explore More Survival Recipes
If you enjoyed making these fruity bars, don’t miss our Chocolate Chia Survival Bar Recipe. It offers a different flavor profile while maintaining the same commitment to long-term storage and nutrition.
Stay Connected for More DIY Preparedness Content
We’re constantly developing new projects and recipes to help you become more self-sufficient and prepared. Be sure to engage with us on social media for our latest updates and inspiring DIY articles.
Join Our Community and Never Miss an Update
Want to be the first to know about our newest DIY projects, survival tips, and preparedness guides? Join our exclusive mailing list! You’ll receive timely notifications and access to valuable content designed to empower your preparedness efforts. (Find the sign-up link at the top right for desktop users or at the bottom for mobile devices.)
Your Feedback Matters!
We love hearing from our readers. Let us know in the comments below if you’ve tried this recipe, what flavors you experimented with, or any tips you have for fellow preppers. Your insights and experiences help shape our content and build a stronger community.
Beyond Bars: A Complete Guide to Food Storage in a Crisis
Having survival bars is fantastic, but a truly resilient emergency plan requires a comprehensive approach to food storage. We highly recommend exploring “When the Food Runs Out,” a complete guide to food storage in a crisis. This invaluable resource covers:
- Essential Supplies: 46 compact pages detailing precisely what you need (and in what quantities) to safeguard your loved ones’ food supply during a crisis.
- Non-Food Necessities: Crucial non-food items that are often overlooked until it’s too late, but can make or break your survival strategy.
- Affordable Sourcing: A detailed list of supplies and where to find essentials without breaking the bank in challenging times.
- Incredible Bonus Reports: Receive four FREE bonus reports (normally $37 each) on Vertical Gardening, Canning Secrets, How to Cook and Store Food Outside, and 170 Gallons a Day.
Don’t wait for a crisis to learn these vital skills. Secure your copy of When the Food Runs Out today and fortify your family’s future.
Considering Premade Options? Our Top Survival Food Bar Recommendations
While homemade is excellent, sometimes you need the convenience of commercially prepared survival food bars. After extensive testing by our executive editor at Survival Life, “Above Average Joe,” we’ve compiled a list of top-tier recommendations. Personally, I can attest to the deliciousness of the Mayday bars – they taste surprisingly like apple cinnamon pie crust!
Mayday Bars: Reliable & Flavorful
Discover Mayday bars, known for their great taste and dependable performance:
Single Serving:
Mayday Food Bar – 400 Calories
24-Pack for Extended Preparedness:
Mayday Food Bar – 400 Calories – Pack of Twenty Four
The Ultimate Bulk Pack:
Mayday 2400 Calorie Food Bars (24 per case) MRE, Camping, Hiking, Survival
Millennium Bars: Balanced Nutrition
A popular choice for emergency kits, Millennium Bars offer balanced nutrition in a compact form:
Millennium Bars Assorted 24-Pack
ER Emergency Ration: Robust and Ready
For a robust and long-lasting option, consider ER Emergency Rations:
ER Emergency Ration 2400+ Calorie, 5-Year Emergency Food Bar for Survival Kits and Disaster Preparedness (Pack of 4)