
Master the Art of Sewing: Create Your Own Stylish Sleeveless Tunic
A sleeveless tunic is more than just a piece of fabric; it’s a statement of style, comfort, and versatility. Imagine a garment that can effortlessly transition from a casual daytime staple to an elegant evening ensemble. With the right fabric and a touch of creativity, this humble sleeveless tunic can easily replace your favorite t-shirt for everyday wear or become the sophisticated centerpiece of a night out on the town. This comprehensive guide will walk you through creating your very own, custom-fit sleeveless tunic, proving that beautiful, handmade fashion is accessible to everyone, regardless of their sewing experience.
Dive into the rewarding world of DIY fashion and discover how simple it can be to craft garments that perfectly reflect your personal style. Our project is designed for maximum impact with minimal effort.
Project Overview: Your Custom Sleeveless Tunic
Estimated Time: 30 – 45 minutes
Difficulty Level: EASY
This project is specifically tailored for beginners, offering a straightforward approach to garment construction. The simplicity of the design, combined with clear, step-by-step instructions, makes it an ideal starting point for anyone looking to build their sewing skills and create a beautiful, functional piece for their wardrobe quickly.
Why Sew Your Own Sleeveless Tunic?
- Custom Fit: Say goodbye to ill-fitting off-the-rack clothes. Tailor your tunic to your exact measurements for unparalleled comfort and a flattering silhouette.
- Unique Style: Choose from an endless array of fabrics, colors, and patterns to create a tunic that truly expresses your individuality.
- Cost-Effective: Save money by making your own clothes, especially for basic pieces that you’ll wear frequently.
- Skill Building: This project reinforces fundamental sewing techniques, building confidence for more complex projects in the future.
- Personal Satisfaction: There’s immense pride in wearing something you’ve created with your own hands.
Materials Required for Your Tunic Project
Gathering the right materials is the first step towards a successful sewing project. While the list may seem simple, each item plays a crucial role in ensuring a professional and durable finish for your sleeveless tunic.
- Fabric (1-1.5 yards, depending on size and desired length): The choice of fabric is paramount. For a flowy, comfortable tunic, knit fabrics like rayon jersey, cotton jersey, or a knit blend (like rayon/cotton knit) are excellent. They offer drape, stretch, and comfort. If you prefer a more structured look, light to medium-weight woven fabrics such as linen blends, challis, or lightweight cotton poplin can also work, though they will require a slightly different approach to seam allowance (as discussed in the tips section). Always pre-wash and dry your fabric before cutting to prevent shrinkage after your tunic is made.
- Coordinating Thread: Select a high-quality all-purpose polyester thread that matches your fabric’s color. If your fabric has multiple colors, choose a thread that blends with the most dominant color or a neutral shade that complements all.
- Clear Ruler: An essential tool for accurate measurements and straight lines. A clear ruler allows you to see your fabric beneath, making it easier to align your markings precisely.
- Pins: These are vital for holding fabric layers together securely before and during sewing. Standard dressmaker pins are generally sufficient, but for delicate knits, consider using ballpoint pins to avoid snagging the fabric.
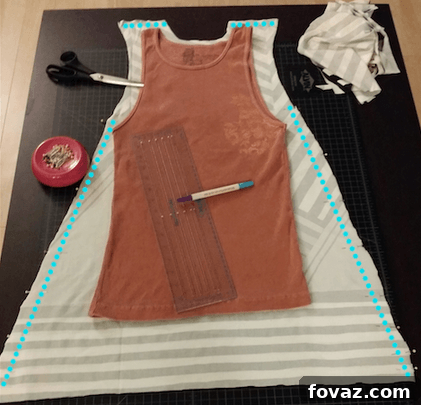
- An Old Tank Top That Fits Well: This is your secret weapon for creating a custom pattern! Choose a tank top that has the desired fit around the bust and shoulders, as this will serve as your blueprint for the upper portion of the tunic.
- Marking Tool (either disappearing ink fabric pen or tailor’s chalk): Accurate marking is key. Disappearing ink pens offer precision and vanish over time or with water, while tailor’s chalk provides a clear, temporary line that can be brushed away. Both are excellent choices for marking your fabric pattern.
- Sharp Fabric Scissors: Invest in a good pair of fabric scissors and reserve them *only* for cutting fabric. Using them on paper or other materials will dull them quickly, leading to frayed edges and inaccurate cuts. Sharp scissors ensure clean, precise cuts, especially important for slippery fabrics.
- Sewing Machine: While not explicitly listed, a sewing machine is implied for this project. Ensure it’s threaded and in good working order before you begin.
- Iron and Ironing Board: Essential for pressing seams and hems for a professional finish.
Measurements Required for a Perfect Fit
Achieving a custom fit is one of the most rewarding aspects of sewing your own clothes. For this project, you’ll primarily need one key measurement, which you can easily customize to your preference.
- Top of Shoulder to Desired Length: This measurement will determine how long your tunic will be. To take this measurement, place the measuring tape at the highest point of your shoulder (where the strap of your tank top rests) and extend it down your body to where you want the tunic hem to fall. For a standard tunic, common lengths include mid-hip, upper thigh, or even knee-length for a tunic dress. For my demonstration tunic, I opted for a length that reached halfway down my thigh, creating a versatile and flattering silhouette. Make sure to consider the length you want to allow for a comfortable hem.
Step-by-Step Guide: Creating Your Sleeveless Tunic
Step 1: Prepare and Fold Your Fabric
Before you even think about cutting, proper fabric preparation is crucial for a successful outcome. First, ensure your fabric has been pre-washed and dried according to its care instructions. This prevents any surprises with shrinkage after your garment is complete. Once dry, press your fabric thoroughly to remove any wrinkles. Then, carefully fold your fabric in half lengthwise, ensuring the right sides (the “pretty” side of the fabric) are facing each other. Align the selvage edges (the finished edges of the fabric) perfectly. Lay the folded fabric flat on a large, clean surface, smoothing out any creases or bumps. This creates a double layer, allowing you to cut both the front and back of your tunic simultaneously.
Step 2: Create Your Pattern Outline Using a Tank Top Guide
This is where your trusty old tank top comes into play as a smart pattern guide. Lay your folded fabric flat and smooth. Take your chosen tank top and carefully place it on top of the folded fabric, aligning the shoulder seams with the folded edge of the fabric (if cutting on the fold for a seamless front/back) or positioning it centrally if cutting two separate pieces. Using your tailor’s chalk or disappearing ink pen, begin marking around the tank top. Start by drawing a line 1 inch away from the edges of the tank top, all around the armholes and shoulders. This 1-inch border accounts for your seam allowance, which is the fabric needed for stitching the seams without reducing the garment’s intended size.
- For a Flowy, A-line Fit: If you desire a relaxed, airy, and gently flared tunic, start flaring out your marking at approximately a 35-degree angle. Begin this angle from just below the armpit, extending downwards towards your desired hem length. This wider flare will create a graceful, flowing silhouette that’s perfect for casual wear or hot weather. This was the route I chose for the demonstration tunic, resulting in a comfortable and flattering drape.
- For a More Fitted, Straight Silhouette: If your preference leans towards a more tailored or straight-cut tunic that skims the body, start flaring out your marking at a subtle 10-degree angle from the armpit downwards. This minimal flare will provide just enough ease for movement while maintaining a sleeker, more structured look.
Once you’ve marked the sides, extend the bottom line to your desired tunic length, remembering to add an extra 1-inch allowance for the hem.
Step 3: Precision Cutting Your Fabric
With your pattern outline clearly marked on the fabric, it’s time to cut. Using your sharp fabric scissors, carefully cut along the marked lines. Take your time to ensure your cuts are as smooth and even as possible. Remember to cut through both layers of fabric simultaneously to ensure your front and back pieces are identical. Don’t worry if your initial cuts aren’t perfectly straight – slight imperfections in fabric cutting are common, especially for beginners, and the sewing process (particularly with the flexibility of knits) will often resolve minor discrepancies, leading to a perfectly presentable garment.
Tip for Tricky Fabrics: Some fabrics, like the Rayon/Cotton Knit used in this project, can be particularly challenging to cut due to their “slinky-ness” or tendency to shift. To manage this, you might find it helpful to place weights on the fabric around your pattern, or even cut the layers one at a time if precision is proving difficult with both layers together. Work slowly and methodically to achieve the best results.
Step 4: Sew Up the Marked Sides Using a Zigzag Stitch
Now that your fabric pieces are cut, it’s time to bring your tunic to life at the sewing machine. Keeping the right sides of the fabric together, align the side edges of your front and back tunic pieces. Pin these edges securely in place, placing pins perpendicularly to the seam line every few inches. This will prevent the fabric from shifting as you sew. Load your sewing machine with your coordinating thread. For knit fabrics, it is absolutely crucial to use a zigzag stitch (or an overlock/serger stitch if you have one). A zigzag stitch allows the seam to stretch with the fabric, preventing the stitches from breaking when the garment is worn. Set your machine to a medium-width, medium-length zigzag stitch (e.g., 2.5mm width, 2.0mm length is a good starting point, but test on a scrap first). Stitch along the marked side lines, ensuring you backstitch at the beginning and end of each seam to secure the stitches. Repeat this process for both side seams.
After sewing, carefully press your seams open or towards the back of the garment. Pressing is a vital step in sewing; it helps to flatten seams, making them lay neatly and giving your finished tunic a professional, crisp appearance.
Step 5: Hem the Neckline, Armholes, and Bottom – And You’re Done!
The final step involves hemming the raw edges to give your tunic a clean and polished finish. Hemming is a straightforward process that elevates the quality of your handmade garment. Start by folding over the raw edge of the neckline by about 0.5 inches towards the wrong side of the fabric. Press firmly with an iron to create a crisp fold. You can fold it over a second time for a double-fold hem for added neatness and durability, especially for knit fabrics. Pin the hem in place and stitch it down using a zigzag stitch or a twin needle if you prefer a professional-looking stretch hem. Repeat this exact process for both armholes, ensuring consistency in the hem allowance.
Finally, tackle the bottom hem of your tunic. Fold the raw edge up by 1 inch towards the wrong side of the fabric. Press thoroughly to create a sharp crease, then fold it up another 1 inch for a double-fold hem. Pin extensively, making sure the hem is even all around. Stitch this hem in place, again using a zigzag stitch or twin needle. Once all hems are sewn, give your entire tunic a final press. Your custom-made sleeveless tunic is now complete!
Styling Your New Sleeveless Tunic: Tips and Tricks
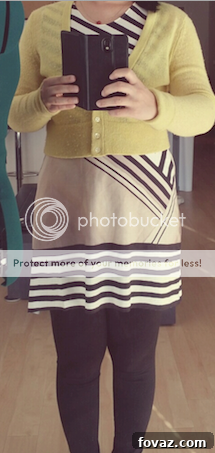
Congratulations, you’ve just created a versatile new addition to your wardrobe! The beauty of a sleeveless tunic lies in its adaptability. I personally love to style this tunic with a contrasting cardigan or a denim jacket for a chic layered look, paired with comfortable flats or stylish wedges for a balanced silhouette. For a more casual vibe, pair it with skinny jeans or leggings and trendy sneakers. If you’re aiming for an elegant ensemble, consider adding a statement necklace and heels.
A word of caution for footwear: While tunics offer great styling freedom, try to refrain from wearing chunky boots with this particular style. The voluminous nature of chunky footwear can sometimes create an overly messy or busy aesthetic, overwhelming the tunic’s graceful drape. The key to successful styling is often balance and simplicity, allowing the tunic to shine as the focal point.
This figure-flattering tunic works exceptionally well with a variety of aesthetics. Don’t be afraid to experiment with graphic patterns (like the one shown in my example) for a bold statement, or opt for solid colors for timeless elegance. The simple cut provides a perfect canvas for whatever fabric choice you make.
Fabric Choice and Fit Considerations
Your choice of fabric significantly impacts the final look and feel of your tunic. As mentioned, knit fabrics are often preferred for their stretch and drape, making them incredibly comfortable and forgiving. However, if you opt to use a woven fabric (which has no stretch), you might want to adjust your initial marking slightly. Give yourself an additional ½ inch seam allowance around the entire perimeter when marking your pattern, and consider adding a little extra ease, especially around the bust and hips. This small adjustment will ensure that your non-stretch tunic still offers enough room for movement and comfort without feeling restrictive.
Beyond the Tunic: Exploring Your Fashion Design Journey
Creating your own sleeveless tunic is just the beginning of what you can achieve in the world of fashion design and sewing. This project builds foundational skills that can be applied to countless other garments, allowing you to curate a truly personalized wardrobe. If this simple project has sparked a deeper interest in fashion and design, there’s a whole world of learning waiting for you.
Interested in becoming a fashion designer or exploring other creative design fields? Expand your horizons and consider formal training to turn your passion into a profession. Check out these resources for further education:
Fashion Design – Diploma of Applied Fashion Design and Technology
Explore other courses at opencollegesgroup.com.au
Discover Interior Design Courses at ocdesigncourses.edu.au