
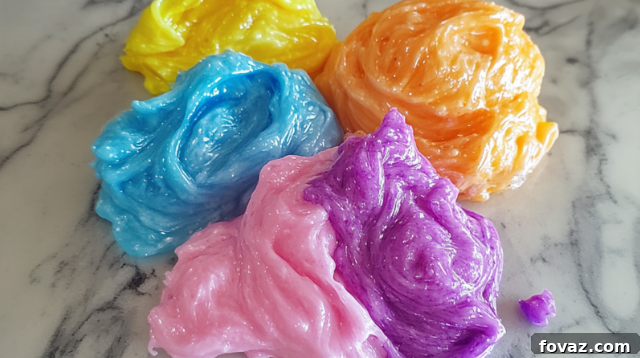
Are you searching for a creative outlet that truly captivates, offering both calming relaxation and boundless entertainment? Perhaps you’ve tried other DIY projects, only to find them overly complex or lacking that satisfying spark. Or maybe your kids are clamoring for an engaging, easy activity to keep their imaginations buzzing. Look no further than fluffy floor slime—a delightful DIY trend that’s just as much fun to create as it is to play with. This isn’t your average sticky goo; it’s a cloud-like, bouncy, and irresistibly soft creation that’s enchanting children and adults across the globe. Imagine the sheer joy of sinking your fingers into a marshmallowy, stretchy texture, surrounded by a kaleidoscope of vibrant colors that you crafted yourself. If that sensation sounds exciting and utterly compelling, then making fluffy floor slime is undoubtedly your next must-try project.
Imagine this scene: A group of children, their faces alight with anticipation, eagerly gather around a large mixing bowl in a bright, cozy kitchen. Their small hands are busy blending fluffy, colorful floor slime, the vibrant hues of blue, pink, and green swirling and stretching between their fingers. The atmosphere is electric with joy and excitement, a perfect snapshot of creative play and hands-on discovery. This is the magic of homemade slime.
Curious about how to whip up this squishy, stretchable masterpiece? Keep reading to unveil all the fun details, discover its incredible benefits, and become a master of fluffy slime creation!
Discovering the Irresistible Appeal of Fluffy Floor Slime
Fluffy floor slime stands in a league of its own, captivating enthusiasts with its unique blend of sensory delights and creative possibilities. Its signature soft, squishy, and incredibly airy texture offers an unparalleled tactile experience that is both soothing and endlessly entertaining. Visually, the vibrant colors and potential for dazzling glitter or charming add-ins make each batch a captivating work of art. Whether you’re seeking a joyful family activity, a mindful way to unwind after a demanding day, or an engaging sensory tool for learning, crafting homemade fluffy floor slime is your gateway to a truly rewarding experience.
Beyond its playful appeal, this craft serves as an excellent medium to engage children in a hands-on activity that profoundly stimulates their creativity, fine motor skills, and even basic scientific understanding. With just a few common household ingredients, you can conjure a slimy masterpiece that is as enjoyable to make as it is to stretch, squeeze, and bounce. The process is remarkably straightforward, making it accessible for absolute beginners, yet it offers ample room for experimentation and customization, allowing even seasoned DIYers to explore new techniques and unique variations. This versatility ensures that every slime-making session can be a fresh adventure.
Ready to embark on this exciting slime-making journey? Dive into the comprehensive step-by-step guide below to start crafting your very own batch of irresistibly fluffy floor slime!
Getting Started: Your Essential Slime-Making Arsenal
Before you begin your fluffy floor slime adventure, gathering all the necessary ingredients and tools is crucial. Having everything at hand ensures a smooth and enjoyable crafting experience, free from interruptions. Here’s what you’ll need to create your cloud-like concoction:
- School Glue (PVA Glue): This is the fundamental ingredient that provides the slime’s essential stickiness and structure. Both white school glue and clear school glue work exceptionally well. White glue tends to create an opaque, pastel-like slime, perfect for classic fluffy textures, while clear glue allows for more translucent or gem-like effects, especially when combined with glitter or vibrant dyes. Consider the final look you envision when choosing your glue.
- Foamy Shaving Cream: The secret behind the characteristic fluffiness of this specific slime! Choose a foam-based shaving cream, not a gel. Unscented varieties are often preferred to avoid an overpowering smell that might conflict with other added scents or simply be too strong. The shaving cream traps air, giving the slime its incredible volume and cloud-like, airy texture.
- Acrylic or Tempera Paint (or Food Coloring): This is where your slime truly comes to life with vibrant color. Acrylic or tempera paints are excellent choices, offering a wide spectrum of hues and good color saturation. Food coloring also works well, especially liquid or gel forms, allowing for easy blending. Don’t be afraid to experiment: choose a single bold color, mix a few for a unique gradient, or create mesmerizing swirls for a tie-dye effect. The more color you add (within reason), the more visually striking your slime will be.
- Slime Activator: This magical ingredient is what brings all the components together, transforming the sticky glue mixture into pliable slime. You have several effective options:
- Borax Solution: Made by dissolving 1 teaspoon of borax powder in 1 cup of warm water. Always supervise children when using borax.
- Liquid Starch: A convenient pre-mixed option that works quickly.
- Contact Lens Solution (containing boric acid and sodium borate) mixed with Baking Soda: A popular and often readily available choice. Typically, you’ll need about 1/2 teaspoon of baking soda per 1/2 cup of glue, along with gradual additions of contact lens solution.
The activator reacts with the PVA glue to form the polymer chains that give slime its unique stretchy consistency.
For those interested in understanding the science behind this fascinating transformation, delve deeper into slime chemistry by checking out this detailed guide on slime chemistry by the American Chemical Society (ACS).
Essential Tools:
- Large Mixing Bowl: A spacious bowl is essential to accommodate the growing volume of fluffy slime, especially after adding shaving cream.
- Mixing Spoons or Spatulas: Sturdy utensils are needed for thorough mixing.
- Measuring Cups and Spoons: For accurate ingredient ratios, particularly important for the activator.
- Optional: Gloves: Can be helpful for sensitive skin or to keep hands extra clean, though most slime washes off easily.
The Ultimate Step-by-Step Guide to Crafting Perfect Fluffy Floor Slime
Now that you have all your ingredients and tools ready, let’s dive into the fun process of creating your very own batch of luxurious fluffy floor slime. Follow these steps carefully for the best results, and remember, the joy is in the journey!
1. Prepare the Base: Pour the Glue
Begin by pouring your desired amount of school glue into a large mixing bowl. The quantity of glue you use will directly determine the final size of your slime batch, so adjust it according to how much slime you wish to make. For instance, using one cup of glue will typically yield a decent amount of slime, perfect for a small group of children to play with or for a generous individual portion. As mentioned, clear glue will produce a different visual effect compared to white glue, offering more transparency and sheen. Make sure your bowl is clean and dry before adding the glue.
2. Infuse with Color: Add Paint or Food Coloring
Next, it’s time to unleash your artistic side! Add a few drops of your chosen acrylic paint, tempera paint, or food coloring to the glue. This is where your creativity truly shines. You could opt for a single, bold color for a striking effect, or meticulously blend a few drops of different shades to create a unique custom hue. For an even more captivating visual, try adding several distinct drops of color without fully mixing them, then gently swirl to achieve a mesmerizing tie-dye effect. Additionally, consider sprinkling in a bit of fine glitter at this stage to give your slime an irresistible sparkle and shimmer. The more thoughtful you are with your color and sparkle additions, the more visually appealing and engaging your fluffy slime will become.
3. Achieve the Fluff: Incorporate Shaving Cream
This step is paramount to achieving that signature fluffy texture. After thoroughly mixing your color into the glue, introduce the shaving cream. Squirt a generous amount of foamy shaving cream directly into the glue and paint mixture. Begin with an amount roughly equal to or slightly less than your glue, then stir everything together thoroughly. The more shaving cream you incorporate, the lighter, airier, and fluffier your finished slime will be. More importantly, the shaving cream significantly increases the volume of the mixture and is solely responsible for giving the slime its cloud-like, soft, and bouncy texture. If you desire an extra-fluffy texture that feels incredibly soft to the touch, consider doubling the amount of shaving cream relative to the amount of glue you started with. As you mix these ingredients, you’ll distinctly notice the mixture becoming lighter in consistency, vastly more voluminous, and starting to resemble a soft, colorful cloud.
4. Activate the Slime: The Magic Transformation
Now for the magical part! Gradually add your chosen slime activator to the voluminous mixture. It’s crucial to add the activator slowly, a small amount at a time (e.g., a teaspoon or a few squirts of contact lens solution), while stirring constantly and vigorously. You will quickly observe a remarkable transformation: the mixture will begin to thicken and pull away from the sides of the bowl, forming a cohesive blob. Continue to add small increments of the activator, mixing well after each addition, until the slime reaches a consistency that is no longer excessively sticky but is still soft, stretchy, and easy to handle. Remember, adding the activator slowly is far better than adding too much too quickly, which can result in overly stiff, rubbery, or breakable slime. If the slime remains excessively sticky after initial activation, do not worry; you can always incorporate a little more activator during the next crucial step.
5. Knead and Enjoy: The Final Touches for Perfection
Once the slime has fully formed into a coherent mass that is mostly pulled away from the bowl, it’s time for hands-on interaction. Remove the mixture from the bowl and begin to knead it with your hands. This kneading process is not just for fun; it’s vital for improving its texture, making it smoother, more elastic, and even more enjoyable to play with. Kneading helps to thoroughly distribute the activator and other components evenly throughout the slime, ensuring a consistent, smooth, and perfectly stretchy final product. If, during the kneading process, the slime still feels too sticky, simply add a few more drops or a small squirt of your activator directly onto the slime and continue kneading until the desired non-sticky consistency is achieved. Conversely, if your slime becomes too stiff or starts to break easily, try kneading in a very small amount of warm water (a teaspoon at a time) to restore its flexibility and stretchiness. This hands-on kneading process is also a fantastic opportunity to bond with your kids, collaborating to create something fun and tactile together. Once kneaded to perfection, your fluffy floor slime is ready for endless stretching, squishing, and creative play!
Why You’ll Absolutely Love This Craft: Beyond Just Play
Fluffy floor slime isn’t merely a fun project; it’s a multi-faceted experience that brings joy, relaxation, and a surprising array of benefits. There’s an incredibly fulfilling sense of accomplishment that comes from creating something from scratch—something that is not only visually appealing but also wonderfully tactile and engaging. Furthermore, it serves as a perfect activity for spending quality time with family, fostering communication and shared laughter, or as a wonderfully tactile way to unwind and de-stress after a long, challenging day.
The repetitive motions inherent in playing with slime—the stretching, squishing, pulling, and folding—can have a profoundly calming and meditative effect. This makes slime play an excellent tool for stress relief and promoting mindfulness, not just for children but for adults as well. The rich sensory experience of working with slime, feeling its unique texture and watching its vibrant colors move, can be therapeutic, helping to regulate emotions and provide a soothing escape from daily pressures.
The versatility of fluffy floor slime significantly adds to its undeniable charm. It’s an incredibly customizable craft, allowing for countless variations to suit individual preferences and creative whims. You can elevate its sparkle by adding different types of glitter, from fine powders to chunky shapes. Incorporating a few drops of essential oils can transform it into a wonderfully scented sensory experience, perfect for relaxation. For a playful twist, embed small toys, beads, or charms within the slime for a surprise element. Moreover, slime can become an educational tool: add alphabet beads for letter recognition, small plastic animals for sorting and imaginative play, or various textured objects for a unique sensory search game. The possibilities truly are endless, making each batch of slime a unique, personalized creation. This infinite customizability encourages ongoing experimentation, transforming slime-making into a regular and evolving part of your DIY and family activity repertoire, always leading to new combinations and exciting discoveries.
Troubleshooting Common Fluffy Slime Woes
Even experienced slime makers encounter occasional challenges, but don’t worry—most common slime problems have straightforward solutions. If your fluffy floor slime isn’t turning out exactly as planned, these tips will help you adjust it to perfection:
- Slime is Too Sticky: This is the most common issue. It means your slime needs more activator. Add a tiny amount of your chosen slime activator (a few drops or a small squirt) directly onto the slime and knead it in thoroughly. Repeat this process gradually until the stickiness is gone and the slime is easy to handle. Be cautious not to add too much at once, as this can quickly lead to stiff slime.
- Slime is Too Stiff or Rubbery: If your slime feels too firm, hard, or breaks easily when stretched, it likely has too much activator. To remedy this, knead in a very small amount of warm water (start with 1/2 teaspoon) or a few drops of hand lotion or a tiny bit of school glue. Continue kneading until the slime regains its flexibility and stretchiness. This process takes patience, but it’s often effective.
- Slime is Not Fluffy Enough: If your slime lacks that signature cloud-like volume, it means you didn’t add enough shaving cream relative to the glue. While you can’t easily add more shaving cream after activation without affecting the texture, you can keep this in mind for your next batch. Remember, a generous amount of foamy shaving cream is key for ultimate fluffiness.
- Slime is Too Watery or Soupy: This can happen if you accidentally added too much liquid (like water or liquid food coloring) or not enough glue. If the slime is watery before activation, try adding a bit more glue. If it’s watery after activation but still sticky, it just needs more activator.
Remember that the specific brand of glue, shaving cream, and activator you use can slightly affect the consistency, so don’t be afraid to tweak the ingredient ratios slightly based on your observations. As you experiment, you’ll develop an intuitive understanding of the perfect slime balance that works for you. Part of the fun and learning truly comes from the process itself—each attempt teaches you something new about how the ingredients interact and how to fine-tune your recipe. So, embrace the creative journey, enjoy the hands-on learning, and don’t be afraid to make mistakes—they often lead to the most exciting discoveries and refined techniques. With each batch of slime you create, your skills will improve, leading to even more fantastic results.
For more important tips on handling household chemicals safely, especially when engaging in DIY projects, visit the helpful resources provided by the National Institutes of Health’s guide.
Storing Your Fluffy Floor Slime for Lasting Fun
To ensure your magnificent fluffy floor slime provides days, or even weeks, of entertainment, proper storage is key. Always keep your slime in an airtight container, such as a plastic food storage container with a lid or a resealable plastic bag. This prevents the slime from drying out, hardening, or attracting dust and debris. Store it at room temperature, away from direct sunlight or extreme heat, which can alter its consistency. If your slime starts to feel a bit dry over time, you can try kneading in a tiny amount of hand lotion or warm water to rejuvenate its texture. With proper care, your homemade fluffy floor slime will remain stretchy, soft, and ready for play whenever inspiration strikes!
Join the Fluffy Floor Slime Craze and Unleash Your Creativity!
Fluffy floor slime is much more than just a fleeting trend; it’s a truly delightful craft that wholeheartedly invites creativity, offers profound relaxation, and promises endless hours of tactile fun. Whether you’re an absolute newcomer to the world of DIY projects or a seasoned crafting pro, this engaging project provides a joyful escape into a vibrant world of color, fascinating texture, and boundless imagination. It’s a fantastic and accessible way to engage kids in a fun, hands-on activity that cleverly doubles as an enriching learning experience. By involving them actively in the entire slime-making process, you’re not only creating something incredibly enjoyable together but also teaching them invaluable life skills such as following instructions, understanding basic chemistry, problem-solving, and cultivating patience.
So, gather your ingredients, clear your workspace, and prepare to embark on a squishy, stretchy, and utterly satisfying adventure. The world of fluffy floor slime awaits!
For even more DIY inspiration and exciting crafting ideas, be sure to check out our comprehensive guide on creative crafts for kids and adults alike. Get ready to dive into your next amazing project and unleash your inner artist!