
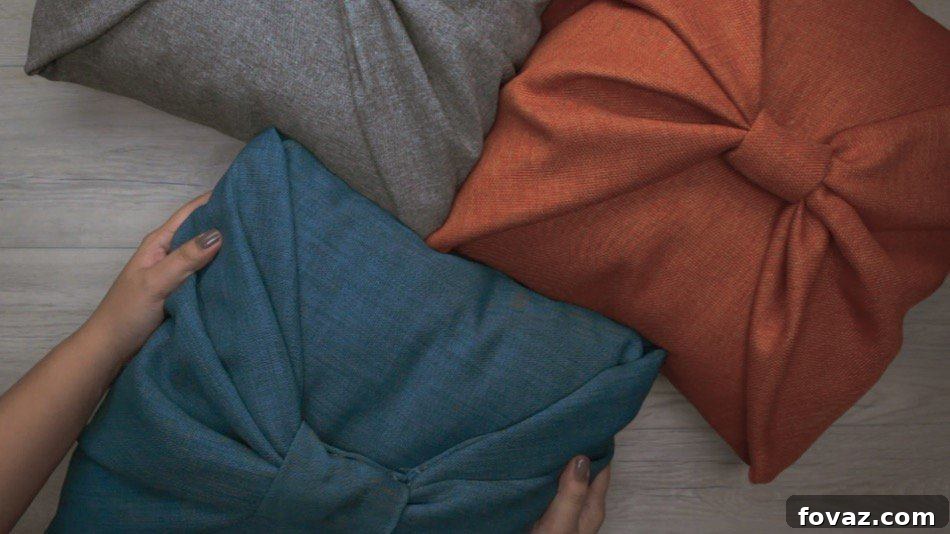
Transforming your living room or bedroom with fresh, new accents has never been simpler or more satisfying! Forget the complexities of sewing machines or the expense of store-bought decorative pillows. These ingenious no-sew pillow covers offer a fantastic, budget-friendly, and incredibly easy way to infuse your home with personality and charm. All it takes is a touch of creativity, your chosen fabric, and a trusty hot glue gun, and you’ll be crafting adorable, custom pillows that look professionally made in no time!
How to Make Beautiful DIY No-Sew Pillow Covers for Any Room
At the heart of every cozy home lies unique decor that reflects its inhabitants. Our passion for DIY home decor projects knows no bounds, and these no-sew pillow covers stand out as an absolute favorite. Whether you’re looking to refresh your space for a new season, add a pop of color, or simply enjoy a rewarding craft project, this tutorial is designed for you. With the colder months approaching, there’s no better time to introduce inviting textures and warm hues into any room. This project is not only fast and wonderfully simple but also yields stunning results that will have your guests asking where you bought them. Follow our detailed steps below, and don’t forget to share your own brilliant home decor ideas with us!
Why Choose No-Sew Pillow Covers? The Ultimate DIY Solution
The appeal of no-sew projects is undeniable, particularly for those new to crafting or seeking quick, impactful home improvements. No-sew pillow covers offer numerous advantages over their traditionally stitched counterparts. Firstly, they eliminate the need for specialized equipment like sewing machines, making them accessible to everyone regardless of their sewing experience. This significantly lowers the barrier to entry, allowing anyone to jump into the world of fabric crafts with confidence and minimal investment.
Secondly, these covers are incredibly time-efficient. What might take hours with a needle and thread can be completed in a fraction of the time with a hot glue gun. This makes them perfect for spontaneous decor updates, quick seasonal changes, or even last-minute handmade gifting ideas. You can literally whip up several covers in an afternoon!
Thirdly, the creative freedom is immense. You can experiment with various fabric textures, patterns, and colors without the commitment or learning curve associated with advanced sewing techniques. From luxurious velvets and plush fleeces for ultimate coziness, to rustic linens and durable cottons for a natural look, or even lightweight denim for a casual vibe, the possibilities are endless. Plus, they are a wonderfully cost-effective way to update your existing pillow inserts, giving them a completely new lease on life without purchasing entirely new pillows. It’s a sustainable, stylish, and incredibly satisfying choice for the modern home decorator seeking personalized touches.
Gather Your Materials: What You’ll Need for Your Project
Before diving into the creative process, ensure you have all your supplies ready and organized. Having everything at hand will make your crafting experience smooth, efficient, and enjoyable. Here’s a detailed look at the essential materials for crafting your stunning no-sew pillow covers:
- Cloth Fabric: This is the canvas for your creativity! Choose a fabric that not only complements your existing decor but also suits your pillow’s intended use and location. Consider various textures like soft cotton for durability and easy cleaning, elegant linen for a natural and sophisticated look, warm fleece for ultimate coziness, or even robust canvas for a modern, structured feel. Think carefully about the pattern too – bold geometric prints, subtle tone-on-tone textures, vibrant floral designs, or classic solid colors can all create drastically different aesthetics. For sizing, you’ll need a piece that is approximately three times the width of your pillow insert (to allow for generous overlaps and decorative ties) plus an additional 6-8 inches for ample seam allowance and shaping. For the height, aim for twice the height of your pillow insert plus another 4-6 inches for the top and bottom folds and room for adjustments.
- Pillow Insert: The comfy foundation of your new cover. You can easily repurpose an old pillow that needs a refresh, or purchase new inserts to achieve a specific size and firmness. Before you begin, ensure your pillow insert is clean, dry, and in good condition to avoid any lumps or irregularities in your finished cover. The dimensions of your insert will directly dictate the precise fabric measurements you’ll need.
- Hot Glue Gun & Glue Sticks: This is your primary tool, acting as the “sewing machine” for this no-sew craft. Invest in a good quality glue gun that heats quickly and provides a consistent, smooth flow of glue. This will make the application much easier and more effective. Make sure you have plenty of all-purpose hot glue sticks on hand, as you’ll be using them liberally to securely bond your fabric layers.
- Sharp Scissors: Essential for precise and clean fabric cuts. Dull scissors can lead to frayed edges, uneven lines, and unnecessary frustration. A dedicated pair of fabric shears is highly recommended for the best results, as they glide through fabric effortlessly, leaving crisp, professional-looking edges.
- Rubber Bands (Optional but Highly Recommended): These humble items will prove incredibly helpful for temporarily holding gathers, scrunches, or initial folds in place as you work on securing your decorative ties or shaping the fabric. They essentially provide an extra pair of hands, allowing the glue to set without the fabric shifting, leading to a much neater finish.
- Measuring Tape or Ruler: Crucial for accurate fabric measurements, ensuring a snug, wrinkle-free, and neatly fitted pillow cover. Precision in measuring prevents waste and ensures a professional appearance.
- Fabric Marker or Tailor’s Chalk (Optional): These tools are wonderfully useful for marking your cut lines, fold points, and placement guides directly onto the fabric. They provide a clear visual reference, especially when working with complex patterns or large pieces of fabric.
Step-by-Step Guide: Crafting Your Stylish No-Sew Pillow Covers
Ready to transform your chosen fabric into a beautiful, personalized pillow cover? Follow these straightforward steps to achieve professional-looking results without a single stitch, embracing a popular wrapped and tied style for maximum decorative appeal.
Step 1: Measure and Cut Your Fabric Accurately
Begin by laying your chosen fabric flat, face down (with the “wrong” side facing up), on a clean, spacious work surface. Place your pillow insert directly in the very center of the fabric. Now, for the crucial measurements: you’ll need the fabric to be approximately three times the width of your pillow insert, plus an additional 6-8 inches. This generous allowance is vital for creating ample overlap and the elegant decorative side ties that define this style. For the height, aim for twice the height of your pillow insert, plus another 4-6 inches for the top and bottom folds and room for minor adjustments. Use your measuring tape and fabric marker or chalk to precisely mark these dimensions, then carefully cut your fabric using sharp scissors. Precision at this stage ensures a neat, well-fitting, and attractive final product.
Step 2: Position Your Pillow Insert for Initial Folds
With your fabric perfectly cut to size, reposition your pillow insert on the back side (wrong side) of the fabric, ensuring it’s centered as much as possible. It’s important to have an even amount of excess fabric on all four sides – top, bottom, left, and right. This symmetrical placement is absolutely key to achieving a balanced and aesthetically pleasing finish once the fabric is folded and tied, preventing any lopsided results.
Step 3: Create the Initial Top and Bottom Folds
Now, gently take the bottom edge of your fabric and fold it upwards, smoothly over the pillow insert. This fold should cover about two-thirds of the pillow’s height from the bottom up. Press it down lightly to create a visible crease. Next, take the top edge of the fabric and fold it downwards, over the pillow, allowing it to slightly overlap the previous bottom fold. The goal here is to completely encase the pillow insert with these two folds, with the raw edges tucked neatly underneath. This creates a foundational “envelope” around the pillow, securing it lengthwise.
Step 4: Preparing the Sides for Decorative Ties and Gathering
With the top and bottom folds in place, your attention now turns to the generous excess fabric on the left and right sides of your pillow. These sections will become your signature decorative ties. Carefully gather the fabric on one side, scrunching it inward towards the center of the pillow’s edge. You want to create a neat, uniform gather that looks pleasing to the eye. This is where your rubber bands come in handy: use one to temporarily secure this gathered section snugly around the middle, near the pillow’s edge. This temporary hold will help maintain the shape and tension of your gather as you prepare to create the final ties. Repeat this entire gathering process meticulously for the other side of the pillow, striving to create a symmetrical gather that mirrors the first.
Step 5: Tie the Sides Together to Form the Closure
Once both sides are neatly gathered and temporarily secured (if using rubber bands), bring the gathered fabric from the left side smoothly over the top of the pillow, towards the center of the back. Do the exact same with the gathered fabric from the right side, bringing it over the top of the pillow to meet the left side’s gather in the middle. Now, carefully and firmly tie these two gathered sections together. You can create a simple, tight knot for a clean look, a double knot for extra security and durability, or even a decorative bow for a softer, more ornate aesthetic, depending entirely on your desired style. If you used rubber bands, they can now be carefully removed or simply covered by your final tie and subsequent decorative elements.
Step 6: Secure the Center Ties with Glue and Add a Decorative Band
To ensure your newly formed ties remain firmly in place and to add a truly polished, professional touch, it’s time for the hot glue. Apply a generous, continuous line of hot glue along the inside of the tied fabric, paying particular attention to where the knots are formed and where the gathered fabric meets the main body of the pillow. Press firmly for several moments to ensure a strong bond. For an even more refined and finished look, cut a small, rectangular piece of matching or contrasting fabric (typically about 2-3 inches wide and long enough to comfortably wrap around your tied center). Apply glue to one end of this small fabric piece, wrap it tightly and smoothly around the tied section in the center, and glue the other end down firmly, creating a neat decorative band that effectively conceals any raw edges, unsightly knots, or visible rubber bands. This step elevates the overall aesthetic.
Step 7: Final Adjustments, Wrapping, and Curing Time
With the decorative band in place and all ties secured, take a moment to ensure all parts of the central wrap are firmly in place and look neat. Hold all newly glued sections firmly for a minute or two to allow the hot glue to cool and set completely. Hot glue works quickly, but adequate curing time ensures maximum adhesion. Double-check all folds and ties to ensure they are tight, the pillow insert is fully encased without any gaps, and the fabric is taut and smooth. Make any minor adjustments to the fabric’s positioning for a flawless, wrinkle-free finish. Your beautiful, custom no-sew pillow cover is now complete and ready to adorn your space!
Personalization & Design Tips: Make It Uniquely Yours
The true beauty of DIY lies in its boundless potential for customization. Don’t stop at just choosing a fabric! Consider elevating your covers with additional embellishments like elegant fringe, playful pom-pom trim (both easily attached with hot glue along the edges), or charming decorative buttons sewn onto the tied sections. You can also unleash your artistic side by using fabric paint or stencils to add unique patterns, personalized monograms, or inspirational quotes directly onto your covers. Experiment with contrasting fabric patches for a chic patchwork effect, or use different textures on the front and back for a versatile, reversible design. The possibilities are truly endless when it comes to expressing your personal style and making each pillow a reflection of your taste.
Caring for Your No-Sew Pillow Covers to Ensure Longevity
While these no-sew covers are surprisingly durable, proper care will ensure their beauty and structural integrity last for years to come. For most fabrics and minor spills, spot cleaning with a damp cloth and a gentle fabric cleaner is highly recommended. If a more thorough clean is absolutely necessary, gentle hand washing in cool water with a mild, non-abrasive detergent is often the best approach. Avoid machine washing, aggressive scrubbing, or harsh chemical detergents, as these can weaken the glue bonds and potentially damage the fabric. After washing, carefully reshape the cover and air dry it flat on a clean surface to help maintain its original shape and prevent any warping or stretching. Always test any new cleaning products on a small, inconspicuous area of the fabric first to ensure colorfastness and prevent damage.
Benefits of Embracing DIY No-Sew Decor for Your Home
Beyond the immediate gratification of creating something beautiful with your own hands, embarking on no-sew projects offers a wealth of tangible and intangible benefits for your home and well-being. It’s an empowering and accessible way to tackle home decor, allowing you to achieve stunning, designer-inspired looks at a mere fraction of the cost of retail items. You gain complete control over the materials, colors, and patterns, ensuring that the quality and style perfectly align with your unique vision and existing decor. Furthermore, engaging in crafting can be a wonderfully therapeutic and mindful activity, offering a creative outlet that effectively reduces stress, enhances focus, and boosts feelings of accomplishment and pride. It’s also an excellent way to repurpose old fabrics, remnants, or existing pillow inserts, contributing positively to a more sustainable and environmentally conscious lifestyle by reducing waste.
Troubleshooting Common No-Sew Pillow Cover Issues
Even the simplest DIY projects can occasionally present minor challenges. If you find your hot glue isn’t holding securely, first ensure your fabric is clean, dry, and free of lint or fabric softener residue, as these can impede adhesion. Also, check that your glue gun is sufficiently hot and that you are applying glue in generous, continuous lines rather than small, isolated dots. For fabric edges that show a tendency to fray, a thin line of fray-check liquid (readily available at most craft stores) applied to the raw edges before gluing can work wonders. If your finished cover appears lumpy, uneven, or doesn’t sit smoothly, your fabric might be too thick for the pillow insert, or your initial folding and gathering might not have been even. Take your time during these critical steps, smooth out any wrinkles thoroughly, and ensure even tension when tying the sides. Remember, practice makes perfect, and minor imperfections often add to the handmade charm!
For a complete visual walkthrough and to see these steps in action, be sure to check out the full tutorial in the video below!
Do you have any brilliant home decor ideas, clever no-sew hacks, or creative fabric choices of your own? We’d absolutely love to hear about them and learn from your experiences! Share your thoughts, tips, and personal flair by leaving a comment below and inspire our vibrant crafting community to embark on their next DIY adventure.
For even more inspiring DIY projects, innovative craft news, and creative home decor solutions, make sure to follow us on our dynamic social media channels:
LIKE this project? We’re sure you’ll LOVE these related DIY ideas:
17 Adorable DIY Pillow Ideas to Personalize Your Space
DIY Home Decor Tips: Effortless Ways to Make a House a Home
Beachy Living Room Ideas: How to Bring Coastal Vibes to Your Home