
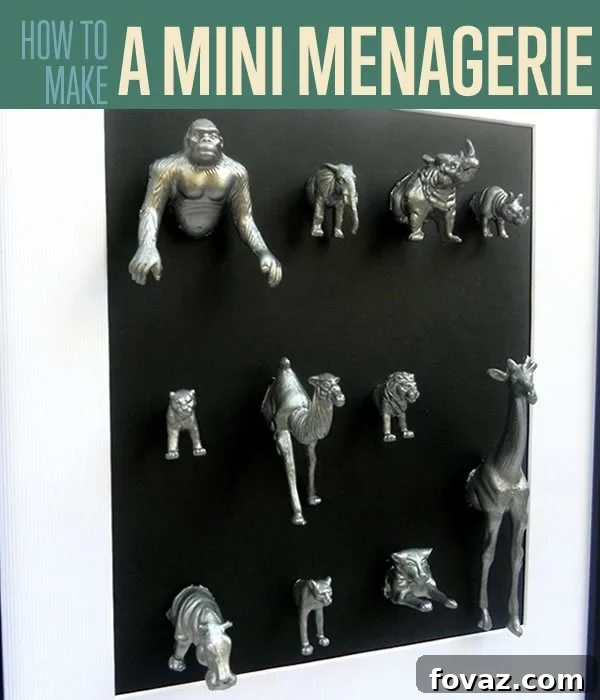
Transform Tiny Toys into Timeless Art: A DIY Guide to Gilded Animal Specimen Frames
Have you ever encountered the captivating world of micro crafts? We certainly have, and we’re utterly enchanted by the charm of miniature creations! Micro crafting, at its heart, is the art of working with – you guessed it – little things. There’s an undeniable appeal in the tiny, the intricate, and the wonderfully detailed, which is precisely why we’re so excited to share today’s project with you. We’re going to guide you through decorating your space with delightful, tiny plastic animal sculptures, but with a sophisticated twist that elevates them far beyond their humble origins as children’s toys.
Imagine transforming ordinary plastic critters into elegant, gilded silver specimens, meticulously mounted within a beautiful frame. This isn’t just a craft; it’s an instant conversation starter, a unique focal point for any room, and a truly personalized piece of art that reflects your style. The best part? This creative journey involves using a rotary tool – an empowering experience that allows you to literally cut these miniature creatures in half, setting the stage for their artistic rebirth. You don’t need to be a child to revel in the adorable nature of these tiny animals; especially once they’re given a luxurious metallic finish and presented as exquisite framed art, they transcend age and become a testament to creative imagination.
This DIY Mini Animal Specimen Art project offers a fantastic opportunity to unleash your inner artist, repurpose forgotten toys, and infuse your home decor with a touch of whimsy and unexpected elegance. Customize the colors to perfectly complement your existing room palette, or choose a theme that speaks to your personal interests. The possibilities are as limitless as your imagination!
Why You’ll Love Crafting This Unique Wall Art
This project is more than just a simple DIY; it’s an exploration into transforming the mundane into the magnificent. Here are several reasons why this gilded animal specimen art will quickly become one of your favorite creative endeavors:
- Unleash Your Creativity: From selecting your animals to choosing your gilding color and frame, every step offers a chance to personalize your art.
- Eco-Friendly Upcycling: Give new life to old, forgotten plastic toys. It’s a wonderful way to teach children about repurposing and sustainability.
- Sophisticated Aesthetic: The metallic finish instantly elevates these simple plastic figures, turning them into faux scientific specimens that exude vintage charm and modern elegance simultaneously.
- Instant Conversation Starter: Guests will be fascinated by this unique display, prompting intriguing discussions about your creative flair.
- Budget-Friendly Decor: Achieve a high-end look without breaking the bank, utilizing readily available and often inexpensive materials.
- Perfect for Any Room: Adapt themes and colors to suit a child’s bedroom, a minimalist living room, a quirky home office, or even a sophisticated study.
- Rewarding Experience: There’s immense satisfaction in creating something beautiful and unique with your own hands.
- Skill-Building: Practice precision cutting with a rotary tool and experiment with different painting techniques.
Essential Tools and Materials for Your DIY Mini Animal Specimen Art
Ready to embark on this exciting crafting adventure? Gathering your supplies is the first crucial step. Ensure you have everything listed below before you begin. Quality tools and materials will make the process smoother and the results more impressive. Here’s a detailed breakdown of what you’ll need:
- Small Plastic Animals: These are the stars of our show! Raid your kids’ toy bins, visit a local toy store, or explore online marketplaces for a diverse selection. Look for solid, durable plastic figures rather than hollow ones, as hollow animals can be more challenging to cut cleanly and may not provide a stable gluing surface. A variety of shapes and sizes can add visual interest to your final arrangement. Think about the theme you want to create – jungle animals, sea creatures, farm animals, or even fantastical beasts!
- Rotary Tool with Standard Mandrel Attachment and Cut-Off Discs: This powerful handheld tool will be used to precisely cut your plastic animals. Ensure you have a standard mandrel attachment for securing the cut-off discs. You’ll need a good supply of cut-off discs, as they are designed to be consumable and can wear down or break quickly, especially when cutting through hard plastics. Safety first: always ensure the tool is in good working order and you’re familiar with its operation before starting.
- Liquid Gilding (or Spray Paint): To achieve that luxurious metallic finish, liquid gilding is an excellent choice for its rich pigment and smooth application. Silver, gold, or copper gilding will all create a stunning effect. As an alternative, high-quality metallic spray paint can also work well, offering a quicker application for multiple animals. If using spray paint, opt for one specifically designed for plastics to ensure good adhesion and a durable finish.
- Small Paintbrush: Essential for applying liquid gilding precisely and evenly. A fine-tipped brush can help reach smaller areas and ensure full coverage without drips. If using spray paint, this item can be omitted.
- Picture Frame: The vessel for your art! Choose a frame that complements your home decor. A vintage-style frame can enhance the “specimen” look, while a sleek modern frame can provide a striking contrast. Consider frames with or without a mat; a mat can add depth and a professional touch. Multi-opening frames can also be fantastic for displaying several smaller animals.
- Cardstock: This will serve as the background for your mounted animals. Black cardstock offers a dramatic contrast for metallic animals, making them truly pop. White or another complementary color (like a deep navy for sea creatures or an earthy green for forest animals) can also be incredibly effective. Ensure the cardstock is thick enough to provide a stable mounting surface and cut to fit your chosen frame perfectly.
- E6000 Glue: A strong, industrial-strength adhesive known for its excellent bonding capabilities on various materials, including plastic. E6000 provides a flexible, waterproof, and clear bond, making it ideal for securing your animals to the cardstock without worrying about them detaching over time.
- Safety Goggles and Dust Mask: Absolutely non-negotiable for personal safety when using a rotary tool. Protect your eyes from flying debris and your lungs from plastic dust.
- Well-Ventilated Area: Crucial for both cutting plastic and especially for painting with liquid gilding or spray paint, which can emit strong fumes. Work outdoors or in a space with ample airflow.
- Protective Surface: Lay down newspaper, cardboard, or a drop cloth to protect your workspace from paint and glue.
Step-by-Step Guide: Crafting Your Gilded Animal Specimen Art
With all your materials gathered and safety precautions in place, you’re ready to bring your vision to life. Follow these detailed steps for a smooth and successful crafting experience.
Step 1: The Cut – Precision and Safety First
This is where the real transformation begins! Carefully use your rotary tool to cut each plastic animal precisely in half. This step requires a steady hand and strict adherence to safety guidelines.
- Prioritize Safety: Always wear your safety goggles and a dust mask. Work in a well-ventilated outdoor area to minimize inhalation of plastic dust.
- Secure Your Workpiece: Hold the plastic animal firmly with one hand (or use a small vise if you have one, ensuring it doesn’t damage the toy). Plan your cut carefully.
- Rotary Tool Handling: Attach a cut-off disc to your rotary tool’s mandrel. Start the tool at a moderate speed.
- Making the Cut: Apply gentle, consistent pressure as you guide the spinning disc through the plastic. Aim for as straight and flat a cut as possible. A flat cut surface is crucial for a stable, seamless bond when you glue it to the frame later.
- Disc Management: Expect to go through several cut-off discs. They are designed to wear down and can break easily when cutting through hard materials like plastic. Have a good supply on hand and replace discs as soon as they show significant wear or begin to crack to maintain efficiency and safety.
- Clean Edges: After cutting, you might have some rough edges. You can gently sand these down with fine-grit sandpaper or use a specialized rotary tool attachment designed for smoothing to achieve a cleaner finish.
Step 2: Gilded Transformation – Adding Elegance
Once your animals are perfectly halved, it’s time to give them their luxurious metallic makeover.
- Prepare Your Workspace: Lay down newspaper or a drop cloth in a well-ventilated area, preferably outdoors or in a garage with open windows.
- Application: If using liquid gilding, dip your small paintbrush into the gilding and apply thin, even coats to the cut side and the outer surface of each animal half. Work methodically to ensure full coverage. If using metallic spray paint, hold the can about 6-8 inches away from the animals and apply light, even coats, rotating the animals to cover all sides.
- Drying Time: Allow each coat to dry thoroughly according to the product instructions before applying the next. This prevents tackiness and ensures a smooth, durable finish. You may need 2-3 coats to achieve a rich, opaque metallic look.
- Full Cure: Let the gilded animals dry completely, ideally overnight, to ensure the paint has fully cured and is ready for handling.
Step 3: Assembling Your Masterpiece – Preparing the Frame
Now, let’s prepare the stage for your magnificent animal specimens.
- Disassemble the Frame: Carefully take your chosen picture frame apart. Remove the backing, matting (if present), and glass.
- Insert Cardstock: Place your chosen cardstock (black, white, or complementary color) into the frame, ensuring it fits snugly. This will be your art’s background.
- Reassemble with Care: Reinsert any matting you wish to use, followed by the glass. This method ensures that if you ever decide to repurpose the frame for a different piece of art, you can easily remove your animal display without damaging the frame components.
- Clean Glass: Ensure the inside of the glass is spotless before securing the backing, as any dust or smudges will be permanently visible once assembled.
- Secure Backing (Temporarily): You can secure the frame’s backing temporarily if it helps you handle the frame while gluing the animals. Just ensure it’s stable.
Step 4: Mounting Your Specimens – The Final Touch
With your frame ready and animals gilded, it’s time to bring them together into a cohesive piece of art.
- Plan Your Layout: Before applying any glue, arrange your gilded animal halves on the cardstock background inside the frame. Experiment with different configurations until you find a pleasing arrangement. Consider symmetry, asymmetry, or a thematic grouping.
- Apply E6000 Glue: Apply a small dollop of E6000 glue to the flat, cut back of each animal half. A little goes a long way with this strong adhesive.
- Firm Placement: Carefully place each animal half onto the cardstock in its desired position. Firmly hold it in place for a few seconds to allow the glue to begin bonding.
- Repeat for All Animals: Continue this process for all your animal halves, ensuring they are securely attached and aligned as planned.
- Overnight Drying: This is a crucial step! Once all animals are glued, lay the frame flat and let it dry undisturbed overnight. E6000 glue requires a full 24-72 hours to achieve maximum bond strength, but allowing it to dry flat overnight will prevent the animals from shifting or falling off while the glue cures. Do not hold the frame upright until the glue has fully set.
Unleash Your Creativity: Customization and Thematic Ideas
This tutorial is just a starting point! The beauty of DIY lies in personalization. Get creative and explore different types of animals, color palettes, and arrangements to truly make this art piece your own. Here are some inspiring ideas:
- Seaside Serenity: Imagine fish, dolphins, whales, and seahorses painted in bright teal, shimmering aquamarine, or pearlescent white for a captivating seaside or nautical-themed display. Pair them with a light blue or sandy beige cardstock.
- Jungle Expedition: Lions, tigers, elephants, and monkeys gilded in antique gold or deep bronze, set against a lush forest green or earthy brown background, would create a sophisticated jungle adventure theme.
- Prehistoric Perfection: Dinosaurs and other ancient creatures, painted in a dark metallic gunmetal or matte black, could offer a dramatic and educational piece, perfect for a child’s room or a quirky office.
- Pet Lover’s Paradise: If you’re an animal lover, dedicate a frame to your favorite domestic companions. Cats and dogs, perhaps gilded in a color that matches their fur, would make a heartwarming tribute.
- Monochromatic Masterpiece: Stick to a single animal type (e.g., a collection of different bird species or various insects) all painted in the same metallic shade for a cohesive and minimalist aesthetic.
- Vibrant Pop: Instead of gilding, use neon spray paints or bright, glossy enamels for a playful, modern, and high-contrast look that stands out.
- Multi-Frame Displays: Create a gallery wall with several smaller frames, each featuring a different animal or a small cluster, all following a consistent theme or color scheme for a grander statement.
- Beyond the Frame: Don’t just stop at framed art! The other halves of your animals can be used for other crafts, such as turning them into unique refrigerator magnets, pushpins, or even quirky jewelry components.
This project would also be a wonderfully nostalgic endeavor to undertake with kids. It’s a fantastic way for them to preserve their childhood memories – turning old, beloved toys into chic, lasting art pieces. It fosters a connection to their past while creating something beautiful for the future.
Safety First: A Crucial Reminder
While this project is incredibly rewarding, it involves tools and materials that require careful handling. Please revisit and internalize these safety precautions:
- Eye Protection: Always, without exception, wear safety goggles when operating a rotary tool. Flying plastic debris can cause serious eye injuries.
- Respiratory Protection: Use a dust mask to prevent inhaling fine plastic particles during cutting and fumes from paint/gilding.
- Ventilation: Work in a well-ventilated area when cutting and painting. If working indoors, ensure windows are open and consider using a fan for air circulation.
- Tool Handling: Read and understand your rotary tool’s instruction manual before use. Keep fingers clear of the cutting disc and hold the tool firmly.
- Disc Awareness: Be aware that cut-off discs are fragile and can break. Always replace damaged or worn discs immediately.
- Chemical Safety: Handle paints, gilding liquids, and adhesives in accordance with their manufacturer’s safety instructions. Avoid skin contact and ensure proper ventilation.
Share Your Craft and Connect with Us!
This tutorial is designed to be simple and inspiring, and we hope you’ll feel compelled to share your creations with friends and family. We absolutely adore seeing your interpretations of our projects! Once you’ve completed your DIY Mini Animal Specimen Art, snap some photos and share them on your favorite social media platforms. Tag us so we can admire your work!
We invite you to take some time to explore the rest of our site. We’re confident that there’s a project or idea here for everyone, whether you’re a seasoned crafter or just starting out. Why not try something new and exciting today?
How did this project work out for you? Did you encounter any challenges or discover any ingenious tips? We’d love to hear your feedback or questions in the comments section below. We make every effort to answer to the best of our ability. If you have a fun craft project that you’d like us to give a whirl, please let us know in the comments as well. Your suggestions fuel our creativity, and the more you comment, the more likely we are to develop similar craft projects in the future!
Thanks for crafting with us, and happy DIY’ing!
Don’t forget to sign up for our newsletter to receive all the latest updates on exciting new craft projects, exclusive tips, and inspiration delivered straight to your inbox!
Stay Connected for More Crafting Inspiration!
Like us on Facebook for a steady stream of fun craft projects and creative ideas right in your feed! You can find our page by searching for “DIY Projects” or by clicking here. Pin your favorite projects to Pinterest to save them for later and share with your friends and followers. Your engagement helps us continue to create content you love!
Check out some related craft posts here for even more inspiration:
Discover how to create a whimsical Alice in Wonderland-inspired stacked teacup lamp
Learn to make a unique and textured DIY puffy paint hexagon vase
Create a stunning sunburst horizon mirror that adds a touch of radiance to any room.