Unleash Creativity with Easy & Engaging Kids Crafts: Woven Pipe Cleaner Cans
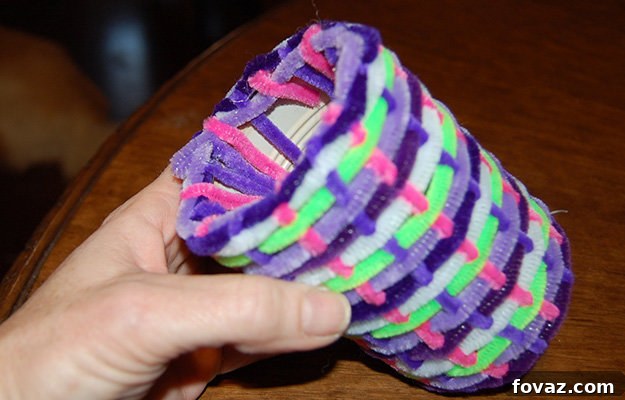
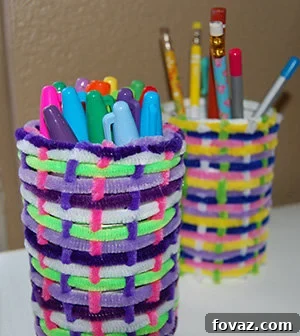
Are you searching for captivating kids’ craft projects that are not only simple to execute but also result in beautiful, useful items worth keeping? Look no further! This delightful woven pipe cleaner can craft is a perfect blend of creativity, sustainability, and practicality, making it an absolute favorite for parents and children alike. It’s incredibly straightforward to make, budget-friendly, and transforms ordinary recycled cans into charming organizers. The end product is not just visually appealing; it also encourages children to keep their belongings tidy, especially since they played a direct role in creating their new storage solution.
The beauty of this project lies in its accessibility. The main material you might need to purchase is a pack of colorful pipe cleaners, readily available at any dollar store, making this a true testament to the value of dollar store craft projects. Our aim is to provide instructions so clear and memorable that you won’t need to constantly reference this guide after a single run-through. Having guided children through over 200 craft projects, we confidently rank this particular activity high for its simplicity, minimal cost, and the impressive “wow factor” of the finished product.
Beyond the appealing outcome, this craft offers a wonderful opportunity for children to engage in independent play without requiring constant, hands-on supervision. Our preferred projects are those you can explain clearly, allowing children to work autonomously while you periodically check on their progress and offer encouragement. This approach empowers children, fostering a sense of accomplishment and the joyful declaration, “I did it all by myself!”—a priceless feeling, regardless of how much subtle guidance they might have received.
Developing Essential Skills Through Playful Weaving
A key component of this project is learning to weave. If your child hasn’t explored weaving before, this is a fantastic introduction. Many children, particularly those from Montessori environments, often return home with an abundance of woven creations, highlighting weaving’s role in developing crucial skills. Teaching weaving is surprisingly easy and provides an excellent platform for children to practice and refine their fine motor skills, hand-eye coordination, and dexterity. Moreover, it introduces them to the concept of following a pattern, nurturing their ability to concentrate and complete a structured task—or at least enjoy the creative challenge of trying!
In the realm of DIY kids’ craft tutorials, it’s often challenging to find instructions that are straightforward enough for a child to follow independently. Our goal here is to craft a guide that both you and your child can easily understand and implement. We truly hope to succeed in this endeavor, especially with the prevalence of electronic devices that can serve as convenient reference points for children. Your feedback in the comments section below is invaluable to us; please let us know how we did. We’re continuously adding more exciting kids’ craft projects and eagerly welcome your suggestions. Every piece of feedback helps us create better content for our community.
PARENTING TIP: Always keep a stash of pipe cleaners readily accessible! They are phenomenal for engaging children in spontaneous creative play, especially when you need them to entertain themselves for a while. You’ll be amazed by the imaginative creations they come up with. Just a few weeks ago, my daughter proudly presented me with an adorable abominable snowman finger puppet—who would have thought? Does anyone else find themselves “hiding” pipe cleaners from their overly enthusiastic little crafters?
Essential Supplies for Your Woven Pipe Cleaner Can Craft
Gathering your materials is the first exciting step in any craft project. For this delightful pipe cleaner weaving activity, you’ll need just a few simple items, most of which you might already have around the house or can find affordably.
- One Clean, Empty Tin Can: Any size will do, from soup cans to larger vegetable cans, but ensure it’s clean and has its label removed. The key is that a single pipe cleaner can comfortably wrap around its circumference. Upcycling old food cans is a fantastic way to teach children about recycling and sustainability.
- 2 Sets of 8 Pipe Cleaners (16 total) in Your Choice of Colors: These will serve as your vertical “warp” threads for the weaving loom. Choosing contrasting or complementary colors can make the final product truly pop!
- 4 Sets of 6 Pipe Cleaners (24 total) in Your Choice of Colors: These will be your horizontal “weft” threads, forming the woven pattern. Feel free to mix and match colors for a vibrant, personalized design.
- Hot Glue Gun: This tool will be used to secure the finished weave to the can. Adult supervision is absolutely required for this step to ensure safety. For families with older children, consider a low-temp “CoolShot” glue gun, which significantly reduces the risk of burns.
- Scotch Tape or Duct Tape: For securing your vertical pipe cleaners to your workspace.
- Flat Work Surface: A piece of cardboard, a plastic-covered canvas, or a sturdy rectangular tray will work perfectly.
- Scissors: For trimming pipe cleaner ends neatly.
Step-by-Step Guide: Crafting Your Woven Pipe Cleaner Can
Step 1: Preparing Your Pipe Cleaners and Measuring Your Can
Begin by organizing your pipe cleaners. You’ll need approximately eight pipe cleaners for each of your two chosen vertical “warp” colors (totaling 16 for your warp), and about six pipe cleaners for each of your four chosen “weft” colors (totaling 24 for your weave). The exact quantities may vary slightly depending on the size and height of your chosen can. It’s always better to have a few extra; you can easily remove unneeded rows later if your weave becomes too long.
A crucial initial check is to ensure that the circumference of your can is not greater than the length of a single pipe cleaner. Simply wrap one pipe cleaner around the can you intend to cover. If it comfortably wraps around with a slight overlap, you’re good to go. This simple test confirms your can is the right size for this project. Encourage your child to help choose the colors, discussing how different combinations might look. This fosters decision-making and a sense of ownership over their creation.
Step 2: Setting Up Your Weaving Loom
Establishing a stable and accessible workspace is vital for a smooth crafting experience. We highly recommend finding a flat, sturdy piece of cardboard, a rectangular tray, or even a plastic-covered canvas to work on. This not only makes it easier for your child to manipulate the pipe cleaners but also allows them to safely move their project around without it falling apart.
Once you’ve selected your two vertical colors (the “warp” threads), carefully lay them out parallel to each other on your chosen work surface. Then, using scotch tape, duct tape, or any strong adhesive tape, secure both ends of each vertical pipe cleaner to your board. Ensure they are evenly spaced and taut. This creates the foundational “loom” for your weaving, providing stability for the subsequent steps and making the weaving process much simpler for little hands.
Step 3: The Art of Weaving
Now comes the fun part: weaving! Take your first pipe cleaner from one of your four horizontal “weft” sets. Begin by weaving it over and under the vertical pipe cleaners. For example, if you start by going *over* the first vertical pipe cleaner, then go *under* the second, *over* the third, and so on, alternating across the entire row.
For the next horizontal pipe cleaner, you will do the exact opposite pattern: if the previous row started over, this row starts *under* the first vertical pipe cleaner, then *over* the second, *under* the third, and so forth. Continue this alternating “over and under, under and over” pattern with all your horizontal pipe cleaners until you’ve used them all or your weave reaches the desired height for your can. As you complete each row, gently push the woven pipe cleaners upwards towards the taped end of your vertical strands. This keeps the weave tight and creates a dense, attractive fabric. Encourage children to explore different color sequences to create unique patterns and designs.
Step 4: Trimming and Preparing for Assembly
Once your weaving is complete, it’s time to prepare it for fitting around your can. First, hold your woven piece up to the can to ensure it’s long enough to wrap around comfortably, with a slight overlap for gluing. If you’ve woven too many rows, you can carefully remove one or two from the loose end. If you need more length, you can easily add another row or two.
For the horizontal “weft” pipe cleaners, you can neatly fold their ends over or under the outermost vertical “warp” pipe cleaner, whichever makes for a tidier finish, and then trim any excess. This creates a clean edge. For the vertical “warp” pipe cleaners, you’ll want to leave at least half an inch of length extending beyond the woven part at both the top and bottom. This extra length will be used to fold over the rim and under the bottom of the can, creating a secure and professional finish. Precision here ensures a neat final product.
Step 5: Securing the Weave to the Can
(**Adult supervision and active participation are required for this step.**) This stage involves using a hot glue gun, so safety is paramount. It’s generally much easier and safer to apply a line of hot glue directly onto the can rather than attempting to glue the pipe cleaners themselves.
Carefully apply a thin line of hot glue along one vertical seam of your can. Quickly, but precisely, press one edge of your woven pipe cleaner piece onto the glued line, ensuring it adheres firmly. Work swiftly as hot glue dries quickly. As you wrap the weave around the can, press the horizontal woven pieces onto the can, taking extreme caution not to touch the hot glue with your fingers. Continue applying glue in small sections along the can and pressing the weave into place until it fully encircles the can. Aim for a tight, seamless fit.
SAFETY TIP: For those who are a bit more experienced or impatient adults, keeping a low-temperature “CoolShot” hot glue gun on hand can be incredibly useful. These guns operate at a lower heat, significantly reducing the risk of burns, making the process safer and more enjoyable for everyone involved.
Step 6: The Finishing Touches
With the main weave securely glued to the can, it’s time to finalize the edges for a polished look and to prevent unraveling. Take the extended vertical pipe cleaner ends at the top of the can and gently fold them inward, tucking them inside the can’s rim. Press them firmly against the inside wall. Repeat this process for the vertical pipe cleaner ends at the bottom of the can, bending them inward and tucking them neatly under the can’s base.
While securing these tucked ends with a dab of hot glue is optional, especially for the inside of the can, it is highly recommended to ensure maximum adhesion and durability. This extra step guarantees that your beautiful woven pipe cleaner can will withstand regular use and maintain its charming appearance for a long time. Once complete, you’ll have a fantastic, homemade organizer that your child will be proud to use!