
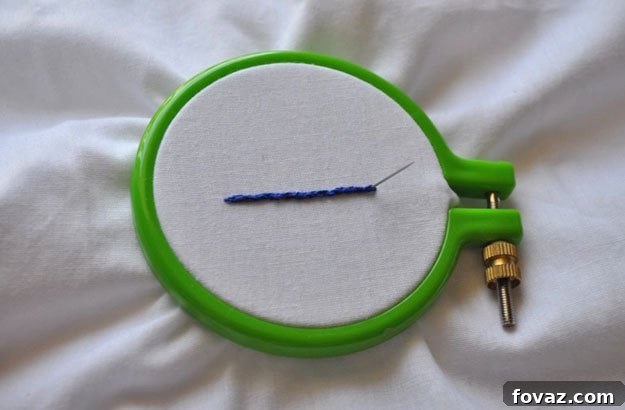
The Split Stitch | A Comprehensive Guide to This Essential Embroidery Stitch
The split stitch stands out as a fundamental and highly versatile technique in the world of hand embroidery. While it shares some structural similarities with the classic back stitch, the split stitch introduces a distinctive textural element that elevates your embroidery designs. Renowned for its elegant, rope-like appearance, it’s an indispensable stitch for creating crisp outlines, delicate lettering, and adding subtle, raised texture to your embroidery projects. Whether you’re a beginner just starting your journey into needlework or an experienced embroiderer looking to refine your skills, mastering the split stitch will unlock new possibilities for your creative expression. This guide will walk you through everything you need to know, from preparing your materials to executing the stitch flawlessly and discovering its myriad applications.
Preparing for Success: Essential Materials You’ll Need
Embarking on any embroidery project requires a few basic tools. For the split stitch, the setup is straightforward, ensuring you can focus on the technique itself. Gathering these items before you begin will make your stitching experience smooth and enjoyable:
- **Blank Piece of Fabric (Cotton is Best):** Choosing the right fabric is crucial. Medium-weight cotton, such as quilter’s cotton or linen blends, is highly recommended for beginners. Its stable weave provides excellent support for your stitches, making it easier to maintain even tension and achieve neat results. Avoid overly stretchy or slippery fabrics when learning, as they can complicate the stitching process. Natural fibers are generally preferred for their durability and aesthetic appeal.
- **Embroidery Hoop, if You Have One:** While not strictly mandatory for every small project, an embroidery hoop is an invaluable tool for maintaining fabric tension. A taut fabric prevents puckering and ensures your stitches lie flat and even. Hoops come in various sizes and materials (wood or plastic). A 6-inch or 8-inch hoop is a great starting point for most projects. Ensure the fabric is stretched firmly within the hoop, but not so tight that it distorts the weave.
- **Embroidery Thread:** The choice of thread significantly impacts the final look of your split stitch. Most commonly, stranded cotton floss (DMC, Anchor, etc.) is used. This type of thread consists of six individual strands that can be separated. For a delicate line, you might use one or two strands; for a bolder, more pronounced line, you might use three or four strands. Experiment with different numbers of strands to achieve varying thicknesses and textures. Silk, rayon, or even thin wool threads can also be used for different effects once you’re comfortable with the basic technique.
- **Needle:** A sharp embroidery needle (also known as a crewel needle) with an eye large enough for your chosen thread is essential. Needles are sized by number; a higher number indicates a finer needle. A size 7 or 8 crewel needle is a good all-rounder for most standard embroidery floss and fabric combinations. The sharp point helps pierce the fabric and, crucially for the split stitch, allows you to accurately split the previous stitch without difficulty.
- **Scissors:** A small, sharp pair of embroidery scissors is ideal for cleanly trimming threads close to your fabric. Keeping them dedicated to fabric work ensures they stay sharp and don’t fray your threads.
Once your materials are at hand, you’re ready for the initial setup. Thread one end of a length of embroidery thread through the eye of your needle. It’s generally advisable to work with lengths of thread no longer than 18-24 inches (45-60 cm) to prevent tangling and excessive wear on the thread. Knot the far end of the thread securely, creating a small, firm knot that won’t pull through your fabric. Trim any excess thread beyond the knot to keep your workspace tidy. For those just beginning, or when working on intricate designs, it’s immensely helpful to draw your design directly onto the fabric first. A fabric pencil, heat-erasable pen, or washable marker allows you to trace precise lines or fill in shapes, providing a clear guide for your stitches and ensuring accuracy in your final piece.
Mastering the Split Stitch: A Step-by-Step Tutorial
The beauty of the split stitch lies in its simplicity and the unique texture it creates. It’s an ideal stitch for confident lines, text, and filling areas with a subtle, textured feel. Follow these steps for a perfect split stitch:
1. **Initiate Your First Stitch:** Begin by bringing your needle up from the back of your fabric to the front at your starting point (Point A). Pull the thread all the way through until the knot at the back secures it. Now, take a step forward by inserting your needle back down through the fabric at a short distance (Point B) from Point A. This creates your very first straight stitch. Aim for a consistent stitch length, typically between 1/8 to 1/4 inch (3-6 mm), as this will contribute to the evenness of your final line. Pull the thread through to the back, ensuring not to pull too tightly to avoid puckering the fabric.
2. **Splitting the Previous Stitch:** Now for the defining step of the split stitch! To begin your second stitch, bring your needle up from the back of the fabric, but instead of piercing the fabric directly, you will poke your needle *through the middle of your first stitch*. Yes, literally through the strands of the thread you just laid down. Aim to split the thread fibers neatly in half with the point of your needle. This is where a sharp needle is truly beneficial. Thread the needle and pull the thread up and through the fabric and the center of that first stitch.
3. **Completing the Second Stitch and Continuing the Pattern:** Once your needle and thread are through the middle of the previous stitch, you are now at your new starting point. Finish your second stitch by taking your needle down into the fabric at a point (Point C) that is the same length from where you emerged as your first stitch (the distance from B to C should be equal to A to B). Pull your thread through to the back of the fabric. You’ll notice how the thread emerging from the middle of the first stitch creates a continuous, slightly raised line.
4. **Repeating the Process:** Continue the pattern by beginning each subsequent stitch in the exact middle of the *previous* one. Each new stitch starts by bringing your needle up through the center of the stitch you just completed, effectively splitting its strands. This continuous splitting action gives the stitch its name and its characteristic rope-like texture. Maintain consistent stitch length and thread tension for a neat and uniform line. With each new stitch, you’ll be building a beautiful, unbroken line that has a distinct tactile quality.
That’s the split stitch! With a little practice, you’ll find it becomes second nature, allowing you to create beautiful, textured lines with ease. It’s a very common and foundational embroidery stitch that offers a fantastic alternative to the backstitch when you desire a more dimensional effect.
Why Choose the Split Stitch? Benefits and Applications
The split stitch is much more than just another way to create a line; it offers unique qualities that make it a favorite among embroiderers for various reasons:
- **Distinctive Texture:** Its most notable feature is the beautiful, slightly raised, rope-like texture it produces. This texture adds a subtle dimension and artisanal feel to any design, making outlines and details stand out.
- **Exceptional for Outlines:** Due to its continuous and uniform nature, the split stitch creates incredibly clean and precise outlines. It’s perfect for defining shapes, borders, and elements that require a sharp edge.
- **Ideal for Lettering and Calligraphy:** When embroidering text, the split stitch provides an elegant and refined line that mimics the flow of script. Its ability to create smooth curves makes it superior to many other outline stitches for intricate lettering.
- **Excellent for Filling Areas:** Beyond outlining, the split stitch can be used to fill in larger areas with a dense, textured surface. By stitching rows closely together, you can create a solid, almost woven appearance, ideal for elements like hair, fur, or specific patterns.
- **Durability:** Because each stitch is essentially locked into the previous one by splitting its fibers, the split stitch is a very strong and durable stitch. It holds up well over time and with washing, making it suitable for items that will see frequent use.
- **Versatility in Thread Usage:** You can vary the number of strands of embroidery floss used to achieve different effects. A single strand creates a fine, delicate line, while multiple strands result in a bolder, more pronounced rope.
Tips for Mastering the Split Stitch and Achieving Perfection
Even though the split stitch is relatively simple, a few tips can help you achieve even better results:
- **Practice on Scrap Fabric:** Before diving into your main project, dedicate some time to practicing on a piece of scrap fabric. This allows you to get a feel for the stitch length, thread tension, and the crucial technique of splitting the thread.
- **Consistent Stitch Length:** Aim for uniform stitch lengths. Inconsistent stitches will lead to a bumpy or uneven line. Use your drawn lines as a guide, and try to make each “step” equal.
- **Even Thread Tension:** Maintain consistent tension as you pull your thread through. Too tight, and your fabric will pucker; too loose, and your stitches will look sloppy. The thread should lie flat and smoothly on the fabric.
- **Use a Sharp Needle:** As mentioned, a sharp crewel needle is paramount. It allows you to cleanly pierce the fabric and, more importantly, precisely split the fibers of the previous stitch without fraying them.
- **Don’t Rush the Split:** Take your time when bringing the needle up through the center of the previous stitch. Ensure you are actually splitting the thread and not just coming up beside it. A good split is key to the stitch’s characteristic look.
- **Experiment with Strands:** Try using different numbers of embroidery floss strands (e.g., 2, 3, or 4 strands) to see how it changes the thickness and texture of your split stitch. This variation can add significant depth to your designs.
- **Working with Curves:** When working around curves, use shorter stitches. Shorter stitches allow for smoother curves and prevent the line from looking jagged or angular.
- **Finishing Your Stitches:** When you reach the end of a line or run out of thread, turn your work over and weave the working thread under a few existing stitches on the back. Make a small knot if necessary, or simply trim the excess close to the woven-in section.
By incorporating these tips into your practice, you’ll soon be creating intricate and beautiful designs with confidence and precision. The split stitch truly is a cornerstone of hand embroidery, offering endless creative possibilities for both decorative and practical projects.
More Basic Embroidery Stitches to Expand Your Repertoire:
Once you’ve mastered the split stitch, you’ll be eager to learn more. Hand embroidery is a rich craft with a vast array of stitches, each offering unique textures and applications. Exploring other fundamental stitches will significantly broaden your creative toolkit and allow you to tackle more complex and varied designs. Here are some other essential stitches that every embroiderer should know:
How to Back Stitch
How to Cross Stitch
Hand Sew The French Knot
Hand Sew The Running Stitch
How to Satin Stitch
How to Split Stitch
How to Stem Stitch
Each of these stitches serves a different purpose, from creating solid outlines to intricate fills and decorative elements. By practicing and combining them, you can bring any embroidery design to life with rich texture and detail. The journey of learning embroidery is continuous, and each new stitch you master opens up exciting new avenues for your needlework artistry.
Stay connected with us for more embroidery tutorials, project ideas, and creative inspiration! Find us on Facebook, Twitter, Pinterest, and Instagram! Share your split stitch creations with us and join our vibrant community of DIY enthusiasts.
Looking for beautifully personalized embroidery pieces crafted with care? Perhaps a unique gift or a special addition to your home decor?
You’ll love these exquisite handmade options on Etsy! Discover unique, hand-stitched artistry perfect for any occasion.