
Imagine pulling a perfectly charred, bubbling Neapolitan pizza from a roaring wood-fired oven in your own backyard. In 90 seconds, you’ve created a masterpiece that rivals the best pizzerias. While a professionally installed brick oven can cost upwards of $3,500, this comprehensive guide will show you how to build your own high-performance outdoor pizza oven for under $400. This isn’t just a dream; it’s an achievable two-weekend project that will transform your outdoor cooking forever.
This guide breaks down every single step, from laying the foundation to firing your very first pizza. We’ll focus on the critical details that other tutorials often miss, especially the curing process, which is the number one reason first-time builds fail. With the right materials and a little patience, you’ll have a durable, efficient, and beautiful centerpiece for your backyard gatherings.
Gathering Your Materials and Tools
A successful build starts with the right components. You don’t need a massive workshop, just a few key materials and one essential rental tool. Here is a complete checklist to ensure you have everything on hand before you begin.
Essential Building Materials
- Fire Bricks: These are the heart of your oven. You will need approximately 100 to 150 standard-sized fire bricks for a medium-sized dome. They are specifically designed to withstand and retain extreme heat.
- High-Temperature Refractory Mortar: Do not substitute this with standard mortar. Brands like Rutland produce mortar that can handle temperatures exceeding 2000°F. Regular mortar will crumble and fail under the heat of a wood fire.
- Cinder Blocks (CMUs): These will form the sturdy base or platform for your oven, elevating it to a comfortable working height.
- Coarse Sand: This will be used to create the temporary mold, or form, for your dome shape. It’s cheap, effective, and easy to remove later.
- Gravel: A 4-inch layer of compacted gravel beneath your base is crucial for drainage and preventing frost heave, which can crack your entire structure in colder climates.
- Refractory Cement or Fireclay: This will be used for the exterior “scratch coat” on the dome, providing an initial layer of insulation and a solid surface for a final finish.
- Optional – Ceramic Fiber Blanket: For maximum heat retention and efficiency, wrapping the dome in a ceramic fiber insulating blanket before the final finish coat is highly recommended. It keeps the heat in, allowing for longer cooking times and more consistent temperatures.
Tools for the Job
- Angle Grinder with Masonry Blade: This is the most important tool you’ll need. Renting one for a weekend is a cost-effective option. It’s essential for cutting bricks to fit the tapering shape of the dome.
- Levels: A 4-foot level is ideal for ensuring your base is perfectly flat, and a smaller torpedo level will be useful for the brick courses.
- Rubber Mallet: For gently tapping bricks into place without cracking them.
- Trowels: A margin trowel for applying mortar and a notched trowel for the scratch coat will be necessary.
- Measuring Tape: Accuracy is key in every step.
- Story Pole: A simple straight piece of wood or rod that you mark with the height of each brick course. This is your guide to creating a perfectly uniform and structurally sound dome.
- Infrared Thermometer: Invaluable for monitoring temperatures during the curing process and essential for knowing when your oven is ready for cooking.
The Two-Weekend Build: A Step-by-Step Guide
Patience is paramount. This project is logically divided into two distinct weekends to allow the mortar in the base to properly cure before it bears the weight of the dome. Rushing this process is a guarantee for structural problems down the line.
Weekend 1: Building a Rock-Solid Foundation
The stability and longevity of your oven depend entirely on its base. Every layer you add will inherit any imperfections from the foundation, so take your time and get this part perfectly right.
Step 1: Site Selection and Excavation
First, check your local building codes. Most municipalities require a minimum of 10 feet of clearance from any combustible structure, including your house, fences, and deck overhangs. Once you’ve chosen a safe and level spot, mark the footprint for your oven base. Excavate the entire area to a depth of 4 inches.
Step 2: Lay a Drainage Bed
Fill the excavated area with 4 inches of gravel and compact it thoroughly. This step is non-negotiable, especially in climates with freezing winters. Water trapped under the base will freeze and expand, a phenomenon known as frost heave, which will inevitably crack your masonry.
Step 3: Construct the Base Platform
Using your cinder blocks (CMUs) and standard mortar, build the walls of your base up to a comfortable working height, typically between 36 and 40 inches. Continuously use your level on every course of blocks. The final top surface must be perfectly level across its entire length and width. An error of even a quarter-inch here will be magnified as you build upwards.
Step 4: Install the Hearth Floor
The floor of your oven, known as the hearth, is where your pizza will cook. Arrange your fire bricks tightly together on top of the base platform. This should be a “dry stack,” meaning no mortar is used between the hearth bricks. This allows the bricks to expand and contract with the intense heat changes without cracking. Once they are laid flat and tight, your work for the first weekend is done. Let the base cure for at least 48-72 hours before proceeding.
Weekend 2: Shaping the Dome and Flue
With a solid and cured base, you’re ready to build the iconic dome. This is where your oven truly takes shape.
Step 5: Create the Sand Form
On top of your fire brick hearth, build a mound of damp sand. The sand should be wet enough to hold its shape, like building a sandcastle. Sculpt it into a perfect dome that will serve as your building guide. A good rule of thumb for dome height is about 75% of the dome’s diameter, a ratio that promotes excellent heat circulation.
Step 6: Lay the Dome Bricks
Mix your high-temperature refractory mortar according to the manufacturer’s instructions, working in small batches to prevent it from hardening prematurely. Don’t add extra water; a thicker consistency is stronger. Begin laying your fire bricks around the base of the sand form. Apply mortar to the bottom and inner side of each brick before setting it in place. Use your story pole on every course to ensure the dome is rising evenly and symmetrically.
Step 7: Close the Dome with the Key Brick
As you build upwards, you’ll need to use your angle grinder to cut bricks into tapered shapes to fit the tightening curve. The final brick at the very top is the key brick, which locks the entire arch structure together. Cut and shape this brick carefully for a snug, perfect fit.
Step 8: Form the Chimney and Opening
Once the dome is complete, you can carefully scoop the sand out from the front opening. Next, construct a small chimney or flue arch at the front of the oven, just outside the main opening. The cross-sectional area of the flue should be about 10-12% of the oven opening’s area to ensure it draws smoke out effectively without starving the fire of oxygen.
Step 9: Apply the Scratch Coat
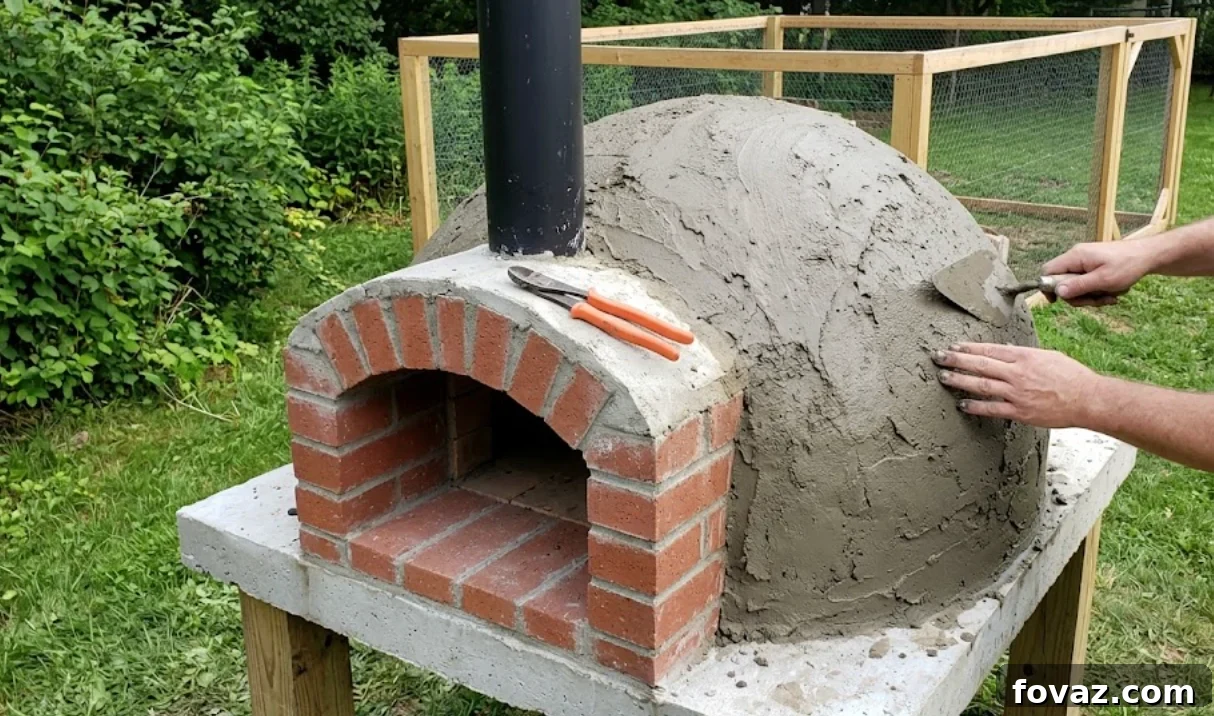
Cover the entire exterior of the brick dome with a 1 to 2-inch layer of refractory cement or fireclay. Before it fully dries, lightly score the surface with your trowel. This “scratch coat” adds insulation and creates a rough texture for a final decorative finish, like stucco, to adhere to later. Now, the most difficult part begins: waiting. Let the completed oven sit untouched for 5 to 7 days before you even think about lighting a fire.
The Critical Curing Process: Don’t Skip This Step
Your newly built oven contains a significant amount of trapped moisture within the bricks and mortar. Lighting a large fire immediately will turn this water into steam, which will expand violently and crack your beautiful dome. The curing process involves a series of small, progressively larger fires to slowly and safely drive this moisture out.
- Days 1 & 2: Build very small kindling fires. Your goal is to keep the oven temperature between 200-250°F for a couple of hours each day. You are essentially just drying the masonry.
- Days 3 & 4: Build slightly larger fires using small logs. Bring the temperature up to 400-500°F and hold it for two hours. Let the oven cool completely between these sessions.
- Day 5: It’s time for a full fire. Build it up gradually until your hearth floor, measured with the infrared thermometer, reaches the target cooking temperature of 750-900°F.
If you notice fine, hairline cracks forming in the exterior scratch coat during this process, don’t panic. This is normal thermal expansion. While the oven is still warm, you can pack these small cracks with a bit of refractory mortar. If it rains at any point before Day 3, you must restart the curing process from Day 1, as the masonry will have reabsorbed moisture.
Frequently Asked Questions About DIY Pizza Ovens
How much does it really cost to build a DIY pizza oven?
A frugal build using some reclaimed fire brick can be done for as little as $200. For all new materials, expect to spend between $300 and $400. Factoring in an angle grinder rental for a weekend might add another $50 to your total budget.
What is the ideal temperature for a wood-fired pizza oven?
For authentic Neapolitan-style pizza, you need extreme heat. The target temperature for the hearth floor should be between 750°F and 900°F. At this temperature, a pizza will cook in just 60 to 90 seconds. Anything below 600°F will bake the pizza rather than fire it.
How long is the total project from start to finish?
The active building time is just two weekends. However, you must account for the curing time for both the base and the dome. Realistically, plan for about three weeks from the day you dig the foundation to the day you enjoy your first homemade pizza.
Help! Why did my new pizza oven crack?
As mentioned, small surface cracks are often a normal part of the curing process. Larger, more significant cracks are typically caused by one of two things: a rushed curing process that created steam pressure, or an unlevel base that caused a structural weak point in the dome. Both issues can often be patched with refractory mortar.
Do I absolutely need a permit for my backyard oven?
While most jurisdictions do not require a formal permit for a freestanding masonry structure of this size, they almost all enforce setback rules (the minimum distance from property lines and structures). A five-minute call to your local building department before you start is the best way to avoid a costly order to tear down your finished oven.
Building your own outdoor pizza oven is more than just a construction project; it’s an investment in countless future evenings of incredible food and shared memories. By following these steps, respecting the materials, and having patience during the curing process, you can build a backyard feature that will be the envy of the neighborhood—all for a fraction of the professional cost.