
Have you ever paused to consider the untapped potential of your drill beyond its conventional role in construction and home renovation? While typically confined to workshops and job sites, this versatile power tool harbors a surprising secret: it can be a game-changer in the kitchen! Imagine slicing through prep time with the same efficiency you build a bookshelf. This isn’t just a fantasy; it’s a practical, albeit unconventional, reality waiting to be explored. Far from being limited to crafting or remodeling, your drill can become an indispensable ally in speeding up various food preparation tasks, transforming mundane chores into quick, exciting kitchen hacks. So, set aside your preconceived notions and read on to discover how to leverage the raw power and precision of your drill to revolutionize your cooking experience.
Unleash Your Drill: 5 Unexpected Ways to Supercharge Your Kitchen Prep
— This post is courtesy of The Family Handyman and shared with permission —
Whether you’re racing against the clock to prepare a family meal, hosting a large gathering, or simply looking to inject some fun and innovation into your culinary routine, your cordless drill offers a suite of ingenious solutions. By repurposing this common power tool, you can achieve remarkable speed and efficiency in tasks that usually demand manual effort and precious time. From peeling a mountain of apples for a delicious pie to effortlessly grinding fresh pepper, your drill is about to earn a new spot in your kitchen toolkit. Get ready to discover five ingenious methods to transform your humble drill into an ultimate kitchen companion, making food prep faster, easier, and undeniably more entertaining. We’ll show you how to peel apples, quickly open cans, grate cheese, grind pepper, and even stir stubborn jars of food with unprecedented ease.
Essential Safety and Setup for Kitchen Power Tools
Before you bring any power tool into the kitchen, safety and cleanliness are paramount. Remember, these tools are not typically designed for food contact, so proper precautions are essential. Always ensure your drill, bits, and any attachments are thoroughly cleaned and sanitized before use, especially if they’ve been previously used for non-food projects. Consider dedicating specific attachments for kitchen use to avoid cross-contamination with chemicals or debris. Opt for a cordless drill for maximum mobility and to minimize the risk of electrical hazards near water. Always wear appropriate eye protection and keep your fingers and loose clothing clear of any rotating parts. Start at the lowest speed setting and gradually increase as needed, maintaining full control over the tool at all times. Taking these vital steps will ensure your culinary power tool adventures are both efficient and safe.
1. Peel Apples with a Drill: The Ultimate Time-Saver
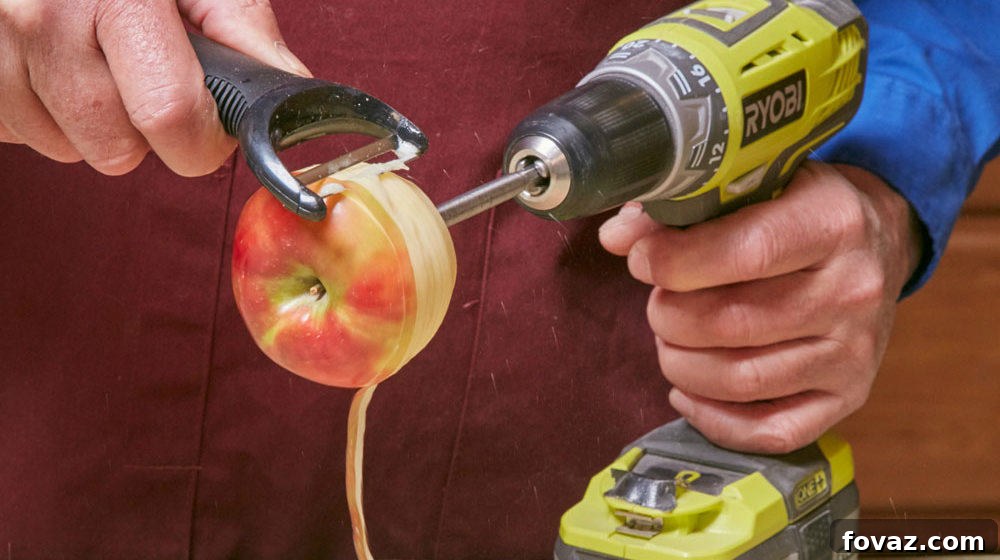
Say goodbye to tedious hand-peeling, especially when you’re preparing a large batch of apples for pies, crisps, or tarts. The humble drill, combined with a simple spade bit, can dramatically accelerate this chore. This clever hack ensures uniform peeling in a fraction of the time, making it perfect for busy bakers or anyone who appreciates efficiency in the kitchen.
To begin, select a spade bit that’s slightly smaller than the core of your apple. Securely chuck the spade bit into your cordless drill, ensuring it’s held firmly in place as you’ll be applying some pressure. Carefully insert the pointed tip of the spade bit into the center of the apple’s bottom, pushing it through until it’s firmly anchored, creating a secure handle for rotation. With one hand holding the drill steady and the apple rotating, use your other hand to gently run a standard vegetable peeler over the apple’s skin. As the apple spins rapidly, the peel is swiftly and smoothly removed, leaving you with a perfectly peeled fruit in seconds. This method not only saves time but also results in consistently peeled apples, ready for your next delicious recipe.
2. DIY Electric Can Opener: Power Up Your Pantry Access
Tired of wrestling with manual can openers, especially when faced with a stack of cans? Transform your drill into a powerful, albeit makeshift, electric can opener. This DIY project is surprisingly simple and incredibly satisfying, turning a mundane task into an effortless one. It’s perfect for those who appreciate a hands-on approach to kitchen gadgetry.
The key to this hack lies in carefully modifying a standard manual can opener. First, you’ll need to remove the crank handle from your manual can opener. We accomplished this by clamping the opener in a vise and grinding out the pin that secures the handle. However, if you don’t have access to a grinder, a combination of sturdy pliers and careful twisting can also work to detach the handle. Once the crank handle is removed, you’ll be left with the exposed crankshaft. Chuck this remaining crankshaft securely into your drill. Now, with one hand firmly holding the drill, attach the can opener to the can as you normally would, using your other hand to hold the opener closed and stable against the can’s rim. Give the drill a gentle press on the trigger, and watch as the can opens with remarkable speed and minimal effort. This ingenious adaptation makes quick work of even the most stubborn cans.
3. Drill-Powered Cheese Grater: Grate with Great Speed
Whether you’re topping a generous mountain of spaghetti with fresh Parmesan or preparing a substantial amount of grated cheese for a large recipe, a drill-powered cheese grater can be an absolute lifesaver. By making a simple modification to a common rotary cheese grater, you can grate cheese at an incredible pace, limited only by your drill’s speed and your steady hand. This hack is particularly useful for hard cheeses.
Start by disassembling your rotary cheese grater. Most models allow you to remove the plastic rotary handle by simply holding the grating barrel stationary and twisting the handle in reverse until it detaches. Next, remove the grating barrel itself from the grater’s main body. You will need a ¼-inch bolt, a flat washer, a lock washer, and a nut. Insert the ¼-inch bolt into the threaded hole located at the bottom of the grating barrel. Secure it tightly in place with the flat washer, followed by the lock washer, and finally the nut. If you find it challenging to achieve sufficient tightening pressure by just holding the bolt from the inside, you can use two sets of pliers – one to hold the bolt head steady inside the barrel and the other to tighten the nut from the outside.
Once the bolt is securely attached to the grating barrel, reinsert the barrel back into the cheese grater body. Now, chuck the protruding bolt head into your drill, ensuring it’s held tightly. Add your cheese to the grater, and with a gentle squeeze of the trigger, start grinding! Depending on the specific design of your rotary grater, you might find that running your drill in reverse provides the most effective grating action. This method transforms a typically laborious task into a quick and efficient part of your food preparation.
4. Powered Pepper Mill: Freshly Ground Spices in an Instant
Tired of the slow, repetitive cranking of your manual pepper mill, only to get a few flakes of pepper at a time? Elevate your seasoning game by integrating your cordless drill into the process. This simple yet effective hack delivers freshly ground pepper instantly, adding a burst of flavor to your dishes with minimal effort. All you need is your drill and a standard socket from your toolbox.
First, carefully unscrew the top of your pepper mill’s grinding mechanism. Once the top is removed, ensure you keep the grinder upright to prevent spilling the peppercorns inside. Now, select a socket that is roughly the same size as the opening of the grinding mechanism and place it over the mechanism itself. This socket will serve a dual purpose: it helps center the mechanism within the grinder and allows you to apply consistent force, crucial for achieving finely ground pepper. Next, chuck the very top of the grinding mechanism directly into your drill. Since the top of the socket is open, you only need about ¼-inch of the mechanism sticking out to securely grip it with the drill chuck. Once it’s tight, start grinding away! You’ll be able to quickly add a generous amount of fresh pepper to mashed potatoes, salads, or anything else on your dinner table.
For those who prefer a finer or coarser grind, remember that most pepper mills allow you to adjust the particle size by how tightly the top of the grinding mechanism is screwed on. Experiment with tightening or loosening the mechanism (before attaching it to the drill) to achieve your desired consistency. This ingenious setup ensures a rapid supply of fresh, aromatic pepper, making every meal more flavorful.
5. Cordless Kitchen Drill Mixer: Conquer Tough Mixing Jobs
Sometimes, stirring thick or separated ingredients in small jars can be a real workout for your wrists. Think about old-fashioned, oily peanut butter where the oil has separated, or stubborn thick sauces. Instead of struggling by hand, embrace the power of your drill. It’s not uncommon for DIY enthusiasts to reach for a power tool to solve a problem, and the kitchen is no exception. As it turns out, the handle of many mixing spoons or even a dedicated whisk attachment fits perfectly into the chuck of a cordless drill, turning it into an impromptu, powerful mixer.
To implement this hack, select a sturdy mixing spoon, a whisk, or even a specialized mixing paddle (ensure it’s food-safe and clean). Securely insert the handle or shaft of your chosen utensil into the drill chuck, tightening it until it’s firmly gripped. Place the utensil into the jar or container you wish to mix, ensuring it reaches the bottom and won’t splash ingredients out. Start your drill at a very low speed, gradually increasing it as the ingredients begin to combine. This method is incredibly effective for quickly emulsifying separated liquids, blending thick sauces, or perfectly incorporating ingredients that would normally require considerable manual effort. Always keep a firm grip on the drill and the container to prevent spills and ensure safe operation. This drill mixer hack makes light work of even the most challenging mixing tasks, saving your arm strength for more important culinary endeavors.
Beyond the Basics: Expanding Your Kitchen Creativity
The five hacks detailed above are just the tip of the iceberg when it comes to the creative possibilities of using a drill in your kitchen. Once you’ve mastered these unconventional methods, you might find yourself looking at your power tools and kitchen chores with a new perspective. Imagine quickly shucking corn, whipping cream to fluffy peaks, or even polishing stainless steel kitchen items with specialized attachments. The key is to think creatively, prioritize safety, and ensure cleanliness.
By adapting tools meant for home improvement, you’re not just saving time; you’re also adding an element of ingenuity and fun to your cooking. These kitchen innovations demonstrate that with a little imagination, efficiency can be found in the most unexpected places. Remember to always use common sense, secure your attachments properly, and maintain hygiene to make your drill an exciting and effective addition to your culinary repertoire.
What do you think? How are you going to use your drill other than for handicraft projects or home renovations? Let me know below in the comments section! Share your own creative kitchen hacks!
Want to stir even more creativity into your kitchen design? Check out these Awesome DIY Kitchen Ideas for inspiration!
Stay connected with me and discover more innovative DIY projects on Facebook, Twitter, Pinterest and Instagram!