
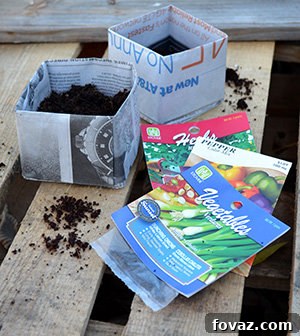
DIY Biodegradable Newspaper Seed Pots: An Eco-Friendly Guide to Starting Seeds Indoors
For many gardening enthusiasts, the arrival of winter doesn’t mean the end of cultivating green dreams. In fact, it’s often the perfect time to begin planning and preparing for the vibrant spring garden ahead. One of the most rewarding ways to keep your green thumb active during colder months is by starting seeds indoors. This method not only gives your plants a head start, ensuring robust growth once the risk of frost has passed, but it also allows you to enjoy the therapeutic process of nurturing new life.
Traditionally, gardeners have relied on store-bought seed starter pots, which can quickly become a significant expense, especially when you’re growing a diverse range of vegetables like tomatoes, peppers, herbs, and flowers. Beyond the cost, these plastic pots often contribute to environmental waste. This guide introduces an ingenious and sustainable solution: creating your own biodegradable seed pots using recycled newspaper. This project is not only incredibly cost-effective but also environmentally friendly, transforming old newspapers into functional, plant-friendly containers that can be directly planted into the soil.
Newspaper seed pots are remarkably versatile. If your seedlings require smaller containers, simply adjust the size of the newspaper page you start with. For plants that need more support or will be grown for an extended period indoors, you can easily double the thickness of the paper to create sturdier pots. This adaptability makes them suitable for a wide array of seeds and plant types.
What’s more, this craft is a fantastic activity for all ages. It’s a simple, engaging origami project that children will love, offering a fun way to introduce them to the basics of gardening and the importance of recycling. The best part? These eco-friendly plant pots naturally decompose in the soil, eliminating the need to transplant seedlings, which can often shock delicate young roots. This seamless transition from pot to garden bed ensures healthier, happier plants right from the start. Let’s dive into how you can make these practical, planet-friendly newspaper seedling pots and revolutionize your seed-starting routine.
Why Choose Newspaper Seed Pots for Your Garden?
Embracing newspaper seed pots for your indoor seed starting offers a multitude of benefits, making them a superior choice for the environmentally conscious and budget-savvy gardener alike. Here’s a closer look at the compelling advantages:
- Eco-Friendly & Sustainable: By repurposing old newspapers, you’re giving waste a new life and reducing your household’s environmental footprint. This practice aligns perfectly with sustainable gardening principles, promoting resourcefulness and minimizing reliance on new plastic products.
- Fully Biodegradable: Unlike plastic pots that persist in landfills for centuries, newspaper pots naturally break down in the soil. This decomposition enriches the soil with organic matter, contributing to a healthier growing environment for your plants and the surrounding ecosystem.
- Cost-Effective: Say goodbye to expensive store-bought seed trays and pots. Newspaper is a readily available and often free resource, making this project incredibly economical. You can create dozens of pots for the cost of zero, allowing you to allocate your gardening budget to other essentials like quality seeds and soil.
- Reduced Transplant Shock: One of the biggest advantages for your plants is the elimination of transplant shock. Since the entire pot can be placed directly into the garden bed, the delicate root system of your seedlings remains undisturbed. This leads to faster establishment, stronger growth, and ultimately, a more productive harvest.
- Excellent Root Development: As the newspaper begins to degrade, it allows the roots to grow directly through the pot and into the surrounding soil. This “root pruning” effect encourages a stronger, more fibrous root system, which is crucial for a healthy and resilient mature plant.
- Breathable Material: Newspaper is porous, providing better aeration to the roots compared to some plastic pots. This helps prevent waterlogging and fungal diseases, fostering an optimal environment for seedling health.
- Adjustable Size & Sturdiness: As mentioned, you can easily customize the size of your pots by cutting the newspaper differently. For extra durability, simply use multiple layers of newspaper, tailoring the pot to the specific needs of your plants.
- Educational & Fun: This DIY project is a fantastic way to engage children and beginners in the gardening process. It’s a hands-on activity that teaches about recycling, plant life cycles, and the rewards of self-sufficiency.
By opting for newspaper seed pots, you’re not just making a practical choice for your garden; you’re making a positive impact on your wallet and the planet.
How to Make Biodegradable Newspaper Seedling Pots: A Step-by-Step Guide
Creating these simple yet effective newspaper plant pots is a quick and rewarding project, perfect for a weekend afternoon. The beauty of using newspaper lies in its biodegradability, meaning you can plant your seedlings directly into the soil without having to remove them from their starter pot. This dramatically reduces transplant shock and makes for healthier, happier plants. Let’s gather our minimal supplies and get started!
Supplies You’ll Need:
- Newspaper: Choose black and white sections to avoid potential issues with colored ink, although modern inks are generally soy-based and safe.
- Scissors: For neatly preparing your newspaper sheets.
- Potting Soil: A high-quality seed-starting mix is essential for healthy seedling development.
- Seeds or Seed Cuttings: Your chosen plants to kickstart your indoor garden.
With these few items, you’re ready to embark on a fun and eco-friendly gardening project!
Step 1: Prepare Your Newspaper Sheet
Begin by taking one full page of newspaper. Carefully cut this page in half lengthwise along the existing fold. For each individual seedling pot, you will only use one of these half-sheets. This ensures a consistent size for your finished pots. Once you have your half-sheet, fold it in half again, making sure the shorter ends meet up perfectly. You might encounter some resistance from the paper’s original fold, so gently flatten it out to achieve a crisp, clean fold. A sharp crease here is important for the structural integrity of your pot.
Ensure your fold is neat and even, as this will form the foundation of your pot.
Step 2: Create the Initial Vertical Fold
With the paper still folded from the previous step, proceed to fold it in half once more along the vertical axis. This will create a tighter, more compact rectangular shape. This fold is crucial as it establishes the central axis and helps in forming the initial structure of the pot. Press firmly to create a distinct crease.
The paper should now be folded into quarters, a narrow rectangle.
Step 3: Form the Bottom Triangular Flaps
Now, gently release the second fold you just made, unfolding the paper back to the previous rectangular shape (folded in half once). Locate the bottom right corner of the folded side (ensure it’s the edge with the folded paper, not the open edges). Take this corner and fold it upwards and inwards so that its edge perfectly aligns with the central crease you established in Step 2. This will form a neat triangle. Repeat this exact action for the bottom left corner, mirroring the fold to create a symmetrical triangle on the other side. These triangular folds will eventually form the base of your seed pot.
Ensure both triangles are sharply creased and symmetrical.
Step 4: Fold the First Bottom Flap
Staying on the same side of the paper, identify the top flap of the open edge. Carefully fold this flap upwards. The goal is to align its top edge precisely with the bottom edges of the two triangular folds you created in Step 3. This fold begins to define the height of your pot and will help secure the base. Make sure your crease is firm and even across the width of the paper.
This fold creates the first layer of the pot’s base structure.
Step 5: Secure the Bottom Flap with an Overlap Fold
With the previous fold still firmly in place, continue by folding the same flap upwards one more time. This additional fold should now overlap the triangular folds you made earlier. This double-folding action is crucial for adding strength and stability to the base of your pot, ensuring it can hold soil without collapsing. Press down firmly to create a very crisp and well-defined crease. The more precise your folds are, the sturdier your finished pot will be.
This overlapping fold secures the base and adds essential rigidity.
Step 6: Mirror Folds on the Reverse Side
Now it’s time to flip the paper over to the other side. You’ll be repeating similar folds to create a symmetrical structure. Begin by taking the right edge of the paper and folding it inwards so that its edge lines up precisely with the central crease. This will form a vertical flap. Immediately repeat this action on the left side, folding the left edge inwards until it meets the central crease as well. These folds will contribute to the side walls of your pot.
Ensure these side folds are firm and neat, defining the future perimeter of your pot.
Step 7: Create the Second Bottom Flap
Continuing on the same side, locate the bottom edge of the paper. Fold it upwards once until its edge meets the first set of flaps you created in the previous step. This initial fold begins to close the bottom of the pot. Keeping this fold securely in place, proceed to fold it upwards one more time, aligning this new crease along the edge you just created. This double fold on the reverse side reinforces the base, mirroring the stability from the front and ensuring the pot will be strong enough to hold soil and moisture.
These dual folds provide a robust and enclosed base for your pot.
Step 8: Tuck the Top Flap into the Pocket
Now, carefully release the very last fold you just made. You will notice a flap at the top of the section you were working on. Take this top flap and meticulously tuck it into the pocket that has formed between the layers of newspaper. This action is crucial for locking the structure in place and creating a secure bottom for your pot. Take your time to ensure the flap is fully inserted and lies flat within the pocket, creating a neat and finished edge. This step essentially interlocks the two sides of the pot, preparing it for its three-dimensional shape.
This tucking motion provides a strong, self-securing closure for the base.
Step 9: Reinforce the Top Pointed Flap
With all the folds securely in place, ensure every crease is as crisp and sharp as possible. Now, focus on the top pointed flap. This flap will become part of the pot’s structure. Fold this pointed flap crisply forwards, pressing firmly along the top of the pocket edge you just created. Immediately after, fold it backwards along the same crease. This forward-and-back folding motion is similar to creasing fabric or a thick card. It doesn’t permanently change the position of the flap, but it “trains” the paper, making it more pliable and easier to manipulate in the subsequent steps, which are essential for the pot to take its final three-dimensional form with ease and precision.
This repeated creasing prepares the paper for the final shaping of the pot.
Step 10: Guide the Bottom Shape with a Strategic Crease
Release the pointed flap from the forward-and-back fold. Now, take the very tip of this pointed flap and fold it downwards until it meets the top left corner at the opening of the pocket you created earlier. This fold is unique because you should *only* crease the fold until it meets the opening of the flap, not across the entire width. This partial crease is a subtle yet vital step that guides the newspaper to naturally adopt the square bottom shape of the box. It acts as a memory fold, ensuring that when you expand the pot, the base will form correctly without much effort. Refer to the accompanying photo for a clear visual of how this specific crease should look – it’s often a small, distinct mark that provides significant structural guidance.
This subtle crease is key to forming a perfect square base for your pot.
Step 11: Final Shaping and Ready for Planting!
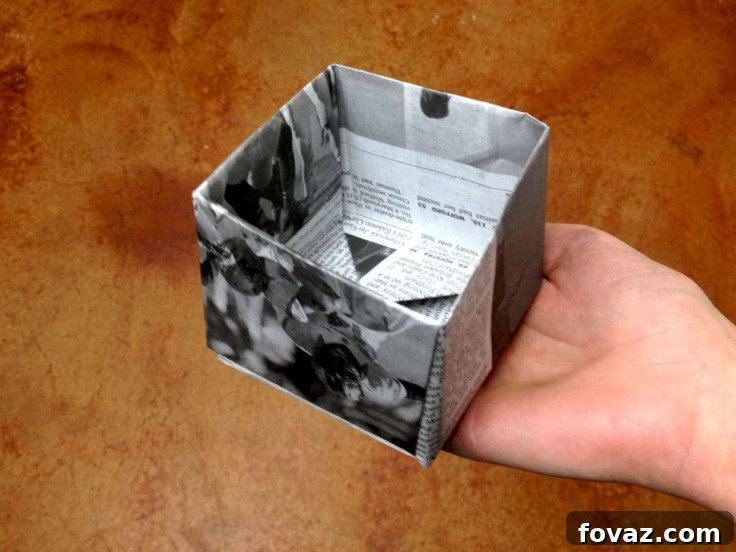
You’re almost there! With all the folds meticulously creased, it’s time to bring your pot to life. Gently grab the sides of the bottom opening, which should now have the guiding crease from the previous step. Slowly and carefully begin to pull these sides in opposite directions. As you do, the pre-creased paper will naturally guide itself, and the box will begin to take its three-dimensional square shape on its own. It’s a truly satisfying moment watching it transform! Once the pot has opened, go back over each edge and press firmly to reinforce all the creases, ensuring they are perfectly crisp and sharp. This final step guarantees the pot maintains its structural integrity when filled with soil. Your sturdy, eco-friendly newspaper planter is now complete and ready for your precious seeds or seed cuttings! Fill it with your preferred seed-starting mix, plant your seeds, and provide them with the care they need to flourish.
Tips for Successful Seed Starting in Newspaper Pots
Making your newspaper pots is just the first step! To ensure your seedlings thrive, here are some essential tips for successful indoor seed starting:
- Use Quality Seed-Starting Mix: Don’t use garden soil. A specialized seed-starting mix is sterile, lightweight, and provides the ideal texture and nutrients for delicate young roots.
- Proper Watering: Newspaper pots can dry out faster than plastic ones. Keep the soil consistently moist but not waterlogged. Water from the bottom by placing your pots in a tray of water, allowing them to wick up moisture.
- Adequate Light: Seedlings need plenty of light to prevent them from becoming leggy. Place them near a bright, south-facing window, or ideally, use grow lights for 14-16 hours a day.
- Maintain Temperature: Most seeds germinate best at specific temperatures, often between 65-75°F (18-24°C). Consider using a seedling heat mat to maintain consistent warmth.
- Air Circulation: Good airflow helps prevent damping-off disease. A small fan set on a low setting can improve circulation.
- Thinning: Once seedlings emerge, thin them to the strongest plant per pot to ensure each has enough space and resources to grow robustly.
- Hardening Off: Before transplanting your newspaper pots outdoors, gradually acclimate your seedlings to outdoor conditions over 7-10 days. This process, called hardening off, involves progressively exposing them to sunlight, wind, and cooler temperatures.
- Planting: When the time comes, simply dig a hole in your garden bed large enough for the entire newspaper pot. Place the pot in the hole, ensuring the top edge is covered with soil to prevent the newspaper from wicking moisture away from the seedling.
By following these guidelines, your newspaper pot-grown seedlings will have the best possible start, leading to a bountiful and beautiful garden.
Loved This Project? Let’s Connect!
We hope you’ve enjoyed learning how to craft these fantastic biodegradable newspaper seed pots. This simple DIY project is a game-changer for eco-conscious gardeners, offering a sustainable, cost-effective, and efficient way to nurture your plants from seed to garden. By embracing recycled materials, you’re not only saving money but also making a positive impact on the environment, one seedling at a time.
If you found this guide helpful and inspiring, we’d love for you to join our growing community of DIY and gardening enthusiasts. Your engagement helps us create more valuable content and connect with fellow green thumbs.
Don’t forget to share your thoughts and experiences in the comments section below! Your feedback is invaluable and encourages us to develop more engaging and useful content like this. We love hearing about your gardening successes and any creative twists you add to our projects. Let us know what other DIY gardening ideas you’d like us to explore next!