
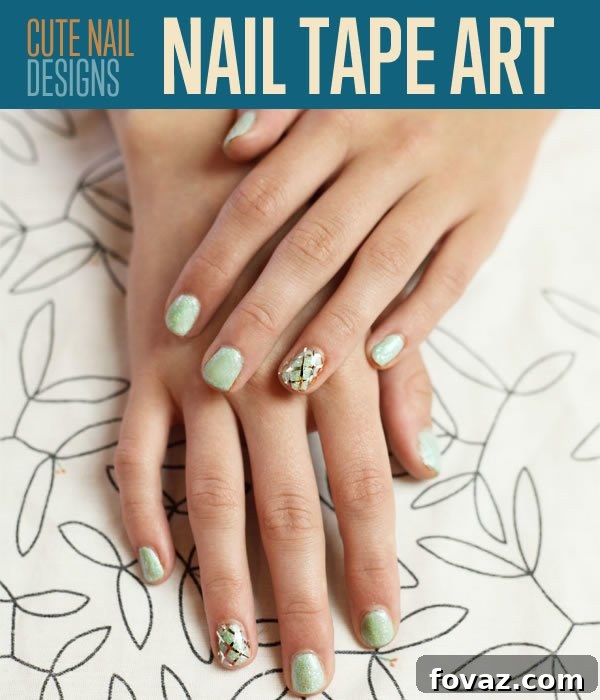
Are you searching for an easy yet captivating way to elevate your nail art game? Look no further! Nail tape is about to become your essential tool for achieving stunning, salon-quality manicures right at home. In this comprehensive guide, we’ll dive into creating a beautiful fishnet-inspired design using metallic nail tape, perfectly complemented by a fresh mint green polish. This combination evokes the enchanting allure of a mermaid, making it an ideal look for summer adventures, beach days, or simply bringing a touch of whimsical sparkle to your everyday style. Prepare to transform your nails from ordinary to extraordinary with this delightful mermaid mani tutorial!
Unlock Creative Nail Designs with Nail Tape: Your Ultimate DIY Guide
Nail tape is a fantastic innovation in the world of DIY nail art, offering unparalleled precision and versatility that can be challenging to achieve with freehand painting. Whether you’re a seasoned nail art enthusiast or a complete beginner, this simple tool opens up a world of geometric patterns, sleek lines, and intricate designs. Our chosen “fishnet” style, reminiscent of shimmering mermaid scales, is not only visually striking but also surprisingly straightforward to create, proving that you don’t need professional skills to achieve professional results.
Supplies Needed for This Enchanting Nail Tape Art Tutorial:
- **Pastel Polish of Your Choosing:** A light, soft hue like mint green or lavender works beautifully for a mermaid-inspired theme. This will serve as your vibrant base color.
- **Glitter Top Coat:** Essential for adding that magical, underwater shimmer and enhancing the mermaid effect. Choose a fine glitter for a subtle sparkle or a chunkier glitter for a bolder statement.
- **Nail Polish Remover:** A must-have for correcting any slips or refreshing your canvas. Even the pros make mistakes!
- **Cotton Balls or Pads:** For applying nail polish remover and keeping your nails clean.
- **Cuticle Scissors:** Small, sharp scissors are crucial for precise trimming of the nail tape.
- **Metallic Nail Tape:** The star of our show! Silver or iridescent tape will give the best “fishnet” or “scale” effect.
- **Tweezers:** Indispensable for handling and positioning the delicate nail tape with accuracy.
- **Clear Top Coat (Optional but Recommended):** While not listed in the original, a good clear top coat is vital for sealing your design and adding long-lasting shine, protecting your beautiful creation.
Before you begin, ensure you have a clean, well-lit workspace. Gathering all your supplies beforehand will make the process smooth and enjoyable, allowing you to fully immerse yourself in the creative flow of crafting your perfect mermaid-inspired nails.
Detailed Instructions for Cute Nail Tape Art: A Step-by-Step Tutorial
Creating captivating nail art with tape doesn’t have to be complicated. Follow these straightforward steps to achieve a stunning, intricate design that looks far more difficult than it actually is.
Step 1: Prepare Your Nails and Apply Your Pastel Base Polish
The foundation of any great manicure is proper preparation. Start by washing your hands thoroughly with soap and water to remove any oils or residues. Use your nail polish remover with a cotton pad to ensure your nails are completely free of old polish. Once your nails are squeaky clean and dry, it’s time to apply your chosen pastel base color.
For an even and smooth application, I recommend starting in the center of the nail, painting long, vertical strokes from the cuticle to the tip. This technique helps distribute the polish evenly and can also aid in faster drying times. Apply two thin coats for opaque coverage, allowing each coat to dry completely before applying the next. Patience at this stage is crucial; a fully dry base coat prevents smudges and ensures a crisp nail tape design. Consider applying a base coat polish first (not included in the original list, but generally good practice) to protect your nails from staining and help your manicure last longer.
Step 2: Add a Dazzling Glitter Top Coat
Now it’s time to bring on the sparkle and truly embrace that mermaid vibe! Once your pastel base polish is completely dry – and I mean *completely* dry – apply a generous layer of your glitter top coat. Think of this as adding the shimmering scales to your mermaid creation. Just like with your base color, aim for an even application, covering the entire nail surface. If you desire a more intense sparkle, you can apply a second thin coat of glitter.
Again, patience is a virtue here. Allow ample drying time before moving on. Rushing this step will lead to messy tape application and potentially lift your beautiful base layers, undoing all your hard work. A good rule of thumb is to wait at least 15-20 minutes, or until the surface feels hard and non-tacky to the touch. This ensures your canvas is perfectly set for the intricate tape work ahead.
Step 3: Strategically Apply the First Nail Tape Strip
With your glitter top coat fully dried, it’s time to prepare for the detailed nail tape application. Here’s a clever tip: a standard scotch tape dispenser can be repurposed to hold your nail tape rolls neatly. This keeps your delicate tape organized and easily accessible, preventing tangles and making the cutting process much smoother.
Begin by cutting a strip of metallic nail tape that is slightly longer than your nail. This extra length provides something to hold onto with your tweezers, making positioning easier. The first line you lay down is perhaps the most critical, as the entire fishnet design relies on its symmetry and angle. Using your tweezers, carefully lay the tape diagonally across your chosen accent nail (we recommend the ring finger for a chic look). Aim for a consistent angle across the nail.
This step might require a few attempts to get it just right, which is precisely why it’s essential for your polish layers to be completely dry. If you make a mistake, gently lift the tape with your tweezers and reposition it. Don’t press down firmly until you are satisfied with the placement. Take your time to ensure this initial stripe is perfectly aligned, as it sets the pattern for the rest of your design.
Step 4: Build Out Your Fishnet Pattern with More Diagonal Stripes
Once your first diagonal strip is perfectly in place, continue building the fishnet pattern by adding more parallel strips above and below it. Remember to keep all these strips going in the same diagonal direction, mirroring the angle of your initial strip. The spacing between each line will determine the “mesh” size of your fishnet design.
For a tighter, more intricate fishnet effect, space your lines closer together. For a bolder, more open pattern, you can place them further apart. I opted for three stripes in total for this specific design, but feel absolutely free to use as many or as few as you like! This is where your creativity truly shines. Use your tweezers to gently press each strip onto the nail, ensuring it adheres well without disturbing the underlying polish. Consistency in spacing is key for a polished, professional look. Don’t be afraid to experiment with different widths or even colors of nail tape for unique variations!
Step 5: Create a Striking Criss-Cross Effect with Opposing Nail Tape
Now that you have your first set of parallel diagonal lines, it’s time to introduce the criss-cross element that truly defines the fishnet or mermaid scale pattern. Move to the opposite side of the nail and begin applying more strips of nail tape, this time in the opposing diagonal direction.
Imagine drawing lines that intersect your first set, creating a grid. Repeat the process from Step 4, carefully aligning your tape from right to left diagonal, ensuring they cross over the previous lines. The goal is to create even diamond or square shapes where the tape intersects. I’ve chosen to use this design as a subtle yet stunning accent on just one or two nails, typically the ring fingers, as it adds a sophisticated focal point without being overwhelming. However, this intricate design would look absolutely fantastic on two, three, or even all five nails for a full, show-stopping manicure! Take your time to ensure each strip is straight and creates a symmetrical pattern with the existing lines. The more precise you are, the more professional your final mermaid nail art will appear.
Step 6: Clean Up Excess Nail Tape and Seal Your Design
Alright, now we address the “hot nail tape mess” that might be extending beyond your nail edges. This is where your precision tools come into play. Using your small cuticle scissors, carefully trim away any unwanted tape that overlaps the edges of your nail. Work slowly and steadily to avoid cutting into your freshly polished nail.
After trimming, use your tweezers to gently remove any tiny leftover pieces of tape and to press down the edges of the tape firmly onto the nail surface. This ensures that the design is flush and secure, preventing any lifting later. The goal is to make sure this beautiful nail art isn’t going anywhere! For an even longer-lasting and glossy finish, I highly recommend applying a good quality clear top coat over your entire design. This crucial step (not explicitly in the original list but implied for a finished look) will seal the tape, protect your art from chipping, and add an incredible shine, making your mermaid nails truly pop. Allow this final top coat to dry completely.
Ta-da! You’ve successfully created a stunning, intricate mermaid fishnet nail design using simple nail tape. The only thing left to do now is grab your swimsuit and head to the beach, little miss mermaid! These dazzling nails are perfect for making a splash this summer.
This DIY nail tape art tutorial is not just about achieving a specific look; it’s about discovering the ease and satisfaction of creating beautiful nail designs yourself. Nail tape offers endless possibilities for geometric patterns, stripes, and accent nails, making it a versatile tool for any nail art enthusiast. With a little practice, you’ll be able to design a myriad of creative looks that reflect your personal style.
Want even more nail designs and nail art ideas to inspire your next manicure? Dive into our site and swim around for a treasure trove of fun, easy, and imaginative beauty tutorials. From intricate patterns to simple elegant touches, we have everything you need to keep your digits looking fabulous all year round. Share your creations with us – we’d love to see your unique take on this mermaid-inspired design or any other nail tape art you dream up! Happy polishing!
Loved This Post? Explore More Creative DIY Nail Art!
Check Out These Related Tutorials:
Unleash your inner artist by learning how to create professional-looking canvas prints from your own cherished photographs. Visit Canvas Factory to transform your memories into stunning wall art.