
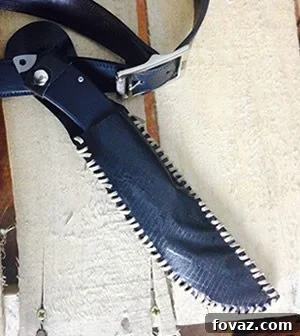
Craft Your Own Durable and Waterproof Duct Tape Knife Sheath
Embark on a unique DIY adventure that transcends typical duct tape crafts. This project introduces an innovative approach to assembling duct tape fabric, utilizing a lacing technique for seams rather than traditional adhesive-only construction. The result is a more refined, distinctive, and exceptionally robust knife sheath that stands apart. While machine sewing duct tape can be challenging due to adhesive residue on needles, this method leverages a thicker lacing material threaded through pre-punched holes, offering superior strength and a professional finish.
Historically, materials like leather have been the go-to for durable sheaths, admired for their aesthetic and resilience. However, leather comes with a higher cost and is less ideal when anticipating exposure to moisture. Duct tape, in stark contrast, offers an unparalleled combination of affordability, exceptional durability, complete waterproofing, and remarkable lightweight properties. These characteristics make it the perfect medium for crafting custom accessories designed to secure and protect a myriad of items, including knives, tools, and more.
Unleash Your Creativity with Duct Tape Fabric
The pattern provided for this knife sheath serves as a fantastic starting point, but the true beauty of this lacing method lies in its boundless possibilities. Once you master this unique sewing technique, you’ll discover that you can apply it to an extensive range of duct tape projects. Imagine recreating virtually any item traditionally sewn from leather or other thick fabrics – from custom wallets and phone cases to utility pouches and decorative items – all crafted with the versatility of duct tape. Explore other examples like the robust belt knife sheath or the festive Christmas stocking made using this same principle. Don’t hesitate to design your own patterns and bring your creative visions to life. If you craft something extraordinary, please share your pictures with us; we’d love to showcase and celebrate your ingenuity within our community!
Materials You Will Need for Your Custom Sheath:
- X-Acto or Utility Knife: Essential for precise, clean cuts, especially for intricate details and strap slots.
- Ruler: Crucial for accurate measurements and ensuring straight cuts, contributing to a professional finish.
- Non-stick Cutting Mat: Protects your work surface and provides a stable base for cutting duct tape without damaging your table.
- Printed Pattern: Download our specially designed pattern from our website, or confidently use a pattern of your own creation.
- (1) Duct Tape Sheet – 8.5 x 11 inches: The fundamental material for your sheath. Choose your preferred color and ensure it’s well-constructed for maximum durability.
- Scissors: For general cutting, especially when preparing your pattern pieces and initial shaping.
- Double-Sided Tape: Used to temporarily secure the paper pattern to your duct tape sheet before cutting, preventing shifting.
- Hole Punch (1/8 inch or Leather Punch Preferred): A key tool for creating clean, uniform holes for lacing. A leather punch offers superior performance on thicker duct tape.
- 2 Yards Craft Lacing, Leather Cord, or Other Type of Cording: The material that forms the strong, decorative seams of your sheath. Choose a cord that complements your duct tape.
- Rivet: For securely attaching the retention strap to the main body of the sheath, providing robust structural integrity.
- Snap Set: (Includes the two snap components and a setting tool, often with a small hammer if you don’t own one) – Essential for the retention strap to keep your knife securely in place.
- Hammer: Necessary for setting both the rivet and the snap components firmly in place.
Detailed Instructions: How to Craft Your Duct Tape Knife Sheath
Follow these comprehensive steps to construct a high-quality, custom duct tape knife sheath. Precision and attention to detail will ensure a durable and aesthetically pleasing result.
1. Prepare Your Pattern for Precision Cutting:
Begin by downloading and printing our specially designed knife sheath pattern .pdf file. This pattern is meticulously crafted to ensure a perfect fit for a standard utility knife, but the principles can be adapted for any blade. Access the pattern here: knife holster pattern .pdf. A well-printed pattern is the foundation for a well-made sheath.
2. Construct Your Durable Duct Tape Sheet:
The integrity of your sheath depends heavily on the quality of your duct tape sheet. Create an 8.5×11 inch duct tape sheet in the color of your choice. For enhanced durability and rigidity, especially crucial for a knife sheath, consider adding a third layer of tape to your sheet. If you’re new to making duct tape sheets or need a refresher on the technique, our detailed Duct Tape 101 tutorial is available by clicking here. This foundational step ensures your sheath will withstand the rigors of use.
For a visual guide, watch our comprehensive video tutorial on how to construct perfect Duct Tape Sheets:
3. Position and Secure the Pattern Pieces:
Carefully cut out the individual pieces from your printed pattern. When cutting, leave a small white border around each piece; this makes them easier to handle and position. Using double-sided tape, gently secure these pattern pieces onto your prepared duct tape sheet. It’s advisable to place the largest piece first, ensuring it fits efficiently on the sheet, and then arrange the smaller components, making sure all pieces fit without overlapping or wasting material before permanently taping them down.
4. Achieve Precise Cuts for Sheath Components:
With the patterns securely taped, use your sharp scissors to meticulously cut along the black lines of each pattern piece. This step simultaneously cuts through both the paper pattern and the duct tape sheet. Upon completion, you should have three distinct duct tape pieces that will form your knife sheath: the larger back piece, the slightly smaller front piece, and a small, rectangular strap piece.
5. Punching Uniform Lacing Holes:
This step is crucial for the aesthetic and structural integrity of your sheath. Using your hole punch (a 1/8 inch or leather punch is recommended for clean results), carefully punch through each designated dot on the pattern. Strive for consistent, even spacing to match the pattern, as this will result in a neat and professional lacing seam. Continue this process until all holes are punched through both the main back and front pieces of your sheath.
6. Cutting the Retention Strap Slots:
Locate the two parallel lines on the pattern, positioned between two circles, near the top of the largest sheath piece. Use your X-Acto or utility knife to carefully cut along these two lines. These cuts will create slots through which the retention strap will pass, securing the knife within the sheath.
7. Attaching the Retention Strap with a Rivet:
Now, gather your rivet, snap components, and the third, small strap piece you cut earlier. This strap is vital for securing the knife. Thread the stem of the rivet through the designated holes on both the strap and the main sheath body. Position the rivet firmly, then use your hammer to securely set it, attaching the small strap piece to the holster. Ensure it’s tightly fastened to prevent slippage.
8. Installing the Snap Mechanism on the Strap:
With the rivet in place, it’s time to install the snap on the retention strap. Position the first snap component (the cap, usually the shiny front piece) on the front side of the strap, and its corresponding back piece on the reverse side. Before hammering, gently press them together to ensure they align and close properly. Once satisfied with the alignment, use your hammer to firmly set each snap component in place. Repeat this for the other side of the snap on the main sheath body, ensuring the snap components will engage perfectly when the strap is closed.
9. Aligning Sheath Pieces for Lacing:
Carefully align the two large sheath pieces – the front and back – ensuring that the punched holes are in close proximity to each other. It’s important to note that they won’t align perfectly flush; the back piece is typically designed to be slightly larger than the front, allowing adequate room for your knife to sit comfortably and securely inside the finished sheath. The largest piece forms the back of the sheath, and the slightly smaller piece forms the front.
10. Preparing Your Lacing Cord:
Measure your craft lacing or cord to the appropriate length; approximately 2 yards should be sufficient, but adjust as necessary based on the size of your sheath. Tie a secure knot very close to one end of the lacing. This knot will act as an anchor point and will remain discreetly on the back side of the sheath.
11. Initiating the Lacing Process:
Begin the lacing by threading the unknotted end of your cord through the top-most pair of aligned holes, pulling it from the back side of the sheath to the front. The knot you tied will prevent the lacing from pulling through completely, securing your starting point. This technique ensures a clean finish on the visible side of your sheath.
12. Executing the Continuous Lacing Stitch:
Now, proceed with the lacing process. Guide the cord from the top to the bottom, then loop it back around the side, bringing it up to the next pair of holes towards the top. This consistent “over-and-under” motion will create a beautiful, uniform edge of stitching along the entire perimeter of your sheath. Maintain consistent tension for a professional and tidy appearance.
13. Securing and Finishing the Lacing:
Continue the lacing pattern until you have worked your way around the entire perimeter of the sheath. Once you reach the last punched hole, tie another secure knot on the backside of the sheath, making sure it’s as close to the sheath’s edge as possible for a snug fit. Trim any excess lacing cleanly from the end, leaving a neat and finished appearance.
14. Your Sheath is Complete and Ready:
Congratulations! Your custom-crafted duct tape knife sheath is now finished and ready for use. Insert your knife, secure the retention strap, and admire your handiwork. This durable, waterproof, and lightweight sheath is perfect for protecting your blade whether you’re camping, hiking, or just need a reliable storage solution.
Watch Our Exclusive Video Tutorial for This Project!
For those who prefer visual guidance, we’ve prepared a comprehensive video tutorial demonstrating every step of crafting your very own duct tape knife sheath. This video complements the written instructions perfectly, offering insights and tips to ensure your project is a resounding success.
How to Make a Duct Tape Knife Sheath
Customization and Creative Expansion:
The beauty of crafting with duct tape lies in its immense versatility. Don’t limit yourself to just one color or texture; experiment with different patterns, camouflage designs, or even metallic duct tapes to personalize your sheath further. Consider adding extra pockets for small tools or fire starters, or integrate a belt loop for convenient carrying. This lacing technique can be scaled up or down for other projects – think custom tool rolls, durable pouches, or even unique footwear. Your imagination is the only limit when working with duct tape fabric.
Care and Maintenance for Your Duct Tape Sheath:
One of the many advantages of a duct tape sheath is its minimal maintenance. Being waterproof, it can be easily wiped clean with a damp cloth if it gets dirty. Avoid prolonged exposure to extreme heat, as this can affect the adhesive properties of the tape. With proper care, your handmade duct tape knife sheath will serve you reliably for a long time, protecting your blade through countless adventures.
Loved This DIY Project? Connect with Us!
If you enjoyed crafting your duct tape knife sheath, please show your support by liking us on Facebook! (Button below) Stay connected to be the first to receive updates on our latest projects, innovative DIY articles, and exclusive crafting tips.
Don’t forget to Pin It! Save this fantastic project to your Pinterest boards so you can easily return to it whenever inspiration strikes. Plus, follow us on Pinterest to discover a continuous stream of fresh, inspiring DIY project pins.
We value your thoughts and feedback! Please share your experiences, ask questions, or offer suggestions in the comments section below. Your engagement directly influences the content we create, so the more interest we see in a post, the more likely we are to develop similar exciting projects for you.
Discover more exciting Duct Tape Projects from our collection:
Master the Craft: How To Make A Durable Duct Tape Tool Belt
Festive Fun: How To Make A Unique Duct Tape Stocking