
The Ultimate Guide to Drying Herbs: Preserve Your Garden’s Bounty Year-Round
If you’re a proud owner of an herb garden, maximizing its potential means more than just fresh-picked flavors during growing season. Learning how to dry herbs is an incredibly rewarding and straightforward process that allows you to extend the joy of your harvest throughout the entire year. Imagine having a pantry stocked with aromatic basil, potent rosemary, and vibrant oregano, all grown by your own hands. This comprehensive guide will walk you through the simplest yet most effective method for preserving your culinary treasures: air drying. Get ready to transform your garden’s abundance into a lasting supply of flavor!
Why Dry Herbs? The Benefits of Preserving Your Harvest
Drying herbs is more than just a traditional preservation technique; it’s a smart and sustainable practice that offers numerous advantages for any home cook or gardener:
- Year-Round Enjoyment: The most obvious benefit is having access to your favorite herbs long after their growing season has ended. No more sacrificing fresh flavor during colder months.
- Intensified Flavor: While fresh herbs boast a bright, lively taste, drying often concentrates their essential oils, leading to a more potent and sometimes different flavor profile that excels in slow-cooked dishes, stews, and roasts.
- Cost Savings: Store-bought dried herbs can be expensive, and their quality often pales in comparison to homemade. Drying your own eliminates this recurring expense and ensures superior taste.
- Reduced Waste: When your garden produces an abundance of herbs, drying is an excellent way to prevent spoilage and make the most of your hard work, ensuring every sprig finds a purpose.
- Self-Sufficiency and Satisfaction: There’s immense satisfaction in using ingredients you’ve grown and preserved yourself. It connects you more deeply to your food and fosters a sense of accomplishment in the kitchen.
- Healthy Cooking: Having a readily available supply of dried herbs encourages healthier cooking by allowing you to season dishes with natural flavors instead of relying on processed seasonings with added salts or artificial ingredients.
Choosing the Best Herbs for Drying
While many herbs can be dried, some varieties are particularly well-suited for air drying due to their lower moisture content and robust structure. These include:
- Rosemary: Its woody stems and needle-like leaves air dry beautifully, retaining much of their fragrant, piney flavor.
- Thyme: Small leaves on delicate stems dry quickly and maintain their earthy notes.
- Oregano: Known for its strong, pungent flavor, oregano intensifies wonderfully when dried.
- Sage: Its velvety leaves dry well, offering a musky, earthy aroma perfect for poultry and stuffings.
- Bay Leaves: Fresh bay leaves can be air-dried to create a long-lasting supply for soups and stews.
- Marjoram: A close cousin to oregano, marjoram provides a sweeter, milder flavor when dried.
- Lavender: While often used for its aromatic qualities, culinary lavender also dries well for teas and baked goods.
Herbs with higher moisture content, like basil, mint, and cilantro, can also be air-dried but may require more careful monitoring to prevent mold. However, these are often better preserved by freezing or using a dehydrator if you want to retain their brightest green color and freshest flavor.
Preparation is Key: Harvesting Your Herbs for Optimal Drying
The success of your dried herbs begins with proper harvesting. Timing and technique play crucial roles in preserving the essential oils that give herbs their distinctive flavors and aromas.
1. Timing Your Harvest
The best time to harvest most herbs for drying is in the mid-morning, just after the morning dew has evaporated but before the intense midday sun has begun to deplete the herbs’ precious essential oils. This ensures the highest concentration of flavor and aroma. Avoid harvesting immediately after rain, as excess moisture can hinder the drying process and encourage mold.
2. Selecting Healthy Specimens
Choose healthy, vibrant sprigs that are free from pests, diseases, or any visible damage. Trim off any yellowed or wilting leaves. Focus on harvesting the leafy parts of the plant, as flowers or woody stems might dry differently and impact the overall quality.
3. To Wash or Not to Wash?
This is a common question among herb drying enthusiasts:
- For Garden-Grown Herbs: If your herbs come straight from a clean, organic garden and are free of pesticides, it’s often best to avoid washing them. Rinsing can remove some of the delicate essential oils that contribute to their flavor. Instead, gently shake the bundles to dislodge any dirt, dust, or tiny insects.
- For Store-Bought Herbs: If you’re drying herbs purchased from a grocery store, a careful wash is recommended. Rinse them gently under cool water, then lay them out on a clean towel or paper towels to pat them thoroughly dry. Ensure there is absolutely no surface moisture remaining before proceeding with the drying process, as residual water is the primary cause of mold.
Method 1: Air Drying Herbs – The Simplest and Most Flavorful Way
Air drying is arguably the easiest and most traditional method for preserving herbs. While it requires a bit of patience, the result is a clean, pure flavor that often surpasses other methods.
Step 1: Create Small Bundles
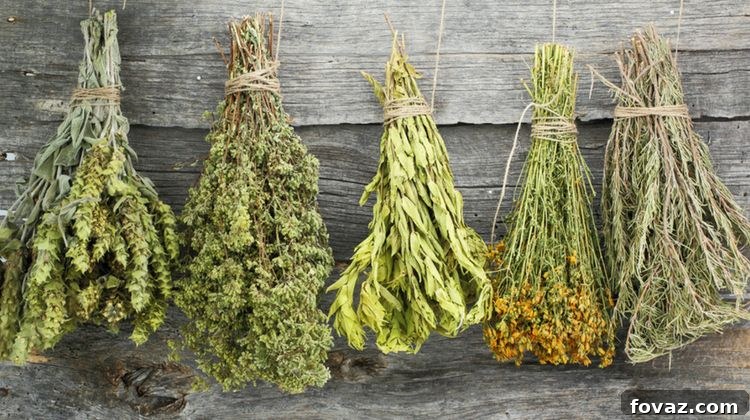
After preparing your herbs, gather small handfuls (about 5-10 sprigs, depending on the herb’s density) into bundles. Use natural twine, rubber bands, or twist ties to secure the stems tightly. It’s crucial to make small bundles to ensure adequate air circulation between the sprigs, which is vital for preventing mold. Leave an extra length of twine or tie material at the end for easy hanging.
Step 2: Find the Ideal Drying Location
Choosing the right spot for hanging your herb bundles is paramount to successful air drying. Look for a location that is:
- Well-Ventilated: Good airflow is essential to whisk away moisture. Stagnant air can lead to mold and mildew.
- Warm: A consistent temperature, ideally between 68-75°F (20-24°C), helps speed up the drying process.
- Dark or Indirect Light: Direct sunlight can bleach the color out of your herbs and degrade their essential oils, diminishing their flavor and potency. A pantry, attic, unused closet, or a room with indirect light is perfect.
- Dry: Avoid excessively humid environments, such as kitchens where steaming regularly occurs. Low humidity is your friend when drying herbs.
Many people utilize a clothesline, a drying rack, or even simple hooks in their chosen drying space. Consider this inspiring example of a vertical herb garden, which not only provides fresh herbs but could also be adapted for air drying small batches in a well-ventilated space:
“Vertical herb garden. #bdc #barnetsondesignco #handmade #diyprojects #woodprojects #vinyldecals #vinylsigns #herbgarden #madewithlove” || What a great way to grow your herbs and save up on space at the same time! Awesome idea, crafter! Tag us with #diyprojects to get featured! || 📷: @barnetsondesignco
A post shared by DIY Projects (@diyprojectsdotcom) on
Step 3: Protect Your Drying Herbs
Once hung, your herbs will be exposed to the elements of your chosen drying space. To protect them from dust, circulating kitchen debris, and potential insect visitors, consider gently wrapping your herb bundles in paper bags. Punch several holes in the paper bag to maintain crucial airflow. This method, as demonstrated by Vegetable Gardener, not only keeps them clean but also helps shield them from any ambient light that might degrade their color or flavor. Alternatively, you can use fine mesh bags or screens.
Step 4: Monitor and Test for Dryness
Air drying typically takes anywhere from 1 to 2 weeks, though some herbs or very humid conditions might require longer. The key is patience. You’ll know your herb bundles are completely dry when the leaves are brittle, crumbly, and easily separate from their stems when touched. They should rustle and feel crisp, rather than pliable or leathery. If there’s any softness or moisture remaining, continue drying to prevent mold growth during storage.
Step 5: Store Your Dried Herbs Correctly
Once your herbs are perfectly dry, carefully remove the paper bags (if used) and proceed with storage. Gently strip the dry leaves from their stems. You can either leave the leaves whole or lightly crush them before storing. Storing them whole helps preserve their essential oils and flavor for a longer period, while crushing them releases more immediate aroma but may reduce their shelf life slightly.
Transfer your dried herbs into airtight containers, such as glass jars with tight-fitting lids. Dark glass jars are ideal as they protect the herbs from light, which can degrade their quality. Label each jar with the herb name and the date it was dried. Store these jars in a cool, dark, and dry pantry or cabinet. Properly stored, most dried herbs will maintain their quality and potency for about 6 months to a year. Beyond that, they won’t necessarily spoil, but their flavor will gradually diminish.
Other Methods for Drying Herbs (Brief Overview)
While air drying is fantastic for many herbs, other methods offer quicker results or are better suited for specific varieties:
- Dehydrator Drying: An electric food dehydrator provides controlled heat and airflow, making it a fast and efficient method for drying a wide variety of herbs, especially those with higher moisture content like basil.
- Oven Drying: If you don’t have a dehydrator, your oven can be used on its lowest temperature setting (usually around 100-150°F or 40-65°C) with the door slightly ajar to allow moisture to escape. This method requires careful monitoring to prevent scorching.
- Microwave Drying: For small batches and quick drying, the microwave can be used, but it’s often debated whether it truly preserves flavor as well as other methods. Herbs are placed between paper towels and microwaved in short bursts until crisp.
Want another method on how to dry herbs? Check out this video from eHow:
The Many Uses of Your Homemade Dried Herbs
Once you have a collection of your own dried herbs, the possibilities are endless! Here are just a few ways to incorporate them into your daily life:
- Culinary Delights: Enhance your cooking by adding them to soups, stews, sauces, roasts, marinades, salad dressings, and bread. Remember that dried herbs are more concentrated than fresh, so use about one-third of the amount called for in recipes that specify fresh herbs.
- Aromatic Teas: Many dried herbs, such as mint, chamomile, and lemon balm, make wonderful soothing or invigorating herbal teas.
- Homemade Seasoning Blends: Create your own custom spice blends for rubs, poultry seasoning, Italian seasoning, or herbes de Provence.
- Gifts from the Garden: Package your beautifully dried herbs in decorative jars for thoughtful, handmade gifts.
- Potpourri and Sachets: Use fragrant dried herbs like lavender, rose petals, and mint to create delightful potpourri or sachets for your home, drawers, or linen closets.
- Infused Oils and Vinegars: While often done with fresh herbs, some dried herbs can also be used to infuse oils and vinegars, adding depth to your culinary creations.
Pro Tips for Successful Herb Drying
- Patience is a Virtue: Don’t rush the drying process. Incomplete drying is the fastest way to end up with moldy herbs.
- Observe and Adjust: Pay attention to your drying environment. If humidity rises, consider moving herbs or adding a fan.
- Experiment: Different herbs behave differently. Try various methods and note what works best for each type you grow.
- Label Everything: It’s easy to forget which herb is which once dried, especially if you have several similar-looking varieties.
- Store in Bulk for Best Flavor: If possible, store leaves whole and crush them just before use. This helps to lock in their volatile oils.
That’s it for how to dry herbs, folks! Now that you’ve learned this simple yet effective method, you can enjoy adding the rich, concentrated flavors of your homegrown dried herbs to your favorite recipes any time of the year. Not only will you elevate your cooking, but you’ll also savor the satisfaction of culinary self-sufficiency.
Will you try drying your own herbs this season? Let us know your experiences or favorite herbs to dry in the comments section below!
Up Next: 7 DIY Greenhouse Ideas That Are Gardening Gold
Stay connected with us on Facebook, Twitter, Pinterest, and Instagram!
Editor’s Note – This post was originally published in June 2014 and has been updated for quality and relevancy.