
Unlock the secret to effortless fire-starting with this ingenious DIY project! Perfect for a cozy evening indoors, a rainy camping trip, or an unexpected power outage, these homemade fire starters are incredibly effective and surprisingly simple to make. All you need are three readily available items: a paper egg carton, some leftover wax, and a handful of dryer lint. In just about an hour from start to finish – with only around 10 minutes of active work – you can create a batch of reliable fire starters that will light up your life, quite literally.
RELATED: How To Build A DIY Firewood Rack for Your Outdoor Adventures
Mastering the Art: How to Make Fire Starters Using Egg Cartons
Imagine having the power to ignite a roaring fire with minimal effort, even when conditions are challenging. This guide will show you how to create highly efficient fire starters that leverage the unexpected potential of dryer lint and recycled wax. While your wax cools, you can feel a sense of accomplishment, knowing you’re preparing for future adventures or emergencies. These little marvels don’t just work well; they light up with an impressive flame that will make you wonder why you hadn’t tried this sooner. Be sure to stick around for the surprising burn test results at the end of this article – you won’t believe how effective they are!
The Unbeatable Advantage: Why Craft Your Own Fire Starters?
There are countless reasons why having a stash of reliable fire starters is a game-changer. Picture this: you’re camping, and an unexpected rain shower leaves your kindling damp and uncooperative. Or perhaps you’re facing a power outage, and the chill in the air calls for a comforting fireplace glow. In such moments, relying on matches alone or struggling with damp twigs can be frustrating. That’s where these egg carton fire starters shine.
During a recent camping trip, I found myself in just such a predicament, battling high humidity and persistent rain. Thanks to a few of these homemade fire starters tucked away in my bag, I had a crackling fire going in no time. They perform significantly better than a handful of kindling or a single match; the unique combination of wax and dryer lint creates a sustained, potent flame that gives your fire the boost it needs to truly take hold. Not only are they incredibly effective, but they’re also a cost-effective and environmentally friendly way to repurpose common household waste. Plus, the satisfaction of creating something so useful with your own hands is truly rewarding. I conducted a thorough burn test to demonstrate their efficiency; keep reading to discover just how long these little powerhouses stay lit!
Essential Materials: What You’ll Need to Get Started
Gathering your materials is the first and easiest step in this exciting DIY project. The beauty of these fire starters lies in their use of everyday items, many of which you likely already have lying around your home. Here’s a detailed look at what you’ll need:
- Dryer Lint: This might just be the most surprising hero of this project! Dryer lint is the fibrous material that collects in your dryer’s lint trap after each cycle. It’s highly flammable due to its composition of tiny fabric fibers, dust, and pet hair, making it an excellent base for a fire starter. Any variety or color of lint will do; just make sure it’s dry. Start collecting it now – you’ll be amazed at how quickly it accumulates.
- Paper Egg Carton: The humble egg carton transforms into the perfect mold for your fire starters. It’s crucial that you use the kind made from pressed paper pulp – the biodegradable, often grayish, cardboard-like material. Avoid styrofoam or plastic egg containers, as these materials release toxic fumes when burned and won’t absorb the wax properly. The size of the carton doesn’t matter; whether it holds a dozen eggs, 18, or more, each individual cup will become a potent fire starter.
- Wax: Wax acts as the binding agent and fuel extender for your lint. We highly recommend using wax from old, burned-down candles. This is a fantastic way to recycle and give new life to items that would otherwise be discarded. Simply collect the remnants from used candles, whether they are in jars or freestanding pillars. If you don’t have old candles, you can purchase paraffin wax flakes or beeswax from craft stores or online.
Pro Tip:
For this project, buying large, inexpensive pillar candles specifically for their wax can be more cost-effective if you don’t have old candles on hand. The wax does not need to be food-grade. Another clever option is to use leftover broken crayons – especially those restaurant crayons that often end up neglected. Crayons are essentially colored wax, and they work wonderfully for this purpose, adding a fun pop of color to your fire starters!
Step 1: The Preparatory Phase – Eggs, Laundry, and Lint Collection
Before you dive into the crafting, a little preparation goes a long way. First, ensure your paper egg carton is empty and clean. Set it aside, ready to be filled. The next task is to gather your dryer lint. This means it’s time to tackle that laundry pile! Every load of laundry contributes to your supply, so cleaning out your dryer’s lint trap becomes a productive part of this project. I simply accumulated my lint in a small pile or bag until I felt I had enough to fill an egg carton – which surprisingly doesn’t take long at all, especially if you do a few loads of laundry. Finally, a practical reason to look forward to doing laundry! It’s amazing how a simple DIY goal can transform mundane chores into exciting steps towards a fun outcome.
Step 2: Expertly Stuffing the Dryer Lint into Your Egg Carton
With your materials ready, it’s time to assemble the core of your fire starters. Take handfuls of your collected dryer lint and gently stuff them into each individual cup of the paper egg carton. The key here is not to pack the lint too tightly. You want it to be snug but still allow for some air pockets. The reason for this specific density is crucial for optimal performance: if the lint is too compressed, the melted wax won’t be able to fully penetrate and saturate the fibers. Conversely, if it’s too loose, it might not hold together well. A moderate, fluffy stuffing ensures that the wax can seep through, thoroughly coating the lint and creating a highly flammable, long-burning fire starter.
Step 3: The Art of Melting Wax – Safety First!
Melting wax requires care and attention to safety. The safest and most recommended method is to use a double boiler. Here’s how to set it up: Find a pot (preferably one you don’t mind getting a little messy, though it should clean up easily) and fill it with about 1-2 inches of water. Next, you’ll need a smaller, heat-safe container that can sit inside the pot without touching the bottom and with room around it for the water to boil. An old, clean soup can or a sturdy mason jar works perfectly for this. Place your wax into this inner container, then place the container into the pot of water. Bring the water to a gentle simmer over medium heat. As the water heats up, it will gradually and safely melt the wax inside the inner container without direct exposure to flame, preventing scorching or potential fire hazards.
Here’s a fantastic trick if you’re using old jar candles: you can often place the entire candle jar (if it’s heat-safe and not cracked) directly into the pot of water to melt the remaining wax. This saves you the effort of scraping wax out of glass containers. Alternatively, if you have loose wax chunks or crayon pieces, simply put them into your soup can or mason jar before placing it in the double boiler. You might need to melt several candles or batches of wax, depending on the size of your egg carton and the amount of wax you have available. This method is far easier and safer than trying to directly heat the wax in a pan, which can lead to overheating or fire. One way or another, you should end up with a beautiful pool of smooth, melted liquid wax, ready for the next step.
Step 4: The Critical Pour – Saturating Your Dryer Lint Babies
Once your wax is fully melted and smoothly liquid, it’s time for the pivotal step: pouring. Exercise extreme caution, as the wax and the container will be very hot. Always use a thick oven mitt or wrap a sturdy dish towel around the can or jar to protect your hands from burns. I found that wrapping a towel around the can provided an excellent grip and insulation.
Before you start pouring, prepare your work surface. Place your egg carton on something that can catch any potential wax drips or leaks. Waxed paper, aluminum foil, or a piece of old cardboard are ideal choices. The paper egg carton is absorbent, and some wax will inevitably seep through the bottom, so being prepared will save you from a waxy mess. Begin by carefully pouring a small amount of melted wax into each lint-filled egg cup. This initial pour ensures that you have enough wax to cover all your “dryer lint babies” evenly. Once you’ve distributed the first round, go back and add more wax as needed, aiming to fully saturate the lint without completely drowning it. The goal is for the lint to be thoroughly coated and embedded in the wax. When you’re satisfied that all the lint is adequately soaked, set your egg carton aside in a safe place and allow your newly formed fire starters to cool and harden completely.
RELATED: Discover More About Making Waterproof Fire Starters
Step 5: The Virtue of Patience – Letting Your Homemade Fire Starters Cool
This might be the hardest step for the impatient crafter, and I confess, I was certainly eager to see the finished product! However, patience is truly a virtue here. You must allow the wax to cool and solidify completely before attempting the next step. Seriously, resist the urge to rush. Give your fire starters at least 45 minutes, or even an hour, to fully harden. If you try to cut them apart while the wax is still warm or soft, you’ll end up with a sticky, waxy mess on your scissors, making the process frustrating and inefficient. Trust me on this one – a little waiting will save you a lot of trouble and ensure clean, perfectly formed fire starters.
Step 6: Separation and Storage – Preparing for Action
Once your fire starters are thoroughly cooled and the wax is rock-hard, you have a couple of options for their final preparation and storage. You can choose to leave them all together in the original egg carton shape, tearing off one section at a time as needed. This can be convenient for storage if you have space. Alternatively, and often preferred for portability and ease of use, you can cut or tear each individual fire starter apart. This will give you a collection of distinct, compact units. A sturdy pair of scissors works well for cutting the paper carton and wax, especially if they are completely cool. The finished product should look like neat, wax-infused lint nuggets, each ready to perform its duty.
It’s important to note that these fire starters, due to their wax content, won’t ignite with a mere spark. You’ll need a reliable flame source, such as matches or a lighter, to get them burning. Make sure to store them alongside your fire-starting tools. They are incredibly versatile for emergency preparedness: throw a few into your camping kit, your car emergency kit, your bug-out bag, or any other kit that includes matches or a lighter. In our rigorous fire test, one of these little wonders burned for an impressive 17 minutes, producing a robust and steady flame – more than sufficient for even novice fire builders to get their kindling roaring!
Step 7: The Moment of Truth – Lighting Your Fire Starters Outdoors
Now comes the exciting part: putting your homemade fire starters to use! When you’re ready to start a fire outdoors, choose your location wisely. It’s always best practice to light your kindling and fire starter on a non-flammable surface, such as sand, dirt, or a designated fire pit, rather than directly on grass or other potentially damaging ground cover. This prevents scorching your lawn and reduces the risk of unintended spread.
To use, simply place one of your fire starters directly under your carefully arranged kindling or small pieces of wood. Light the wax-soaked lint with a match or lighter. The combination of wax and lint provides a long-lasting, intense flame that will quickly catch your kindling. Combustion typically lasts for well over 10 minutes, and the flame can grow surprisingly high, so always maintain a safe distance and never leave your fire unattended. Watch as your fire starter expertly coaxes the larger wood into a vibrant, warming blaze.
The final product, when ignited, creates an astonishingly large and sustained flame:
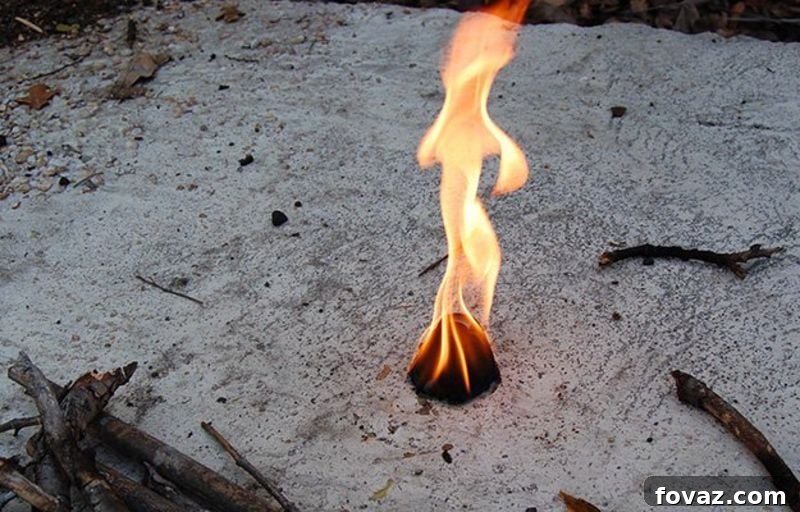
The flame reached an impressive size here, truly showcasing how effectively the combination of wax and dryer lint works. Its robust and consistent burn is absolutely perfect for getting any fire started quickly and efficiently. Anyone else feel like tackling their laundry now? 😉
For even more innovative fire starter ideas you can craft at home, watch this inspiring video from Specific Love Creations:
This project is a fantastic endeavor for outdoor enthusiasts, campers, and anyone who appreciates preparedness or simply enjoys the warmth of a good fire. With these simple, readily available items from around your house, you can whip up a batch of these DIY fire starters in no time, ensuring you’re ready for your next bonfire, backyard BBQ, or an unexpected chilly evening. Not only will you have a reliable fire-starting aid, but you’ll also gain the satisfaction of transforming waste into something incredibly useful.
Now that you possess the knowledge of how to create powerful fire starters from scratch, we’re eager to hear about your experience! Share your crafting journey and any tips you discover in the comment section below.
Up Next, Explore More Fire-Related DIY Inspiration:
- 11 Fireplace Front Ideas For A Cozy & Homey Upgraded Look
- Simple Mini Fire Pit Ideas Perfect For Your Small Yard
- Fun Fall DIY! Make Your Own Rustic Candle Sconces
Calling all crafting DIYhards, DIY Projects needs YOU! Click here if you want to write for us.
Don’t forget to stay connected with us on Facebook, Twitter, and Instagram for more inspiring DIY ideas!
Editor’s Note: This post was originally published on May 17, 2018, and has been updated for quality, relevancy, and comprehensiveness to provide the best possible experience for our readers.