
Transforming a dream into reality is always a rewarding endeavor, especially when it involves creating a central hub for entertainment and relaxation in your own home. Imagine a beautiful, rustic bar where you can unwind after a long day or host memorable gatherings with loved ones. This comprehensive, step-by-step guide will walk you through the exciting process of building your very own wood pallet bar, allowing you to craft a unique and functional piece of furniture that reflects your style and passion for DIY.
A DIY pallet bar is more than just a piece of furniture; it’s a statement. It embodies sustainability, creativity, and the satisfaction of building something with your own hands. Pallets, often discarded, are a readily available and inexpensive resource that can be repurposed into stunning and durable structures. Whether you envision a cozy indoor bar for intimate evenings or a vibrant outdoor bar perfect for summer barbecues, this project offers immense flexibility and a rewarding experience for any DIY enthusiast.
RELATED: 18 Clever DIY Wood Pallet Projects You Can Do Now
Unlock Your Inner Craftsman: A Detailed Guide to Building Your Custom Wood Pallet Bar
Building a wood pallet bar is a project that combines practical woodworking skills with creative design. This guide is structured to ensure a smooth and enjoyable building process, from selecting the right materials to adding the final decorative touches. Get ready to embark on a journey that culminates in a personalized entertainment space that will be the envy of your friends and family.
Essential Materials & Tools for Your Pallet Bar Project:
Before you begin cutting and assembling, gather all the necessary tools and materials. Having everything on hand will streamline your workflow and prevent unnecessary interruptions.
- Pallets: The foundation of your bar. Aim for heat-treated (HT stamped) pallets, free from severe damage or chemical stains. You’ll likely need 3-5 standard-sized pallets, depending on your desired bar dimensions.
- Tape Measure: Crucial for accurate measurements, ensuring all your cuts and assemblies fit perfectly.
- Pen or Pencil: For marking cut lines and drilling points on your wood.
- Miter Saw: Essential for making precise, clean, and angled cuts, ensuring a professional finish for your frame and other components. A circular saw or jigsaw can also work, but a miter saw offers superior accuracy for framing.
- Drill: For pre-drilling pilot holes (to prevent wood splitting) and driving wood screws efficiently.
- Wood Screws: A variety of lengths will be useful. Opt for exterior-grade screws if your bar will be outdoors, ensuring resistance to rust and weather.
- LED Strip Lights: An optional but highly recommended addition for creating ambiance and highlighting your bar.
- Sander (Orbital or Belt): For smoothing rough surfaces and preparing the wood for finishing. Various grit sandpaper (e.g., 80-grit for initial shaping, 120-grit for general smoothing, 220-grit for fine finishing).
- Safety Gear: Gloves, safety glasses, and hearing protection are crucial when working with power tools and raw wood.
- Pry Bar and Hammer: If you need to disassemble pallets, these tools will be indispensable.
- Wood Glue: For extra strong joints, especially on critical structural components.
- Wood Filler/Putty: To fill gaps, nail holes, or imperfections for a smoother finish.
- Stain, Varnish, or Paint: To protect and beautify your bar. Choose a durable, waterproof finish, especially for outdoor use.
- Chipboard or Plywood: For the bar top and shelves. Plywood is generally more durable and water-resistant, making it ideal for outdoor bars.
Step 1: Sourcing, Selecting, and Preparing Your Pallets
The success of your pallet bar project begins with the right foundation: your pallets. This initial step is paramount for both the aesthetics and safety of your finished bar.
Start by carefully sourcing your pallets. While many businesses give them away for free, it’s crucial to select them wisely. Look for pallets stamped with “HT,” which signifies they have been heat-treated to prevent pests, rather than chemically treated (which might be marked “MB” for methyl bromide – these should be avoided for indoor furniture due to potential chemical residue). Thoroughly inspect each pallet for structural integrity. The slices of wood should be relatively neat, and the wood should be of good quality, free from excessive rot, mold, or severe cracks. Don’t be deterred by minor damage or if some slats are broken; these can often be repurposed or reinforced. However, always be vigilant for any exposed nails, splinters, or sharp edges, and remove or hammer them down before proceeding.
If disassembling pallets, use a pry bar and hammer carefully to separate the planks from the stringers. This process can be time-consuming but yields valuable reclaimed wood. Once disassembled or if using intact pallets, clean the wood thoroughly. A stiff brush and some soapy water can remove dirt and grime. Allow the wood to dry completely before any cutting or sanding. This preparation ensures a clean, safe, and ready-to-work-with material for your bar.
Step 2: Designing and Building the Main Frame
With your pallets ready, it’s time to lay out the blueprint for your bar. Begin by deciding on the precise location for your pallet bar, whether it’s a specific spot in your living room, patio, or backyard. Measure the available area meticulously to determine the optimal dimensions for your bar. This careful planning ensures your finished bar fits perfectly and offers maximum usability without overcrowding your space.
For a foundational and sturdy structure, you’ll generally create a rectangular base frame. This frame will define the overall footprint of your bar. Using your tape measure and pencil, mark out the lengths and widths on your chosen pallet planks. Employ a miter saw to achieve clean, precise, and straight cuts for all your frame pieces. Accuracy here is key to a professional-looking and stable bar. Assemble these pieces, joining them at the corners using wood screws. For added strength and longevity, consider applying wood glue to the joints before screwing them together. Once the base rectangle is formed, integrate vertical pillars at regular intervals. These pillars are critical for supporting the bar top and providing overall structural rigidity. Ensure these vertical supports are plumb (perfectly vertical) and securely fastened to the base frame. The number and spacing of these pillars will depend on the overall length of your bar and the desired load-bearing capacity.
Step 3: Crafting and Attaching the Bar Top
The bar top is the most visible and functional part of your pallet bar, so careful execution here is essential. Whether you’ve chosen durable plywood or more economical chipboard, this piece will serve as the primary surface for drinks, snacks, and conversation.
Measure the dimensions of your bar’s frame precisely, adding an overhang if desired. An overhang of at least three inches is highly recommended, as it not only provides comfortable legroom for those standing or sitting at the bar but also offers a discreet space to tuck away LED strip lights later on. Using your miter saw or circular saw, cut your chipboard or plywood to these exact specifications. If your chosen material is too wide or long, carefully remove the excess parts, ensuring all edges are straight and smooth. Once cut, position the bar top onto your frame, ensuring it’s centered and aligned. Screw it down securely onto the top edges of your pallet frame and vertical pillars. Use plenty of wood screws, spacing them evenly, to prevent any wobble or movement. For a truly professional finish, consider countersinking the screw heads and filling them with wood putty before sanding.
Step 4: Reinforcing the Structure for Enhanced Durability and Safety
A bar, by its nature, needs to be robust. It will support significant weight from bottles, glasses, and general use. Therefore, strengthening your frame is a non-negotiable step to ensure longevity and safety.
Carefully assess the potential weight your bar will bear. If you plan to load it with heavy bottles or a mini-fridge, you’ll need substantial support. Add additional vertical pillars or cross-braces where necessary, especially under areas expected to bear more weight. A good rule of thumb is to place additional pillars every 400 to 600 millimeters (approximately 16 to 24 inches) along the length of the bar. These reinforcements prevent sagging and increase the overall stability. Beyond the vertical supports, don’t overlook the importance of securing the pallet slats themselves to your chipboard or plywood frame. Screwing these elements together creates a cohesive and incredibly strong unit. This step transforms what might start as a collection of individual pieces into a formidable and reliable piece of furniture, capable of withstanding years of use and enjoyment.
RELATED: Repurposed Pallet Furniture | Make A Wood Pallet Coffee Table
Step 5: Integrating Practical Shelving and Storage Solutions
A bar isn’t just about the counter; it’s also about efficient storage. Thoughtfully designed shelves will maximize the functionality and organization of your pallet bar, allowing you to neatly store bottles, glasses, and other bar essentials.
Begin by planning the layout of your shelves. Consider what you’ll be storing – will it be tall liquor bottles, smaller glasses, or perhaps some bar tools? Measure the internal dimensions of your bar’s frame where you intend to place the shelves. Cut pieces of wood (either from leftover pallet slats or new plywood) that would fit perfectly into these spaces. You can create simple horizontal shelves by screwing them onto the vertical pallet slats at the back of your bar. For added stability, consider adding small wooden ledgers or brackets underneath each shelf. You can also explore options for custom wine bottle holders, glass racks that hang upside down, or even cubbies for specific items. Precision in measuring and cutting these shelf pieces will ensure they fit snugly and securely, providing practical and accessible storage that enhances your bar’s usability.
Step 6: The Art of Finishing: Sanding, Staining, and Sealing Your Pallet Bar
Once the construction is complete, the finishing touches elevate your pallet bar from a raw wooden structure to a polished piece of furniture. This stage is crucial for both aesthetics and durability.
The first and most critical step is thorough sanding. Pallet wood, especially reclaimed pieces, can be rough, splintery, and uneven. Use an orbital or belt sander to smooth all surfaces, starting with a coarse grit (like 80 or 100) to remove major imperfections, then moving to medium (120-150 grit) and finally fine grit (220 grit) for a silky-smooth finish. This not only makes the bar safe to touch but also prepares the wood to properly absorb stain or paint. After sanding, wipe down the entire bar with a tack cloth to remove all sawdust. Now, it’s time to apply your chosen finish. If you desire a rich, darker stain or want to enhance the natural wood grain, apply wood stain according to the manufacturer’s instructions. Allow it to dry completely. Following the stain (or directly after sanding if you prefer a natural look), apply several coats of varnish or a durable sealant. Varnish not only gives the wood a beautiful sheen but, more importantly, makes it waterproof and resistant to spills, scratches, and general wear and tear. For outdoor bars, ensure you use an exterior-grade sealant that offers robust protection against UV rays, moisture, and temperature fluctuations. Sand lightly between varnish coats for an ultra-smooth finish.
Step 7: Personalizing and Decorating Your Pallet Bar with Style and Ambiance
With the structure built and finished, it’s time to infuse your personality into the bar. This is where your DIY pallet bar truly comes to life, reflecting your taste and creating the perfect ambiance for entertaining.
A fantastic way to enhance the atmosphere is by adding LED strip lights. These versatile lights can be tucked discreetly under the bar top’s overhang, along the inside of shelves, or around the base to create a soft, inviting glow. When installing, use the adhesive backing provided with most LED strips, and for extra security, carefully add small clips or screws to keep them firmly in place. Be extremely careful not to screw directly through the light strip itself, as this will damage the wiring. Consider choosing color-changing LEDs for dynamic lighting effects, or warm white for a classic, cozy feel. Beyond lighting, think about other decorative elements: vintage bottle openers mounted to the side, small chalkboards for drink specials, hooks for towels or bar tools, or even custom signage with your bar’s name. Arrange your favorite glassware and liquor bottles artfully on the shelves. For outdoor bars, consider adding weather-resistant plants or string lights. This final stage is all about making your pallet bar a unique and inviting space, ready for countless memories with family and friends.
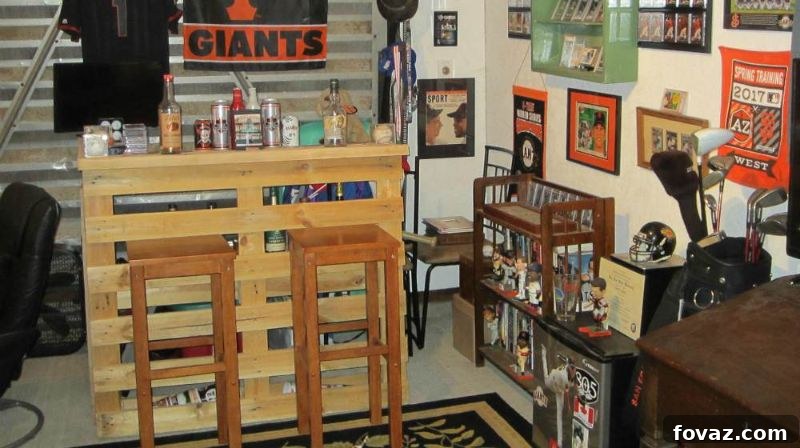
This is how a completed pallet bar, incorporating these steps, might look:
Beyond crafting a stunning bar, the versatility of pallet wood extends to a myriad of other furniture and home improvement projects. Its rustic charm and eco-friendly appeal make it a popular choice for creative DIYers. To inspire your next endeavor, watch this insightful video by Family Handyman. They demonstrate how to easily transform reclaimed pallet wood into a practical and stylish side table, showcasing just one more way you can upcycle these readily available materials into beautiful additions for your home:
In conclusion, building your own wood pallet bar is a highly rewarding DIY project that offers numerous benefits, from significant cost savings to the immense satisfaction of creating something unique and functional with your own hands. By following this detailed guide, you can confidently transform old pallets into a fantastic indoor or outdoor bar, providing the perfect setting for entertaining guests and enjoying your favorite beverages. It’s an opportunity to add character to your home, practice your woodworking skills, and contribute to sustainable living by repurposing materials that might otherwise go to waste. So, gather your tools, unleash your creativity, and get ready to toast to your amazing accomplishment with family and friends at your brand-new, handcrafted pallet bar!
Do you have other innovative ideas or useful tips for making a wood pallet bar? Share your insights and experiences with our community in the comments section below! Your contributions can inspire fellow DIY enthusiasts.
Up Next for More DIY Inspiration:
- How To Know If A Pallet Is Safe To Use: Essential Safety Guidelines
- 31 Super Cool Reclaimed Wood Craft Ideas And DIY Projects To Try
- 25 Smart DIY Hidden Storage Ideas For Every Corner Of Your Home
Calling all crafting DIYhards, DIY Projects needs YOU! Click here if you want to write for us and share your passion.
Don’t forget to stay connected with us on Facebook, Twitter, Pinterest, and Instagram for daily inspiration and the latest DIY trends!