
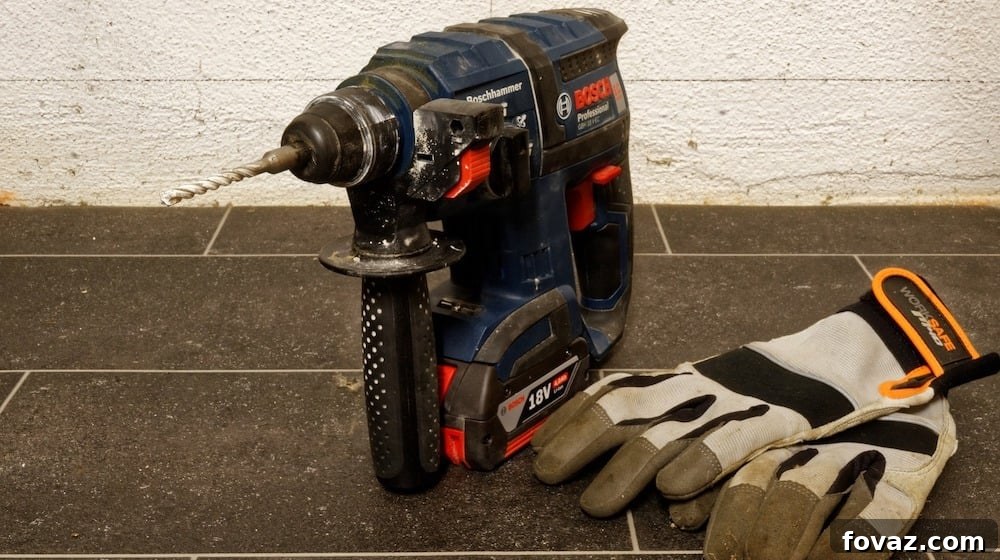
Are you looking to confidently tackle DIY projects that involve drilling into concrete but feel unsure where to begin? This comprehensive guide is designed specifically for you. We’ll walk you through every essential step, transforming you from a hesitant beginner into a skilled DIYer capable of drilling into concrete with ease and precision.
How to Drill into Concrete: Your Ultimate Step-by-Step Guide for DIY Success
Mastering the art of drilling into concrete is a valuable skill for any homeowner or DIY enthusiast. While working with power tools can initially seem daunting, rest assured that with the right knowledge and tools, it’s a straightforward process. This guide will demystify concrete drilling, helping you overcome any apprehension and empowering you to handle a variety of home improvement tasks, from hanging heavy shelves to mounting televisions or installing outdoor fixtures securely.
Concrete is a robust material, and standard drills often aren’t sufficient for the job. This guide focuses on using the correct equipment, primarily a hammer drill and specialized masonry bits, to ensure efficient and safe drilling. By following our detailed instructions, you’ll gain the confidence to approach your projects effectively, saving time and potentially costly professional fees.
Essential Tools and Materials You’ll Need
Before you begin any concrete drilling project, assembling the right set of tools and materials is crucial. Using inappropriate tools can lead to frustration, damage, and even injury. Here’s a detailed list of what you’ll need to get started:
- Hammer Drill: This is the cornerstone of concrete drilling. Unlike a standard drill, a hammer drill provides a pounding motion in addition to rotation, which is essential for breaking through hard concrete. If you don’t own one, they are readily available for rent or purchase. Look for models with adjustable speeds and a comfortable grip.
- Masonry Drill Bits: Specialized drill bits designed for concrete, brick, and stone are non-negotiable. These bits typically feature a carbide tip that can withstand the abrasive nature of concrete. Ensure your bit size matches the diameter of the anchors or fasteners you plan to use. Different types exist, such as standard masonry bits and SDS (Slotted Drive System) bits, which are designed for heavy-duty hammer drills and offer superior performance and bit retention.
- Pencil: For accurately marking your drilling spot. A carpenter’s pencil offers a thicker, more visible line.
- Hammer: Used in conjunction with a countersink or punch to create an initial indentation, which helps prevent the drill bit from wandering.
- Center Punch or Countersink: A small, pointed tool used with a hammer to create a starting dimple on your mark. This crucial step guides the drill bit precisely.
- Stud Finder with Live Wire Detector: An indispensable safety tool. Concrete walls can hide electrical wires or plumbing pipes. A good stud finder with metal and live wire detection will help you avoid dangerous and costly accidents.
- Measuring Tape: For precise placement of your holes.
- Safety Glasses: Concrete dust and small chips can fly during drilling. Eye protection is non-negotiable.
- Dust Mask: Drilling concrete generates fine dust that can be harmful if inhaled. A good quality dust mask (N95 or higher) is highly recommended.
- Hearing Protection: Hammer drills can be very loud. Earplugs or earmuffs will protect your hearing.
- Gloves: To protect your hands from abrasions and improve grip.
- Shop Vacuum or Blower: To clean out the drilled holes and the surrounding area. A clean hole ensures your anchor gets a firm grip.
- Marker or Chalk: For clear visibility of your chosen spot.
- Depth Stop (optional, but recommended): Many hammer drills come with an adjustable depth rod that helps you drill to a consistent, pre-set depth. If yours doesn’t, you can mark your drill bit with tape.
- Appropriate Anchors and Screws: Ensure you have the right type and size of concrete anchors (e.g., expansion anchors, sleeve anchors, wedge anchors, or tapcons) for your specific project and load requirements.
Pre-Drilling Checklist: Safety First!
Before you even think about turning on your drill, it’s vital to perform a thorough safety check and preparation of your workspace. This not only protects you but also prevents damage to your home.
Step 1: Choose the Right Drill and Bit for Concrete
For drilling into concrete, brick, block, stone, or quarry, a **hammer drill** paired with a **masonry bit** is essential. A standard drill lacks the impact mechanism needed to effectively penetrate concrete. Masonry bits are specifically designed with a carbide tip that can withstand the intense friction and pulverizing action required. When selecting your masonry bit, ensure its diameter matches the size of the anchor or fastener you plan to use for your project. For very heavy-duty tasks or frequently drilling into concrete, consider an SDS (Slotted Drive System) hammer drill and corresponding SDS bits, which offer superior power transmission and bit retention.
In contrast, if you were working with other materials: a drywall bit (often a twist bit or spade bit) is suitable for sheetrock or plasterboard; a spur point bit is ideal for wood, providing a clean entry hole; and a tile bit (often spear-pointed carbide or diamond-tipped) is used for ceramic, tile, or glass to prevent cracking and chipping.
Step 2: Prioritize Safety & Scan the Drilling Area Thoroughly
Safety is paramount. Always wear your personal protective equipment (PPE), including safety glasses, a dust mask, and hearing protection, before starting. Next, carefully assess your drilling location. It is critically important to avoid drilling near any electrical outlets, light switches, or plumbing lines. These hidden utilities can cause serious injury or extensive damage if punctured.
Utilize your stud finder with a live wire and metal detector. Slowly scan the wall surface in the intended drilling area, moving horizontally and vertically. Pay close attention to any signals indicating hidden wires, pipes, or rebar within the concrete. Remember that electrical lines typically run vertically from outlets/switches, and horizontally along floor joists or ceiling lines. Similarly, plumbing lines are common near bathrooms, kitchens, and radiators. If your stud finder detects anything, shift your drilling spot to a safer location. When drilling through a floor, be mindful of what lies directly below on the floor beneath it. An ounce of prevention here is worth a pound of cure.
Step 3: Mark Your Drilling Spot with Precision
Once you’ve identified a safe drilling location, use your pencil to clearly mark the exact spot where you intend to drill. Accuracy at this stage will save you headaches later. To ensure your drill bit starts precisely where you want it and doesn’t “walk” or wander across the concrete surface, take your hammer and center punch or countersink. Place the tip of the punch directly on your pencil mark and give it a sharp tap with the hammer. This will create a small, shallow indentation in the concrete. This dimple acts as a guide, providing a starting point for your drill bit and keeping it snug in place.
Step 4: Begin Drilling – The Initial Penetration
With your spot marked and indented, insert the masonry bit into your hammer drill and tighten it securely. If your drill has a depth stop, set it to the desired depth for your anchor. Place the tip of the drill bit into the indentation you just made. Begin drilling at a slow speed with moderate, steady pressure, ensuring the drill is held perpendicular to the concrete surface. This slow start allows the bit to properly seat itself and create a small pilot hole without skittering across the surface. Let the hammer action do the work; avoid excessive force.
Step 5: Increase Speed and Maintain Consistent Pressure
Once you’ve created a noticeable indentation and the drill bit is stable, you can increase the drill’s speed to a moderate to high setting, maintaining consistent, firm pressure. Continue to apply steady, forward pressure, allowing the hammer drill’s impact action to break down the concrete. Periodically pull the drill bit out a few inches and push it back in while it’s still spinning. This action helps to clear concrete dust and debris from the hole, preventing the bit from binding and overheating. If you reach your desired depth, remember not to stop the drill abruptly. Instead, gradually reduce the speed as you slowly pull the drill bit completely out of the hole to prevent chipping around the edge.
Step 6: Clear the Drilled Hole
After drilling to the required depth, the hole will likely be filled with concrete dust and small debris. It is crucial to clear this out thoroughly. Use a shop vacuum with a narrow attachment or an air blower to remove all traces of dust. A clean hole is essential for your concrete anchors to achieve maximum grip and hold securely. Any residual dust can prevent the anchor from expanding properly or forming a strong bond with the concrete.
Step 7: Insert Anchor and Finish Your Project
With a clean, dust-free hole, you are ready to insert your chosen anchor. Follow the manufacturer’s instructions for your specific type of anchor (e.g., tapcon, sleeve anchor, wedge anchor). For most expansion anchors, you’ll simply insert them into the hole. Then, align your fixture and drive in the appropriate screw or bolt to expand the anchor and secure your item firmly to the concrete wall. Congratulations, you’ve successfully drilled into concrete and are now ready to resume or complete your DIY project!
Tips for Success and Common Concrete Drilling Mistakes to Avoid
To ensure a smooth and effective drilling experience, keep these additional tips in mind and be aware of common pitfalls:
- Don’t Force It: If the drill isn’t making progress, don’t just push harder. The bit might be dull, or you might have hit rebar. Forcing it will only overheat the drill and bit.
- Keep the Drill Straight: Always ensure the drill is perpendicular to the surface. Drilling at an angle can cause the bit to bind, break, or create an uneven hole.
- Clear Debris Frequently: As mentioned, pulling the bit out periodically while spinning helps clear dust. This prolongs bit life and improves drilling efficiency.
- Use the Right Bit Size: Always match your drill bit size precisely to the anchor manufacturer’s recommendation for optimal holding power.
- Check for Rebar: If you suddenly hit an extremely hard spot and the drill stops making progress, you might have encountered rebar. Do not continue drilling. Move your drilling location slightly. Drilling through rebar with a standard masonry bit can damage the bit and the rebar itself, compromising the structural integrity.
- Cool the Bit: For very deep holes or multiple holes, the bit can get hot. Periodically spraying a little water on the tip (being careful not to get water into the drill’s motor) or letting the bit cool can extend its life.
Why Master Concrete Drilling? Unlock Endless DIY Possibilities
Learning how to drill into concrete opens up a world of possibilities for your home improvement projects. It’s a skill that empowers you to take on tasks that might otherwise require professional help, saving you money and giving you a tremendous sense of accomplishment. Imagine being able to securely mount a heavy flat-screen TV to a concrete basement wall, hang robust shelving in your garage, install security cameras on an exterior concrete facade, or even create unique decorative elements like a rustic wine rack on an exposed concrete wall. You could even go all out and accent your wall with wood pallets, creating a stunning focal point. This skill allows you to fully customize and utilize every space in your home, enhancing both functionality and aesthetics.
Frequently Asked Questions About Drilling Concrete
- Can I use a regular drill for concrete? No, not effectively. While a standard drill might scratch the surface, it lacks the hammer action necessary to break through the hard aggregate in concrete. A hammer drill is essential for efficient and safe drilling into concrete.
- How do I know what size drill bit to use? Always check the instructions for the concrete anchors or fasteners you plan to use. They will specify the exact drill bit diameter required for proper installation and maximum holding strength.
- What if I hit rebar? If your drill suddenly stops making progress and the bit seems to be hitting an impenetrable object, you likely hit rebar (reinforcing bar) within the concrete. Do not try to drill through it with a masonry bit, as it will dull or break the bit and potentially damage the rebar. It’s best to shift your drilling location slightly to avoid the rebar.
- How do I clean the hole after drilling? Use a shop vacuum with a narrow nozzle attachment or an air blower to remove all concrete dust and debris from the hole. A clean hole is crucial for anchors to seat and expand properly.
- How deep should I drill? Drill deep enough to accommodate the full length of your chosen anchor, plus a little extra (about 1/4 to 1/2 inch) to allow for any dust that might remain at the bottom of the hole.
Press play to watch a full video tutorial:
Congratulations! You now possess the knowledge and confidence to safely and effectively drill into concrete. By following these detailed steps, you’ll be able to tackle a wide array of DIY projects, transforming your living spaces and empowering your creativity. The possibilities for home improvement are truly endless once you master this fundamental skill.
Now that you know how to drill into concrete, what exciting DIY projects are you planning to start? Share your ideas and questions with us in the comments below!
Did you know your drill isn’t just for construction? Discover some surprising uses in the kitchen! Here are some amazing drill food prep hacks!
Stay connected with us on Facebook, Twitter, Pinterest, and Instagram for more DIY inspiration and tips!
Feature image via Help & Advice
Show off your DIY achievements! Grab our exclusive FREE shirt – get it right here and wear your passion proudly.