
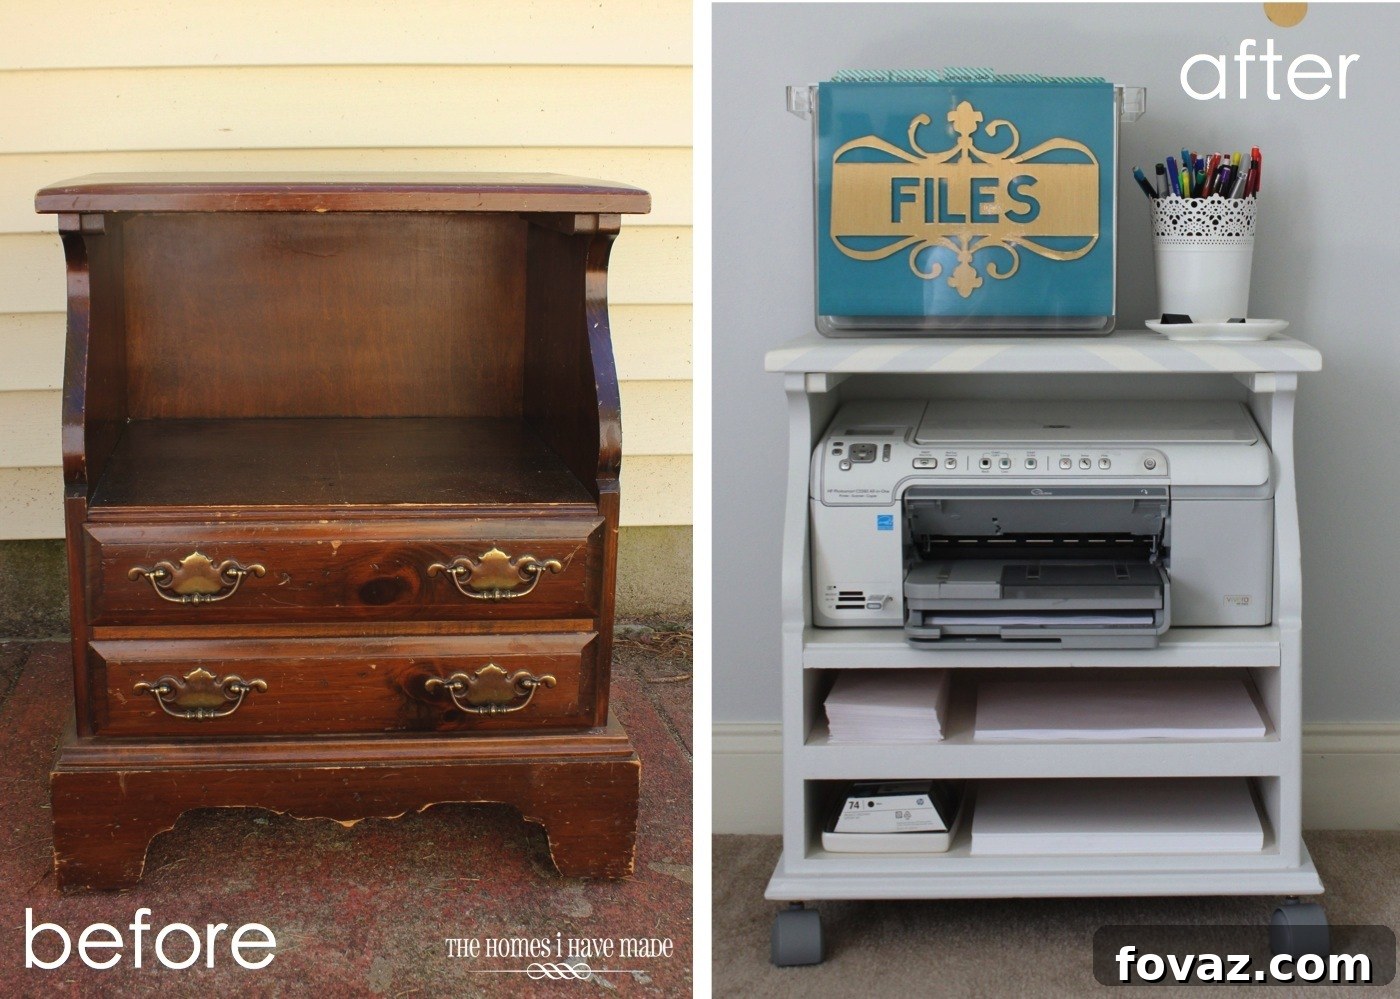
Looking to breathe new life into old furniture? Discover the incredible potential of upcycling as we guide you through transforming a forgotten bedside table into an indispensable rolling printer cart. This project isn’t just about saving money; it’s about sustainable living, unleashing creativity, and crafting a unique piece perfectly suited to your home office needs.
—This post was originally by ForRent.com, and shared with permission—
DIY Upcycled Craft: From Bedside Table to Stylish Rolling Printer Cart
In today’s world, where sustainability and personalization are highly valued, furniture transformations have become incredibly popular—and for excellent reasons! With a little bit of effort, imagination, and the right tools, you can turn a discarded curb-side find into a cherished treasure for your apartment or home. The market is now brimming with innovative products that make giving old furniture a fresh start easier than ever before.
Consider this unassuming bedside table, which had been relegated to a quiet corner of our home for years. Despite its worn appearance, its solid wood construction and compact size held promise. I simply couldn’t bring myself to donate it to a thrift store, sensing its hidden potential. I’m incredibly glad I didn’t let it go! With the strategic application of paint, a few clever structural modifications, and the addition of four smooth-gliding casters, it has been reborn as a chic and highly functional addition to our home office.
Why Embrace Furniture Upcycling?
Upcycling furniture offers a myriad of benefits that extend beyond mere aesthetics. Firstly, it’s an environmentally conscious choice. By repurposing existing items, we reduce waste, decrease demand for new manufacturing, and lessen our ecological footprint. Secondly, it’s incredibly cost-effective. Instead of investing in brand-new, often expensive, furniture pieces, you can transform an old item for a fraction of the cost, usually just requiring paint, hardware, and a few basic supplies.
Beyond the practical advantages, upcycling allows for unparalleled creativity and personalization. Each piece you transform becomes unique, reflecting your personal style and meeting your specific functional requirements. It’s a chance to experiment with different techniques, colors, and designs, creating furniture that truly tells a story and stands out from mass-produced items. The satisfaction of seeing a forgotten item repurposed into something beautiful and useful is truly rewarding.
Project Overview: The Humble Beginnings of a Home Office Hero
This project began with a single, somewhat damaged bedside table—an item that no longer served its original purpose but possessed valuable underlying qualities. I was drawn to the idea of repurposing it into something highly functional that our home office desperately needed: a stylish home for our printer and its accessories. This transformation also presented an exciting opportunity to experiment with various techniques and design ideas.
For this particular makeover, my aim was to maintain a simple yet sophisticated design. However, I couldn’t resist adding a subtle tone-on-tone geometric pattern to the top and sides. This detail, while neutral and refined, injects a touch of freshness and uniqueness, elevating the piece beyond a simple painted surface.
Every piece of furniture possesses its own character, and thus, every transformation journey is unique. While you might not have this exact nightstand in your possession, the comprehensive process detailed here is highly adaptable. It provides a foundational framework that can be applied to almost any furniture upcycling project you envision. So, let’s embark on this creative journey together!
Step-by-Step Guide: Transforming Your Bedside Table
1. Initial Assessment and Strategic Disassembly
My first step involved a thorough examination of the nightstand. Understanding its construction—how its various components were assembled—was crucial for determining the best approach to carefully disassemble it. This initial assessment helped me plan the structural changes required for both improved aesthetics and enhanced functionality.
I began by unscrewing and gently prying off the decorative wood frame located along the bottom of the nightstand. Removing this trim achieved two key objectives: it created cleaner, more contemporary lines for the base, and, more importantly, it provided a perfectly flat surface to which the casters could be securely attached. Next, I removed the skinny drawers from the base, along with the tracks that were screwed into the internal walls of each shelf slot. With these elements gone, it became clear that converting these two drawer openings into open, accessible shelves would be a straightforward and highly functional modification.
2. Structural Modifications and Surface Preparation
With the old drawers and decorative trim removed, the next phase involved installing new, sturdy shelves. I took careful internal measurements of the nightstand and had my local home improvement store cut ¾” plywood to fit these dimensions precisely. Once the plywood shelves were in place, I secured them firmly with high-quality wood glue, ensuring a robust and lasting bond. To achieve a seamless finish, I then meticulously puttied all raw edges of the new shelves, as well as any existing dings, dents, or imperfections on the nightstand’s original top and sides, using wood filler. This step is critical for creating a smooth, professional surface ready for painting. After several rounds of sanding—starting with a coarser grit and progressing to a finer one—and thoroughly wiping away all dust, the nightstand was finally prepared for its colorful transformation.
3. Gathering Your Painting Supplies
A successful paint job relies on the right tools and materials. Here’s a detailed list of the supplies I used for this nightstand transformation:
- Primer: Zinsser 123 Spray Primer (essential for superior adhesion and to block any stains from bleeding through).
- Base Coat Paint: Sherwin Williams ProClassic Paint in Alabaster White, mixed with Floetrol (this additive is a game-changer for reducing brush marks and achieving a smoother, more professional finish).
- Accent Paint: Glidden Paint in Martha Stewart’s Cumulus Cloud (for creating the subtle, tone-on-tone striped design).
- Protective Top Coat: Rust-Oleum’s Clear Gloss Protective Spray (to provide durability and a beautiful, long-lasting finish).
- Application Tools: A disposable paint tray, a 2″ foam roller (ideal for smooth surfaces), a 1.5″ angled brush (for cutting in and detailed work), and a small artist’s paintbrush (for fine details and touch-ups).
4. Priming and Base Coat Application
With all materials at hand, I began the painting process. I started by thoroughly priming the entire nightstand—both inside and out—using the Zinsser 123 Spray Primer. This step is non-negotiable as it ensures excellent paint adhesion and uniform coverage. After the primer dried completely, I gave the entire surface a light sanding with a fine-grit sanding block to create an even smoother texture. Following another thorough wipe-down to remove all sanding dust, I proceeded to apply two even coats of the ProClassic white paint, which was pre-mixed with Floetrol. I used the small foam roller for the larger flat surfaces and the angled brush for edges and harder-to-reach areas, ensuring full, streak-free coverage.
5. Crafting the Tone-on-Tone Design
Once the base coat was completely dry, it was time to add the unique striped pattern to the top and sides. I began by creating a large “X” across the top of the nightstand using painter’s tape. This initial “X” served purely as a temporary guide and was removed before any accent paint was applied.
Next, I meticulously created the striped/triangle pattern within each section of the “X.” I first placed tape directly alongside the initial “X” (bottom left). To ensure consistent spacing for my subsequent stripes, I cleverly used small scraps of painter’s tape as temporary measurement markers (bottom center). I continued this process, alternating sides and carefully positioning the tape so that all points of each triangle met precisely (bottom right). For crisp, clean points, I used a ruler and an X-acto knife to trim away any excess tape, exercising caution not to cut too deeply and score the underlying paint. This process was repeated for all quadrants of the “X” until the entire top surface was taped off. Finally, I carefully removed the original “X” tape (not shown) to reveal the perfectly outlined design.
6. Extending the Design and Final Painting
To carry the elegant striped pattern down the sides of the nightstand, I simply extended strips of painter’s tape directly downwards from where the top stripes ended. Due to the diagonal nature of the top pattern and the straight vertical lines on the sides, a perfect alignment at the corner might seem challenging. However, a clever trick mitigates this: the slight misalignment naturally occurs under the lip of the top edge, making it virtually unnoticeable once the piece is completed and in use.
With all the tape securely in place, I applied two even coats of the Martha Stewart Cumulus Cloud paint to the taped-off areas on the top and sides, using the small foam roller. This is a crucial step for achieving clean lines: immediately after applying the second coat, while the paint was STILL wet, I carefully and steadily removed all the painter’s tape. This technique is paramount to prevent the paint from stretching or creating messy, jagged lines. The result was a perfectly crisp, clean, and professional-looking striped design—a true success!
7. Protective Finish and Caster Installation
After the light grey accent paint had dried completely overnight, I applied several coats of the clear glossy protective spray to the entire nightstand. This protective layer is vital for enhancing durability, protecting the paint from wear and tear, and ensuring the cart remains beautiful for years to come. Once the protective coats were dry, I carefully flipped the nightstand over and proceeded to install the four rolling casters onto the newly flat base. This simple addition is what transforms a stationary table into a versatile, mobile printer cart.
8. The Big Reveal: Functional Elegance in Your Home Office
After allowing everything to cure for an additional day—a crucial step for paint and finishes to fully harden and achieve maximum durability—I proudly wheeled the newly transformed cart into its designated home. The fit was absolutely perfect, a detail I, of course, meticulously tested even before the project began! For the printer’s power cord, I discreetly drilled a small hole in the back panel of the cart. With the cord neatly pulled through, the printer nestled perfectly within its new stylish enclosure.
The newly created small shelves are the ideal height and depth for organizing all essential printing supplies: stacks of paper, various envelope sizes, specialized photo paper, and spare ink cartridges. This design offers vastly superior functionality compared to the tiny, often impractical drawers that once occupied this space. Now, all of our printing, mailing, and filing necessities are consolidated into one compact, tidy, and effortlessly mobile spot, bringing unparalleled organization and style to our home office.
What an ingenious and incredibly useful transformation of an almost-discarded nightstand! This project stands as a testament to the power of upcycling.
Your Next Upcycling Adventure Awaits!
This project beautifully demonstrates that painting a piece of furniture can not only grant it a fresh aesthetic but that some thoughtful structural tweaks can completely redefine its function. Before you consider donating or, worse, trashing a piece of furniture you no longer have a use for, take a moment to pause. Engage your creativity and envision if there is something, anything, you can do to make it perfectly suited for your apartment or home—both in terms of look and utility. The possibilities are truly endless, and the satisfaction of creating something new from old is immense.
Do you have any other furniture pieces in mind that you think could be perfectly upcycled for your apartment? Share your ideas and inspire us in the comments section below!
Next: How to Reupholster a Chair | Home Decor Furniture Rehab Tutorial