
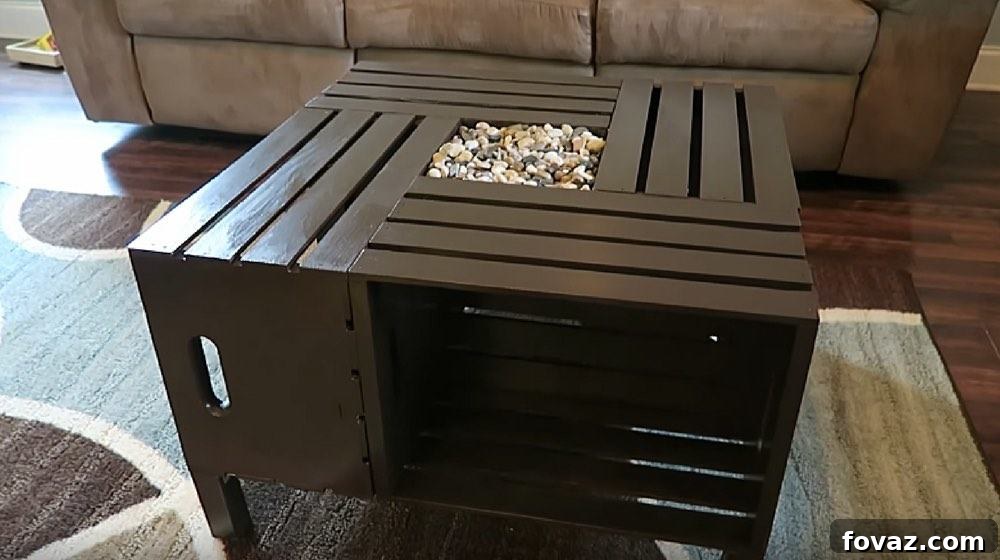
Are you looking for a creative way to repurpose those charming wooden wine crates accumulating in your garage? Instead of letting them gather dust, transform them into a magnificent, custom-made coffee table. This upcycling project isn’t just about saving money; it’s about adding a unique, rustic touch to your home decor that reflects your personal style and commitment to sustainable living. Dive into this detailed guide and discover how easy it is to construct a beautiful wine crate coffee table that will surely be a conversation starter.
DIY Wine Crate Coffee Table: Crafting Rustic Charm on a Budget
Upcycling has become more than just a trend; it’s a smart, eco-friendly approach to home decor, allowing you to create stunning pieces with character and history. My wife, Lauren, is a fantastic host who frequently organizes delightful wine and cheese parties, which means we’ve accumulated quite a collection of sturdy wooden wine crates. Rather than discarding them, I saw an opportunity for a creative DIY project. The result? A beautiful, rustic wine crate coffee table that perfectly complements our home’s aesthetic and has earned us countless compliments. This guide will walk you through every step, ensuring you can replicate this rewarding project with ease.
Why Build a Wine Crate Coffee Table?
- Affordable & Budget-Friendly: Reusing materials significantly cuts down on costs compared to buying a new coffee table.
- Unique & Personalized: No two wine crate tables are exactly alike, giving you a truly one-of-a-kind piece.
- Eco-Friendly Upcycling: Give new life to discarded items, reducing waste and promoting sustainability.
- Rustic & Charming Aesthetic: Adds warmth, character, and a touch of farmhouse or industrial style to any living space.
- Functional Storage: The crates themselves offer built-in storage or display areas.
- Sense of Accomplishment: There’s immense satisfaction in creating something beautiful and practical with your own hands.
Materials You’ll Need for Your Wine Crate Coffee Table:
Gathering your supplies beforehand ensures a smooth and enjoyable crafting experience. Here’s a detailed list of what you’ll need, along with some considerations:
- 4 Wooden Wine Crates: Look for sturdy crates of similar size and condition. You might find these at local wineries, liquor stores, flea markets, or even online. Ensure they are clean and free from any loose debris or sharp edges.
- Scrap Wood for Legs: Aim for pieces that are roughly 2″x2″ or 2″x3″ in dimension. Pine or reclaimed wood works well. For a standard coffee table height (typically 16-18 inches), your leg pieces should be around 14-16 inches long, depending on the height of your crates. Consider how high you want your finished table to be.
- Wood Stain or Paint: Choose a color that matches your desired aesthetic. Water-based stains dry quickly and offer easy cleanup, while oil-based stains penetrate deeper for richer colors. Alternatively, you could paint the crates for a more vibrant or distressed look.
- Protective Top Coat (Optional but Recommended): A polyurethane, lacquer, or varnish top coat will protect your table from spills and wear, ensuring its longevity.
- Sandpaper (various grits): Start with a medium grit (100-120) for initial smoothing, then move to a finer grit (180-220) for a silky-smooth finish.
- Wood Glue: Essential for strong, lasting joints between the crates and for attaching the legs securely.
- Wood Screws or Nails: Nails (1.5-2 inches long) are good for initial assembly, but wood screws offer superior strength and durability for the main structure and leg attachment.
- Small Hooks or Cleats (for the central base): These will help support the base within the central cavity of the table.
- Cardboard or Plywood (for the central base): A sturdy piece of cardboard can work, but a thin sheet of water-resistant plywood (e.g., ¼ inch thick) will provide a much more durable and stable central base.
Tools Required:
- Tape Measure: For accurate measurements of legs and crate placement.
- Pencil: For marking cuts and drilling spots.
- Power Sander or Sanding Block: Speeds up the sanding process and ensures evenness.
- Paintbrush or Foam Applicator: For applying stain or paint.
- Clean Rags or Cloths: For wiping off excess stain and cleaning up.
- Hammer (if using nails): For driving nails into the wood.
- Cordless Drill/Driver (if using screws): Essential for pre-drilling pilot holes and driving screws.
- Saw (Hand saw, miter saw, or circular saw): For cutting the scrap wood to create the table legs.
- Safety Glasses: Crucial for protecting your eyes from wood dust, splinters, and flying debris.
- Dust Mask (Optional but Recommended): To protect your respiratory system from fine wood dust during sanding.
Step-by-Step Guide to Building Your Wine Crate Coffee Table:
Step 1: Prepare and Sand the Crates and Scrap Wood
Before you begin assembling, proper preparation is key to a professional-looking finish and safe handling. Take each wooden wine crate and your scrap wood pieces and thoroughly sand them. Start with a medium-grit sandpaper (like 100 or 120-grit) to smooth out any rough patches, sharp edges, or old splinters. This initial sanding also helps open up the wood grain, allowing the stain to penetrate more evenly. Once the major imperfections are gone, switch to a finer grit sandpaper (180 or 220-grit) for a silky-smooth finish. Pay special attention to the inside and outside of the crates, as well as all edges of your leg pieces. A smooth surface isn’t just about aesthetics; it significantly reduces the risk of nasty splinter accidents and ensures a better absorption of stain or paint.
After sanding, use a clean cloth or a shop vacuum to remove all wood dust from the surfaces. Any lingering dust can interfere with stain or paint adhesion, leading to an uneven finish.
Step 2: Stain or Paint the Crates and Scrap Wood
Now comes the fun part – adding color and character! Choose your preferred wood stain or paint. If using stain, apply a thin, even coat using a paintbrush or foam applicator, always working in the direction of the wood grain. For a deeper color, allow the first coat to dry completely (check product instructions for drying times, typically 1-4 hours for water-based, longer for oil-based) before applying a second coat. Water-based stains are excellent if you’re in a hurry, as they dry significantly quicker than oil-based varieties. Oil-based stains, however, often provide a richer, more traditional finish.
If you opt for paint, apply a primer first, especially if your crates have any natural oils or varied wood tones, to ensure even color coverage. Then, apply two thin coats of your chosen paint, allowing ample drying time between each. For a rustic, distressed look, you can lightly sand some edges after painting to reveal the wood underneath.
Once your stain or paint is dry, consider applying a protective top coat like polyurethane or clear lacquer. This will seal the wood, protect against moisture and scratches, and extend the life of your coffee table. Apply 2-3 thin coats, sanding lightly with a very fine-grit sandpaper (e.g., 320-grit) between coats for a super smooth finish.
Step 3: Cut and Prepare the Legs
With your crates and leg wood prepped and finished, it’s time to cut the legs. First, decide on the final height of your coffee table. A standard coffee table usually stands between 16 to 18 inches tall. Since your crates already provide some height, measure the height of one crate. Subtract this from your desired total table height to determine the length needed for your legs. For instance, if your crates are 11 inches tall and you want a 17-inch table, your legs should be 6 inches long. The original tutorial suggests 5 inches, which might result in a slightly lower table, so adjust according to your preference. Carefully measure and mark each of your four scrap wood pieces, then use a saw to cut them precisely. Accuracy here is crucial for a stable, level table.
After cutting, briefly sand the cut ends of the legs to remove any rough edges and apply a coat of your chosen stain or paint to match the crates.
Step 4: Securely Attach the Crates Together
Now, let’s bring the main structure of your coffee table to life. Arrange the four crates in your desired configuration. A popular and practical layout involves placing them in a square formation, with the open sides facing outwards, creating convenient storage or display shelves on all four sides. Alternatively, you could place two crates side-by-side and stack the other two on top, or arrange them to create a rectangular table with a central cavity.
Once you have your preferred arrangement, it’s time to join them. For maximum stability, use both wood glue and screws. Apply a generous amount of wood glue to the surfaces where the crates will meet. Then, carefully align them. Use a drill to pre-drill pilot holes (slightly thinner than your screws) to prevent the wood from splitting, especially near edges. Drive 1.5-inch to 2-inch wood screws through the sides of adjacent crates, ensuring they are securely fastened. Aim for at least two screws per joint. Repeat this process until all four crates are firmly attached to each other, forming a sturdy unit.
Step 5: Create a Sturdy Base in the Middle Cavity
The central space created by assembling the four crates is a wonderful feature, offering an opportunity for unique decoration or additional storage. To create a stable base for this area, you’ll first need to support it. Measure the inner dimensions of the square or rectangular cavity. Then, cut a piece of plywood (a thin ¼ inch sheet is ideal) to fit snugly within this space. While cardboard can work as a temporary solution, plywood provides superior durability and a more finished look, especially if you plan to display heavier items or incorporate lighting.
To support the plywood base, attach small wooden cleats or L-brackets to the inner walls of the crates, just below the top edge of the central opening. Ensure these supports are level. Rest your cut plywood piece on these cleats or brackets. You can secure the plywood to the cleats with small screws or glue. This central base is perfect for showcasing decorative rocks, faux succulents, a small planter, fairy lights, or even a custom-cut piece of glass for a more refined look.
Tip: If you’d like to create an open bottom space for larger items or to simply keep the rustic look, you can skip this step, but the central base adds versatility and prevents items from falling through.
Step 6: Attach the Legs for Stability
With the main body of your coffee table complete, the final step is to attach the legs. Turn the assembled crate structure upside down on a clean, protected surface. Position each of your prepped legs at the four corners of the table’s bottom. For optimal stability and strength, use both wood glue and screws. Apply wood glue to the top surface of each leg where it will meet the crate. Then, carefully align each leg, ensuring it’s square with the corner.
Using your drill, pre-drill pilot holes through the bottom of the crates into the top of the legs. Then, drive 1.5-inch to 2-inch wood screws through the bottom of the crates into each leg. Use at least two screws per leg for robust attachment. If necessary, you can also use small L-brackets on the inside corners for additional reinforcement. Once all legs are securely attached, carefully turn your coffee table upright. Inspect it for any wobbling; if it’s uneven, you might need to slightly adjust a leg or add small furniture pads to the bottom of the shorter legs.
Wipe off any excess wood glue that may have squeezed out during attachment with a damp cloth immediately, before it dries, to maintain a clean finish.
Your DIY Wine Crate Coffee Table is Complete!
Congratulations! You’ve successfully transformed simple wine crates into a functional, stylish, and utterly unique piece of furniture. Step back and admire your handiwork. This isn’t just a coffee table; it’s a statement piece that embodies creativity, resourcefulness, and personal charm. Now, the fun part begins: decorating your new centerpiece! Fill the side compartments with books, magazines, or small baskets for organized storage. Adorn the top with succulents, a beautiful vase of fresh flowers, scented candles, or other centerpieces that reflect your taste. The central cavity offers a perfect spot for decorative rocks, glass beads, or even a seasonal display.
To be honest, I never imagined I’d be this thrilled with our wine crate coffee table. The satisfaction of creating something so practical and beautiful from repurposed materials is immense. It’s surprising because I’ve received loads of compliments and even a couple of orders from friends and family who wanted one of their own! All in all, this project was a complete win. I got to make my wife happy, and I even found a potential avenue to earn a little extra income with my DIY skills.
Want to see the full video tutorial of the wine crate coffee table in action? Just press play:
Beyond the Coffee Table: More Upcycling Ideas
The beauty of this project lies not only in its outcome but also in its inspiration. It encourages you to look at everyday items with a fresh perspective, seeing potential where others see waste. Wine crates are incredibly versatile and can be transformed into various pieces of furniture and decor. Consider using them for:
- Bedside tables: Stack two crates vertically for a rustic nightstand with built-in storage.
- Shelving units: Mount individual crates on a wall or stack them to create unique bookshelves.
- Pet beds: Line a crate with a soft cushion for a cozy pet retreat.
- Planters: Use sealed crates for outdoor or indoor plant displays.
- Storage bins: Simply clean and perhaps line them for stylish storage in any room.
This wine crate coffee table project is a testament to the power of DIY and upcycling. It’s an accessible project for beginners yet offers enough customization for seasoned crafters. So, gather your materials, clear your workspace, and get ready to create a piece that adds character and functionality to your home.
We’d love to hear about your experience and see your finished creation! Let us know what you think of this wine crate coffee table project by leaving a comment below.
Wondering what to do with your leftover wine bottles after emptying the crates? Here are a few creative projects to choose from! Don’t let anything go to waste!
Stay connected with us for more inspiring DIY ideas and projects! Follow us on Facebook, Twitter, Pinterest, and Instagram!