
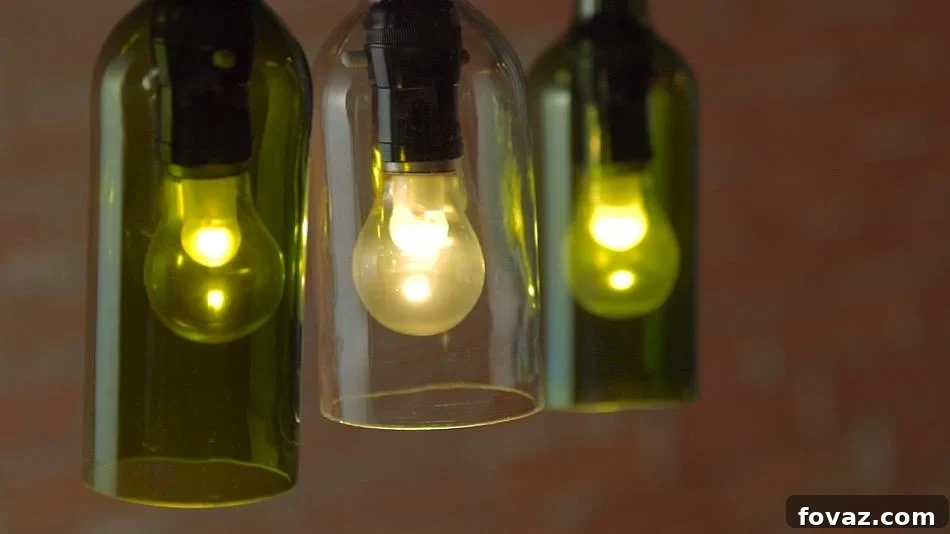
Transforming ordinary objects into extraordinary decor pieces is at the heart of creative upcycling. Among the most popular and rewarding DIY projects is crafting elegant wine bottle lights. These beautiful, repurposed lights add a unique touch of cozy ambiance to any home, perfectly timed for creating warmth as the seasons change. Imagine the soft glow illuminating your space, a testament to your creativity and commitment to sustainable living. This comprehensive guide will walk you through the simple yet effective steps to convert an empty wine bottle into a stunning hanging light fixture, complete with essential safety tips and clever styling ideas.
Illuminate Your Space: The Ultimate DIY Wine Bottle Light Tutorial
As the air grows crisper and the days shorten, there’s a natural inclination to infuse our homes with comfort and warmth. What better way to achieve this than with personalized, handcrafted decor? If you’re a fan of repurposing glass bottles – and let’s be honest, who isn’t always looking for a good excuse to enjoy a bottle of wine? – then this DIY wine bottle light project is tailor-made for you. It’s an incredibly satisfying craft that results in charming, eye-catching lights perfect for any room, from the kitchen to the patio. The process, while involving a few careful steps, is surprisingly straightforward, making it accessible for DIY enthusiasts of all skill levels. Read on to discover how you can create your very own custom wine bottle hanging lights and bring a touch of rustic elegance to your living environment.
Why Choose DIY Wine Bottle Lights? Embracing Sustainable and Unique Home Decor
In an age where mass-produced items often lack character, DIY projects like these wine bottle lights offer a refreshing alternative. They embody the principles of upcycling, transforming what would otherwise be waste into something beautiful and functional. This not only contributes to a more sustainable lifestyle but also allows you to infuse your personal style into your home decor. Each light you create will have its own unique story, reflecting the bottle’s original journey and your creative touch. Beyond the eco-friendly aspect, these lights are incredibly versatile. They can serve as ambient lighting in a cozy reading nook, a captivating centerpiece for an outdoor dinner party, or even as decorative elements for festive occasions. The subtle glow from the repurposed glass creates an inviting atmosphere that store-bought fixtures often struggle to replicate, making your space feel truly one-of-a-kind. Plus, the satisfaction of crafting something beautiful with your own hands is a reward in itself.
Getting Started: Essential Tools and Materials for Your Upcycled Lighting Project
Before diving into the creative process, gathering all your materials and ensuring a safe workspace is paramount. Precision and preparation are key to a successful outcome. This project involves working with glass, an open flame, and chemicals, so attention to detail and safety should be your top priorities. Here’s a detailed list of what you’ll need, along with some important considerations for each item:
What You Will Need for Your Wine Bottle Lights:
- Empty Wine Bottle (Label Removed): Select a sturdy bottle with a clean, smooth surface. Thicker glass tends to work best for cutting. Ensure it’s thoroughly cleaned and dry, with all labels and adhesive residue removed. Soaking in hot soapy water and scrubbing with a sponge often does the trick.
- Acetone (100% Pure): This chemical is crucial for softening the glass and facilitating a clean break. Nail polish remover containing acetone might work, but 100% pure acetone found in hardware stores or beauty supply shops is highly recommended for best results. Always work in a well-ventilated area when using acetone.
- Cotton Wick (Thick, Untreated): A thick cotton string, twine, or even cotton mop head strands can work. The wick needs to absorb enough acetone to sustain a consistent flame around the bottle. Avoid synthetic materials, as they may melt or produce toxic fumes.
- Scissors: For cutting your cotton wick to the appropriate length.
- Lighter or Match: To ignite the acetone-soaked wick. Handle with care.
- Ice Water (in a Bowl): A large bowl filled with ice and water is essential for the thermal shock process. The colder the water, the more effective the clean break. Make sure the bowl is wide enough to fully submerge the bottom section of your wine bottle.
- Sandpaper (Assorted Grits): You’ll need medium-grit (e.g., 80-120 grit) for initial smoothing and fine-grit (e.g., 220-400 grit) for a polished, smooth finish. Wet/dry sandpaper is ideal, used with water to prevent glass dust and ensure a smoother edge.
- Hanging Light Bulb Socket Kit (with Cord): Look for pre-wired kits designed for pendant lights. Ensure it includes a suitable cord length for your desired hanging height. Many kits come with a switch and plug for easy installation.
- Light Bulb (LED Recommended): Choose an energy-efficient LED bulb, especially if your light will be on for extended periods. Small, decorative Edison bulbs or standard candelabra bulbs often fit well and provide a warm glow. Ensure the bulb’s wattage is appropriate for your socket.
- Cork (Optional): A standard wine cork can be drilled to act as a decorative cap for the bottle’s neck, providing a finished look and securing the cord.
- Safety Glasses and Gloves: Absolutely mandatory when working with glass and chemicals. Protect your eyes from glass shards and your hands from cuts and chemical exposure.
- Towel or Cloth: For protecting your work surface and wiping up spills.
- Workspace: A clean, well-ventilated area, preferably outdoors or in a garage, is ideal due to the use of acetone and potential glass dust.
Step-by-Step Guide: Crafting Your Own Elegant Wine Bottle Hanging Lights
Now that you have all your materials ready and your safety gear on, let’s proceed to the exciting part: transforming your empty wine bottle into a dazzling light fixture. Remember, patience and precision are your best tools here.
Step 1: Prepare Your Acetone Bath
Pour enough 100% pure acetone into a medium-sized, shallow bowl to half-fill it. Ensure this bowl is stable and placed on a heat-resistant surface in a well-ventilated area, away from any flammable materials. This will be where your wick gets saturated.
Step 2: Immerse and Saturate Your Cotton Wick
Take your cotton wick, ensuring it’s long enough to wrap around the circumference of your wine bottle several times (at least 3-4 times). Fully immerse the wick in the acetone, allowing it to soak completely. The goal is for the wick to be thoroughly saturated, which will ensure an even and consistent flame during the cutting process. Let it sit for a minute or two.
Step 3: Precision Wrapping for a Clean Cut
Carefully remove the saturated wick from the acetone, letting any excess drip back into the bowl. Wrap the wick tightly around the wine bottle at the exact point where you want the cut to be. A good starting point is about one-third of the way up from the bottom of the bottle. This area usually provides a good balance for stability and aesthetics once it’s a lamp. Ensure the wick lies flat against the glass and is not twisted or overlapping unevenly, as this can lead to an inconsistent cut.
Step 4: Secure the Wick with a Tight Knot
After wrapping the wick around the bottle the first time, wrap it around a second time, directly on top of the first layer. This creates a thicker band of fuel for the flame. Once wrapped, tie a tight knot to secure the wick firmly in place. The wick must be snug against the glass to transfer heat efficiently and create a clean break. Double-check that it’s positioned exactly where you desire the cut.
Step 5: The Controlled Flame: Igniting the Wick
With extreme caution, use a lighter or match to carefully ignite the acetone-soaked wick. As the wick catches fire, slowly and continuously twist the bottle horizontally, ensuring the flame heats all sides of the wick evenly. This even heating is critical for uniform thermal expansion of the glass. The flame will burn for about 30-60 seconds, and you might hear a slight cracking sound as the glass heats up. Keep rotating the bottle steadily until the flame begins to diminish or you hear a distinct “ping” indicating the glass has cracked.
Step 6: The Thermal Shock: Dipping into Ice Water
Immediately after the flame dies down or you hear the crack, swiftly and smoothly dip the heated section of the bottle into the bowl of ice-cold water. The sudden temperature change (thermal shock) will cause the heated glass to contract rapidly, cleanly breaking the bottle along the line where the wick was wrapped. A distinct “clink” or “pop” is often heard as the bottom separates.
Step 7: The Clean Break: Separating the Sections
Gently lift the bottle from the water. The bottom section should now be completely separated from the top, leaving a clean, relatively smooth edge. If the cut isn’t perfect on the first try, or if the bottom doesn’t separate, you can try re-saturating the wick, re-wrapping it, and repeating steps 5 and 6, focusing on even heating and immediate cold water immersion. Sometimes a light tap on the cut line helps if it’s clinging by a thread.
Step 8: Smoothing the Edges: Safety and Aesthetics
This is arguably the most crucial step for safety. The freshly cut edge of the glass will be extremely sharp. Don your safety gloves and glasses for this process. Using coarse-grit sandpaper (e.g., 80-120 grit) and a little water, begin sanding the sharp edge in a circular motion. Apply firm, consistent pressure. Once the sharpest edges are rounded off, switch to finer-grit sandpaper (e.g., 220-400 grit) to achieve a smooth, polished finish. This may take some time, but it’s essential to prevent cuts and make the light safe to handle. Run your finger (carefully!) along the edge to ensure there are no rough spots.
Step 9: Threading Your Light Cord
Take your hanging light bulb socket kit. From the newly cut bottom opening of the wine bottle, carefully thread the light cord upwards through the bottle’s neck. Guide the cord until the socket component is positioned just inside the bottle or at its lip, depending on your desired aesthetic.
Step 10: Twist Your Bulb into Place
Once the socket is correctly positioned, gently twist your chosen light bulb into the socket. Ensure it’s securely fastened but avoid overtightening. If your light kit has a decorative sleeve or ring, now is the time to secure it.
Step 11: Final Cord Adjustment
Pull the cord all the way through from the top (neck) of the bottle until the light bulb and socket are snugly in place within the bottle. Adjust the cord length as needed for hanging. You can use a small cable tie or knot inside the bottle to prevent the cord from slipping further down if your kit doesn’t have a built-in stopper.
Step 12: Enjoy Your Beautiful New Wine Bottle Light!
Plug in your newly crafted wine bottle light and marvel at your handiwork! Hang it in your chosen spot, whether it’s over a kitchen island, in a cozy corner, or as part of a larger display. The soft glow emanating from the repurposed glass will instantly elevate the ambiance of your space.
Pro Tips for Perfect Wine Bottle Lights and Enhanced Safety
- Choosing the Right Bottle: Experiment with different bottle shapes and colors. Green and brown bottles produce a warmer, more subdued glow, while clear bottles allow for brighter illumination. Thicker glass bottles are generally easier to cut.
- Advanced Smoothing Techniques: For an even smoother, more professional finish, after sanding with fine-grit sandpaper, you can use a Dremel tool with a grinding or polishing bit, or even specialty glass polishing paste. Always wear appropriate safety gear.
- Adding a Cork Finial: For a polished look, drill a hole (slightly larger than your cord’s diameter) through a wine cork. Thread the light cord through the cork from the top, then fit the cork into the neck of the bottle before inserting the bulb. This not only adds a decorative touch but also helps secure the cord.
- Safety Precautions Revisited: Never rush the glass cutting process. Always work in a well-ventilated area. Keep a fire extinguisher or a bucket of water nearby when working with open flames. Dispose of broken glass carefully. If you’re unsure about wiring, consider purchasing pre-wired light kits or consulting an electrician.
- Cleaning the Cut Edge: After sanding, thoroughly wash and dry the bottle to remove any fine glass dust, which can be irritating.
Creative Ways to Display Your New Wine Bottle Lights
The beauty of these DIY wine bottle lights lies in their versatility. Here are some ideas to inspire you:
- Kitchen Island or Bar Area: Hang a series of three or more at varying heights above a kitchen island or home bar for a sophisticated, industrial-chic look.
- Cozy Reading Nook: A single wine bottle light suspended near a comfortable armchair can create the perfect ambiance for evening reading.
- Bedroom Accent: Use them as unique bedside lamps, replacing traditional sconces for a rustic, romantic feel.
- Outdoor Patio or Balcony: For outdoor entertaining, string several wine bottle lights along a pergola or fence (ensure your light kits are rated for outdoor use or use them only in dry conditions). They cast a magical glow that’s perfect for summer evenings.
- Event Decor: These lights make fantastic decorations for weddings, parties, or holiday gatherings, adding a personal and handcrafted touch to any celebration.
The Joy of Sustainable Crafting and Personal Expression
Embarking on this DIY journey isn’t just about creating a light fixture; it’s about embracing sustainability, expressing your creativity, and adding a piece of your personality to your home. Each wine bottle light tells a story of transformation, from a discarded item to a cherished piece of decor. The sense of accomplishment you’ll feel when you switch on your handmade light for the first time is truly unparalleled. It’s an inexpensive yet impactful way to refresh your living space and contribute to a greener planet.
Wasn’t that both fun and rewarding? Who knew the process of cutting wine bottles could be so enjoyable and yield such beautiful results? I absolutely adore the unique look and warm glow they add when hung, and I’m confident you’ll feel the same way. There’s something truly special about the character that upcycled items bring into a home. Don’t hesitate to share your experiences and how your DIY wine bottle lights turned out in the comments section below! We love hearing about your creative endeavors!
To further visualize the steps and gain confidence, check out the video below to see how this DIY project is done!
For more inspiring DIY and craft news, make sure to follow us on our social media channels! You can find us on Facebook, Twitter, Pinterest and Instagram!
LIKE this project? We’re sure you’ll LOVE these creative upcycling ideas too:
24 Creative Uses for Beer Bottles17 Ingenious DIY Crafts Using Recycled Plastic BottlesCraft Your Own Self-Watering Planters Using Wine Bottles