
Post Up a Stylish DIY Corkboard: Transform Your Space and Boost Productivity
— This post was originally by forrent.com, (original publish date March 10, 2016) shared with permission —
Are you looking for an easy, affordable, and incredibly effective way to bring order and personality to your home or office? Imagine a dedicated spot where important notes, cherished photos, inspiring quotes, and urgent reminders all come together in one beautifully organized display. A custom DIY corkboard is precisely what you need! Far more than just a functional item, a personalized pin board becomes a unique piece of DIY home decor, reflecting your style while helping you conquer clutter.
This project is perfect for anyone craving a quick and inexpensive organizational solution. With just a few basic supplies and a small amount of your time, you’ll craft a budget-friendly custom pin board that perfectly organizes papers, photos, and reminders with undeniable style. It’s an opportunity to create something truly tailored to your specific needs and the aesthetic of your home. So, roll up your sleeves and let’s transform a plain cork board into something utterly fabulous and impeccably organized.
Why a DIY Corkboard is Your Next Must-Have Project
In our fast-paced lives, staying organized often feels like an uphill battle. Papers pile up, important dates get forgotten, and inspiration can feel lost amidst the everyday chaos. This is where a strategic and stylish corkboard comes into play. But why go the DIY route?
- Unmatched Customization: Unlike off-the-shelf options, a custom pin board allows you to choose your exact colors, patterns, and even the size and type of frame, ensuring it perfectly complements your existing decor.
- Budget-Friendly: Often, the materials for a DIY corkboard are less expensive than purchasing a pre-designed, stylish one from a home goods store. You can even repurpose an old, forgotten board!
- Personal Satisfaction: There’s immense satisfaction in creating something with your own hands. This project isn’t just about organizing; it’s about expressing your creativity and making your space truly your own.
- Enhanced Functionality: Design a board that serves your specific organizational needs, whether it’s for school schedules, meal planning, vision boarding, or displaying artwork.
My Journey to Organized Bliss (and How You Can Start Yours)
My biggest goal for 2016 was to become truly organized. I’ll be honest: I try really hard to keep a tidy house, but my right-brained self often struggles with the systematic approach organization demands. I always have the best intentions, but thankfully, my left-brained husband excels at getting rid of clutter and running a tight ship – a quality I truly wish I had inherited! His ability to maintain order consistently inspires me, even if it’s a skill I’m still developing.
That’s precisely why I decided to turn a plain, unassuming corkboard into a genuine work of art. My aim was twofold: to create a visually appealing piece that would add charm to my space, and more importantly, to fashion a constant source of inspiration to help me stay organized. By tacking my daily to-do lists, important reminders, and motivating visuals onto something beautiful, I believe this decorative corkboard will be the catalyst for a more orderly life. It’s going to work, right? I’m confident it will, and you can achieve the same results!
Gathering Your Essentials: What You’ll Need for Your Stylish Corkboard
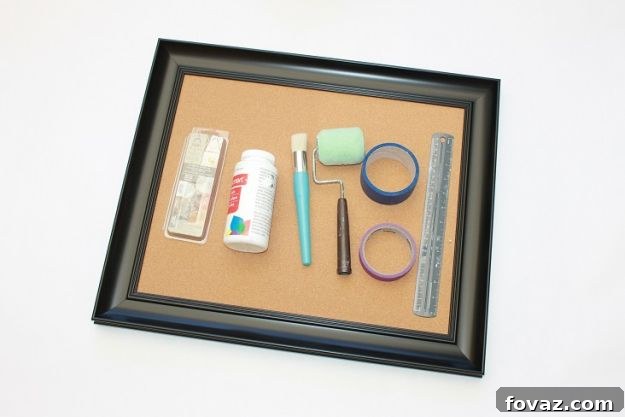
Before you dive into the creative process, ensure you have all your materials ready. A well-prepared workspace makes any easy DIY craft project smoother and more enjoyable. Here’s a detailed list of what you’ll need, along with some tips for selection:
The Corkboard Base: Choosing Your Canvas
- Corkboard: You can choose a framed or unframed one, or even better, repurpose one you already have! Consider the size that best fits your designated space and your organizational needs. A larger board offers more pinning area, while a smaller one can be a charming accent.
Painting Perfection: Tools for a Flawless Finish
- Mini Paint Roller: Ideal for applying paint quickly and evenly over large, flat cork surfaces. It helps achieve a smooth finish with minimal brush strokes.
- Foam Brush: Essential for reaching edges, corners, and detailed areas that the mini roller can’t access. Also great for touch-ups.
- Stencil Brush: Specifically designed for stencil work, allowing for controlled application of thicker paints or creams without bleeding under the stencil.
- White Craft Paint: Your chosen base color. Acrylic craft paint works wonderfully on cork and is easy to clean up.
Designing Your Masterpiece: Stencils, Tape, and Accents
- Stencil Cream: This will be your accent color, creating the striking pattern on your board. Stencil creams are typically thicker than regular paint, offering good coverage and less chance of bleeding. If you can’t find stencil cream, a slightly thicker acrylic craft paint in your chosen metallic or accent color can work as an alternative.
- Painter’s Tape: Crucial for protecting areas you don’t want painted and for creating crisp, clean lines for your design. Opt for thin painter’s tape for precise patterns.
- Ruler: For accurately measuring and creating perfectly straight and symmetrical lines.
Step-by-Step Guide: Crafting Your Custom Corkboard
Now that you have all your materials, let’s get crafting! Follow these detailed instructions to create a truly stunning and personalized organization tool.
Step 1: Prepare Your Foundation (The Frame)
Begin by carefully covering any frame around your corkboard with painter’s tape. This step is vital for achieving a clean, professional finish. If your corkboard has a wooden frame that you wish to paint a different color from the cork surface, do this first! Paint the frame, let it dry completely, and then proceed to tape it off before moving on to the cork itself. If you’re using an unframed corkboard or love the existing frame, you can skip this part of the taping and just ensure your edges are neat.
Step 2: Laying the Base Color
It’s time to paint your corkboard! I’ve found that a mini paint roller makes things incredibly quicker when you’re covering large surfaces with a single color, ensuring a smooth, even application. If you don’t have one, a foam brush can work, though it may take a bit more time and effort to achieve a consistent finish. As you work, you might realize the mini roller doesn’t quite reach all the way to the very edges of the corkboard, especially if there’s a slight bevel or a tight corner near the frame. This is where your foam brush comes in handy – use it to meticulously paint into those edges. Once the edges are done, use the mini roller again to gently blend in any brush strokes from the foam brush, ensuring a seamless look across the entire surface. Apply at least two thin coats for optimal coverage, allowing each coat to dry completely before applying the next.
Step 3: Mapping Out Your Design
Once your base coat is thoroughly dry, grab your ruler and thin painter’s tape to begin creating your distinctive pattern. For this design, we’re aiming for elegant 1-inch diagonal lines. Start by finding the center of the top edge of your corkboard. From this point, carefully apply your painter’s tape diagonally, creating parallel lines that are exactly 1 inch apart. Ensure the tape is pressed down firmly to prevent any paint from bleeding underneath. Precision in this step is key to a crisp final pattern. Take your time to measure accurately and create even spacing.
Step 4: First Strokes of Genius (Applying Stencil Cream)
Now, with your diagonal tape lines in place, use your stencil brush to carefully paint in between these tape lines with your chosen stencil cream. This is a crucial step for achieving your decorative pattern. If this is your first time working with stencil cream, be aware that it’s usually a bit thicker than regular paint and might not glide as smoothly. Use a dabbing or stippling motion with your stencil brush rather than brushing, as this helps prevent the cream from seeping under the tape and ensures a clean line. Apply thin, even layers. You might find that one application is sufficient due to its thickness, but if a second thin coat is needed for full opacity, allow the first to dry to the touch before reapplying. Let this first set of painted lines dry completely.
Step 5: Unveiling the Pattern (Part One)
Once the stencil cream is fully dry, carefully peel away the painter’s tape. Take your time with this to avoid accidentally peeling off any paint. You’ll now see your first set of crisp diagonal lines. To create the criss-cross pattern, you’ll repeat the taping process, but this time, make new 1-inch diagonal lines with painter’s tape on the opposite side of the corkboard. These new lines should intersect with your freshly painted lines, forming a grid of unpainted squares where your next color will go. Again, ensure the tape is firmly pressed down.
Step 6: Completing the Criss-Cross
With your new set of diagonal tape lines applied, it’s time to paint the second side of your design using your gold stencil cream (or your chosen accent color). Just as in Step 4, use your stencil brush and a dabbing motion to fill in the areas between the tape lines. This second layer will complete the striking criss-cross pattern, adding depth and visual interest to your corkboard. Ensure even coverage and allow the stencil cream to dry thoroughly. Patience here will yield the best results.
Step 7: Defining the Edges
Once the second layer of stencil cream is dry, carefully peel away the tape from this section. Now, to add a final touch and define the edges of your intricate design, create more 1-inch diagonal tape lines specifically on the outer edges or perimeter of your existing pattern. This step allows you to create a border or frame your patterned area, giving it a polished and professional look. This final set of tape lines will help you paint the remaining unpainted sections, creating a cohesive design.
Step 8: The Finishing Touches
For the final painting step, use your white craft paint (or your base color) to fill in the rest of the corkboard in between the newly applied tape lines from Step 7. This will complete your design, tying all the elements together and creating a finished, polished aesthetic. Ensure the paint is applied smoothly and evenly. Let this final coat dry completely, ideally for several hours or overnight, especially if you’ve applied multiple layers of paint.
That’s it! Once everything is dry, carefully peel off all the remaining painter’s tape. Take a moment to admire your handiwork – you’ve just created a beautiful, custom, and incredibly stylish way to stay organized! Congratulations on completing your creative cork board project!
Beyond the Basics: Customization Ideas for Your Unique Corkboard
While the diagonal pattern is a classic and elegant choice, the beauty of a personalized organization project lies in its endless possibilities for customization. Here are some ideas to make your corkboard truly one-of-a-kind:
- Different Patterns: Experiment with chevron, stripes, polka dots, checkerboards, or even freehand designs. Geometric patterns are always popular for a modern look.
- Color Palettes: Don’t limit yourself to white and gold. Choose colors that perfectly match your room’s decor – vibrant hues for a playful space, pastels for a serene feel, or bold contrasts for a dramatic statement.
- Fabric Overlay: Instead of painting, consider covering the corkboard with a thin layer of decorative fabric before adding any designs. This adds texture and a cozy feel.
- Embellishments: Attach small decorative elements like faux flowers, beads, or even mini lights around the frame or on the board itself for extra flair.
- Push Pin Variety: Use decorative push pins, thumbtacks with unique shapes, or even mini clothespins attached to thumbtacks to hold your items.
- Mixed Media: Incorporate stenciled words, small painted motifs, or even sections of wallpaper or decorative paper for an eclectic look.
Let your imagination be your guide! This DIY home organization project is a canvas for your creativity.
Pro Tips for a Perfect DIY Experience
- Work in a Well-Ventilated Area: Ensure good airflow when painting to dissipate fumes and aid drying.
- Patience is Key: Rushing steps, especially drying times, can lead to smudges or less-than-perfect lines.
- Test First: If you’re unsure about a technique or color combination, test it on a scrap piece of cork or cardboard.
- Cleanliness: Keep your brushes and rollers clean between coats and colors for the best results.
- Use Light Coats: Multiple thin coats of paint or stencil cream are always better than one thick coat, which can become clumpy or uneven.
- Remove Tape While Paint is Damp (Optional): For very crisp lines, sometimes removing painter’s tape when the paint is still slightly damp can prevent chipping, but for stencil cream, waiting until it’s dry might be safer to avoid smudging the thick paint. Experiment if you wish!
The Transformative Power of a Personalized Space
Creating your own stylish cork board is more than just a craft project; it’s an investment in your mental well-being and productivity. A dedicated space for your thoughts, tasks, and inspirations can dramatically reduce mental clutter and enhance your focus. Imagine walking into a room and seeing your goals, reminders, and cherished memories beautifully displayed on a board you created with your own hands. It’s a constant source of motivation, a visual diary, and a testament to your ability to take control of your environment. This effective home organization solution makes every day a little bit smoother and a lot more inspired.