
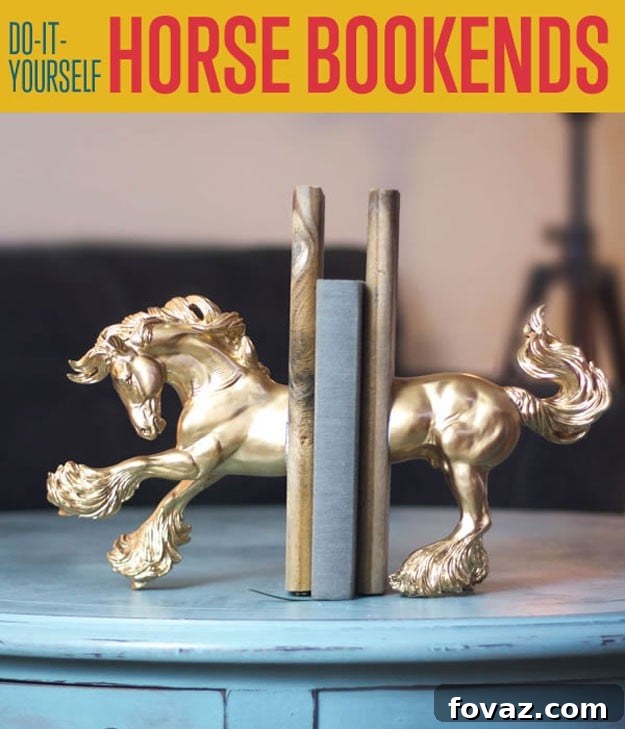
DIY Gold Horse Bookends: Add Equestrian Elegance to Your Home Decor
Are you searching for a unique gift that speaks volumes of thoughtfulness and style, or perhaps a captivating piece to elevate your own home decor? Look no further than these exquisite DIY Gold Horse Bookends. Perfectly blending traditional charm with a touch of modern glamour, this project is designed for both seasoned crafters and enthusiastic beginners. Imagine the dynamic energy these golden equine figures will bring to your bookshelf, creating an instant focal point and reflecting a sophisticated aesthetic. This comprehensive guide will walk you through creating a stunning set of custom bookends that are not just functional, but truly works of art, ideal for any horse lover or design aficionado seeking a touch of equestrian elegance.
Beyond their decorative appeal, these handmade bookends offer a fantastic opportunity to personalize your living space or craft a memorable, bespoke present. The process is surprisingly straightforward, cost-effective, and incredibly rewarding, proving that luxurious home decor doesn’t always come with a hefty price tag. By following our detailed step-by-step instructions, you’ll discover how simple it is to transform readily available materials into a statement piece that exudes luxury and captures attention. Get ready to embark on a creative journey that culminates in a truly spectacular addition to any room, bringing vibrancy, organization, and a touch of golden grace to your cherished book collection. This DIY project is perfect for enhancing your living room, study, or bedroom with a personalized touch.
Essential Supplies for Your DIY Horse Bookends Project
Gathering your materials is the first exciting step in bringing your elegant horse bookends to life. Each item has been carefully selected for its effectiveness, durability, and accessibility, ensuring a smooth and enjoyable crafting experience. Remember, the quality of your supplies often contributes significantly to the overall finish and longevity of your DIY creation, so take a moment to select them with care. Here’s a detailed list of what you’ll need to make these unique bookends:
- Breyer Horse Model: The undeniable star of our project! We highly recommend using a Breyer horse model for its realistic detailing, authentic proportions, and durable plastic construction, which makes it ideal for crafting and cutting. I personally found the Gypsy Vanner model on Amazon.com to be perfect, but any Breyer horse with a good stance and a suitable size (around 1:9 traditional scale is common) will work beautifully. Consider the horse’s pose – a dynamic or elegant stance can add more visual interest and character to your finished bookends. Opt for a solid plastic model rather than hollow ones for easier cutting and better stability.
- Two Matching Wood Scraps: These substantial pieces of wood will form the sturdy and stable bases of your bookends. Aim for pieces that are approximately 12 inches tall and 4 inches wide, ensuring they provide ample support and leverage to keep a row of books upright. The height is crucial for accommodating various book sizes, from novels to larger art books, while the width offers the necessary stability. You can repurpose reclaimed wood for an eco-friendly touch and unique character, or easily purchase new, unfinished pieces from any hardware store. Critically, ensure both pieces are perfectly flat on at least one side; this flat surface will be the base that rests flush against your bookshelf, preventing wobbling and ensuring proper alignment. Light sanding may be needed if the surfaces are not perfectly smooth.
- Metallic Gold Spray Paint: This is where the magic happens, transforming your plastic horse into a glamorous, gilded showpiece. A high-quality metallic gold spray paint is essential to achieve a rich, even, and lustrous finish that mimics real metal. Look for brands known for their excellent coverage, quick-drying properties, and strong adhesion to both plastic and wood. Hardware stores offer a wide selection of metallic finishes, from brilliant, shiny gold to a more subdued antique gold or even rose gold, allowing for personal customization. Choosing a paint + primer in one formula is highly recommended for best results, as it enhances adhesion and durability, creating a long-lasting, chip-resistant finish for your DIY home decor project.
- Liquid Nails Glue (or similar heavy-duty construction adhesive): For a truly secure and lasting bond between the painted horse halves and their wooden bases, a strong, industrial-grade construction adhesive is indispensable. Liquid Nails is a popular choice, renowned for its powerful grip and versatility on various materials, including the plastic of the Breyer horse and your wooden bases, making it an excellent choice for this project. Ensure you select a fast-drying, strong-hold formula that offers long-term durability and resistance to stress, preventing your beautiful bookends from coming apart over time. Always read the product instructions for specific drying times and ventilation requirements, as these adhesives can have strong fumes.
- Metal Heel Grinder (or a robust metal file/rasp): This seemingly unconventional tool is actually a clever secret weapon for achieving perfectly smooth, professional-looking edges on your cut plastic. You can often find these sturdy tools in the bath and beauty section of pharmacies like Walgreens or Rite Aid for just a few dollars. Its coarse, durable metal surface is far more effective than standard sandpaper, which often struggles to effectively smooth sturdy plastic edges, especially after a hacksaw cut. The metal heel file quickly grinds down irregularities, leaving a much cleaner and more polished finish on your horse halves, which is crucial for both aesthetics and ensuring optimal adhesion in a later step.
Essential Tools from Your Craft Room for Bookend Creation
While the primary supplies are specific to this unique bookend project, you’ll also need a few common tools typically found in any well-equipped craft room, workshop, or even a basic home toolbox. These tools are crucial for executing the steps safely and effectively, ensuring your DIY horse bookends come out looking professionally crafted and built to last. Always prioritize safety when using cutting tools, and ensure your workspace is adequately prepared, especially when dealing with spray paint.
- Q-Tips: These small, humble cotton swabs are incredibly useful for precision cleaning, particularly when dealing with excess glue. During the assembly phase, some adhesive may inevitably squeeze out from the seams. Q-tips allow you to meticulously wipe away any fresh glue residue immediately, preventing smudges, unsightly blobs, or unwanted texture on your beautifully painted surfaces. Keep a good supply on hand, as you’ll want to clean up any glue overflow promptly before it begins to set, ensuring a perfectly clean and polished finish around the base of your horse figures.
- Work Surface Cover for Spray Painting: Protecting your work area is paramount when using spray paint. Overspray can travel further than you might expect, so it’s essential to shield your surrounding surfaces. A dedicated drop cloth, several layers of old newspaper, a large piece of cardboard, or even a plastic tarp will effectively protect your floor, table, or workbench from paint residue. Always choose a well-ventilated area for spray painting, preferably outdoors on a calm day or in a garage with open doors and windows, to minimize the inhalation of fumes and ensure proper paint drying. This simple preparation step prevents unnecessary cleanup and safeguards your environment.
- Hacksaw: A sharp, sturdy hacksaw is an absolutely essential tool for making a clean and precise cut through the plastic Breyer horse model. When selecting a hacksaw, opt for one with a fine-toothed blade, as this will produce smoother cuts and significantly reduce the amount of post-cutting refinement needed. If you don’t currently own a hacksaw, they are readily available and affordable at any hardware store and are a versatile tool for many other DIY projects involving cutting metal or plastic. Always handle the hacksaw with extreme care, ensure the workpiece is stable, keep your fingers clear of the blade, and wear appropriate protective gear, such as gloves and safety glasses, to prevent injury.
Step-by-Step Guide: Crafting Your Gold Horse Bookends
Now that you have all your materials and tools meticulously gathered and prepared, let’s dive into the exciting and rewarding creative process. Each step is designed to be straightforward and achievable, meticulously guiding you closer to a magnificent pair of DIY horse bookends that will capture attention and admiration in any setting.
Step 1: Precisely Cutting Your Breyer Horse Model
This initial step requires careful attention to detail and a steady hand. Using your sharp hacksaw, you will neatly slice your Breyer horse precisely in half, transforming a single figure into two distinct halves that will form your bookends. The primary goal here is to achieve as straight and clean a cut as possible, as this will directly impact the final appearance and, more importantly, the stability and flush fit of your bookends against their wooden bases. Before you begin cutting, take a moment to accurately identify and mark the exact midpoint of the horse’s body. A good technique is to lightly draw a line around the circumference of the horse where you intend to cut using a fine-tip marker or pencil. This visual guide will significantly help you maintain a straight path with the hacksaw.
To ensure safety and precision, place the horse on a stable work surface. If possible, secure it with a clamp or ask a helper to hold it firmly and steadily. Begin sawing slowly and steadily, applying consistent, even pressure. Avoid rushing or using excessive force, as this can lead to jagged edges, an uneven cut, or even damage to the plastic, all of which will require more effort to smooth and correct later. Safety is paramount throughout this process; always keep your fingers well clear of the blade and wear appropriate protective gear, such as sturdy gloves and safety glasses. Achieving a perfectly straight cut might seem daunting, but patience and a controlled approach are key. If your first pass isn’t perfectly straight, you can often make small, careful adjustments during the cutting process. A clean, even cut not only looks better but also ensures that the horse halves will sit flush and stably against the wooden bases, creating a more professional and durable bookend. Once the horse is successfully separated into two distinct halves, gently set them aside. Inspect the cut edges – don’t worry if they’re not perfectly smooth or have small burrs yet, as that’s precisely what the next step addresses in detail.
Step 2: Refining and Smoothing the Edges of Your Horse Halves
Even with the sharpest hacksaw and the most careful technique, cutting through sturdy plastic like that of a Breyer horse model will almost always leave small, rough particles, burrs, and uneven edges along the cut line. These imperfections, if left untreated, can significantly detract from the overall elegance and professional finish of your DIY bookends. More critically, they can prevent a strong, flush, and reliable adhesion to the wooden bases. This is precisely where our unique secret weapon, the metal heel file (or a robust metal file), comes into play! Unlike ordinary sandpaper, which often struggles to effectively smooth sturdy plastic edges and quickly wears down, a metal heel file – typically found in the bath and beauty section of pharmacies like Walgreens or Rite Aid for just a few dollars – possesses the abrasive power and durability needed for this specific task. Its coarse, durable metal surface quickly and efficiently grinds down irregularities, leaving a much smoother and cleaner finish on your plastic horse halves.
To begin, firmly hold one half of the horse in one hand. Using the metal heel file, gently but persistently rub along the rough midsection edge where the cut was made. Apply even pressure and work in short, controlled strokes, moving the file back and forth or in a circular motion. You’ll quickly notice the plastic becoming visibly smoother and more even as you work. For a clear demonstration, compare the smoothed edge to an unsmoothed one, as effectively shown in the example photo for Step 2 (where the horse half on the left has been refined, and the one on the right has not yet been treated). Continue this meticulous process for both horse halves until all the rough particles, sharp points, and unevenness are completely gone. A well-smoothed edge is crucial not only for the aesthetic appeal of your finished product but also for ensuring a strong, seamless, and flush bond with the wooden base in a later step. Take your time with this step, as a smooth, prepared foundation is key to achieving a professional-looking and durable end product. Once both halves are perfectly smooth to the touch and visually clean, you’re ready to move on to the next exciting transformation: painting.
Step 3: Applying the Glamorous Metallic Gold Finish
Now for the truly transformative and visually impactful step: applying the metallic gold spray paint! This is where your Breyer horse models will go from plastic toys to elegant, gilded sculptures, radiating luxury and charm. Before you begin painting, ensure you are working in a well-ventilated area, preferably outdoors on a dry, calm day or in a garage with ample airflow and open doors and windows, to safely disperse paint fumes. Lay down your chosen work surface cover (such as a dedicated drop cloth, several sheets of old newspaper, or a large piece of cardboard) to thoroughly protect the surrounding area from any potential overspray. Carefully place both horse halves on the covered surface, ensuring they are stable, upright, and easily accessible from all angles for even painting.
Begin by applying a very light, even coat of metallic gold spray paint to one side of each horse half. Hold the spray can approximately 8-12 inches away from the surface and use a continuous, sweeping motion, moving past the edges of the horse to avoid paint buildup and unsightly drips. The first coat should be thin and may not provide full coverage; its primary purpose is to create a bonding layer for subsequent coats and ensure even adhesion. Allow this initial coat to dry completely, typically for 10-15 minutes, or according to the specific manufacturer’s instructions on your spray can. Once dry, apply a second, slightly heavier coat, meticulously ensuring you cover any areas missed in the first pass and achieve a more uniform color. You’ll want to aim for a consistent, opaque gold finish without any drips, streaks, or visible plastic showing through. For optimal coverage, a truly luxurious look, and enhanced durability, you might find it necessary to apply a third coat. Remember to let each coat dry thoroughly before applying the next, and before carefully flipping the horse halves to paint the other side. Patience during the drying process is crucial for achieving a smooth, professional-grade finish that truly shines. Once all sides have been painted to your satisfaction and are completely dry to the touch, your horse halves will gleam with opulent metallic beauty, perfectly ready for the final assembly phase.
Step 4: Assembling Your Elegant Gold Horse Bookends
With your horse halves now beautifully gilded and gleaming, it’s time for the final, crucial assembly step that transforms them from decorative figures into functional and elegant bookends. This step involves using the powerful Liquid Nails glue (or your chosen heavy-duty construction adhesive) to securely attach each painted horse half onto its respective wooden scrap base. As with spray painting, ensure you are working in a very well-ventilated area, as construction adhesives can emit strong fumes that should be avoided. Lay down a protective surface cover to catch any potential glue drips or spills.
First, take a moment to double-check your two wood scraps. They should be of similar height, thoroughly clean of any dirt, dust, or debris, and most importantly, perfectly flat on at least one side. This flat side will be the critical base that rests flush against your bookshelf, providing essential stability and preventing your bookends from rocking or tilting. Position one wooden scrap upright on your work surface. Take one of your beautifully painted horse halves. Apply a generous, continuous bead of Liquid Nails glue along the entire cut edge of the horse-half. Do not skimp on the adhesive here; a strong, tight, and comprehensive bond is absolutely essential for creating durable and long-lasting bookends that can withstand the weight of your books. However, apply thoughtfully to avoid applying so much that it becomes uncontrollable or excessively messy.
Carefully press the glued edge of the horse half firmly onto the top edge of the wooden board. Position it centrally or slightly off-center for a balanced and aesthetically pleasing look, depending on your preference. As you press down, some excess glue will almost certainly gush out from the seam between the horse and the wood. This is precisely where your Q-tips become invaluable! Immediately use damp Q-tips to gently and meticulously wipe away any excess glue that squeezes out. Working quickly is important, as Liquid Nails can begin to set relatively fast, making it progressively harder to clean up neatly. Continue to hold the horse half firmly in place for a minute or two to allow the initial tack and bond to form. Repeat this entire process for the second horse half and its corresponding wooden scrap.
Once both horse halves are attached, carefully inspect them from all angles to ensure they are upright, straight, and properly aligned. Make any minor adjustments before the glue fully cures. The key to creating durable, long-lasting bookends is allowing the adhesive ample time to dry and cure completely. Most heavy-duty construction adhesives like Liquid Nails require at least 24 hours to dry to the touch and achieve their initial bonding strength, with full cure taking longer. During this crucial period, avoid moving or placing any stress on the newly assembled bookends. For best results and maximum durability, allow them to cure for even longer, perhaps 48-72 hours, especially if you live in a humid environment where drying times can be extended. Once everything has dried completely and the bond is solid and unwavering, your stunning DIY Gold Horse Bookends are finished, ready to proudly adorn your favorite bookshelf and elegantly organize your literary treasures!
Join Our DIY Community: Share Your Creative Journey!
We truly hope you thoroughly enjoyed this comprehensive tutorial on how to create your own magnificent DIY Gold Horse Bookends! It’s incredible how a few simple supplies and a dash of creativity can transform an ordinary object into a glamorous, functional piece of home decor that truly reflects your personal style. We’d absolutely love to hear your thoughts on this project. Did you find it easy to follow? Do you have any brilliant tips, innovative techniques, or alternative ideas for making horse bookends or other unique bookend designs? Share your insights, experiences, and finished projects in the comments section below! Your feedback and creativity inspire us and the entire DIY community.
At DIY Projects, we are passionate about fostering a vibrant and supportive community of creative enthusiasts. We believe strongly in inspiring people to tap into their inventive side and discover the immense satisfaction and pride that comes from making things with their own hands. Whether it’s crafting unique home decor projects, ingeniously upcycling forgotten treasures, trying out delicious new recipes, or mastering practical tutorials, we’re dedicated to bringing you a diverse world of DIY possibilities. We constantly explore and share cool DIY projects, from simple craft ideas perfect for beginners to more ambitious home improvement endeavors, because we want everyone to realize that a world of creative possibilities and personalized solutions is just a click away. We thrive on your engagement and contributions! If you have another craft project you’d like to share with our community, or if there’s a particular DIY challenge or style you’d like us to tackle next, please let us know. We’re always eager to try new ideas, feature the incredible work of our readers, and build a collaborative space for all things handmade. Connect with us and become part of a growing network of DIY enthusiasts where inspiration and innovation flourish daily. Stay connected with us on Facebook, Twitter, Pinterest, and Instagram for your daily dose of creativity, helpful tips, and endless project inspiration!
Discover More Inspiring DIY Projects You’ll Love!
If you enjoyed crafting these elegant gold horse bookends, you’re in for a treat! We have a treasure trove of other exciting DIY projects that are sure to spark your imagination and add even more personalized charm and functionality to your home. Explore these popular posts from our extensive collection for more creative inspiration:
DIY Father’s Day Gift Ideas | Faux Copper Eagle Bookends
Looking for another unique bookend idea or a thoughtful, handmade gift for a special occasion like Father’s Day? This fantastic tutorial guides you through the process of creating impressive faux copper eagle bookends, perfect for a dad or anyone who appreciates a touch of rustic sophistication. It’s an excellent project to expand your bookend-making skills with a completely different aesthetic and theme.
DIY Realistic Faux Fur Rug | DIY Home Decor
Add instant warmth, luxurious texture, and a cozy, inviting feel to any room in your home with this brilliant guide on making a realistic faux fur rug. This project is a fantastic and budget-friendly way to introduce soft furnishings and high-end comfort into your home decor, offering a stylish accent that rivals expensive boutique alternatives without the hefty price tag.
Salvaged Window DIY Coffee Table | Unique Coffee Tables
Embrace the art of upcycling and sustainable design with this ingenious project that transforms an old, salvaged window into a stunning and utterly unique coffee table. Discover how to give discarded items a new lease on life, creating a beautiful, conversation-starting centerpiece that is both eco-friendly and incredibly stylish. This project perfectly exemplifies innovative DIY home decor and creative repurposing.