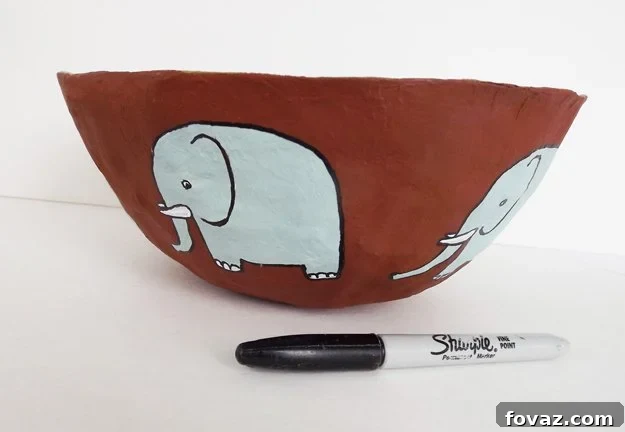
DIY Paper Mache Bowl: Your Ultimate Guide to Creative Home Decor
Are you looking for an inspiring and budget-friendly craft project that can transform into a beautiful piece of DIY decor? Do you want to add a personalized touch to your home organization? Then creating your very own paper mache bowl is the perfect project for you! This detailed tutorial will guide you through every step, showing you how to turn simple materials like newspaper into a sturdy, functional, and decorative bowl. It’s an accessible craft for all skill levels and a fantastic way to unleash your creativity while also contributing to sustainable living by upcycling.
Unlock Your Artistic Side with Paper Mache Projects
Paper mache, a classic and enduring crafting technique, offers an exciting way to create custom pieces for your home or office. These handmade paper mache bowls are not just easy and fun to make, but they are incredibly versatile. Imagine a unique bowl holding your keys and loose change by the door, displaying decorative items on a shelf, or serving as a charming centerpiece on your coffee table. The beauty of paper mache lies in its customizable surface, which eagerly awaits your personal touch. You can paint it with your favorite colors, incorporate intricate designs, or add textures and embellishments to truly make it your own.
Why Choose a DIY Paper Mache Bowl?
Beyond the simple joy of crafting, making a paper mache bowl offers numerous benefits:
- Personalized Home Decor: Unlike store-bought items, your paper mache bowl will be a unique reflection of your style and creativity, adding character to any room.
- Functional Organization: Perfect for decluttering, these bowls can elegantly store small items like jewelry, office supplies, craft notions, or everyday essentials, keeping your space tidy.
- Eco-Friendly Crafting: This project is a fantastic way to upcycle old newspapers, magazines, or other scrap paper, giving them a new life and reducing waste.
- Budget-Conscious Hobby: Most of the materials required are inexpensive and readily available, making it an affordable and rewarding pastime.
- Therapeutic and Relaxing: The hands-on process of tearing paper, mixing paste, and layering can be a wonderfully calming and meditative activity.
- Unique Handmade Gifts: A custom-made paper mache bowl makes a thoughtful and personal gift for friends and family, showcasing your effort and care.
What You’ll Need for Your DIY Paper Mache Bowl
Before you begin, gather all your supplies. Having everything ready will ensure a smooth and enjoyable crafting experience. Most of these items are likely already in your home or easily acquired from a local craft store.
- Newspaper: The primary material for your bowl. You can also use other types of paper like old magazines or brown paper bags for different textures.
- All-purpose Flour: The main ingredient for your homemade paper mache paste.
- Water: To mix with the flour to achieve the perfect paste consistency.
- A Pinch of Salt: A small but important addition that helps prevent mold growth in your paste, especially during the drying process.
- A Bowl (for molding): Choose a sturdy bowl of the desired shape and size for your finished paper mache creation. Glass, ceramic, or plastic bowls work best as molds.
- Plastic Wrap: Essential for covering your mold bowl, allowing for easy and damage-free removal of your dried paper mache.
- Craft or Acrylic Paints: A variety of colors to decorate your bowl. Acrylic paints are highly recommended for their vibrant colors, good coverage, and quick drying time.
- Paint Brushes: A selection of sizes, including larger brushes for base coats and finer brushes for intricate details.
- Elmer’s Glue (PVA glue, optional): Adding a small amount to your paste can enhance its strength, adhesion, and overall durability.
- Whisk: To effortlessly mix your paste until it’s perfectly smooth and lump-free.
- Tape: To secure the plastic wrap firmly to your mold bowl, preventing it from shifting during application.
- Sandpaper: Fine-grit sandpaper (around 120-220 grit) for smoothing any rough edges or textures on your dried bowl, preparing it for painting.
- Protective Sealer: A clear, waterproof sealer (such as a clear acrylic spray sealer or brush-on varnish) to protect your finished artwork from moisture, dust, and wear, ensuring its longevity.
- Permanent Black Marker: For outlining designs, adding sharp details, and enhancing the visual pop of your artwork.
- Jute Twine (optional): For decorative embellishments, adding a rustic or natural touch to your bowl.
- Hot Glue Gun & Glue Sticks (optional): If you plan to add embellishments like jute, a hot glue gun provides quick and strong adhesion.
Step-by-Step Guide: Crafting Your Paper Mache Masterpiece
Step 1: Prepare Your Work Area for a Seamless Project
Before you dive into the delightful mess of paper mache, it’s crucial to prepare your workspace. Paper mache paste can be sticky, so clearing an area and covering it thoroughly is key. Lay down old garbage bags, plastic sheeting, or aluminum foil over your table or counter to protect surfaces from drips and spills. This protective layer will make cleanup significantly easier. You might also want to wear old clothes or an apron to keep your attire clean. A well-prepared workspace sets the stage for a more enjoyable and less stressful crafting experience.
Step 2: Prepare Your Newspaper Strips
The foundation of your paper mache bowl is made from newspaper strips. Take your newspaper and tear or cut it into strips. For most bowls, strips that are about 1 inch (2.5 cm) wide are ideal. The length can vary, but generally, strips between 6 to 10 inches (15 to 25 cm) long are manageable and effective for layering. While cutting gives a cleaner edge, tearing the newspaper can sometimes result in softer, feathered edges that blend more seamlessly when layered, leading to a smoother finished surface. Prepare a generous pile of strips; you’ll need many to build up sufficient layers for a sturdy bowl.
Step 3: Prepare Your Mold Bowl for Easy Release
This critical step ensures your dried paper mache creation can be easily removed from its mold without damage. Take the bowl you’ve selected as your form and completely wrap it with plastic wrap. Ensure the plastic wrap is smooth and taut against the bowl’s surface, pressing out any trapped air bubbles or wrinkles as much as possible. These imperfections can transfer to your paper mache. Secure the edges of the plastic wrap to the inside of the mold bowl with tape. This creates an effective non-stick barrier, allowing your perfectly dried paper mache bowl to detach effortlessly later on.
Step 4: Mix Your Paper Mache Paste
The paste acts as the binder for your paper mache. A reliable and simple recipe involves flour and water. In a mixing bowl, combine 1 cup of all-purpose flour with 2 cups of water. Using a whisk, gradually mix these ingredients until the paste is completely smooth and free of any lumps. For enhanced durability and to inhibit mold growth, stir in about 1/4 cup of white glue (like Elmer’s glue) and a small pinch of salt. The consistency should be similar to a thin pancake batter – thick enough to cling to the newspaper strips but fluid enough to spread evenly. If your paste is too thick, add a tablespoon of water at a time until you reach the desired consistency; if too thin, add a little more flour.
Step 5: Apply the Paper Mache Layers with Care
Now, the exciting part begins! Take one of your prepared newspaper strips and fully immerse it in the paper mache paste, ensuring it’s thoroughly saturated. Gently pull the strip out, using your fingers to “squeegee” off any excess paste. The strip should be wet but not dripping. Carefully lay the paste-covered strip over your plastic-wrapped mold bowl, starting from the center and working outwards. Smooth each strip down with your fingers, pressing out any air bubbles or wrinkles. Crucially, overlap each subsequent strip, varying the direction of your layers (e.g., some horizontal, some vertical, some diagonal). This cross-hatching technique significantly increases the structural strength and stability of your finished bowl. Apply at least 3 to 5 layers for a reasonably sturdy bowl; applying more layers will result in an even stronger and more durable piece. Once you’ve achieved the desired number of layers, place your bowl in a well-ventilated area and allow it to dry completely. This is the most time-consuming step and can take anywhere from 24 to 48 hours, or even longer depending on the number of layers, humidity levels, and ambient temperature. The bowl must be bone dry and hard before proceeding.
Step 6: Demold, Trim, and Smooth Your Bowl’s Form
Once your paper mache is completely dry and rigid, it’s time to separate it from the mold. Carefully peel off the tape that secures the plastic wrap to the inside of your mold bowl. Then, gently pull the plastic-wrapped paper mache form away from the mold. If it resists, you can very carefully use a butter knife to gently pry the edges, but extreme gentleness is paramount to avoid damaging your creation. Once separated, carefully remove the plastic wrap from your paper mache bowl. Now, inspect the rim. Using a sharp pair of scissors, carefully trim any uneven edges to create a neat, aesthetically pleasing rim. If you notice certain parts are thicker or rougher than others, particularly around the rim, you can apply additional small pieces of paper mache to even them out and let them dry completely. Once you are satisfied with the shape and evenness, lightly sand the entire surface of the bowl with fine-grit sandpaper. This step removes any remaining bumps, rough textures, or sharp edges, creating a beautifully smooth canvas ready for painting and enhancing the professional finish of your handmade bowl.
Step 7: Paint the Base of Your Bowl
With your bowl now perfectly shaped and smoothed, it’s ready for its decorative transformation. Select the craft or acrylic paint color of your choice for the base coat. For optimal coverage and vibrant results, especially if you’re painting a lighter color onto the newspaper, it’s highly recommended to first apply one or two coats of white primer or white acrylic paint. This creates an even, opaque base that will make your chosen color truly pop and ensure consistent coverage. Paint both the inside and outside of the bowl, allowing each coat to dry thoroughly according to the paint manufacturer’s instructions before applying the next. Applying several thin, even coats often yields a smoother and more professional finish than one thick coat.
Step 8: Add Your Chosen Design – Tracing an Elephant Pattern (or Your Own Creative Vision!)
This is where your paper mache bowl truly comes to life and reflects your personal style! The original project suggests an elegant elephant pattern, but feel free to choose any design that inspires you – from intricate floral motifs and modern geometric shapes to abstract patterns or even personalized text. To transfer a design without a printer, you can use the classic “old-fashioned way” as described: print or draw your pattern onto paper, then heavily shade the entire back of the image with a soft pencil. Place the image right-side up on your bowl, secure it gently with tape to prevent movement, and then firmly trace over the lines of your design with a pencil. When you carefully lift the paper, a faint but clear pencil outline of your design will be visible on the bowl, ready for painting. Alternatively, you can use carbon paper for a cleaner transfer, or if you’re confident in your freehand drawing skills, you can sketch directly onto the painted surface.
Step 9: Paint Your Transferred Design
With your design now traced onto the bowl, it’s time to bring it to life with color. Carefully paint all the elements of your design using your chosen craft or acrylic paints. Take your time, especially with finer details, utilizing smaller brushes as needed to achieve precision. Allow the paint to dry completely after each color application, particularly if your design involves multiple colors that touch each other, to prevent smudging or mixing. You may find that a second coat of paint for your design elements enhances their richness and vibrancy, providing better coverage and a more polished look.
Step 10: Outline and Seal Your Bowl for Definition and Durability
To give your design crisp definition and a polished, professional appearance, use a permanent black marker to carefully outline all the painted elements. This step truly makes the design pop and adds a finishing touch. Once the marker ink is completely dry, it’s time to protect your beautiful artwork and ensure its longevity. Apply a protective sealer to the entire bowl, both inside and out. Krylon Crystal Clear Acrylic Sealer, available in both spray and brush-on forms, is a popular and effective choice, but any clear acrylic sealer, varnish, or even Mod Podge can be used. The sealer creates a protective barrier that guards the paint against moisture, dust, fading, and general wear and tear, making your bowl significantly more durable. Apply the sealer in a well-ventilated area, following the manufacturer’s instructions regarding the number of coats and drying times. A glossy sealer will give your bowl a shiny finish, while a matte sealer will provide a more subtle, understated look.
Step 11: Add Embellishments for Extra Charm (Optional)
For an extra layer of charm, texture, or personalization, consider adding embellishments to your paper mache bowl. The original project suggests wrapping jute twine around the bowl, which adds a lovely rustic touch. To do this, use a hot glue gun to carefully apply a thin line of hot glue to the desired area and gently press the jute twine into place, working in small sections for better control. Always exercise caution when using a hot glue gun. Other creative embellishment ideas include attaching beads, sequins, ribbons, small fabric scraps, buttons, or even small painted wooden elements. This final, optional step allows you to further customize your paper mache bowl, truly making it a unique and eye-catching piece of handmade decor.
Creative Variations and Tips for Your Next Paper Mache Project
Once you’ve successfully crafted your first paper mache bowl, you’ll discover that the possibilities for this versatile medium are virtually limitless! Here are some ideas to inspire your next creative endeavor:
- Explore Different Shapes: Don’t limit yourself to just round bowls. Experiment with square, rectangular, or oval molds. You can even use inflated balloons as molds for unique, organic, and wavy-edged bowls.
- Vary Textures: Instead of solely using newspaper, try incorporating other types of paper for different textures – thin cardboard for rigidity, tissue paper for translucent effects, or even fabric scraps for a textile feel.
- Add Glitter and Shine: For a dazzling effect, mix fine glitter directly into your paint or sprinkle it onto wet sealer before it dries. Metallic paints also add a sophisticated shimmer.
- Create Themed Decor: Design bowls for specific occasions or holidays. Imagine a spooky Halloween candy bowl, a festive Christmas centerpiece, or a pastel Easter basket.
- Personalize Gifts: If making a bowl as a gift, add the recipient’s name, a special date, or a meaningful quote to make it an even more cherished keepsake.
- Experiment with Techniques: Try decoupage by adhering printed images or fabric swatches onto the bowl before sealing. You can also use stencils for precise patterns.
- Consider Outdoor Use: For paper mache items intended for outdoor display, ensure you use waterproof exterior paints and a highly durable, outdoor-grade sealant to protect them from the elements.
Here’s the pattern I used for the paper mache bowl:
Click here to download the elephant pattern for your bowl!
Share Your Masterpiece and Connect with the DIY Community!
We sincerely hope you thoroughly enjoyed this comprehensive tutorial on how to make a paper mache bowl. It’s truly a rewarding experience to transform simple, everyday materials into something so beautiful, functional, and deeply personal. We’re eager to hear about your creative journey! Did you try this project? What unique designs, color palettes, or embellishments did you incorporate into your own paper mache bowl? Share your experiences, tips, and most importantly, photos of your fantastic creations in the comments section below. We believe in fostering a vibrant community of DIY enthusiasts where creativity knows no bounds and every project is celebrated.
At DIYProjects.com, we are passionately dedicated to inspiring people to embrace their creative side through a wide array of projects. From delightful home decor ideas and clever upcycling initiatives to delicious recipes and insightful crafting tutorials, our mission is to demonstrate just how much you can accomplish yourself. We strive to make every project an accessible and enjoyable experience, bringing the joy of DIY right to your fingertips.
Stay connected with us for a constant stream of exciting DIY ideas, inspiration, and community engagement! Find us and follow our latest projects on Facebook, Twitter, Pinterest, and Instagram! Join our growing community and let’s continue to create amazing things together, one DIY project at a time!
Looking for More Inspiring DIY Projects? Explore Our Collections!
If you’ve enjoyed the creative process of crafting your paper mache bowl, you’ll love exploring these other popular and engaging DIY projects from our site. Dive into more hands-on endeavors and discover new ways to personalize your living space, entertain your family, and develop new skills!
-
DIY Kids Crafts You Can Make in Under an Hour
-
Kids Crafts | 30 Easy Craft Projects for Kids
-
Best Kids Party Ideas