

A DIY macrame curtain is more than just a window dressing; it’s a statement piece, a work of art that infuses your living space with warmth, texture, and a distinct bohemian elegance. Imagine soft sunlight filtering through intricately knotted patterns, casting beautiful shadows across your room. Whether you envision it adorning your living room, adding a dreamy touch to your bedroom, or bringing a serene vibe to a nursery, this gorgeous handmade curtain is guaranteed to elevate your home’s aesthetic. Creating your own macrame curtain allows for complete customization, making it a truly unique accent that reflects your personal style and creativity. It’s a surprisingly rewarding project that’s accessible even to crafting novices, offering a therapeutic escape into the world of knotting while yielding a stunning, functional piece of decor.
RELATED: DIY Hanging Macrame Chair For Your Porch Or Room
Master the Art of Macrame: An Easy Pattern for a Stunning Macrame Curtain!
What You Will Be Needing for Your Macrame Curtain Project:
- A sturdy wooden dowel (the length will determine your curtain’s width)
- High-quality macrame yarn (consider natural fibers like cotton for best results)
- A sharp pair of scissors
- A reliable measuring tape
Step 1: Precision Measurement, Careful Cutting, and Secure Attachment
The first and most crucial step in crafting your macrame curtain is preparing your cords. Begin by grabbing your measuring tape and determining the ideal length for your curtain. Measure the distance from your curtain rod or chosen hanging point down to your desired floor clearance, or however long you wish your finished curtain to be. A common and aesthetically pleasing length is often about one and a half feet from the floor, allowing for a graceful drape without dragging.
Once you have this initial measurement, it’s time to account for the knotting process, which consumes a significant amount of cord. For macrame projects, a good rule of thumb is to double your desired final length. So, if you want your curtain to be 60 inches long, you’ll need to cut each individual strand of macrame yarn to 120 inches. This generous allowance ensures you won’t run short during knotting, which can be frustrating. Carefully cut your macrame yarn according to this doubled measurement. The total number of individual strips you’ll need depends on the length of your wooden dowel or curtain rod and your desired curtain density. For a fuller curtain, you’ll need more strips cut closer together; for a sparser, airier look, fewer strips spaced further apart will suffice. A good starting point is to space your knots roughly 0.5 to 1 inch apart on the dowel.
Now, one by one, take each cut strip of yarn and fold it precisely in half, aligning the ends perfectly. This creates a loop at the fold. Next, you’ll use a fundamental macrame knot known as the lark’s head knot to securely attach each doubled strand to your wooden dowel. To do this, place the loop of the folded yarn over the top of the dowel, then thread the two loose tail ends through the loop itself, pulling firmly downwards. Make absolute certain to tighten each knot securely against the dowel. A tight, consistent lark’s head knot is vital for a stable and aesthetically pleasing foundation for your entire macrame curtain. Repeat this straightforward process for every single strip until your dowel is adorned with all your prepared macrame cords, evenly spaced and ready for the next creative phase.
Step 2: Mastering Your First Macrame Knot – The Foundation of Your Curtain!
With all your cords neatly attached to the dowel, it’s time to delve into the art of knotting. For this particular macrame curtain design, we’ll focus on the versatile and visually appealing square knot – a cornerstone of macrame artistry. Begin by sectioning your hanging strips of yarn into groups of four. You’ll work with these four strands to create a single square knot. Identify your first strip (on the far left), the two central strips (second and third), and your fourth strip (on the far right).
To start the first half of your square knot, take the first strip (the leftmost one) and elegantly cross it over the top of the second and third (central) strips. Then, continue this motion by bringing the first strip under the fourth strip (the rightmost one), forming a distinct loop on the left side. Simultaneously, take your fourth strip (the rightmost one) and cross it underneath the perpendicular section of the first strip (the one you just moved). Continue by passing it over the top of the second and third (central) strips. Finally, guide the fourth strip through the loop that you initially formed with your first strip. Gently and evenly pull both the first and fourth strips to begin tightening your knot. The goal here is to create a snug, half-formed square knot that sits neatly just below your lark’s head knots. Consistency in tension is key for a uniform look across your entire curtain.
Step 3: Completing the Square Knot for a Harmonious Pattern
Now that you’ve successfully completed the first half of your initial square knot, it’s time to finish it off and reveal its full, beautiful form. The completion of a square knot mirrors the first half, but in reverse. This ensures a balanced and symmetrical knot. To begin the second half, you will now start with the strip that is currently on the right side (which was your original fourth strip). Fold this strip over the top of the two central strands.
Next, take the strip that is currently on the left side (your original first strip). Bring this strip over the top of the fourth strip (the one you just folded), then guide it behind the two central strips, and finally, thread it through the loop that was created by the fourth strip. Once both ends are through, gently but firmly pull both the left and right working strands. As you tighten, you’ll notice the second half of the square knot nestling perfectly underneath the first half you created in the previous step. Ensure the tension is consistent with your first half to achieve a perfectly symmetrical and neat square knot. This completed knot is the fundamental building block of your macrame curtain. After successfully forming your very first complete square knot, you’ll proceed to replicate this exact process across all the remaining sections of four strips along your dowel. Take your time, maintain even tension, and enjoy watching your curtain’s intricate pattern begin to emerge.
RELATED: DIY Crescent Moon Macrame Dream Catcher to Spruce Up Any Room
Step 4: Cascading the Knots for an Elegant V-Shape Design
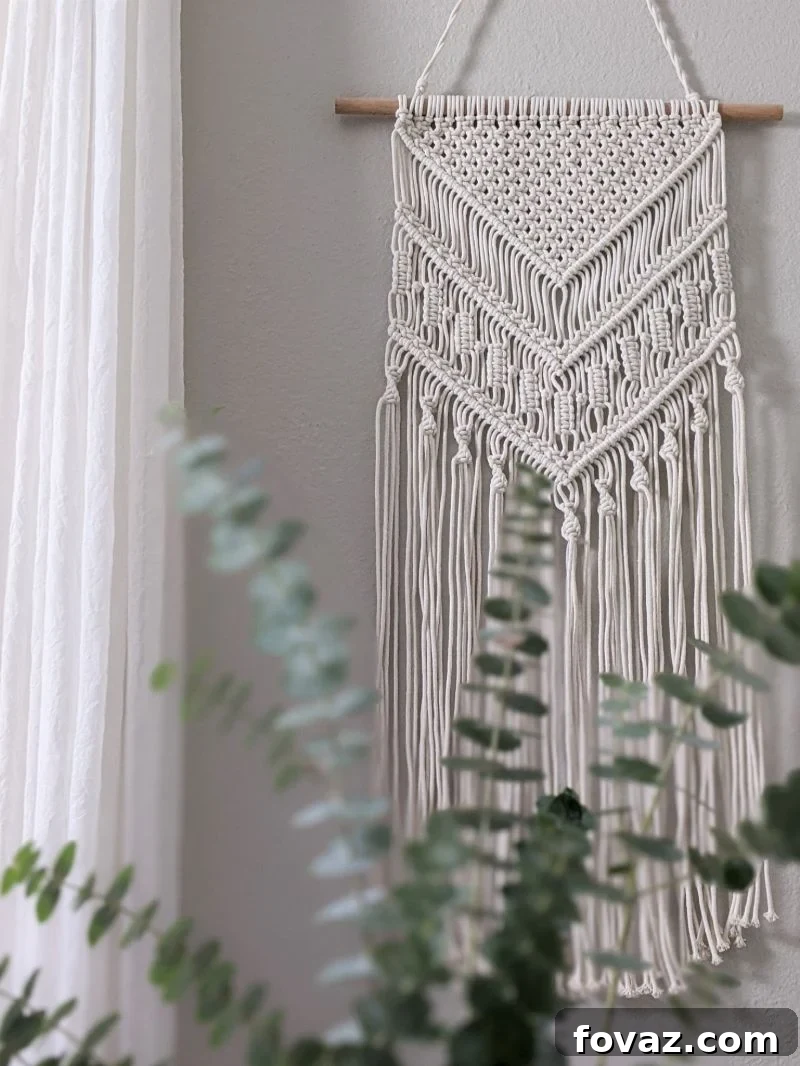
Once you have a full row of beautifully executed square knots, it’s time to introduce variation and create a captivating cascading effect, often referred to as a V-pattern or diamond pattern. This adds depth and visual interest to your macrame curtain. For this next row, you will repeat the familiar square knot process, but with a subtle yet significant shift in your starting point. Instead of beginning with the very first strip from the previous row, you will now start with the third strip from the overall arrangement on your dowel.
This means you will take two strands from the first square knot and two strands from the second square knot of the row above to form a new square knot in the middle. This strategic offset will naturally create a staggered, descending pattern. As you continue to make square knots using this method, connecting two adjacent strands from one knot above and two adjacent strands from the next knot above, you will observe a beautiful cascading “V” shape forming. You have the creative freedom to go as “crazy” as you like with this cascading technique. You can continue to create further staggered rows, deepening the V-pattern as much as you desire, until you achieve a pronounced V-shape that extends down your curtain. If you have enough macrame strips remaining and wish to continue the intricate pattern, feel free to do so. However, even after just one or two rows of cascading, you will have a visibly stunning and distinctive macrame pattern. It’s perfectly fine to stop once you’re satisfied with the visual impact and the cascading pattern is clearly defined. This flexibility allows you to customize the complexity and overall look of your unique macrame curtain.
Step 5: Sealing the Deal – Creating a Polished Bottom Edge
After diligently knotting and meticulously forming your macrame curtain pattern, and once you’re absolutely delighted with its design and overall appearance, the final structural step is to “seal the deal” by creating a neat and secure bottom edge. This prevents the individual strips from unraveling and gives your curtain a professional, finished look. There are several ways to achieve this, but a simple and effective method involves grouping and securing the remaining loose strips at the bottom.
You can choose to tie off individual strands or group them into small, consistent bundles. For a clean, unified look, gather a small group of two or three adjacent strips together. Take one of the outer strips from this group and wrap it tightly around the other strips in the bundle, creating a small, secure knot close to the last row of macrame knots. Alternatively, you can tie a simple overhand knot with all the strips in that small bundle, pulling it taut. Repeat this process methodically across the entire width of your curtain until all the hanging strips have been securely tied off in uniform bundles or individual knots. The key is to make these finishing knots tight and consistent in placement and size to ensure the “seal” is both durable and aesthetically pleasing, completing the structural integrity of your macrame curtain.
Step 6: Cutting Excess Fringe – The Finishing Touch
With the main macrame pattern complete and the bottom edge securely “sealed,” the final exciting step is to refine the fringe and personalize the length of your macrame curtain. Once you’ve hung your newly crafted masterpiece and are completely happy with its drape and how it looks adorning your window or doorway, it’s time to grab your sharp scissors for the final trim.
Carefully assess the length of the remaining excess strips at the bottom. Decide whether you prefer a perfectly even, straight fringe for a crisp, modern look, or perhaps an angled, V-shaped, or staggered fringe for a more organic, artistic flair. Use your measuring tape to guide your cuts if you desire absolute precision, or simply eyeball it for a more freehand, natural aesthetic. Trim off any unnecessary length, ensuring the fringe is uniform if that’s your preference, or deliberately uneven if that suits your style. Take your time with this step, as a well-executed fringe significantly enhances the overall appeal of your macrame curtain. Once trimmed to perfection, step back and admire your beautiful, unique, and handcrafted macrame curtain! It’s ready to bring a touch of bohemian charm and personalized elegance to your home.
The final product should look like this, a testament to your creativity and patience:
For visual learners or those seeking alternative macrame curtain styles, watch this insightful video from Living to DIY With Rachel Metz:
This comprehensive tutorial on how to create your very own macrame curtain is designed to be incredibly easy and enjoyable, making it a fantastic project for all skill levels. It’s a particularly wonderful activity to share with your children, allowing them to participate in the creative process and even craft a unique curtain for their own rooms! Engaging in DIY projects like this helps foster an appreciation for handmade items and teaches the immense value and joy derived from creating something beautiful and functional with your own hands. Beyond the aesthetic appeal, macrame offers a relaxing and mindful indoor activity, perfect for unwinding and tapping into your artistic side. Your handmade macrame curtain isn’t just a piece of decor; it’s a testament to your ingenuity and a warm, personalized addition to any space.
What are your thoughts on this detailed guide for making a stunning macrame curtain? Share your experiences, tips, or questions in the comments section below – we’d love to hear from you!
UP NEXT, explore more exciting DIY macrame and home improvement ideas:
- DIY Macrame Necklace Ideas You Can Make With Your Kids
- How to Make Friendship Bracelets | DIY Hemp Macrame Bracelet
- How To Restore A Rusty Cast Iron Griddle Using A Ball Of Steel Wool
Calling all crafting DIYhards and creative minds, DIY Projects needs YOU to share your passion! Click here if you’re interested in writing for us and contributing to our community.
Don’t forget to stay connected with the DIY Projects community and discover endless inspiration on our social media channels: follow us on Facebook, Twitter, Pinterest, and Instagram for daily doses of creativity!