
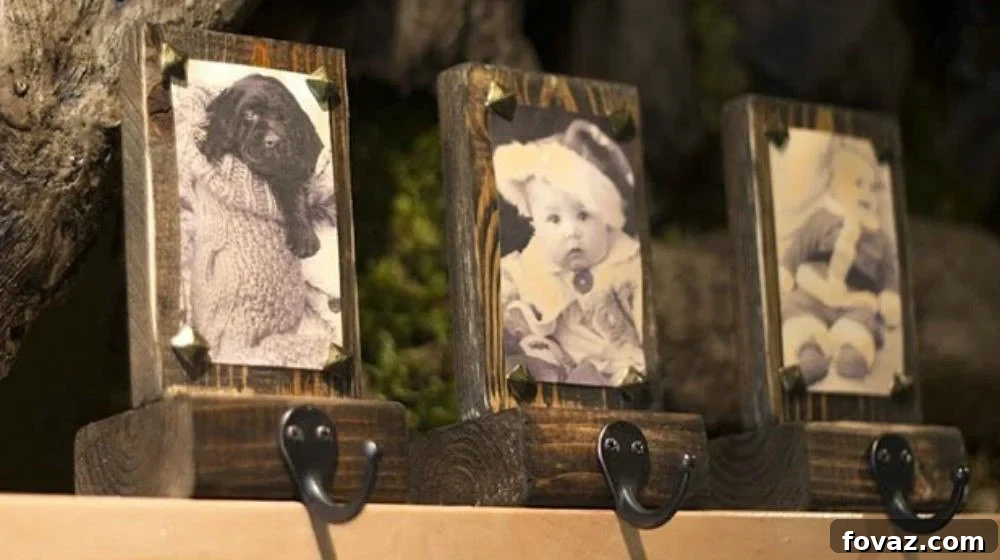
Transform your holiday display with charming, handmade Christmas stocking hangers! Learn how to create personalized, rustic decor pieces that will bring warmth and character to your home.
RELATED: 10 Creative Wire Hanger Craft Ideas for Your Home
Table of Contents
- Embrace the Holiday Spirit with DIY Stocking Holders
- Why Choose Handmade? Benefits of Crafting Your Own Stocking Hangers
- Gather Your Essentials: What You Need for Three Stocking Hangers
- Essential Tools for Your Crafting Space
- Step-by-Step Guide: Crafting Your Rustic Stocking Hangers
- Step 1: Preparing Your Wood Blocks for a Flawless Finish
- Step 2: Expertly Gluing Your Wood Blocks
- Step 3: Staining for the Perfect Rustic Appeal
- Step 4: Securely Attaching Your Stocking Hooks
- Step 5: Adding a Personal Touch with Photos or Embellishments
- Pro Tips for Stability and Customization
- Creative Variations and Personalization Ideas
- Styling Your Mantel: Displaying Your New Stocking Hangers
- Your Handmade Holiday Masterpiece Awaits!
- Watch the Video Tutorial
- More Holiday DIY Inspiration
DIY Christmas Stocking Hangers: Crafting Personalized Holiday Decor
As the magical Christmas season approaches, our thoughts turn to festive decorations, cozy traditions, and creating a warm, inviting atmosphere for family and friends. While store-bought decorations are convenient, there’s an undeniable charm and sentimental value in homemade touches. This year, elevate your holiday display with beautiful, custom-made DIY stocking hangers. Perfect for showcasing your cherished Christmas stockings, these rustic holders not only serve a practical purpose but also add a unique, personal flair to your mantelpiece or shelf.
Forget the generic and embrace the joy of crafting! Our detailed tutorial will guide you through creating stunning, personalized stocking hangers that reflect your unique style and become treasured parts of your holiday tradition for years to come. Whether you’re aiming for a cozy farmhouse look, a timeless traditional aesthetic, or a personalized touch with family photos, these DIY wooden stocking holders are surprisingly simple to make and incredibly rewarding.
Why Choose Handmade? The Enduring Benefits of Crafting Your Own Stocking Hangers
Opting for DIY Christmas decor offers a multitude of advantages over mass-produced alternatives. Here’s why crafting your own stocking hangers is a brilliant idea:
- Unmatched Personalization: Store-bought hangers offer limited options. With DIY, you have complete control over the design, allowing you to match your existing decor, incorporate family photos, or even engrave names for a truly bespoke touch. Imagine each family member having a hanger adorned with their baby picture or a significant moment!
- Cost-Effective Holiday Decor: Crafting at home often proves to be more budget-friendly than purchasing high-end decor. Using readily available wood scraps and basic craft supplies, you can create multiple hangers for a fraction of the cost of similar items in boutiques.
- A Unique Aesthetic Statement: These rustic stocking holders aren’t just functional; they’re conversation starters. Their handmade charm adds a distinctive character that store-bought items simply can’t replicate, infusing your home with a cozy, authentic holiday spirit.
- Creating Cherished Heirlooms: Handmade items carry stories and memories. These stocking hangers can become cherished keepsakes, passed down through generations, making Christmas traditions even more special.
- Perfect as Thoughtful Gifts: Looking for a heartfelt gift? Personalized DIY stocking hangers make excellent presents for newlyweds, new parents, or anyone who appreciates handmade treasures. Customize them to suit the recipient’s style for an extra special touch.
- A Rewarding Creative Outlet: There’s immense satisfaction in creating something beautiful with your own hands. This project is simple enough for beginners but offers plenty of room for creative expression, making it a relaxing and fulfilling activity.
In just about an hour of enjoyable work, and with a few simple supplies, you can craft these lovely Christmas accents, bringing a homemade holiday touch to any mantel decor.
Gather Your Essentials: What You Need for Three Rustic Stocking Hangers
Before you begin your crafting journey, gather all your materials. This list is designed to create three beautiful rustic stocking hangers, but you can easily adjust the quantities for more or fewer pieces. We’ve included links for your convenience to help you source these items easily.
- Wood Blocks:
- 3 square cuts of a 2×4 board (approximately 5 inches tall for stability and aesthetic balance).
- 3 rectangular cuts of a 1×4 board (these will form the base that sits flush against your mantel or shelf, providing extra stability).
Tip: You can often find pre-cut wood blocks at craft stores or ask your local hardware store to cut a larger board to your desired dimensions. Reclaimed wood can also add amazing character!
- Adhesives and Finishes:
- High-quality wood glue (for a strong, lasting bond between your wood pieces).
- Your chosen wood stain (mahogany for a classic, rich finish, or explore other shades like dark walnut, weathered gray, or natural oak to match your decor).
- Hardware:
- 3 sturdy garment hooks or cup hooks (ensure they are robust enough to hold a filled stocking).
- Decorative upholstery tacks (look for unique designs or finishes to add an interesting detail, such as beveled or antique brass).
- Personalization Element:
- Baby Photos (or any personal photos you wish to display). Consider printing them in sepia tone for a vintage, warm aesthetic.
Essential Tools for Your Crafting Space
Having the right tools makes any DIY project smoother and more enjoyable. These basic tools are likely already in your craft room or easily accessible.
- Paper towels (essential for wiping excess glue, applying stain, and general cleanup).
- Rubber gloves (to protect your hands from wood stain and glue).
- Power drill or a reliable manual screwdriver (for pre-drilling pilot holes and securely attaching the hooks).
- Sandpaper (various grits, starting with 100-grit for rough edges and moving to finer grits like 180 or 220 for a super smooth finish).
- Hammer (for safely inserting upholstery tacks).
- Clamps (optional, but highly recommended for holding glued pieces firmly while drying).
Step-by-Step Guide: Crafting Your Rustic Stocking Hangers
Follow these detailed instructions to create beautiful, long-lasting stocking hangers. Take your time with each step to ensure a professional and durable finish.
Step 1: Preparing Your Wood Blocks for a Flawless Finish
Starting with well-prepared wood is crucial for a smooth and attractive final product. If you’re cutting your own wood, remember that a single 2×4 board can yield many stocking hangers. For this project, a 5-inch tall cut for the main block works wonderfully, providing both stability and an appealing visual presence.
Once your wood is cut, the next step is to smooth out any rough edges or splinters. Use 100-grit sandpaper to tackle the initial imperfections. If your wood is particularly rough, you might even start with a slightly coarser grit like 80, then move up to 100-grit. Sand along the grain of the wood, applying even pressure. Pay special attention to the corners and edges, rounding them slightly for a softer, more finished look. For an exceptionally smooth feel, progress to a finer grit sandpaper (like 180 or 220) after the initial sanding. This meticulous preparation ensures a beautiful surface for staining and prevents any snags later.
Safety Tip: Always wear protective eyewear when sanding, especially with a power sander, and consider a dust mask.
Step 2: Expertly Gluing Your Wood Blocks
Now that your wood blocks are perfectly smooth, it’s time to assemble the main structure of your stocking hangers. Take your thinner 1×4 rectangular block and firmly attach it to the bottom of your square 2×4 block using wood glue. The 1×4 piece will serve as the base that provides additional stability and helps anchor the hanger on your mantel.
Apply a generous but not excessive amount of wood glue to one side of the 1×4 piece. Align it carefully with the bottom edge of the 2×4 block, ensuring it’s centered. Press the two pieces together firmly. If you have clamps, this is the ideal time to use them to hold the blocks securely in place while the glue dries completely. If you don’t have clamps, you can use heavy books or other weights to apply consistent pressure. Wipe away any excess glue that squeezes out immediately with a damp paper towel. Allow the glue to dry for the recommended time on the product packaging, which is typically several hours, or even overnight, to ensure a rock-solid bond. Patience here will prevent your hangers from falling apart later!
Step 3: Staining for the Perfect Rustic Appeal
With your wood blocks securely glued and dried, it’s time to add character and depth with a wood stain. Don your rubber gloves to protect your hands. Choose a wood stain that complements your Christmas decor. A mahogany stain offers a classic, rich finish, evoking a traditional holiday feel. However, don’t hesitate to explore other options like dark walnut for a deep, sophisticated look, weathered gray for a modern farmhouse vibe, or a lighter oak for a more natural aesthetic.
Apply the stain evenly using a clean cloth or a foam brush, working in the direction of the wood grain. Allow the stain to sit for a few minutes (refer to product instructions for exact timing) before wiping off any excess with a clean, dry cloth. This process allows the wood to absorb the pigment, enhancing its natural beauty. For a deeper, richer color, you can apply a second coat after the first has dried. Ensure adequate ventilation when staining and allow your stained pieces to dry completely, which might take 24-48 hours, depending on the stain type and humidity. A fully dry surface is crucial before moving on to the next step.
Step 4: Securely Attaching Your Stocking Hooks
Once your stained wood blocks are 100% dry and cured, it’s time to add the functional element: the hooks. Position each garment hook along the bottom of your 2×4 square. Before screwing them in, it’s highly recommended to pre-drill small pilot holes with your power drill (or a hand drill). This prevents the wood from splitting, especially with harder woods, and makes screwing in the hooks much easier and more secure. Ensure the pilot hole is slightly smaller than the screw’s diameter.
Carefully screw the hooks into place. Make sure they are aligned neatly and are securely fastened. You want them to be strong enough to hold a generously filled stocking without wobbling. If you’re aiming for an aged or weathered look, now is a good time to lightly distress the edges of your stained pieces with some medium-grit sandpaper. This will reveal some of the lighter wood underneath, creating a beautifully worn appearance that enhances the rustic charm.
Step 5: Adding a Personal Touch with Photos or Embellishments
This is where your stocking hangers truly become personalized and unique! For a vintage, warm aesthetic, consider transforming your chosen photos into sepia tone using photo editing software like Photoshop. Sepia refers to a reddish-brown colored effect commonly associated with photographs from the nineteenth century, lending a timeless and nostalgic feel.
Once your photos are printed to size, use decorative upholstery tacks to pin them into place on the front face of your 2×4 block. Using a hammer will help you push the tacks in firmly and save your fingers! Look for upholstery tacks with interesting textures or finishes – I particularly love beveled upholstery tacks for their fun geometric character, which adds an extra layer of visual interest. Position the photos evenly and secure them with tacks in each corner or at strategic points. This personal touch will make each stocking hanger incredibly special and a delightful focal point on your mantel.
Alternative Personalization: Instead of photos, you could paint or stencil family names, monograms, festive designs, or even attach small decorative ornaments or miniature wooden cutouts. The possibilities for customization are endless!
Pro Tips for Stability and Customization
You’re done with the main construction, but a few extra tips can make your stocking hangers even better and more versatile:
- Ensuring Stability: If your Christmas stockings are particularly light, your new hangers might stand perfectly on their own. However, for heavier stockings (especially once filled with goodies!), additional stability is key. Consider applying 3M adhesive strips or furniture gripper pads to the bottom of the 1×4 base. These strips provide excellent grip to anchor them securely to your mantel or shelf, preventing accidental toppling. The best part? They can be easily removed after the holidays without leaving any damaging marks.
- Achieving an Aged Look: Beyond the distressed edges mentioned in Step 4, you can further enhance the aged look by lightly dry-brushing some watered-down white or light gray paint over your stained wood. This technique, often called “whitewashing” or “dry brushing,” settles into the wood grain, creating a beautiful weathered effect that perfectly complements rustic decor.
- Sealing for Longevity: While stain protects the wood, adding a clear coat of polyurethane or a protective wax finish will further enhance durability and protect against moisture and wear. A matte finish polyurethane will maintain the rustic look without adding too much shine.
Creative Variations and Personalization Ideas
While the basic design is fantastic, don’t be afraid to unleash your creativity and make these stocking hangers truly your own:
- Paint vs. Stain: Instead of staining, consider painting your wood blocks. Solid colors like classic red, forest green, or winter white can create a vibrant, festive look. You can also distress painted pieces for a shabby-chic effect.
- Stenciled Designs: Add intricate patterns, snowflakes, holiday greetings, or family names using stencils and paint. This is an easy way to add detail without freehand drawing.
- Decoupage: Apply festive fabric scraps, patterned paper, or even sheet music using decoupage medium for a unique texture and visual appeal.
- Other Embellishments: Attach small sprigs of faux holly, miniature pinecones, jingle bells, or tiny bows with hot glue. These small additions can greatly enhance the holiday feel.
- Reclaimed Wood Charm: Source old fence posts, pallet wood, or barn wood for your blocks. The natural imperfections and history of reclaimed wood will instantly give your hangers an authentic, rustic character.
- Different Hooks: Explore various hook styles – classic brass cup hooks, ornate black iron hooks, or even simple polished chrome hooks can dramatically change the look to suit modern or industrial aesthetics.
Styling Your Mantel: Displaying Your New Stocking Hangers
Now that your beautiful DIY stocking hangers are complete, it’s time to arrange them on your mantel or shelf! Here are some tips for a picture-perfect display:
- Even Spacing: Arrange your hangers with equal spacing between each one for a balanced and tidy look.
- Layering with Garlands: Drape a festive garland (pine, eucalyptus, or even fabric) across your mantel, allowing it to weave around and behind your stocking hangers. This creates depth and a lush holiday feel.
- Complementary Decor: Surround your hangers with other holiday elements like pillar candles, miniature Christmas trees, decorative lanterns, or framed seasonal art.
- Beyond the Mantel: No mantel? No problem! These versatile hangers can also be displayed on a wide bookshelf, a console table in your entryway, or even a sturdy windowsill. Just ensure the surface is stable and wide enough to prevent tipping.
- Weight Distribution: If you have varying sizes of stockings or different levels of fullness, try to distribute the weight evenly across your hangers to maintain balance.
Your Handmade Holiday Masterpiece Awaits!
There you have it, crafters! You’ve successfully created personalized, rustic Christmas stocking hangers that are ready to display your festive stockings with style and charm. This project is more than just a craft; it’s an opportunity to infuse your home with warmth, character, and heartfelt memories.
The beauty of this DIY lies in its versatility. You can make unique, personalized hangers for every member of your family, celebrating their individuality. Imagine the delight on Christmas morning as everyone finds their stocking hanging from a custom holder!
And if you discover a passion for crafting these lovely pieces, consider expanding your reach. Handmade holiday decor is highly sought after, and platforms like Etsy offer a fantastic avenue to share your creations with a wider audience. Don’t forget the most important step: filling those beautifully hung Christmas stockings with thoughtful treats and gifts!
We’d love to see your unique creations! Do you have other rustic stocking hanger ideas or clever customization tips? Share your take on a Christmas stocking holder in the comments section below, or post your finished project on social media and tag us!
Watch the Video Tutorial
For a visual guide and additional inspiration, check out The Latina Next Door’s video tutorial. She shares an awesome style of making stocking hangers that complements these instructions beautifully:
More Holiday DIY Inspiration
Looking for more ways to add handmade charm to your home this holiday season? Explore these related DIY guides:
- 10 DIY Christmas Stockings | Homemade Christmas Project
- 27 DIY Christmas Lanterns Ideas To Brighten Up Your Home
- Best Christmas Sugar Cookie Recipe | How To Make Christmas Cookies
Stay connected with us on Facebook, Twitter, and Instagram for more DIY inspiration and project ideas!
Editor’s Note: This post was originally published on November 25, 2016, and updated for quality and relevancy.