

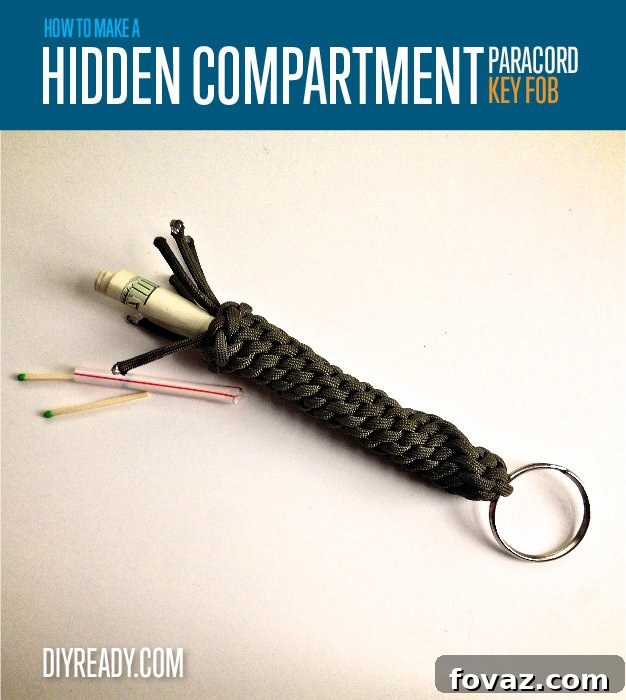
Unleash your creativity and practical skills by learning how to craft your very own paracord keychain. More than just a decorative accessory, a handmade paracord keychain is a versatile tool that can serve many purposes. Whether you’re looking to create thoughtful, personalized gifts for friends and family, develop a new product line for your craft business, or simply want a durable and unique way to organize your keys, this comprehensive guide will walk you through the process. We’ll delve into the art of knot-tying to construct a robust keychain, complete with an ingenious secret compartment – perfect for stashing emergency cash, a small fire starter, or other compact survival essentials.
RELATED: How To Make A Paracord Belt: Step-By-Step Instructions
In this article, you will discover:
- Essential Materials and Tools for Your DIY Paracord Keychain
- Detailed Step-by-Step Instructions to Craft Your Paracord Keychain with a Secret Compartment
Master the Craft: How to Create a Paracord Keychain with a Hidden Compartment
Gather Your Essentials: What You’ll Need to Make a DIY Paracord Keychain
Before diving into the knotting process, ensure you have all the necessary materials and tools ready. Having everything organized will make the crafting experience much smoother and more enjoyable. Here’s what you’ll need:
- Three 5-foot Strands of Paracord: Paracord, specifically 550 paracord, is known for its incredible strength and versatility. Each 5-foot strand provides ample length for a standard keychain and allows for any necessary trimming. Don’t be afraid to experiment with three different colors to create a visually striking and personalized design. Contrasting colors can also help you follow the weaving pattern more easily.
- Lighter or Matches: Essential for sealing the ends of the paracord. This prevents fraying and ensures a clean, durable finish for your keychain. Always exercise caution when working with open flames.
- Pencil (or similar cylindrical object): This is the secret to creating your hidden compartment. A standard pencil works perfectly, providing the internal structure around which the knots will form, leaving a hollow space once removed.
- Keyring: The final component that transforms your paracord creation into a functional keychain. Choose a keyring that complements your design and is sturdy enough to hold your keys securely.
- Scissors or a Sharp Knife (Optional but Recommended): While not strictly listed in the original, a good pair of scissors or a sharp knife is invaluable for cleanly cutting the paracord strands to your desired length and for trimming excess material at the end.
Having these items laid out and ready will set you up for success as you embark on crafting your unique paracord keychain.
Crafting Your Creation: Step-by-Step Instructions to Make a Paracord Keychain
Follow these detailed instructions carefully to construct a resilient and functional paracord keychain, complete with a clever secret compartment. Take your time with each step, and don’t be afraid to practice the knots until you feel confident.
Step 1. Getting Started: Laying the Foundation
Begin by taking your first two strands of paracord. These will be your primary working cords for the initial knot. Carefully intersect them at their exact centers to form a clear cross shape. Position the bottom strand horizontally across your workspace, and lay the top strand vertically over the center of the horizontal one. This initial setup is crucial for establishing the proper tension and alignment for your first knot. Ensure both cords are balanced and centered before moving on.
Step 2. Looping the Paracord: Initiating the Knot Structure
Now, focus on the horizontal cord, which we’ll refer to as P1 (Paracord 1). Take each end of P1 and carefully cross it over the vertical cord (P2, Paracord 2). As you do this, you should notice that the cords naturally begin to form an “S” shape. This “S” configuration is the beginning of a key knot that will secure your design. Make sure the loops are even and loose enough for the next weaving step, but tight enough to hold their shape. This step sets the stage for interlacing the cords.
Step 3. Weaving the First Secure Knot: Bringing It Together
With P1 still maintaining its “S” shape, it’s time to integrate P2 into the knot. Take the top end of P2 and bring it down. Weave it over P1, then continue to thread it downwards, passing it through the bottom loop formed by P1. This creates a secure crossover.
Next, perform the same action with the bottom end of P2, but in the opposite direction. Bring this end upwards, over P1, and thread it through the top loop that P1 has created.
Gently pull on all four ends to begin tightening the knot. As you pull, ensure the knot remains somewhat loose at this stage. This slight looseness is deliberate, as it will allow for the introduction of the third paracord strand in the following step. The goal here is to form a recognizable, yet adaptable, square knot.
Step 4. Integrating the Third Paracord Strand: Expanding the Design
With your initial knot in place, it’s time to introduce your third piece of paracord, P3. Take one end of P3 and carefully insert it through the side of the knot you’ve just made. The easiest way to do this is by passing P3 directly through the loops created by P1. Thread P3 until you reach its midpoint, ensuring an equal length of P3 extends from each side of the knot.
Once P3 is properly positioned, gently pull all six cords (the four ends of P1 and P2, and the two ends of P3) to tighten the entire structure. This action will secure P3 within your foundational knot, creating a compact and robust starting point for your keychain. This marks the completion of your initial knot, now encompassing all three paracord strands.
RELATED: How to Make A Paracord Survival Bracelet: Tire Tread
Step 5. Beginning the Crown Knots: Building the Body of the Keychain
Now, we will start forming the distinctive crown knots that will make up the body of your keychain. Begin by spreading all six paracord ends out in different directions, resembling the spokes of a wheel. This arrangement helps in identifying each strand as you work.
Let’s initiate the crown knot sequence. Take the right end of P1 and cross it downwards, laying it over the bottom strand of P2. This creates the first loop of your crown knot.
Continue this process in a clockwise direction. Take the next strand (which will be the one immediately clockwise from the end you just moved) and cross it over the strand directly below it, then thread it through the loop created by the previous step. Repeat this pattern, always taking the next clockwise strand, crossing it over the one immediately to its “right” (in the direction of travel), and then through the loop formed by the previous cord.
You will continue looping the paracord ends in this manner, working your way around the central knot. Each strand will be looped over its neighbor and then passed through the loop created by the preceding strand. The pattern is cyclical and builds upon itself.
As you approach the final loop, take the top strand of P2. Loop it over P3, and then carefully thread it through the very first loop you created at the beginning of this step (the one formed by P3 and P1). This action effectively closes the crown knot.
Gently pull on all the cords to tighten the knot evenly. You should now have a closed and aesthetically pleasing crown knot. The key to a clean crown knot is maintaining consistent tension as you pull the cords tight, ensuring a uniform appearance.
Step 6. Crafting the Secret Compartment: The Pencil Method
Once you have successfully completed approximately three to four crown knots, it’s time to introduce the ingenious secret compartment. This is where your pencil comes into play.
Carefully insert your pencil directly into the center of the knots you’ve already made. The knots should now snugly encase the pencil, forming a cylindrical space around it. With the pencil still inserted, continue making additional crown knots, working your way up the length of the pencil. The pencil acts as a temporary mandrel, ensuring that the central hollow space for your compartment is consistently sized and perfectly cylindrical.
Continue knotting until your key fob reaches the desired length. For a typical keychain, you’ll likely have enough cord to create a fob approximately 5 inches long, which provides ample space for small items. As you knot, consistently check the tension to ensure the compartment walls are firm and uniform. This continuous crown knotting around the pencil is what forms the robust and discreet storage area.
Step 7. Sealing the Compartment: The Diamond Knot Finish
Once your fob has reached the desired length and you’re satisfied with the size of your hidden compartment, it’s time to prepare it for filling and then seal it off. With the pencil still inserted, create one final crown knot. However, this time, keep this last crown knot deliberately loose. This looseness is essential as it will serve as the opening for your compartment.
Now, you are going to finish your keychain with a secure and decorative diamond knot. To begin the diamond knot, select any one of the working ends of your paracord.
Carefully take this selected end and thread it underneath the adjacent cord in the series, then bring it up and through the next loop. This creates a diagonal path for the cord.
Pull the cord gently through the loop you just created. Do not tighten it completely yet.
Repeat this exact process with the next cord over, continuing in a clockwise motion around the knot. Each cord will be threaded underneath its neighbor and then up through the subsequent loop, always maintaining the clockwise progression. Continue until all the cords have been worked through, and you see them neatly emerging from the center of the knot, forming a distinct diamond shape.
Once all cords are in place, gently begin to tighten the diamond knot. Pull the cords just enough to bring them together and secure the structure, but avoid extreme tension at this stage. Now, carefully remove the pencil from the center of your creation. You should have a hollow, cylindrical compartment.
Step 8. Utilizing Your Hidden Compartment: Customizing Your Fob
Congratulations! You now have an incredibly functional and stylish compartment right within your paracord keychain. This versatile space can hold a variety of small, essential items. Consider stashing waterproof survival gear like mini fire starters, a few water purification tablets, or even emergency cash for those unexpected situations. For urban dwellers, it can be a discreet spot for a spare house key, a small USB drive, or even a tiny flashlight. Place your chosen items carefully inside the compartment.
Once the compartment is filled, fully tighten the diamond knot you previously made. Pull firmly on all the cords until the knot is snug and secure, effectively closing off and protecting your hidden treasures. Ensure the knot is tight enough to prevent accidental opening, but not so tight that it deforms the compartment. This final tightening completes the main structure of your DIY paracord keychain.
Step 9. The Final Touch: Adding Your Keyring
The last step is to make your creation fully functional. Take your chosen keyring and attach it to the top part of the fob, typically through one of the top loops or by threading it through the central opening where the cords emerge before the diamond knot. Ensure it’s securely fastened.
And there you have it – your very own, handmade DIY paracord keychain with a secret compartment is complete! Take a moment to admire your craftsmanship.
Watch this video tutorial from Paracord Crafts to make a quick release paracord key fob:
For all you practical DIY enthusiasts, this paracord keychain is more than just a craft project; it’s an exercise in creating a highly functional and personal accessory. The satisfaction of making something with your own hands, combined with the utility of the finished product, makes this a truly rewarding endeavor.
Given the recent surge in popularity of practical and handmade accessories, these paracord keychains make truly wonderful and thoughtful presents for friends and family. They’re suitable for virtually any occasion, from birthdays to holiday gifts, or even as a simple token of appreciation. Each one can be customized with different colors and compartment contents, making it a unique gift tailored to the recipient.
Will you embark on this DIY paracord keychain adventure? Share your creative ideas and plans for customizing your DIY paracord keychain in the comments section below! We’d love to hear about the colors you’ll choose or what unique items you’ll stash in your secret compartment.
Up Next: Discover more exciting paracord projects!
- How To Make A Snare Trap With Paracord: A Survival Essential
- Master the Badass Paracord Solid Gear Wrap | Advanced DIY Paracord Projects
- Craft a Stunning DIY Macrame Necklace With Stone And Beads | Elevate Your DIY Jewelry Skills
Stay connected with the latest DIY trends and project inspiration by following us on Facebook, Twitter, and Instagram!
Editor’s Note: This post was originally published on February 9, 2014, and has been updated for quality, relevancy, and to provide a more comprehensive guide for our readers.