
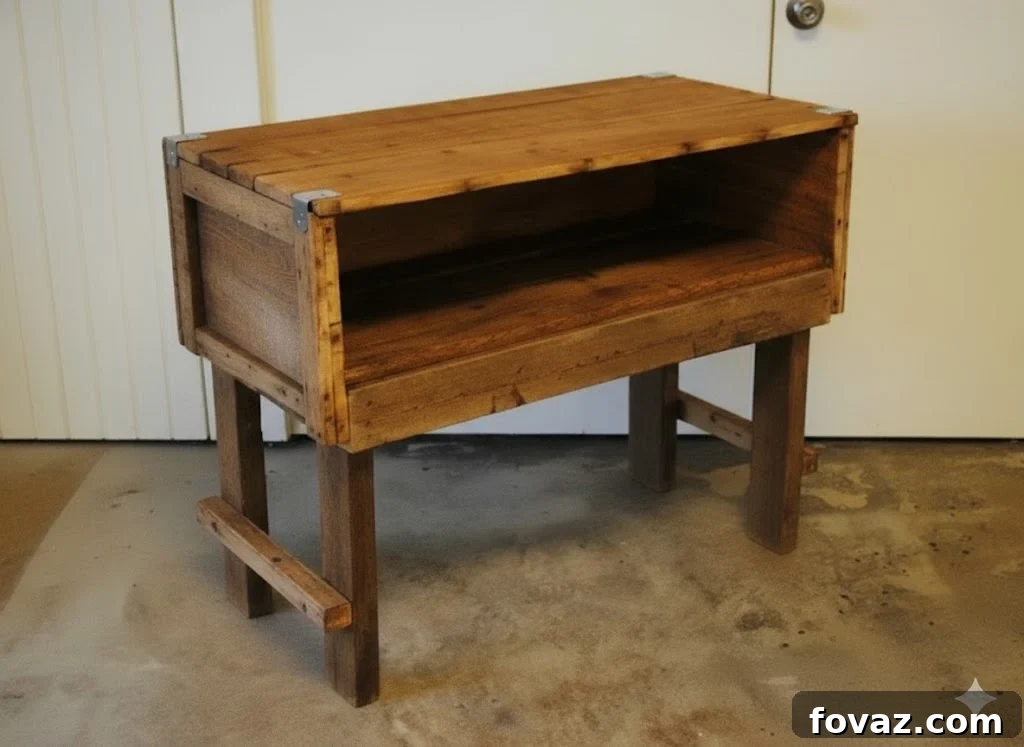
Build Your Own Rustic Reclaimed Wood TV Stand: A Comprehensive DIY Guide
Are you searching for a rewarding woodworking project that will transform your living space this weekend? Look no further! This detailed guide will show you how to construct a beautiful, sturdy, and uniquely rustic TV stand from reclaimed-style wood. Infuse your living room with charming character and handcrafted appeal, all while enjoying the satisfaction of a successful DIY endeavor.
Why Choose a DIY TV Stand for Your Home?
The allure of custom-built furniture is undeniable, and a DIY TV stand offers a multitude of benefits over store-bought alternatives. Firstly, it provides an unparalleled opportunity for customization. You dictate the dimensions, the finish, and the overall aesthetic to perfectly match your existing decor and specific needs. Whether you have a massive flat-screen TV or a compact setup, a DIY approach ensures a perfect fit.
Secondly, crafting your own furniture, especially with distressed or reclaimed-style wood, brings a unique narrative and character to your home. Each imperfection, every mark of age, tells a story, creating a focal point that is both functional and a conversation starter. This project is ideal for those who appreciate the charm of found objects and vintage aesthetics, offering a “shortcut” to achieving that coveted antique look with new materials.
Finally, a DIY project often translates to significant cost savings. By sourcing your own materials and investing your time, you can create a high-quality piece of furniture that would otherwise come with a hefty price tag in retail. It’s an empowering way to furnish your home, develop new skills, and express your personal style.
Designing Your Rustic TV Stand: Dimensions and Aesthetic
This particular TV stand design embodies a rustic aesthetic, reminiscent of an old wooden crate. Its robust dimensions are 40 inches long (L), 40 inches high (H), and 22 inches deep (D), providing ample space for your television and media components. The beauty of this design lies in its simplicity and the ability to customize its “aged” appearance. When selecting lumber for a distressed project, actively seek out boards with existing knots, minor blemishes, or interesting grain patterns. These natural imperfections are not flaws; they are features that will enhance the final distressed look, saving you effort later on. Remember, you’ll be intentionally adding more character with various tools, so don’t shy away from boards that aren’t “perfectly blemish-free.”
Essential Tools and Materials for Your DIY TV Stand Project
Before you begin, gather all necessary tools and materials. Having everything on hand will ensure a smooth and efficient building process. Safety is paramount, so always wear appropriate safety gear, including eye protection and gloves, when working with power tools and lumber.
Lumber List:
- (2) 1x12s @ 8 feet L: These will form the main top and shelf panels. The 1×12 dimension provides good surface area for media components.
- (2) 1x3s @ 8 feet L: Used for bracing and additional structural elements.
- (2) 1x4s @ 8 feet L: Integral for securing panels and adding decorative or structural facings.
- (2) 2x4s @ 8 feet L: These robust pieces will serve as the strong, foundational legs of your TV stand.
Tools You’ll Need:
- Miter Saw or Circular Saw: For making precise cuts to your lumber. A miter saw offers excellent accuracy for repeatable cuts.
- Pocket Hole Jig: An indispensable tool for creating strong, concealed joints, essential for a clean finish without visible screws.
- Drill/Driver: For drilling pilot holes and driving screws.
- Wood Glue: Provides additional strength and stability to your joints, ensuring a lasting build.
- 1 ¼” Pocket Hole Screws: Specifically designed for pocket hole joinery.
- Wood Screws (various lengths, e.g., 1 ¼” to 2 ½”): For general assembly and attaching components where pocket holes aren’t used.
- Clamps: Essential for holding pieces securely in place while drilling and screwing, ensuring accurate alignment.
- Measuring Tape and Pencil: For accurate measurements and marking cuts.
- Speed Square or Combination Square: To ensure all your corners and joints are perfectly square.
- Sanding Supplies: Sandpaper (various grits, e.g., 80, 120, 220) for preparing surfaces for finishing. A power sander can speed up this process.
- Distressing Tools: Wood file, hammer, chain, paint can opener, bag of rocks, awl, etc. (more on this in the distressing section).
- Safety Glasses and Gloves: Always protect your eyes and hands.
Step-by-Step Construction Guide for Your DIY TV Stand
Step 1: Constructing the Top and Shelf Panels
Begin by assembling the main top surface of your TV stand. From your 1×12 boards, cut two pieces to 40 inches in length. Next, take one of your 1×4 boards and cut a 40-inch piece. The 1×4 will serve as a connecting brace for the two 1x12s, adding structural integrity and a wider surface. Using your pocket hole jig, drill pocket holes along the edges of the 1×4 board, ensuring they are positioned to attach securely to both 1×12 boards.
Apply a thin, even layer of wood glue along the edges of the 1x12s where they will meet the 1×4. Clamp the boards together tightly, ensuring a flush surface. Drive 1 ¼” pocket hole screws through the pre-drilled holes in the 1×4 into the 1x12s, creating a strong, unified top panel. Wipe away any excess glue with a damp cloth before it dries.
Now, repeat this entire process to create the shelf panel. However, for the shelf, make all your cuts to 37 inches in length instead of 40 inches. This slightly shorter length will create a recess for the shelf, adding visual interest and a subtle design element to your TV stand.
Step 2: Assembling the Side Panels
The side panels will provide the vertical structure for your TV stand. Take a 1×12 board and cut four pieces, each measuring 21 ¾ inches in length. These will form the main body of your side panels. From a 1×3 board, cut four pieces, each 18 ¼ inches long. These 1×3 pieces will act as cross braces or supports for the side panels, ensuring stability and a finished look.
To assemble each side panel, take two of the 21 ¾-inch 1×12 boards. Position two of the 18 ¼-inch 1x3s at the top and bottom ends of these 1x12s. These 1x3s should be clamped flush with the ends of the 1x12s, spanning the width to connect them. Pre-drill pilot holes through the 1x3s into the 1x12s to prevent splitting. Apply wood glue to the joining surfaces, then secure the 1x3s to the 1x12s using 1 ¼” wood screws. Repeat this process for the other side panel. You should now have two identical side panels, each composed of two 1x12s joined by two 1x3s, resembling the structure in the provided image.
Step 3: Cutting Legs and Distressing All Boards
From your 2×4 lumber, cut four identical leg pieces, each measuring 25 ¼ inches. These will be the primary support legs. Additionally, cut a 37-inch piece from a 1×4 board; this piece will be used later as a front brace below the shelf.
With all your lumber cut to size, it’s time for the fun part: distressing! This process is crucial for achieving the “old looking crate” aesthetic. The degree of distressing is entirely up to your personal taste, but remember, the goal is to create authentic-looking wear and tear.
Distressing Techniques:
- Wood File: Use a wood file to create gouges, scrapes, and softened edges. Apply varying pressure and angles for natural results.
- Hammer: Gently (or not so gently!) tap the wood with different parts of the hammer – the claw, the head, or the edge – to create dents, dings, and impressions.
- Chain: Drape a heavy chain over the wood and swing it or drag it across the surface to create random nicks and scuff marks.
- Paint Can Opener or Screwdriver: Use the sharp edges to create small indentations or scratches that mimic age and use.
- Bag of Rocks: Place small rocks in a canvas bag and lightly strike or drag it over the wood for varied texture.
- Sanding: After initial distressing, light sanding with 80-grit sandpaper can soften some of the harsher marks and blend them in, giving a more natural, worn appearance.
DISTRESSING TIP: Employ a full range of motion strokes and vary your tools and pressure. Avoid creating repetitive patterns; instead, move randomly across all surfaces of the boards, including edges and corners, to achieve even and realistic weathering. Think about how real furniture gets used and damaged over decades. For a more in-depth guide on distressing wood, you can view how to distress wood on my other post.
Step 4: Assembling the Main Frame
Once you are satisfied with the distressed look of all your individual components, it’s time to bring them together. Place the 40-inch top panel face down on a clean, stable workbench. This ensures the top surface remains pristine during assembly.
Take your two assembled side panels. Drill pocket holes into the top edge of each side panel where it will connect to the underside of the top panel. Also, drill pocket holes along the back edges of the side panels if you plan to add a back panel later (though not specified in this original plan, it’s good practice for versatility).
Carefully position the side panels perpendicular to the top panel, ensuring they are flush with the outer edges. Apply wood glue to the joining surfaces, then attach the side panels to the top using 1 ¼” pocket hole screws, driving them through the pocket holes into the top panel. Ensure everything is square as you fasten it.
Next, it’s time to install the shelf. Measure 3 ½ inches down from the top ends of the side panels. This measurement marks the bottom edge of where your shelf will sit. Drill pocket holes along the underside edges of the shelf panel where it will connect to the side panels. Apply wood glue, align the shelf at your marked height, and attach it to the side panels using 1 ¼” pocket hole screws from the underside. This method keeps the screws hidden from view.
Once flipped upright, your assembly should now resemble a basic cabinet frame with a top and a recessed shelf, similar to the photo provided:
Step 5: Adding the Front Brace
Carefully decide which side of your partially assembled unit will serve as the front. This is a good time to observe your distressing work and pick the side with the most appealing character. Take the 37-inch 1×4 board you cut earlier. This piece will act as a decorative and structural brace directly beneath the shelf, spanning the front opening.
Apply wood glue to the edges of the 1×4 where it will meet the side panels and the underside of the shelf. Position it snugly underneath the shelf, ensuring it is flush with the front edges of the side panels. Use 1 ¼” pocket hole screws to attach it securely. You can drill pocket holes from the inside of the shelf down into the 1×4, or from the inside of the side panels into the ends of the 1×4, depending on which method provides the cleanest finish.
Step 6: Attaching the Legs and Final Supports
Now it’s time to add the sturdy 2×4 legs. Lay your TV stand on its side or back to easily access the corners. Begin by clamping one of the 2×4 leg pieces to an inside corner of the TV stand. Use the existing edges of the cabinet as a guide to ensure the leg is perfectly square and flush. A square tool (like a speed square) is invaluable here to confirm alignment before fastening.
Apply wood glue to the surfaces where the leg will meet the cabinet. Pre-drill pilot holes through the side panels and bottom frame into the leg to prevent wood splitting. Securely attach the leg using appropriate wood screws (e.g., 2 ½” screws for a strong hold). Repeat this process for the remaining three legs, ensuring each is plumb and square.
Once all four legs are attached, carefully flip the TV stand upright. Check for levelness and stability. Give it a gentle wobble test – if it rocks, check your leg attachments and squareness. Make any necessary adjustments.
Finally, to add extra stability and a finished look to the lower section, measure 6 inches up from the ground on each leg. Take the remaining 1×3 boards. These will serve as lower cross braces between the legs. Apply wood glue to the ends of the 1x3s where they will meet the legs. Clamp them in place at the 6-inch mark, pre-drill pilot holes to prevent splitting, and attach them to the legs with wood screws. Repeat this for all visible sides. Your rustic TV stand is now fully built!
Adding the Finishing Touches: Staining, Oxidizing, or Painting
With the construction complete, the real transformation begins with the finishing process. This is where you truly bring out the character of your distressed wood and achieve your desired aesthetic.
Oxidizing for an Aged, Weathered Look
If you’re aiming for an authentically aged, naturally weathered appearance, oxidizing the wood is an excellent choice. This chemical reaction process uses common household ingredients to dramatically alter the wood’s color, creating beautiful shades of brown and gray that mimic years of exposure to the elements. The basic recipe involves brewing strong black tea (for tannins), and soaking steel wool in vinegar for a few days to create an iron acetate solution. When applied to tannic wood, these solutions react, darkening the wood. The more tannic the wood (e.g., oak, pine with added tea), the darker and richer the resulting color will be. For a comprehensive tutorial on how to oxidize wood, click here!
A significant advantage of oxidizing is that the solution is typically very thin, almost like water. This allows you to apply it after the entire TV stand is assembled without worrying about it pooling in corners or leaving uneven streaks. It penetrates the wood rather than sitting on top, creating a deep, natural patina.
Traditional Staining for Rich Color
If you prefer a more controlled color and a wide range of hues, traditional wood staining is an excellent option. For best results with staining, prepare your piece by sanding the entire TV stand after distressing. Start with a medium-grit sandpaper (e.g., 120-grit) to smooth out any rough areas, then move to a finer grit (e.g., 220-grit) for a silky-smooth finish. This will ensure even stain absorption. If you opt for a wipe-on, wipe-off stain, it is often easier to stain the separate pieces of the TV stand *before* final assembly. This allows you to reach all inside corners and tight spaces without the stain gathering or becoming uneven, ensuring a professional-looking finish.
Painting for a Pop of Color or Shabby Chic Style
For a painted finish, especially if you desire a rustic or shabby chic “chalk paint” look, you can easily create your own. Mix unsanded tile grout into your preferred latex paint. An eggshell or duller finish paint is recommended for an authentic, low-sheen look. Sift about 2 tablespoons of tile grout into 1 cup of paint, mix thoroughly until smooth, and paint immediately. The mixture will thicken and clump over time, so work in small batches for the smoothest application. Apply multiple thin coats for best coverage and durability. Once dry, you can lightly sand the edges and distressed areas to reveal some of the wood underneath, enhancing the aged effect.
Protecting Your Finish: Sealing and Topcoats
Regardless of whether you stain, oxidize, or paint, a protective topcoat is essential for durability. If you are aiming for an old, weathered, or rustic look, a satin or matte polyurethane, or a clear wax finish, will be ideal. These options will keep the sheen down and prevent the piece from looking too polished or modern, preserving its handcrafted, aged charm. Apply topcoats according to product instructions, usually in thin, even coats, allowing adequate drying time between applications.
Caring for Your New DIY TV Stand
Once your DIY TV stand is complete and the finish has fully cured, caring for it is simple. Dust regularly with a soft, dry cloth. For spills, wipe immediately with a slightly damp cloth, then dry thoroughly. Avoid harsh chemical cleaners, especially on oxidized or waxed finishes, as they can strip away the protective layer. If your stand receives heavy use, you may consider reapplying a wax or topcoat every few years to maintain its beauty and protection.
Conclusion: Embrace Your Creative Side with DIY
Building your own DIY TV stand is more than just a woodworking project; it’s an opportunity to create a piece of furniture that is truly unique, functional, and deeply satisfying to build. By following this comprehensive guide, you can achieve a rustic, reclaimed wood aesthetic that adds warmth and character to any living room. We hope you enjoyed this tutorial and feel inspired to tackle this rewarding project.
What are your thoughts on this homemade TV stand? Did you incorporate any unique design elements or finishes? Share your experiences and insights in the comments section below – we’d love to hear from you! Do you have other craft projects you’re passionate about or tips you’d like to share with fellow DIY enthusiasts? Your contributions help us build a vibrant community where creativity flourishes and every project is just a click away.
Stay connected with us for more cool DIY projects, home decor ideas, upcycling inspiration, and helpful tutorials. Follow us on Facebook, Twitter, Pinterest, and Instagram to never miss out on our latest projects!