
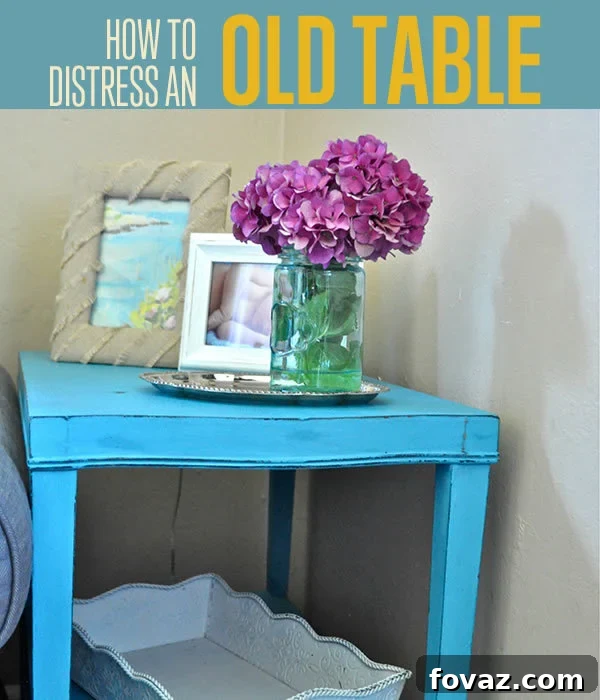
Are you ready to breathe new life into an old, forgotten table? Perhaps you’ve stumbled upon a hidden gem at a thrift store, or maybe you have a cherished family heirloom that’s seen better days. Whatever the case, transforming a piece of furniture with a beautifully distressed finish is one of the most rewarding and popular DIY projects today. It’s an art form that instantly adds character, warmth, and a touch of vintage charm to any room. If you’ve already checked out our essential guide on How To Refinish A Table For Painting, then you’re perfectly primed for the next exciting stage: painting and expertly distressing your table to achieve that coveted aged aesthetic. This process is surprisingly straightforward, and we’re confident that anyone can master it at home with these quick and easy tips and tricks for furniture revamping! We’re thrilled to share our unique and stunning results, knowing that each table, depending on your chosen color palette and distressing technique, will unveil its own distinctive personality. Get ready to embark on a creative journey and enjoy the incredible transformation!
Unlock the Charm of Distressed Furniture: Why This Style Endures
Distressed furniture is more than just a trend; it’s a timeless style that brings a sense of history, authenticity, and comfort into modern living spaces. The beauty of a distressed finish lies in its ability to mimic the natural wear and tear of time, creating pieces that look like treasured antiques without the hefty price tag. This technique allows you to transform ordinary, or even outdated, furniture into unique focal points that tell a story. It’s incredibly versatile, complementing various interior design themes from rustic farmhouse and shabby chic to industrial and eclectic. Beyond aesthetics, distressing offers practical benefits: it helps hide minor imperfections on older pieces and can even make future dings and scratches blend in seamlessly. By choosing to distress your table, you’re not just repainting; you’re infusing it with character and making a sustainable choice to upcycle and appreciate the craftsmanship of existing furniture.
How to Distress a Table: Your Step-by-Step Guide to a Vintage Look
Alright, now that you’ve mastered the foundational refinishing work – ensuring your table is clean, sanded, and ready for its artistic makeover – you’re perfectly equipped to dive into the exciting world of distressing. This journey will not only revitalize your furniture but also infuse your home with a fresh, customized look that reflects your unique style. Let’s gather our tools and materials and turn that vision into a beautiful reality!
Essential Tools and Materials for Your Distressing Project:
Having the right supplies on hand is crucial for a smooth and successful furniture distressing project. While some items are standard, others are specific to creating that authentic worn look. Here’s what you’ll need to prepare:
- High-Quality Paint Brush: Invest in a good quality brush for smooth paint application. A synthetic brush works well with most paints, especially water-based ones.
- Flat Paint (Chalk Paint Recommended): I highly recommend using flat paint, and specifically homemade or store-bought chalk paint. Chalk paint adheres beautifully to most surfaces without extensive priming, offers a matte finish, and is incredibly easy to distress, making it ideal for this technique.
- Black Sharpie Paint Marker: This specialty marker is key for creating dark, aged edges and areas that will peek through the distressed topcoat, mimicking natural wear. Ensure it’s an oil-based paint marker for better coverage and longevity.
- Clear Furniture Paste Wax: This finishing wax provides a durable, protective topcoat, enhances the paint’s color, and gives a lovely sheen. It also seals the distressed areas, ensuring their longevity.
- Soft Cloths: You’ll need several clean, lint-free soft cloths for applying wax and buffing your finished piece to a beautiful shine. Microfiber cloths work exceptionally well.
- Old Candle: A simple household candle, preferably white or a light color, is an ingenious tool for creating resistance against the paint, making the distressing process much easier and more controlled.
- Scraper and Sandpaper (120-150 grit): A putty knife or metal scraper will help with initial paint removal. For fine-tuning and smoothing the distressed areas, 120 to 150-grit sandpaper is perfect for achieving that naturally worn look without excessive scratching. You might also consider finer grit (220) for a super smooth finish after distressing, if desired.
Step 1: The Initial Setup – Gathering Your Materials
Before diving into the creative process, take a moment to meticulously gather all your listed materials. Lay them out in an organized fashion in your designated workspace. This not only ensures you have everything on hand, preventing interruptions, but also helps you visualize the project ahead. A well-organized workspace contributes significantly to a smoother, more enjoyable, and efficient DIY experience. Double-check your paint, brushes, and especially your distressing tools. Having all your supplies within easy reach will make each subsequent step flow seamlessly.

Step 2: Defining the Aged Look – Darkening the Edges
This critical step lays the groundwork for an authentic distressed appearance. Take your black Sharpie paint marker and carefully apply it to the edges of your table – the corners, legs, and any other areas that would naturally show wear over time. Think about where a piece of furniture would typically get bumped, rubbed, or handled. The purpose of this dark underlayer is to create depth and contrast, mimicking the original wood or a darker base coat peeking through the top layer of paint once distressed. Don’t be afraid to apply it generously to these specific areas, but avoid overdoing it across large flat surfaces. This focused application will ensure a more realistic and subtle distressed effect later on. Allow the marker to dry completely according to the manufacturer’s instructions before moving on.

Step 3: The Secret to Easy Distress – Applying Candle Wax
Here’s where a simple candle becomes your secret weapon for controlled distressing. Take your old candle and apply a light, even coating of wax over all the areas you just darkened with the Sharpie marker. The candle wax acts as a resist. When you paint over these waxed sections, the paint will have difficulty adhering firmly. This slight resistance is what makes it incredibly easy to scrape or sand off the top layer of paint later, revealing the darkened areas underneath. Focus on a thin, consistent layer of wax – too much wax can make the paint peel off too easily and uncontrollably, while too little won’t create enough resistance. This technique ensures that your distressing is intentional and localized, giving you maximum control over the final aged appearance of your table.

Step 4: The Foundation – Painting Your Piece
Now for the main color! Using your chosen flat paint (preferably chalk paint), begin to paint your entire table. Apply thin, even coats, allowing each coat to dry completely before applying the next. The number of coats required will depend on your paint’s coverage and the desired opacity of your finish. For this particular table, I applied three coats to achieve a rich, consistent color. Patience is key during this stage; rushing the drying process can lead to a less durable finish and potential issues during distressing. Ensure full coverage of the waxed areas as well – these sections are where the magic of distressing will happen. Once you’ve achieved your desired coating and the final layer is fully dry, you’re ready to reveal the hidden character beneath.

Step 5: Revealing the Character – Scraping and Sanding for Distress
This is arguably the most exciting part, where your table truly begins to transform into a vintage masterpiece. Gently begin to scrape the edges and other spots where you applied the candle wax. You’ll notice that the paint over these waxed areas will peel or chip off with relative ease, revealing the dark Sharpie layer and hints of the original surface underneath. Start with light pressure; you can always apply more. Once the initial scraping is done, grab your 120-150 grit sandpaper. Use it to further enhance the distressed areas, softening the peeled edges and creating a more natural, worn look. Focus on areas that would naturally experience wear: corners, raised details, edges, and anywhere hands would frequently touch. Sand in the direction of the wood grain for a more authentic finish. The goal is to achieve an organic, aged appearance, not to create uniform scratches. Step back frequently to assess your progress and ensure you’re happy with the amount of distressing. Remember, less is often more initially, as you can always remove more paint but cannot easily put it back on.

Step 6: The Final Touch – Applying a Protective Finish with Clear Paste Wax
Once you’ve achieved your desired distressed look, it’s crucial to protect your hard work with a durable finish. Clear furniture paste wax is an excellent choice as it not only enhances the depth of your paint color and adds a beautiful, soft sheen but also creates a waterproof and protective coating against daily wear and tear. Using a clean, soft cloth, apply the paste wax in thin, even coats over the entire surface of your table. Work in small sections, rubbing the wax into the paint with circular motions. After applying, allow the wax to sit for a few minutes (check product instructions) before buffing away any excess with a fresh, clean cloth. Buffing helps achieve that lovely sheen and ensures an even finish. For high-traffic areas like a tabletop, I highly recommend applying at least two coats of wax for superior protection against moisture and spills. Be mindful that paste wax takes approximately three days to fully harden or ‘cure,’ so during this period, be extra careful to protect the surface from heavy objects, excessive moisture, and harsh chemicals. Once cured, your table will be ready for years of enjoyment!

Tips for a Flawless Distressed Furniture Makeover
Achieving a perfectly imperfect distressed look is an art, but with a few extra tips, you can elevate your project from good to outstanding:
- Work in a Well-Ventilated Area: Especially when painting and sanding, ensure good airflow to protect your health. Consider wearing a mask during sanding to avoid inhaling dust.
- Test on Scrap Wood: If you’re new to distressing, practice your technique on a piece of scrap wood. This allows you to experiment with different amounts of wax and sanding pressure without risking your main project.
- Embrace Imperfections: The beauty of distressed furniture lies in its aged, imperfect appearance. Don’t strive for absolute perfection; subtle variations and natural-looking wear are part of its charm.
- Clean Between Steps: After sanding, thoroughly wipe down your table with a tack cloth or a damp cloth to remove all dust particles before applying wax or any subsequent coats.
- Consider Layering Colors: For an even richer, more complex distressed look, consider painting a dark base coat, then a contrasting lighter color, and finally distressing to reveal hints of both layers.
- Experiment with Tools: While sandpaper and scrapers are standard, you can also use steel wool, wire brushes, or even a damp cloth for subtle distressing effects on freshly applied paint.
Beyond the Basics: Creative Distressing Ideas
Once you’ve mastered the fundamental technique, don’t hesitate to get creative with your distressing projects. Consider layering two different paint colors, perhaps a dark navy under a soft cream, to create a more dynamic and nuanced aged effect. You could also incorporate stenciling onto your distressed piece, allowing the worn texture to give the stenciled design an even more authentic, antique feel. For a bolder statement, use a heavier hand with your sanding in certain areas to expose more of the natural wood or a darker base layer. Alternatively, for a subtle, shabby chic look, focus on softer edges and minimal distressing. The possibilities are endless, and each project is an opportunity to express your unique style.
Sit back, relax, and truly enjoy your beautiful “new” table! This transformed piece is now ready to be a cherished addition to your home.
You are now fully equipped to make your furniture beautiful and uniquely yours! Thank you for checking out our comprehensive tutorial on how to refinish a table with a stunning distressed paint look. As simple as this tutorial makes it seem, we know that truly transforming a table requires dedication and attention to detail. However, with these clear steps and a bit of patience, your table will no longer be sad and lonely looking. With this refinishing and distressing process, all you need to do is select a particular color of paint that speaks to you, and voilà! You can refinish your thrift-store find to look like a rare, high-end gem from a boutique furniture store, or give a beloved piece a fresh, character-filled lease on life. The satisfaction of a successful DIY furniture makeover is truly unparalleled.
Can’t find exactly what you’re looking for? Don’t forget to explore all of our favorite furniture projects and countless other DIY ideas in our dedicated Workshop Section on DIY Projects! We love hearing from our passionate community, so if you have a fun project idea, suggest it, and our team will get on it faster than you think. Don’t miss out on the latest and greatest in everything DIY related – be sure to sign up for our mailing list to receive exclusive tips, tutorials, and inspiration directly in your inbox. Connect with us on social media; check out our Facebook page and follow us for quick glances at our daily projects and behind-the-scenes content. And of course, remember to Pin It to Pinterest to easily share our DIY craft projects with friends, family, and fellow enthusiasts. Happy crafting!
Here are some related posts to inspire your next DIY project: