
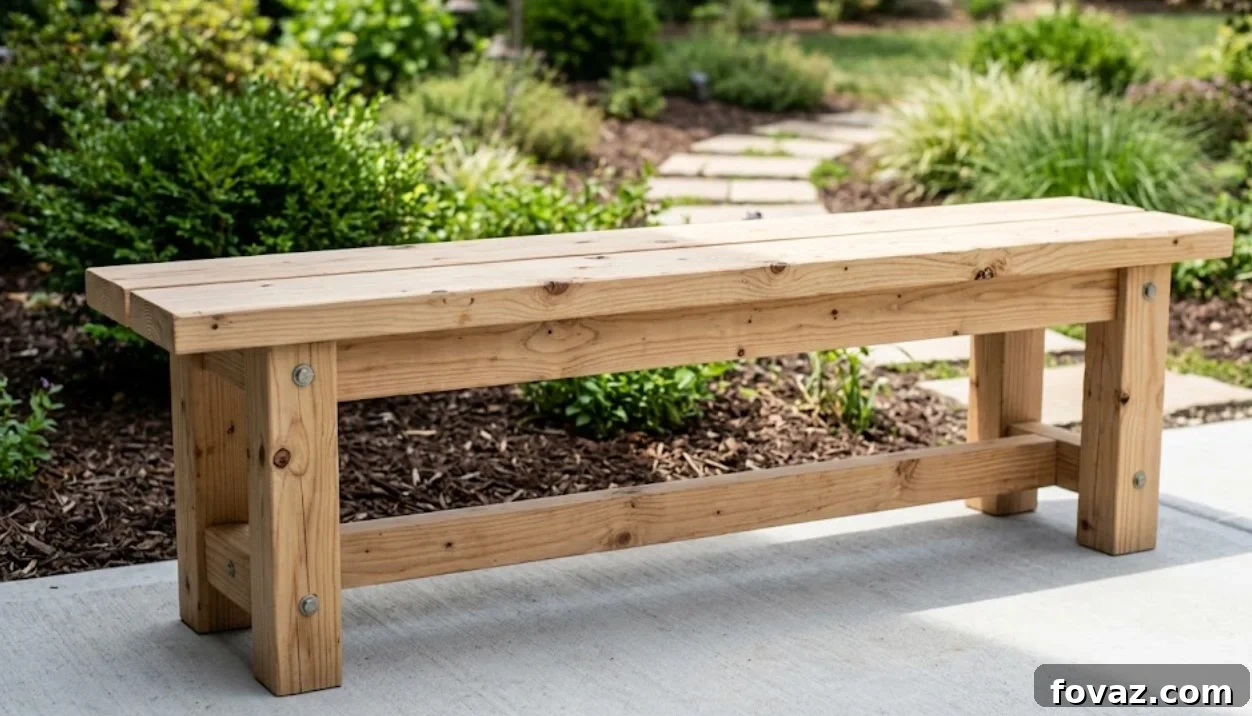
DIY Wooden Bench: A Weekend Project Overview
- Skill Level: Absolute Beginner. This project is designed without complex joints, making it the perfect introduction to woodworking.
- Time Commitment: Approximately 2 to 4 hours. You can easily complete this on a Saturday afternoon.
- Estimated Cost: $30 to $50. Your final cost will depend on the type of wood you choose.
Have you been dreaming of building your own furniture but feel intimidated by complicated plans and long lists of expensive tools? If so, you’ve found the perfect starting point. This guide will walk you through building a sturdy and beautiful 48-inch classic wooden bench. Its timeless design makes it incredibly versatile, fitting perfectly in an entryway, at the foot of a bed, or as charming outdoor seating on a patio or porch.
The best part about this project is its simplicity. It’s designed specifically for those with little to no woodworking experience. We’ll use basic tools and readily available lumber to create a piece of furniture you can be proud of. Forget the confusing joinery and focus on the fundamentals of measuring, cutting, and assembling. In just a few hours, you’ll transform a pile of boards into a functional and stylish bench.
Let’s dive into the details and get you started on your woodworking journey!
Gathering Your Tools and Materials
You don’t need a professional workshop to build this bench. The entire project can be completed with a few essential power tools and some basic supplies from your local hardware store. Keeping it simple is the key to success for any beginner project.
Essential Tools for the Job
This short list covers everything you need to make accurate cuts and assemble your bench securely.
- Miter Saw or Circular Saw: Either of these saws will be perfect for making the straight, square cuts required for this project. A miter saw offers a bit more precision for repetitive cuts, but a circular saw paired with a speed square as a guide works just as well.
- Power Drill: A cordless drill is your best friend for this build. You will need it for two key tasks: drilling pilot holes with a standard drill bit and driving in the screws with a driver bit.
- Tape Measure & Speed Square: The old saying “measure twice, cut once” is your mantra. A reliable tape measure is non-negotiable. A speed square is equally important for ensuring your cuts are perfectly 90 degrees and your assembled parts are square.
- Orbital Sander: While you can sand by hand with sanding blocks, an orbital sander will save you a significant amount of time and effort. It will provide a much smoother, more professional finish, especially on the bench seat.
- Clamps (Optional but Recommended): A pair of wood clamps can act as an extra set of hands, holding pieces firmly in place while you drill and drive screws. They are incredibly helpful for ensuring tight, strong joints.
Required Materials and Lumber
The materials list is just as straightforward as the tool list. Choosing the right materials, especially for an outdoor bench, will ensure it lasts for years to come.
- Lumber: This entire bench is built from standard dimensional lumber. You will need common 2x4s and 2x3s. For an indoor bench, standard pine or fir is affordable and works great. If you plan to place the bench outdoors, it is highly recommended to invest a little more in cedar. Cedar is naturally resistant to rot and insects, making it an excellent choice for patio furniture. Pressure-treated lumber is another durable outdoor option.
- Wood Screws: You will need a box of 2 1/2-inch wood screws. If your bench will be exposed to the elements, make sure to purchase “exterior-grade” screws. These are coated to resist rust and corrosion, preventing ugly stains and ensuring the bench’s structural integrity over time.
- High-Quality Wood Glue: This is a crucial component. While screws provide the initial clamping force to hold the wood together, it’s the wood glue that creates a permanent, powerful bond between the pieces. A strong glue joint is often stronger than the wood itself. Do not skip this step, as it’s what prevents the bench from becoming wobbly down the road. Use an exterior-grade glue like Titebond III for any outdoor applications.
Your Complete Cut List
Accuracy is key at this stage. Take your time to measure carefully and make precise cuts. If all your pieces are the correct size, the assembly process will be smooth and easy, much like assembling a simple kit. It’s a good idea to label each piece with its corresponding letter (A, B, C, etc.) with a pencil after cutting to avoid any mix-ups.
- (A) Top Boards (Seat): 4 pieces of 1×4 or 2×4 lumber, cut to 48 inches each.
- (B) Legs: 4 pieces of 2×4 lumber, cut to 17 inches each.
- (C) Side Supports (Top): 2 pieces of 2×4 lumber, cut to 14 inches each.
- (D) Long Stretchers (Base): 2 pieces of 2×3 lumber, cut to 40 1/2 inches each.
- (E) Short Stretchers (Base): 2 pieces of 2×3 lumber, cut to 10 1/2 inches each.
Step-by-Step Assembly Instructions
Now for the fun part: bringing your bench to life. Work on a flat, level surface like a garage floor or a sturdy workbench. Follow these steps in order for a stress-free build.
Step 1: Construct the Two Leg Assemblies
First, we will build the two “end” sections of the bench. Take two of your Legs (B) and one Short Stretcher (E). Lay the two legs on your work surface, parallel to each other. Place the short stretcher between them, positioned about 3 to 4 inches up from the bottom ends of the legs. Use your speed square to make sure the stretcher is perfectly perpendicular to the legs.
Apply a thin layer of wood glue to both ends of the stretcher where it will meet the legs. Then, drill two pilot holes through the outside of each leg and into the end of the stretcher. Drilling pilot holes is essential to prevent the wood from splitting when you drive in the screws. Secure the stretcher with four 2 1/2-inch screws (two per side). Repeat this entire process to build a second, identical leg assembly.
Step 2: Attach the Top Side Supports
Next, we’ll add the pieces that will support the seat. Take one of your Side Supports (C) and place it across the top ends of one of the leg assemblies you just built. It should sit flat, like a cap on top of the legs. It is critical that this support piece is perfectly flush with the top of the legs. Any unevenness here will result in a wobbly bench seat.
Apply wood glue to the top of each leg, then position the support piece. Drill pilot holes down through the support and into the top of each leg. Drive two 2 1/2-inch screws per leg to secure it firmly. Repeat this for the second leg assembly.
Step 3: Connect the Two Halves to Form the Base
It’s time to connect the two end pieces and form the main structure of the bench. Stand both leg assemblies upright, parallel to each other. Take your two Long Stretchers (D) and position them between the leg frames. They should line up perfectly with the short stretchers you attached in Step 1, creating a sturdy rectangular base.
This is where clamps are extremely helpful for holding the structure steady. If you don’t have clamps, ask a friend to help you hold the pieces in place. Apply glue to the ends of the long stretchers, drill your pilot holes through the legs into the stretchers, and secure them with 2 1/2-inch screws. Your bench frame is now complete and should feel solid.
Step 4: Install the Top Boards to Create the Seat
You’re on the home stretch! Take your four Top Boards (A) and arrange them across the top of the frame. They will rest directly on the Side Supports (C) you installed in Step 2. Position the front and back boards so they are perfectly flush with the front and back edges of the bench frame. There should also be a small, even overhang of about 2 inches on each end.
For the two middle boards, create a small, consistent gap between all four boards (about 1/4 inch is ideal). This gap not only adds a nice visual detail but also allows for wood movement with changes in humidity and provides drainage for rainwater if the bench is outdoors. A pencil or a paint stir stick works well as a temporary spacer. Once you are happy with the layout, drill pilot holes and screw the boards down into the side supports below. Use two screws at each end of every board for maximum stability.
Applying the Finishing Touches
Congratulations, you’ve built a bench! Now it’s time to transform it from a raw wood project into a finished piece of furniture. This final stage is just as important as the construction itself.
Start by sanding every surface. Using an orbital sander with 120-grit sandpaper, smooth out all the flat surfaces, paying close attention to the seat. Be sure to lightly sand all the sharp edges and corners to “break” them, making them softer to the touch and less prone to splintering. Once the initial sanding is done, switch to a finer 220-grit sandpaper to give the wood a silky-smooth feel. Wipe away all the sanding dust with a clean cloth.
Finally, apply your chosen finish. You can use a wood stain to enhance the natural grain, or paint it a bold color to match your decor. If your bench will be used outdoors, it is essential to protect it. Apply at least two or three coats of an exterior-grade polyurethane or a spar urethane. This will seal the wood from moisture and protect it from UV damage, ensuring your hard work lasts for many seasons.
Frequently Asked Questions (FAQs)
Here are answers to some common questions you might have while building your bench.
1. Can I use pressure-treated lumber for this project?
Absolutely. Pressure-treated pine is an excellent, budget-friendly choice for outdoor furniture. However, be aware that it is often sold “wet” with treatment chemicals. You should let the bench dry out for several weeks or even a month before attempting to apply any stain or paint, as the moisture will prevent the finish from adhering properly.
2. Is wood glue really necessary if I’m using screws?
Yes, 100%. Think of it this way: screws hold the pieces together, but glue makes them one solid piece. The glue creates a bond that is incredibly strong and rigid, which is what prevents joints from loosening and the bench from becoming wobbly over time. It’s the secret to long-lasting DIY furniture.
3. How can I guarantee my wood won’t split when I drive the screws?
The key is to always drill a pilot hole before inserting a screw. A pilot hole removes wood to make a clear path for the screw. The ideal drill bit size for a pilot hole is slightly smaller than the diameter of the screw’s threads. This allows the threads to bite firmly into the wood without forcing the wood fibers apart and causing a split.
4. Can I easily change the size of this bench?
Yes, this design is very easy to modify. To make the bench longer or shorter, simply change the length of the Top Boards (A) and the Long Stretchers (D). All the other pieces (Legs, Side Supports, Short Stretchers) will remain the same dimensions. This makes it simple to build a custom-sized bench for your specific space.
5. What is the best type and size of screw for this project?
For assembling furniture with 2x lumber (which is actually 1.5 inches thick), 2 1/2-inch screws are the perfect length. They are long enough to provide a strong hold without poking through the other side. Always opt for screws with a star (Torx) or square drive head over a Phillips head, as they are far less likely to strip out during installation.